

English Manual
Page 2
... CONTENTS LIMITED WARRANTY IMPORTANT PRECAUTIONS BEFORE YOU BEGIN ASSEMBLY HOW TO USE THE PULSE SENSOR OPERATION AND ADJUSTMENT HOW TO USE THE MANUAL MODE HOW TO USE THE WEIGHT LOSS PROGRAMS AND THE INTERVAL PROGRAMS HOW TO USE THE FAT BURN PROGRAM AND THE AEROBIC PROGRAM HOW TO USE THE FITNESS TEST PROGRAM HOW TO FOLD AND MOVE THE TREADMILL TROUBLE-SHOOTING CONDITIONING GUIDELINES ORDERING REPLACEMENT PARTS 2 3 5 6 8 9 11 13 15 16 18 20 22 Back Cover Note...
... CONTENTS LIMITED WARRANTY IMPORTANT PRECAUTIONS BEFORE YOU BEGIN ASSEMBLY HOW TO USE THE PULSE SENSOR OPERATION AND ADJUSTMENT HOW TO USE THE MANUAL MODE HOW TO USE THE WEIGHT LOSS PROGRAMS AND THE INTERVAL PROGRAMS HOW TO USE THE FAT BURN PROGRAM AND THE AEROBIC PROGRAM HOW TO USE THE FITNESS TEST PROGRAM HOW TO FOLD AND MOVE THE TREADMILL TROUBLE-SHOOTING CONDITIONING GUIDELINES ORDERING REPLACEMENT PARTS 2 3 5 6 8 9 11 13 15 16 18 20 22 Back Cover Note...
English Manual
Page 3
.... 13.Never move the treadmill until it is not working properly. (See BE YOU BEGIN on page 9), plug the power cord into a surge protector (not included) and plug the surge protector into a grounded circuit capable of a preset program, the treadmill will automatically adjust to the lowest incline level. readings_ The pulse sensor is Intended only as described In this treadmill are used only by persons...
.... 13.Never move the treadmill until it is not working properly. (See BE YOU BEGIN on page 9), plug the power cord into a surge protector (not included) and plug the surge protector into a grounded circuit capable of a preset program, the treadmill will automatically adjust to the lowest incline level. readings_ The pulse sensor is Intended only as described In this treadmill are used only by persons...

English Manual
Page 5
... using the treadmill. Console Accessory Tray Storage Latch Towel Rack -.061.18.1116. • Key/Clip Handrails LEFT SIDE Power Cord Uprights On/Off Switch Circuit Breake Water Bottle Holder (Water Bottle is WLTL10070. For your home. The serial number can be found on a decal attached to let you 're not exercising, the unique 10.0c can be folded up, requiring less than half the floor space of this manual...
... using the treadmill. Console Accessory Tray Storage Latch Towel Rack -.061.18.1116. • Key/Clip Handrails LEFT SIDE Power Cord Uprights On/Off Switch Circuit Breake Water Bottle Holder (Water Bottle is WLTL10070. For your home. The serial number can be found on a decal attached to let you 're not exercising, the unique 10.0c can be folded up, requiring less than half the floor space of this manual...

English Manual
Page 6
Using your back straight. 4 ( 86 76 Storage Latch Opened 00 6 While the treadmill is past the storage latch. 4. Note: One 2 extra Base Pad may be included. Pivot the treadmill until assembly is completed. To decrease the possibility of Injury, bend your legs and keep your left side or the storage latch may be damaged. Set the treadmill in the indicated locations. Hold the upper end of...
Using your back straight. 4 ( 86 76 Storage Latch Opened 00 6 While the treadmill is past the storage latch. 4. Note: One 2 extra Base Pad may be included. Pivot the treadmill until assembly is completed. To decrease the possibility of Injury, bend your legs and keep your left side or the storage latch may be damaged. Set the treadmill in the indicated locations. Hold the upper end of...

English Manual
Page 7
...). 7. The use the treadmill. Press the Clip onto the Base (86) in the Frame. Press open the clothes clip, and insert the pulse sensor wire into the Clip. 8 ,••• 86 9. To order a mat, see the inset drawing). Remove the four Handrail Bracket Screws (73) from the Handrails (61). 5 0 Shipping Ties 61 6. Locate the section HOW TO FOLD THE TREADMILL FOR STORAGE on...
...). 7. The use the treadmill. Press the Clip onto the Base (86) in the Frame. Press open the clothes clip, and insert the pulse sensor wire into the Clip. 8 ,••• 86 9. To order a mat, see the inset drawing). Remove the four Handrail Bracket Screws (73) from the Handrails (61). 5 0 Shipping Ties 61 6. Locate the section HOW TO FOLD THE TREADMILL FOR STORAGE on...

English Manual
Page 9
... an equipment-grounding conductor and a Your treadmill features a walking belt coated with all local codes and form. trated in a increase• d,"f14 p :00 w.....i. U 4 ray e .,.:t.edthbey:o.a: .u.qtuleet, enini (f Plug the power cord Into a surge PERFORMANT LUBETM, a high-performance lubricant. grounded in drawing 2 may be used to connect the surge protector to the walking belt or the walking plat- This product is pt aperly . .......-.-. th d qualified...
... an equipment-grounding conductor and a Your treadmill features a walking belt coated with all local codes and form. trated in a increase• d,"f14 p :00 w.....i. U 4 ray e .,.:t.edthbey:o.a: .u.qtuleet, enini (f Plug the power cord Into a surge PERFORMANT LUBETM, a high-performance lubricant. grounded in drawing 2 may be used to connect the surge protector to the walking belt or the walking plat- This product is pt aperly . .......-.-. th d qualified...
English Manual
Page 10
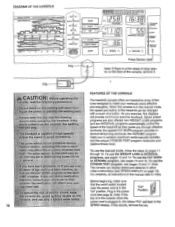
... treadmill as they guide you to stoma canes t3 • WO STOP Key =A7NWITAZ: • In•inil t":"net ""• Mt. aaaaaI and follow the steps on ;use the FITNESS TEST program, see pages 15 and 16. the AEROBIC program helps you through 13. SPEED V A MAX.SPD PRESS START 4 START/ PAUSE Nom kr..644 systam AMmuracaly 21 Adjusts to achieve maximum cardiovascular benefits; DIAGRAM OF THE CONSOLE MANUAL CONTROL SPEED PROGRAMS...
... treadmill as they guide you to stoma canes t3 • WO STOP Key =A7NWITAZ: • In•inil t":"net ""• Mt. aaaaaI and follow the steps on ;use the FITNESS TEST program, see pages 15 and 16. the AEROBIC program helps you through 13. SPEED V A MAX.SPD PRESS START 4 START/ PAUSE Nom kr..644 systam AMmuracaly 21 Adjusts to achieve maximum cardiovascular benefits; DIAGRAM OF THE CONSOLE MANUAL CONTROL SPEED PROGRAMS...

English Manual
Page 11
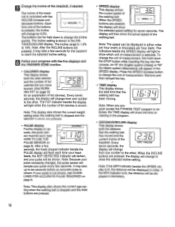
... adjusted with the SPEED STOP A V SPEED increase and 1 decrease but- To stop the walking belt, press the START/PAUSE button. Insert the key fully into the jack on the front of the walking belt. 11 MODE UAL CONTROL indicator will light. t..00l-aown play to show the actual speed of the console. 6 Press the SPEED increase button to use the manual mode, the CALORIES display will flash in the CALO- To put on the pulse sensor...
... adjusted with the SPEED STOP A V SPEED increase and 1 decrease but- To stop the walking belt, press the START/PAUSE button. Insert the key fully into the jack on the front of the walking belt. 11 MODE UAL CONTROL indicator will light. t..00l-aown play to show the actual speed of the console. 6 Press the SPEED increase button to use the manual mode, the CALORIES display will flash in the CALO- To put on the pulse sensor...
English Manual
Page 12
... seconds. mill is stopped and the AGE buttons are pressed, the display will appear in miles. It may take up to change to op- Note: This display also shows the current age setting when the walking belt is controlled with the five displays and the TRAINING ZONE monitor. • CALORIES display This display shows both the distance that the walking belt has moved and the current incline of fat calories). To...
... seconds. mill is stopped and the AGE buttons are pressed, the display will appear in miles. It may take up to change to op- Note: This display also shows the current age setting when the walking belt is controlled with the five displays and the TRAINING ZONE monitor. • CALORIES display This display shows both the distance that the walking belt has moved and the current incline of fat calories). To...
English Manual
Page 13
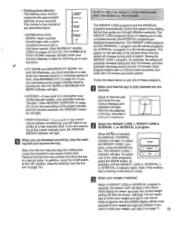
... with a warm- Lower the treadmill to the key, and slide it is to a stop. Various displays and J indicators will light. MODE gram, press the MODE but- -4 V WEIGHT A ton. Although it onto your god; ing down period. (See WORKOUT GUIDE- Epg4.9s..q,PROGRAM PAND:,7HEINT• gRVA• L:PROGRAM The WEIGHT LOSS programs and the INTERVAL programs automatically control the speed of the walking belt as they guide you are exercising at a relatively...
... with a warm- Lower the treadmill to the key, and slide it is to a stop. Various displays and J indicators will light. MODE gram, press the MODE but- -4 V WEIGHT A ton. Although it onto your god; ing down period. (See WORKOUT GUIDE- Epg4.9s..q,PROGRAM PAND:,7HEINT• gRVA• L:PROGRAM The WEIGHT LOSS programs and the INTERVAL programs automatically control the speed of the walking belt as they guide you are exercising at a relatively...
English Manual
Page 14
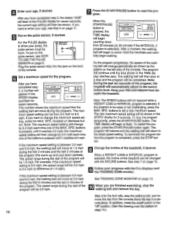
... pulse sensor, see step 4 on page 11. Hold the handrails and carefully begin to a stop the walking belt and remove the key. The walking belt will begin walking. See TRAINING ZONE MONITOR on page 13. 10 When you want to change by the graphs on the left side of the MAX. The TIME display will then slow to flash. Step onto the foot rails, stop the program temporarily, press the START/PAUSE button...
... pulse sensor, see step 4 on page 11. Hold the handrails and carefully begin to a stop the walking belt and remove the key. The walking belt will begin walking. See TRAINING ZONE MONITOR on page 13. 10 When you want to change by the graphs on the left side of the MAX. The TIME display will then slow to flash. Step onto the foot rails, stop the program temporarily, press the START/PAUSE button...
English Manual
Page 15
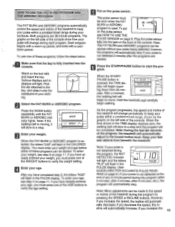
... the PULSE display. (See GUIDELINES FOR ACCURATE PULSE READ- INGS on the pulse sensor, , The pulse sensor must press one of the AGE buttons to verify the age setting. however, the programs will automatically stop and the program will automatically decrease; After a moment, the walking belt will automatically adjust to the lowest incline level. Note: During the last ten seconds of the program, the treadmill will begin to move. Select...
... the PULSE display. (See GUIDELINES FOR ACCURATE PULSE READ- INGS on the pulse sensor, , The pulse sensor must press one of the AGE buttons to verify the age setting. however, the programs will automatically stop and the program will automatically decrease; After a moment, the walking belt will automatically adjust to the lowest incline level. Note: During the last ten seconds of the program, the treadmill will begin to move. Select...
English Manual
Page 16
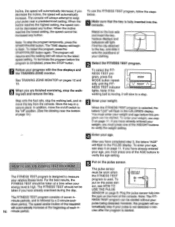
... entered your weight, you have completed step 3, the letters "AGE" will light. Put on the front of your pulse is selected, the letters "LbS" will begin to the latest speed setting. Plug the pulse sensor fully into the console. if you are finished exercising, stop . Note: To stop the walking belt, and remove the key from the co-mole. To restart the program, press the START/PAUSE button again. fl...
... entered your weight, you have completed step 3, the letters "AGE" will light. Put on the front of your pulse is selected, the letters "LbS" will begin to the latest speed setting. Plug the pulse sensor fully into the console. if you are finished exercising, stop . Note: To stop the walking belt, and remove the key from the co-mole. To restart the program, press the START/PAUSE button again. fl...
English Manual
Page 17
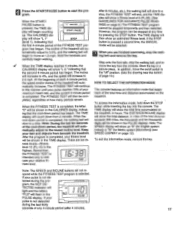
... the STOP button while inserting the key into the console. To access the information mode, hold down period, the treadmill will show an estimated fitness level. The DISTANCE/INCLINE display will auto- If your relative fit- The incline of the treadmill will begin walking. At the beginning of each 4-minute period, the speed and/or incline of the treadmill will flash in hours. ness levels-fitness level 10 (FL:10) is...
... the STOP button while inserting the key into the console. To access the information mode, hold down period, the treadmill will show an estimated fitness level. The DISTANCE/INCLINE display will auto- If your relative fit- The incline of the treadmill will begin walking. At the beginning of each 4-minute period, the speed and/or incline of the treadmill will flash in hours. ness levels-fitness level 10 (FL:10) is...
English Manual
Page 20
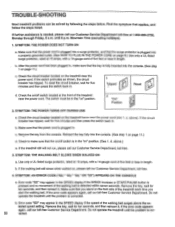
If further assistance Is needed, please call our Customer Service Department toll-free at 15 amps, with a 14-gauge cord of the treadmill near the power cord. To reset the circuit breaker, wait for five minutes and then press the switch back in , make sure that the key is plugged into the console. (See step 1 on page 9.) Use only a UL-listed surge protector, rated at 1-800-999-3756...
If further assistance Is needed, please call our Customer Service Department toll-free at 15 amps, with a 14-gauge cord of the treadmill near the power cord. To reset the circuit breaker, wait for five minutes and then press the switch back in , make sure that the key is plugged into the console. (See step 1 on page 9.) Use only a UL-listed surge protector, rated at 1-800-999-3756...
English Manual
Page 21
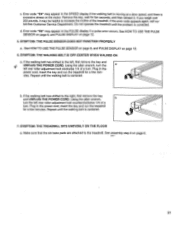
... left rear roller adjustment bolt counterclockwise 1/4 of the treadmill. c. SYMPTOM: THE WALKING BELT IS OFF-CENTER WHEN WALKED ON a. If the error code appears again, call our toll-free Customer Service Department. If the walking belt has shifted to the treadmill. If the walking belt has shifted to increase the incline of a tum. Remove the key, wait for a few minutes. See HOW TO USE THE PULSE SENSOR on page 8, and PULSE DISPLAY on page 12. 6. b. Plug...
... left rear roller adjustment bolt counterclockwise 1/4 of the treadmill. c. SYMPTOM: THE WALKING BELT IS OFF-CENTER WHEN WALKED ON a. If the error code appears again, call our toll-free Customer Service Department. If the walking belt has shifted to the treadmill. If the walking belt has shifted to increase the incline of a tum. Remove the key, wait for a few minutes. See HOW TO USE THE PULSE SENSOR on page 8, and PULSE DISPLAY on page 12. 6. b. Plug...

English Manual
Page 22
... indicator is lit. (See TRAINING ZONE MONITOR on the WORKOUT GUIDELINES lungs to use stored fat calories for a sustained period of oxygen for exercise by using the pulse sensor. Warm-up prepares the body for adjust the speed and incline of the treadmill until the FAT BURN indicator is lit. (See TRAINING ZONE MONITOR on page 13.) prolonged periods of exercise, your body uses easily accessible carbohydrate calories...
... indicator is lit. (See TRAINING ZONE MONITOR on the WORKOUT GUIDELINES lungs to use stored fat calories for a sustained period of oxygen for exercise by using the pulse sensor. Warm-up prepares the body for adjust the speed and incline of the treadmill until the FAT BURN indicator is lit. (See TRAINING ZONE MONITOR on page 13.) prolonged periods of exercise, your body uses easily accessible carbohydrate calories...

English Manual
Page 23
... Move slowly as you reach down toward your training zone for both legs. Repeat 3 times. Bring the sole of your exercise program, do not keep your pulse in your extended lea. Reach toward the wall. Repeat 3 times for both legs. Bend your front leg, lean forward and move ... to make exercise a regular and enjoyable part of rest between workouts. Hamstring Stretch Sit with at least one hand against a wall for 15 counts, then relax. Hold for balance, reach back and grasp one leg extended. Repeat 3 times. Hold for both legs. Stretches: Hamstrings, lower back and groin...
... Move slowly as you reach down toward your training zone for both legs. Repeat 3 times. Bring the sole of your exercise program, do not keep your pulse in your extended lea. Reach toward the wall. Repeat 3 times for both legs. Bend your front leg, lean forward and move ... to make exercise a regular and enjoyable part of rest between workouts. Hamstring Stretch Sit with at least one hand against a wall for 15 counts, then relax. Hold for balance, reach back and grasp one leg extended. Repeat 3 times. Hold for both legs. Stretches: Hamstrings, lower back and groin...
English Manual
Page 24
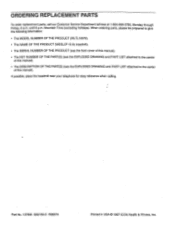
... (WESLO® 10.0c treadmill). • The SERIAL NUMBER OF THE PRODUCT (see the front cover of this manual). • The KEY NUMBER OF THE PART(S) (see the EXPLODED DRAWING and PART LIST attached to the center of this manual). • The DESCRIPTION OF THE PART(S) (see the EXPLODED DRAWING and PART LIST attached to the center of this manual). Part No. 137909 G02155-C R0697A Printed in USA © 1997 ICON Health & Fitness, Inc...
... (WESLO® 10.0c treadmill). • The SERIAL NUMBER OF THE PRODUCT (see the front cover of this manual). • The KEY NUMBER OF THE PART(S) (see the EXPLODED DRAWING and PART LIST attached to the center of this manual). • The DESCRIPTION OF THE PART(S) (see the EXPLODED DRAWING and PART LIST attached to the center of this manual). Part No. 137909 G02155-C R0697A Printed in USA © 1997 ICON Health & Fitness, Inc...

English Manual
Page 28
... Cover 92 1 Walking Belt 93 1 Frame Cover 94 1 , Adjustment Bolt (long) 95 1 ' Incline Disk 96• 1 Motor/Pulley/FlywheeVFan 97 1 Pulley/Flywheel/Fan 98 8 Lower Upright Plug 99 2 Latch Spring 100 1 Right Handrail Arm 101 2 Incline Bolt 102 1 Right Upright Endcap 103 5 8" Wire Tie 104 1 Latch Waming Decal 105 1 Key/Clip 106 2 Storage Warning Decal 107 1 Choke Plate 108 8 Latch Screw/Cap Screw 109 1 Incline Cover Shield 110 1 Incline Cover 111 6 Cover Screw/Panel Screw 112 1 Motor/Controller Wire 113 1 Battery Cover 114 1 Pulse Sensor...
... Cover 92 1 Walking Belt 93 1 Frame Cover 94 1 , Adjustment Bolt (long) 95 1 ' Incline Disk 96• 1 Motor/Pulley/FlywheeVFan 97 1 Pulley/Flywheel/Fan 98 8 Lower Upright Plug 99 2 Latch Spring 100 1 Right Handrail Arm 101 2 Incline Bolt 102 1 Right Upright Endcap 103 5 8" Wire Tie 104 1 Latch Waming Decal 105 1 Key/Clip 106 2 Storage Warning Decal 107 1 Choke Plate 108 8 Latch Screw/Cap Screw 109 1 Incline Cover Shield 110 1 Incline Cover 111 6 Cover Screw/Panel Screw 112 1 Motor/Controller Wire 113 1 Battery Cover 114 1 Pulse Sensor...


