

English Manual
Page 1
...-STATION DUAL STACK MODEL NO. 50503 SERIAL NO. A MADE IN CANADA Congratulations on selecting a WEIDER Fitness Product. Write serial number inttte space 7 above for choosing WEIDER. Saturday 9:00 AM - 5:00; Thank you and provide helpful information. PRINTED IN CANADA NN126850503 WEIDER SPORTING GOODS, INC. 900 West St. Our customer service representatives are committed to serve you again for O 0 SERIAL NUMBER nimffiromm. Extended Seasonal...
...-STATION DUAL STACK MODEL NO. 50503 SERIAL NO. A MADE IN CANADA Congratulations on selecting a WEIDER Fitness Product. Write serial number inttte space 7 above for choosing WEIDER. Saturday 9:00 AM - 5:00; Thank you and provide helpful information. PRINTED IN CANADA NN126850503 WEIDER SPORTING GOODS, INC. 900 West St. Our customer service representatives are committed to serve you again for O 0 SERIAL NUMBER nimffiromm. Extended Seasonal...

English Manual
Page 2
.... PAGE 1 WEIDER SPORTING GOODS TABLE OF CONTENTS Table of Contents 1 Important Safety Precautions 1 Introduction 2 Part List 3-6 Ordering Parts 7 Assembly Steps 8-31 How To Use Your Gym 32-33 Conditioning...parts Immediately. 5. Read all instructions before using this equipment Is used. we suggest that you are missing a part, it may have gotten mixed up with pre-existing health problems. Read all instructions in the lid of like losing parts. Replace any exercise program consult your assembly. Position the stepper on the stepper. 6. Use this Owner's Guide...
.... PAGE 1 WEIDER SPORTING GOODS TABLE OF CONTENTS Table of Contents 1 Important Safety Precautions 1 Introduction 2 Part List 3-6 Ordering Parts 7 Assembly Steps 8-31 How To Use Your Gym 32-33 Conditioning...parts Immediately. 5. Read all instructions before using this equipment Is used. we suggest that you are missing a part, it may have gotten mixed up with pre-existing health problems. Read all instructions in the lid of like losing parts. Replace any exercise program consult your assembly. Position the stepper on the stepper. 6. Use this Owner's Guide...

English Manual
Page 3
.... 3. Lubricate all fasteners, nuts arid bolts, and caps to keep it also contains maintenance tips and parts information. INTRODUCTION PAGE 2 WEIDER SPORTING GOODS Thank you for future reference. LAT BAR TOP MAST DIP STATION RICHT ARM PRESS STATION LEFT STEPPER STATION AB FLEX STATION O LEG EXTENSION MAINTENANCE TIPS Keeping your POWERGUIDE X5 in this manual and after assembly is provided to assembly instructions it for choosing the Weider POWERGUIDE X5...
.... 3. Lubricate all fasteners, nuts arid bolts, and caps to keep it also contains maintenance tips and parts information. INTRODUCTION PAGE 2 WEIDER SPORTING GOODS Thank you for future reference. LAT BAR TOP MAST DIP STATION RICHT ARM PRESS STATION LEFT STEPPER STATION AB FLEX STATION O LEG EXTENSION MAINTENANCE TIPS Keeping your POWERGUIDE X5 in this manual and after assembly is provided to assembly instructions it for choosing the Weider POWERGUIDE X5...
English Manual
Page 6
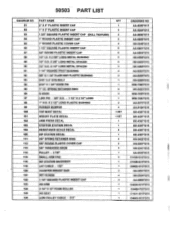
... TOP MAST DECAL WEIGHT PLATE DECAL ARM PRESS DECAL STEPPER STATION DECAL RESISTANCE SCALE DECAL DIP STATION DECAL 5/8" SPRING RETAINER RING 5/8" ROUND PLASTIC COVER CAP 3/8" THREADED KNOB PULLEY - 2 7/8" SMALL ARM PAD DIP STATION BACKREST LAT CABLE - 132" COUNTER WEIGHT BAR SET SCREW 11/4" SQUARE PLASTIC INSERT CAP AB ARM 3 114" X 10" FOAM ROLLER AB SEAT LOW PULLEY CABLE - 213" CITY 1 2 2 2 4 8 6 2 2 3 4 2 I I 6 4 I 2 4 1 SET 1 SET I .1 2 1 2 2 3 1 2 1 1 2 4 . 2 1 1 I .D. X 2 5/8" LONG METAL BUSHING 1/2" O.D. X 3/8" LONG METAL SPACER 1/2" O.D. 50503 PART LIST DIAGRAM NO. 81...
... TOP MAST DECAL WEIGHT PLATE DECAL ARM PRESS DECAL STEPPER STATION DECAL RESISTANCE SCALE DECAL DIP STATION DECAL 5/8" SPRING RETAINER RING 5/8" ROUND PLASTIC COVER CAP 3/8" THREADED KNOB PULLEY - 2 7/8" SMALL ARM PAD DIP STATION BACKREST LAT CABLE - 132" COUNTER WEIGHT BAR SET SCREW 11/4" SQUARE PLASTIC INSERT CAP AB ARM 3 114" X 10" FOAM ROLLER AB SEAT LOW PULLEY CABLE - 213" CITY 1 2 2 2 4 8 6 2 2 3 4 2 I I 6 4 I 2 4 1 SET 1 SET I .1 2 1 2 2 3 1 2 1 1 2 4 . 2 1 1 I .D. X 2 5/8" LONG METAL BUSHING 1/2" O.D. X 3/8" LONG METAL SPACER 1/2" O.D. 50503 PART LIST DIAGRAM NO. 81...

English Manual
Page 7
... PART NAME QTY 127 HACK SLIDE CABLE - 207" 1 128 STEPPER CABLE - 60 114" 1 129 1/2" O.O. X 1 7/8" LONG PLASTIC BUSHING 3 145 WEIGHT ASSIST DIP STATION BRACKET 1 147 "L" LOCKING PINS - 5/16" X 4 1/2" 2 148 5/16" X 1" HEX HEAD BOLT 1 149 CABLE ADJUSTMENT BLOCK 1 150 LEG STRAP / ARM CURL HANDLE 1 151 LINKING CHAIN - 12" 1 152 "J" PIN - 3/8" X 7" 1 153 PULLEY PIVOT BRACKET - 2" X 3 1/2" 1 154 ACCESSORY ROPE i 155 FIREMAN'S LATCH HOOK 1 156 1/2" X 1 3/4" LONG METAL BUSHING 1 ASSEMBLY MANUAL I .D. 50503 PART LIST DIAGRAM...
... PART NAME QTY 127 HACK SLIDE CABLE - 207" 1 128 STEPPER CABLE - 60 114" 1 129 1/2" O.O. X 1 7/8" LONG PLASTIC BUSHING 3 145 WEIGHT ASSIST DIP STATION BRACKET 1 147 "L" LOCKING PINS - 5/16" X 4 1/2" 2 148 5/16" X 1" HEX HEAD BOLT 1 149 CABLE ADJUSTMENT BLOCK 1 150 LEG STRAP / ARM CURL HANDLE 1 151 LINKING CHAIN - 12" 1 152 "J" PIN - 3/8" X 7" 1 153 PULLEY PIVOT BRACKET - 2" X 3 1/2" 1 154 ACCESSORY ROPE i 155 FIREMAN'S LATCH HOOK 1 156 1/2" X 1 3/4" LONG METAL BUSHING 1 ASSEMBLY MANUAL I .D. 50503 PART LIST DIAGRAM...

English Manual
Page 8
... HEAD BOLT 1 140 WEIGHT SELECTOR PIN 2 141 3/8" SPRING CLIP 1 143 1/2" O.D. 50503 PART LIST DIAGRAM NO. X 1 7/8" LONG PLASTIC BUSHING 3 145 WEIGHT ASSIST DIP STATION BRACKET 1 147 "L" LOCKING PINS - 5/16" X 4 1/2" 2 148 5/16" X 1" HEX HEAD BOLT 1 149 CABLE ADJUSTMENT BLOCK 1 150 LEG STRAP /ARM CURL HANDLE 1 151 LINKING CHAIN - 12" 1 152 "J" PIN - 3/8" X 7" 1 153 PULLEY PIVOT BRACKET - 2" X 3 1/2" 1 154 ACCESSORY ROPE 1 155 FIREMAN'S LATCH HOOK 1 156 1/2" X 1 3/4" LONG METAL BUSHING 1 ASSEMBLY MANUAL 1 WALL CHART 1 HARDWARE BAG (STEPS...
... HEAD BOLT 1 140 WEIGHT SELECTOR PIN 2 141 3/8" SPRING CLIP 1 143 1/2" O.D. 50503 PART LIST DIAGRAM NO. X 1 7/8" LONG PLASTIC BUSHING 3 145 WEIGHT ASSIST DIP STATION BRACKET 1 147 "L" LOCKING PINS - 5/16" X 4 1/2" 2 148 5/16" X 1" HEX HEAD BOLT 1 149 CABLE ADJUSTMENT BLOCK 1 150 LEG STRAP /ARM CURL HANDLE 1 151 LINKING CHAIN - 12" 1 152 "J" PIN - 3/8" X 7" 1 153 PULLEY PIVOT BRACKET - 2" X 3 1/2" 1 154 ACCESSORY ROPE 1 155 FIREMAN'S LATCH HOOK 1 156 1/2" X 1 3/4" LONG METAL BUSHING 1 ASSEMBLY MANUAL 1 WALL CHART 1 HARDWARE BAG (STEPS...

English Manual
Page 9
... (See Cover) THE SAME INFORMATION IS REQUIRED WHEN PLACING YOUR ORDER BY MAIL. Ordering Number of the Product (50503) 3. THE PARTS ORDER CARD WHICH IS INCLUDED WITH THIS "PRODUCT OR'BY CALLING OUR PRODUCT SERVICE NUMBER: 1-800-225-0653. Model Number of the Part (See Parts List Page) 4. READY THE FOLLOWING INFORMATION TO 1EXPEDITE YOUR ORDER: 1. All parts and service inquiries should be directed to protection...
... (See Cover) THE SAME INFORMATION IS REQUIRED WHEN PLACING YOUR ORDER BY MAIL. Ordering Number of the Product (50503) 3. THE PARTS ORDER CARD WHICH IS INCLUDED WITH THIS "PRODUCT OR'BY CALLING OUR PRODUCT SERVICE NUMBER: 1-800-225-0653. Model Number of the Part (See Parts List Page) 4. READY THE FOLLOWING INFORMATION TO 1EXPEDITE YOUR ORDER: 1. All parts and service inquiries should be directed to protection...
English Manual
Page 10
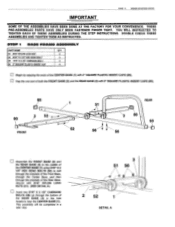
... 2" SQUARE PLASTIC INSERT CAPS (80). STEP II BASE FRAME ASSEMBLY PART NAME 51 5116" NYLON LOCK NUT 52 5116" X 21/2" HEX HEAD BOLT 56 5/16" X 21/2" CARRIAGE BOLT 80 2" SQUARE PLASTIC INSERT CAP QTY 2 2 2 4 D Begin by capping the ends of the Rear Base. PAGE 8 WEIDER SPORTING GOODS IMPORTANT SOME OF THE ASSEMBLIES HAVE BEEN DONE AT THE FACTORY...
... 2" SQUARE PLASTIC INSERT CAPS (80). STEP II BASE FRAME ASSEMBLY PART NAME 51 5116" NYLON LOCK NUT 52 5116" X 21/2" HEX HEAD BOLT 56 5/16" X 21/2" CARRIAGE BOLT 80 2" SQUARE PLASTIC INSERT CAP QTY 2 2 2 4 D Begin by capping the ends of the Rear Base. PAGE 8 WEIDER SPORTING GOODS IMPORTANT SOME OF THE ASSEMBLIES HAVE BEEN DONE AT THE FACTORY...

English Manual
Page 11
... ring. PAGE 9 WEIDER SPORTING GOODS STEP 2 GUIDE ROD ASSEMBLY PART NAME 51 5/16" NYLON LOCK NUT 53 5116" X 3" HEX HEAD BOLT Assemble the end of the GUIDE RODS (4) with 5/16" NYLON LOCK NUTS (51). Using 5/16" X 3" HEX HEAD BOLTS (53), bolt through one Bracket, the Base Frame, and then the other Bracket. QTY 2 2 4 SLOTTED SIDE 53 c ID 2 NOTE: Tighten the Machine Screw and Lock...
... ring. PAGE 9 WEIDER SPORTING GOODS STEP 2 GUIDE ROD ASSEMBLY PART NAME 51 5/16" NYLON LOCK NUT 53 5116" X 3" HEX HEAD BOLT Assemble the end of the GUIDE RODS (4) with 5/16" NYLON LOCK NUTS (51). Using 5/16" X 3" HEX HEAD BOLTS (53), bolt through one Bracket, the Base Frame, and then the other Bracket. QTY 2 2 4 SLOTTED SIDE 53 c ID 2 NOTE: Tighten the Machine Screw and Lock...

English Manual
Page 13
... bolt through one Bracket, through the Guide Rod, and then through the other Bracket. PRE-ASSEMBLED PULLEY TOP MAIN UPRIGHT 11 PRE-ASSEMBLED PULLEY 81 ILI 0 100 80 51 WELDED BRACKETS 55 0 11 4 4 0 O 61 60 \O- 0 o 0 2 FRONT WELDED 60 62 BUSHING REAR Press a 2" SQUARE PLASTIC INSERT CAP (80) into the TOP MAIN UPRIGHT (11). Secure with a 3/8" NYLON LOCK NUT (61). CI Remove...
... bolt through one Bracket, through the Guide Rod, and then through the other Bracket. PRE-ASSEMBLED PULLEY TOP MAIN UPRIGHT 11 PRE-ASSEMBLED PULLEY 81 ILI 0 100 80 51 WELDED BRACKETS 55 0 11 4 4 0 O 61 60 \O- 0 o 0 2 FRONT WELDED 60 62 BUSHING REAR Press a 2" SQUARE PLASTIC INSERT CAP (80) into the TOP MAIN UPRIGHT (11). Secure with a 3/8" NYLON LOCK NUT (61). CI Remove...
English Manual
Page 14
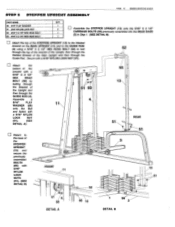
... DETAIL A 55 13 56 DETAIL B STEP 5 STEPPER UPRIGHT ASSEMBLY PAGE 12 WEIDER SPORTING GOODS PART NAME 50 5/16" FLAT WASHER 51 5/16" NYLON LOCK NUT 52 5/16" X 21/2" HEX HEAD BOLT 55 5/16" X 2 1/4" HEX HEAD BOLT QTY 1 4 u Assemble the STEPPER UPRIGHT (13) onto the 5/16" X 2 1/2" 1 CARRIAGE BOLTS (56) previously assembled into the REAR BASE (3) in Step 1. (SEE DETAIL B) 1 Attach the top of the STEPPER...
... DETAIL A 55 13 56 DETAIL B STEP 5 STEPPER UPRIGHT ASSEMBLY PAGE 12 WEIDER SPORTING GOODS PART NAME 50 5/16" FLAT WASHER 51 5/16" NYLON LOCK NUT 52 5/16" X 21/2" HEX HEAD BOLT 55 5/16" X 2 1/4" HEX HEAD BOLT QTY 1 4 u Assemble the STEPPER UPRIGHT (13) onto the 5/16" X 2 1/2" 1 CARRIAGE BOLTS (56) previously assembled into the REAR BASE (3) in Step 1. (SEE DETAIL B) 1 Attach the top of the STEPPER...
English Manual
Page 16
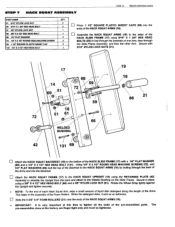
Using 1/4" X 2 1/2" ROUND HEAD MACHINE SCREWS (72) and 1/4" FLAT WASHERS (69) bolt the top of the Backrest to the HACK SQUAT ARMS (18) by bolting through 2 the Slide Frame Assembly, and then the other Arm. Rotate the Wheel Strap tightly against the Upright and tighten securely. When the detergent dries, it acts as an adhesive. PAGE 14 WEIDER SPORTING GOODS STEP 7 HACK SQUAT ASSEMBLY PART NAME QTY...
Using 1/4" X 2 1/2" ROUND HEAD MACHINE SCREWS (72) and 1/4" FLAT WASHERS (69) bolt the top of the Backrest to the HACK SQUAT ARMS (18) by bolting through 2 the Slide Frame Assembly, and then the other Arm. Rotate the Wheel Strap tightly against the Upright and tighten securely. When the detergent dries, it acts as an adhesive. PAGE 14 WEIDER SPORTING GOODS STEP 7 HACK SQUAT ASSEMBLY PART NAME QTY...
English Manual
Page 19
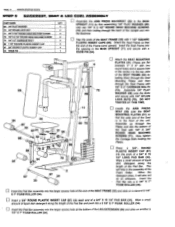
PAGE 17 WEIDER SPORTING GOODS STEP 9 BACKREST, SEAT & LEG CURL ASSEMBLY PART NAME 89 1W FLAT WASHER 70 1/4" NYLON LOCK NUT 71 1/4" X 3/4" ROUND HEAD MACHINE SCREW 72 114" X 21/2" ROUND HEAD MACHINE SCREW 73 114" X r CARRIAGE BOLT 86 11/2" SQUARE PLASTIC INSERT CAP 87 314" ROUND PLASTIC INSERT CAP 94 KNOB PIN QTY 4 2 4 2 2 2 4 1 1E1 Assemble the ARM PRESS BACKREST (29) to the MAIN UPRIGHT (11) by first assembling 1/4" FLAT...
PAGE 17 WEIDER SPORTING GOODS STEP 9 BACKREST, SEAT & LEG CURL ASSEMBLY PART NAME 89 1W FLAT WASHER 70 1/4" NYLON LOCK NUT 71 1/4" X 3/4" ROUND HEAD MACHINE SCREW 72 114" X 21/2" ROUND HEAD MACHINE SCREW 73 114" X r CARRIAGE BOLT 86 11/2" SQUARE PLASTIC INSERT CAP 87 314" ROUND PLASTIC INSERT CAP 94 KNOB PIN QTY 4 2 4 2 2 2 4 1 1E1 Assemble the ARM PRESS BACKREST (29) to the MAIN UPRIGHT (11) by first assembling 1/4" FLAT...

English Manual
Page 24
... OTHER PARTS OF YOUR BODY BETWEEN MOVING PARTS OR WEIGHTS WHILE THE GYM IS IN USE. u KEEP ALL BOLTS AND FASTENERS TIGHTENED. H: eel IIEIIEINE NMI CABLES 213■■ PAGE 22 WEIDER SPORTING GOODS LOW PULLEY CABLE 126 132" LAT CABLE 118 601/4 STEPPER CABLE 128 207" HACK SQUAT CABLE 127 AVOID CABLE PROBLEMS: Woven Cable, like the exercise is binding up, stop immediately and check the Cable run . Pulleys, Brackets, Guide Wheels, and Guide Rods...
... OTHER PARTS OF YOUR BODY BETWEEN MOVING PARTS OR WEIGHTS WHILE THE GYM IS IN USE. u KEEP ALL BOLTS AND FASTENERS TIGHTENED. H: eel IIEIIEINE NMI CABLES 213■■ PAGE 22 WEIDER SPORTING GOODS LOW PULLEY CABLE 126 132" LAT CABLE 118 601/4 STEPPER CABLE 128 207" HACK SQUAT CABLE 127 AVOID CABLE PROBLEMS: Woven Cable, like the exercise is binding up, stop immediately and check the Cable run . Pulleys, Brackets, Guide Wheels, and Guide Rods...

English Manual
Page 25
... by fitting the Cable into PULLEY (C). PAGE 23 WEIDER SPORTING GOODS STEP 13 LAT CABLE ASSEMBLY PART NAME QTY 121 SETSCREW 2 A I.AT BAR HOLDER 118 11 11 22 PULLEY TRAP BRACKET POSITION 41 FRONT OF GYM ENTIRE LAT CABLE ROUTING NOTE: The PULLEYS (A,B, & C) have been pre-assembled to the TOP MAIN UPRIGHT (11) at 12 o'clock and re-tighten this assembly. 1011 it just barely clears the Pulley and re-tighten this assembly...
... by fitting the Cable into PULLEY (C). PAGE 23 WEIDER SPORTING GOODS STEP 13 LAT CABLE ASSEMBLY PART NAME QTY 121 SETSCREW 2 A I.AT BAR HOLDER 118 11 11 22 PULLEY TRAP BRACKET POSITION 41 FRONT OF GYM ENTIRE LAT CABLE ROUTING NOTE: The PULLEYS (A,B, & C) have been pre-assembled to the TOP MAIN UPRIGHT (11) at 12 o'clock and re-tighten this assembly. 1011 it just barely clears the Pulley and re-tighten this assembly...

English Manual
Page 29
... that the entire Cable run is seated into the PULLEY PIVOT BRACKET (37) but still loose enough to the Cable End Bracket on the right ARM PRESS ARM (25). a Take the CABLE (126) forward over the Pulley and Cable and set screw in the Adjuster Ferrule tightly so it under and around behind the MAIN UPRIGHT (11) and fit the Cable into the deep 3 1/2" "V" PULLEY (20). Check...
... that the entire Cable run is seated into the PULLEY PIVOT BRACKET (37) but still loose enough to the Cable End Bracket on the right ARM PRESS ARM (25). a Take the CABLE (126) forward over the Pulley and Cable and set screw in the Adjuster Ferrule tightly so it under and around behind the MAIN UPRIGHT (11) and fit the Cable into the deep 3 1/2" "V" PULLEY (20). Check...
English Manual
Page 31
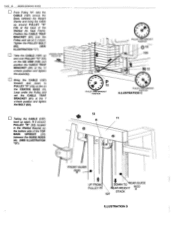
... BRACKET POSITION ILLUSTRATION C 12 11 R FRONT GUIDE RyD UP FROM PULLEY P I DOWN TO EAR GUIDE REAR WEIGHT R4OD STACK 127 ILLUSTRATION D Taking the CABLE (127) back up around PULLEY "R" (12) located in the Welded Bracket on the CENTER BASE (1). Tighten the PULLEY BOLT (62). (SEE ILLUSTRATION "C") a Take the CABLE (127) up and over the Pulley and set the CABLE TRAP BRACKET (41) at the 7 o'clock...
... BRACKET POSITION ILLUSTRATION C 12 11 R FRONT GUIDE RyD UP FROM PULLEY P I DOWN TO EAR GUIDE REAR WEIGHT R4OD STACK 127 ILLUSTRATION D Taking the CABLE (127) back up around PULLEY "R" (12) located in the Welded Bracket on the CENTER BASE (1). Tighten the PULLEY BOLT (62). (SEE ILLUSTRATION "C") a Take the CABLE (127) up and over the Pulley and set the CABLE TRAP BRACKET (41) at the 7 o'clock...
English Manual
Page 32
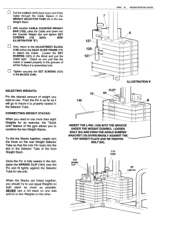
... the Pin and fit tightly against the Selector Tube for an exercise, the "Quick Link" feature of all the Pulleys it is assembled onto. Y o o 0 0 0 0 0 0 To link the Stacks together, simply turn the Knob on the rear Weight Selector Tube so that the Cable is properly seated in the rear Weight Stack. u Tighten securely the SET SCREWS (121) in the Block and pull the Cable tight. LOOSEN BOLT (54...
... the Pin and fit tightly against the Selector Tube for an exercise, the "Quick Link" feature of all the Pulleys it is assembled onto. Y o o 0 0 0 0 0 0 To link the Stacks together, simply turn the Knob on the rear Weight Selector Tube so that the Cable is properly seated in the rear Weight Stack. u Tighten securely the SET SCREWS (121) in the Block and pull the Cable tight. LOOSEN BOLT (54...
English Manual
Page 34
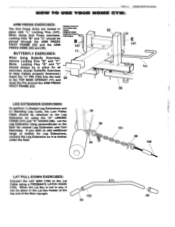
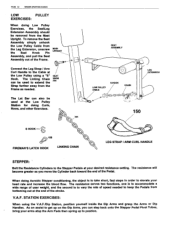
... USE YOUR HOME GYM: ARM PRESS EXERCISES: The Arm Press Arms are locked in the TOP MAIN UPRIGHT (11) and 25 hook the Pin around the ARM PRESS PIVOT FRAME (22). 22 ( 15L 26 LEG EXTENSION EXERCISES: To perform 1.) Seated Leg Extensions and 2.) Standing Leg Curls, the Low Pulley Cable should be pinned through the ARM PRESS PIVOT FRAME (22) and the ARM PRESS ARMS (25) and (26). Let the Leg Extension hang perpendicular to the Lat FA Cable using...
... USE YOUR HOME GYM: ARM PRESS EXERCISES: The Arm Press Arms are locked in the TOP MAIN UPRIGHT (11) and 25 hook the Pin around the ARM PRESS PIVOT FRAME (22). 22 ( 15L 26 LEG EXTENSION EXERCISES: To perform 1.) Seated Leg Extensions and 2.) Standing Leg Curls, the Low Pulley Cable should be pinned through the ARM PRESS PIVOT FRAME (22) and the ARM PRESS ARMS (25) and (26). Let the Leg Extension hang perpendicular to the Lat FA Cable using...
English Manual
Page 35
... the rate of speed needed . SEAT KNOB PIN The Lat Bar can also be used at your heart rate and increase the blood flow. As an assist to get up on the Dip Arms, you can be used to keep the Pedals from the Frame as you move the Cylinder back toward the end of the Pedal. SEAT ASSEMBLY 0 LOW PULLEY CABLE S-HOOK CHAIN LEG EXTENSION 150 151 S HOOK - V.A.F. The resistance serves...
... the rate of speed needed . SEAT KNOB PIN The Lat Bar can also be used at your heart rate and increase the blood flow. As an assist to get up on the Dip Arms, you can be used to keep the Pedals from the Frame as you move the Cylinder back toward the end of the Pedal. SEAT ASSEMBLY 0 LOW PULLEY CABLE S-HOOK CHAIN LEG EXTENSION 150 151 S HOOK - V.A.F. The resistance serves...


