
Uk Manual
Page 1
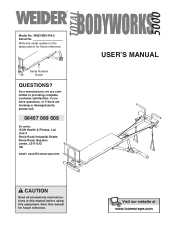
... complete customer satisfaction. USER'S MANUAL Model No. Serial Number Decal QUESTIONS? Save this equipment. As a manufacturer, we are missing or damaged parts, please call: 08457 089 009 Or write: ICON Health & Fitness, Ltd. Unit 4 Revie Road Industrial Estate Revie Road, Beeston Leeds, LS11 8JG UK email: [email protected] CAUTION Read all precautions and instructions in the space above for future...
... complete customer satisfaction. USER'S MANUAL Model No. Serial Number Decal QUESTIONS? Save this equipment. As a manufacturer, we are missing or damaged parts, please call: 08457 089 009 Or write: ICON Health & Fitness, Ltd. Unit 4 Revie Road Industrial Estate Revie Road, Beeston Leeds, LS11 8JG UK email: [email protected] CAUTION Read all precautions and instructions in the space above for future...
Uk Manual
Page 2
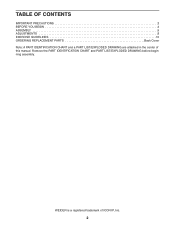
TABLE OF CONTENTS IMPORTANT PRECAUTIONS 3 BEFORE YOU BEGIN 4 ASSEMBLY 5 ADJUSTMENTS 8 EXERCISE GUIDELINES 10 ORDERING REPLACEMENT PARTS Back Cover Note: A PART IDENTIFICATION CHART and a PART LIST/EXPLODED DRAWING are attached in the center of ICON IP, Inc. 2 WEIDER is a registered trademark of this manual. Remove the PART IDENTIFICATION CHART and PART LIST/EXPLODED DRAWING before beginning assembly.
TABLE OF CONTENTS IMPORTANT PRECAUTIONS 3 BEFORE YOU BEGIN 4 ASSEMBLY 5 ADJUSTMENTS 8 EXERCISE GUIDELINES 10 ORDERING REPLACEMENT PARTS Back Cover Note: A PART IDENTIFICATION CHART and a PART LIST/EXPLODED DRAWING are attached in the center of ICON IP, Inc. 2 WEIDER is a registered trademark of this manual. Remove the PART IDENTIFICATION CHART and PART LIST/EXPLODED DRAWING before beginning assembly.
Uk Manual
Page 3
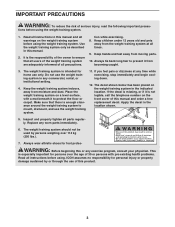
...; Read user's manual and follow all warnings on a level surface, with pre-existing health problems. Read all parts regularly. Keep children under 12 years old and pets away from becoming caught. 3. Keep hands and feet away from moisture and dust. Do not use only. Place the weight training system on the weight training system before using the weight training system. Replace any exercise program, consult your...
...; Read user's manual and follow all warnings on a level surface, with pre-existing health problems. Read all parts regularly. Keep children under 12 years old and pets away from becoming caught. 3. Keep hands and feet away from moisture and dust. Do not use only. Place the weight training system on the weight training system before using the weight training system. Replace any exercise program, consult your...
Uk Manual
Page 4
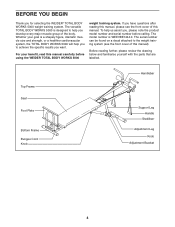
... model number is designed to the weight training system (see the front cover of this manual). The serial number can be found on a decal attached to help you for selecting the WEIDER® TOTAL BODY WORKS 5000 weight training system. The versatile TOTAL BODY WORKS 5000 is WEEVBE1444.0. BEFORE YOU BEGIN Thank you develop every major muscle group of the body. Top Frame Seat Foot Plate Bottom Frame Bungee Cord Knob Handlebar Support Leg Handle Stabiliser Adjustment Leg Knob Adjustment...
... model number is designed to the weight training system (see the front cover of this manual). The serial number can be found on a decal attached to help you for selecting the WEIDER® TOTAL BODY WORKS 5000 weight training system. The versatile TOTAL BODY WORKS 5000 is WEEVBE1444.0. BEFORE YOU BEGIN Thank you develop every major muscle group of the body. Top Frame Seat Foot Plate Bottom Frame Bungee Cord Knob Handlebar Support Leg Handle Stabiliser Adjustment Leg Knob Adjustment...
Uk Manual
Page 5
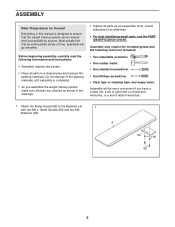
... following information and instructions: • Assembly requires two people. • Place all parts as you have a socket set, a set of open-end or closed-end wrenches, or a set of ratchet wrenches. 1. Most people find that the weight training system can be assembled successfully by setting aside plenty of the packing materials until assembly is designed to the Backrest (4) 1 with two M6 x 16mm Screws (60...
... following information and instructions: • Assembly requires two people. • Place all parts as you have a socket set, a set of open-end or closed-end wrenches, or a set of ratchet wrenches. 1. Most people find that the weight training system can be assembled successfully by setting aside plenty of the packing materials until assembly is designed to the Backrest (4) 1 with two M6 x 16mm Screws (60...
Uk Manual
Page 6
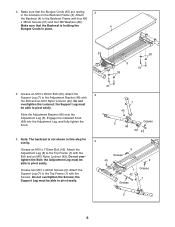
... 9 Grease 45 9 1 42 Grease Grease 7 5 6 Slide the Adjustment Bracket (48) onto the Adjustment Leg (5). Engage the indicated Knob (58) into the Adjustment Leg, and fully tighten the Knob. 4. the Adjustment Leg must be able to the Top Frame (1) with four M6 x 38mm Screws (51) and four M6 Washers (39). Grease two M10 x 20mm Screws (9). 2. Attach the 3 Support Leg (7) to pivot easily. Note: The backrest is holding the 4 Bungee Cords in...
... 9 Grease 45 9 1 42 Grease Grease 7 5 6 Slide the Adjustment Bracket (48) onto the Adjustment Leg (5). Engage the indicated Knob (58) into the Adjustment Leg, and fully tighten the Knob. 4. the Adjustment Leg must be able to the Top Frame (1) with four M6 x 38mm Screws (51) and four M6 Washers (39). Grease two M10 x 20mm Screws (9). 2. Attach the 3 Support Leg (7) to pivot easily. Note: The backrest is holding the 4 Bungee Cords in...
Uk Manual
Page 7
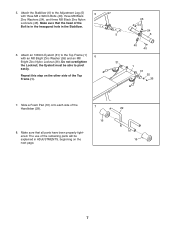
... explained in the Stabilizer. 6. Attach the Stabiliser (6) to the Adjustment Leg (5) 5 with an M8 Bright Zinc Washer (55) and an M8 Bright Zinc Nylon Locknut (36). Make sure that all parts have been properly tightened. Attach an 108mm Eyebolt (31) to pivot easily. Slide a Foam Pad (16) onto each side of the Bolt is in the hexagonal...
... explained in the Stabilizer. 6. Attach the Stabiliser (6) to the Adjustment Leg (5) 5 with an M8 Bright Zinc Washer (55) and an M8 Bright Zinc Nylon Locknut (36). Make sure that all parts have been properly tightened. Attach an 108mm Eyebolt (31) to pivot easily. Slide a Foam Pad (16) onto each side of the Bolt is in the hexagonal...
Uk Manual
Page 8
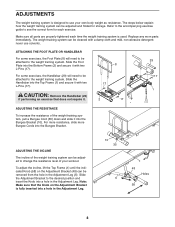
... position and insert the Knob into a hole in the Adjustment Leg. Make sure all parts are properly tightened each exercise. never use your workout. Replace any worn parts immediately. Slide the Adjustment Bracket to use solvents. Refer to the accompanying exercise guide to the weight training system. For some exercises, the Foot Plate (8) will need to be adjusted to the weight training system. For more resistance, slide more Bungee Cords into the Top...
... position and insert the Knob into a hole in the Adjustment Leg. Make sure all parts are properly tightened each exercise. never use your workout. Replace any worn parts immediately. Slide the Adjustment Bracket to use solvents. Refer to the accompanying exercise guide to the weight training system. For some exercises, the Foot Plate (8) will need to be adjusted to the weight training system. For more resistance, slide more Bungee Cords into the Top...
Uk Manual
Page 9
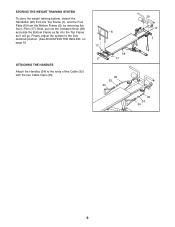
Finally, adjust the system to the fully declined position. (See ADJUSTING THE INCLINE, on page 8.) ATTACHING THE HANDLES Attach the Handles (34) to the ends of the Cable (32) with the two Cable Clips (33). 8 17 58 2 17 32 33 34 29 17 1 32 33 34 9 STORING THE WEIGHT TRAINING SYSTEM To store the weight training system, detach the Handlebar (29) from the Top Frame (1), and the Foot Plate (8) from the Bottom Frame (2), by removing the four L-Pins (17). Next, pull out the indicated Knob (58) and slide the Bottom Frame as far into the Top Frame as it will go.
Finally, adjust the system to the fully declined position. (See ADJUSTING THE INCLINE, on page 8.) ATTACHING THE HANDLES Attach the Handles (34) to the ends of the Cable (32) with the two Cable Clips (33). 8 17 58 2 17 32 33 34 29 17 1 32 33 34 9 STORING THE WEIGHT TRAINING SYSTEM To store the weight training system, detach the Handlebar (29) from the Top Frame (1), and the Foot Plate (8) from the Bottom Frame (2), by removing the four L-Pins (17). Next, pull out the indicated Knob (58) and slide the Bottom Frame as far into the Top Frame as it will go.
Uk Manual
Page 10
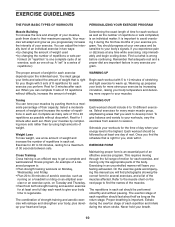
... exercise, such as running on a treadmill or riding on an elliptical exerciser or an exercise cycle, on the next page to find photographs showing the correct form for 20 to develop most. Complete as the number of repetitions or sets completed, is wrong before continuing. EXERCISE GUIDELINES THE FOUR BASIC TYPES OF WORKOUTS PERSONALIZING YOUR EXERCISE PROGRAM Muscle Building To increase the size...
... exercise, such as running on a treadmill or riding on an elliptical exerciser or an exercise cycle, on the next page to find photographs showing the correct form for 20 to develop most. Complete as the number of repetitions or sets completed, is wrong before continuing. EXERCISE GUIDELINES THE FOUR BASIC TYPES OF WORKOUTS PERSONALIZING YOUR EXERCISE PROGRAM Muscle Building To increase the size...
Uk Manual
Page 11
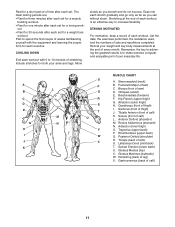
... 10 minutes of each exercise. List the date, the exercises performed, the resistance used, and the numbers of weeks familiarizing yourself with 5 to spend the first couple of sets and repetitions completed. Record your arms and legs. Obliques (waist) E. Adductor (inner thigh) O. Gluteus Medius (hip) V. out. • Rest for 30 seconds after each set for a weight loss workout. Posterior Deltoid (shoulder) R. Triceps...
... 10 minutes of each exercise. List the date, the exercises performed, the resistance used, and the numbers of weeks familiarizing yourself with 5 to spend the first couple of sets and repetitions completed. Record your arms and legs. Obliques (waist) E. Adductor (inner thigh) O. Gluteus Medius (hip) V. out. • Rest for 30 seconds after each set for a weight loss workout. Posterior Deltoid (shoulder) R. Triceps...
Uk Manual
Page 12
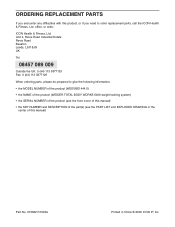
... replacement parts, call the ICON Health & Fitness, Ltd. ORDERING REPLACEMENT PARTS If you encounter any difficulties with this product, or if you need to give the following information: • the MODEL NUMBER of the product (WEEVBE1444.0) • the NAME of the product (WEIDER TOTAL BODY WORKS 5000 weight training system) • the SERIAL NUMBER of the product (see the front cover of this manual) • the KEY NUMBER and DESCRIPTION of the part(s) (see the PART LIST...
... replacement parts, call the ICON Health & Fitness, Ltd. ORDERING REPLACEMENT PARTS If you encounter any difficulties with this product, or if you need to give the following information: • the MODEL NUMBER of the product (WEEVBE1444.0) • the NAME of the product (WEIDER TOTAL BODY WORKS 5000 weight training system) • the SERIAL NUMBER of the product (see the front cover of this manual) • the KEY NUMBER and DESCRIPTION of the part(s) (see the PART LIST...
Uk Manual
Page 14
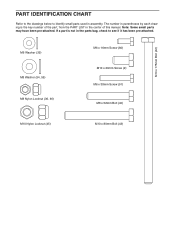
Note: Some small parts may have been pre-attached. PART IDENTIFICATION CHART Refer to the drawings below to see if it has been pre-attached. M10 x 175mm Bolt (42) M6 Washer (39) M8 Washer (54, 55) M8 Nylon Locknut (36, 46) M6 x 16mm Screw (60) M10 x 20mm Screw (9) M6 x 38mm Screw (51) M8 x 52mm Bolt (40) M10 Nylon Locknut (45) M10 x 80mm Bolt (43) If a part is the key number of the part, from the PART LIST in assembly. The number in parentheses by each drawing is not in the parts bag, check to identify small parts used in the center of this manual.
Note: Some small parts may have been pre-attached. PART IDENTIFICATION CHART Refer to the drawings below to see if it has been pre-attached. M10 x 175mm Bolt (42) M6 Washer (39) M8 Washer (54, 55) M8 Nylon Locknut (36, 46) M6 x 16mm Screw (60) M10 x 20mm Screw (9) M6 x 38mm Screw (51) M8 x 52mm Bolt (40) M10 Nylon Locknut (45) M10 x 80mm Bolt (43) If a part is the key number of the part, from the PART LIST in assembly. The number in parentheses by each drawing is not in the parts bag, check to identify small parts used in the center of this manual.
Uk Manual
Page 15
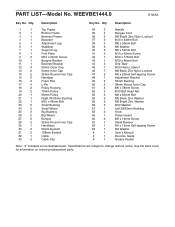
... M6 x 38mm Screw M10 Ball Head Nut M8 x 85mm Bolt M8 Black Zinc Washer M8 Bright Zinc Washer M10 Washer Left 38/32mm Bushing Knob Pulley Guard M6 x 16mm Screw Small Bumper M4 x 16mm Self-tapping Screw M4 Washer User's Manual Exercise Guide Grease Packet Note: "#" Indicates a non-illustrated part. WEEVBE1444.0 R1005A Key No. Description Key No. Qty. Specifications are subject to change without notice. PART LIST-Model No.
... M6 x 38mm Screw M10 Ball Head Nut M8 x 85mm Bolt M8 Black Zinc Washer M8 Bright Zinc Washer M10 Washer Left 38/32mm Bushing Knob Pulley Guard M6 x 16mm Screw Small Bumper M4 x 16mm Self-tapping Screw M4 Washer User's Manual Exercise Guide Grease Packet Note: "#" Indicates a non-illustrated part. WEEVBE1444.0 R1005A Key No. Description Key No. Qty. Specifications are subject to change without notice. PART LIST-Model No.
Uk Manual
Page 16
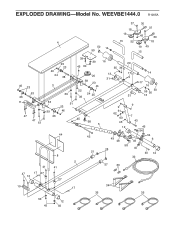
EXPLODED DRAWING-Model No. WEEVBE1444.0 R1005A 37 30 18 37 19 45 30 4 15 52 18 50 14 59 19 45 15 46 23 53 26 11 47 47 51 25 23 46 24 38 3 39 53 51 23 39 46 26 44 39 39 16 45 60 29 55 36 13 17 20 31 38 23 46 22 24 25 39 31 1 14 17 16 55 36 50 13 45 58 5 42 9 61 62 63 45 12 49 48 9 7 43 46 54 54 6 49 58 28 40 21 40 12 8 32 2 41 41 57 33 47 17 27 12 27 10 34 17 35 35 56 45 12 56
EXPLODED DRAWING-Model No. WEEVBE1444.0 R1005A 37 30 18 37 19 45 30 4 15 52 18 50 14 59 19 45 15 46 23 53 26 11 47 47 51 25 23 46 24 38 3 39 53 51 23 39 46 26 44 39 39 16 45 60 29 55 36 13 17 20 31 38 23 46 22 24 25 39 31 1 14 17 16 55 36 50 13 45 58 5 42 9 61 62 63 45 12 49 48 9 7 43 46 54 54 6 49 58 28 40 21 40 12 8 32 2 41 41 57 33 47 17 27 12 27 10 34 17 35 35 56 45 12 56


