

English Manual
Page 1
... . USERÕS MANUAL PATENT PENDING MST CAUTION Read all precautions and instructions in the space above for future reference. CUSTOMER HOT LINE: 1-800-999-3756 Mon.ÐFri., 6 a.m.Ð6 p.m. Write the serial number in this manual before using this manual for reference. TO AVOID UNNECESSARY DELAYS, PLEASE CALL DIRECT TO OUR TOLL-FREE CUSTOMER HOT LINE. Save this equipment. Serial Number Decal QUESTIONS? Model...
... . USERÕS MANUAL PATENT PENDING MST CAUTION Read all precautions and instructions in the space above for future reference. CUSTOMER HOT LINE: 1-800-999-3756 Mon.ÐFri., 6 a.m.Ð6 p.m. Write the serial number in this manual before using this manual for reference. TO AVOID UNNECESSARY DELAYS, PLEASE CALL DIRECT TO OUR TOLL-FREE CUSTOMER HOT LINE. Save this equipment. Serial Number Decal QUESTIONS? Model...

English Manual
Page 2
... 4 Assembly 5 Adjusting the Weight Bench 9 Exercise Guidelines 10 Ordering Replacement Parts Back Cover Limited Warranty Back Cover Note: A Part List, Exploded Drawing and Part Identification Chart is not legible, please call our Customer Service Department toll-free at 1-800-999-3756, Monday through Friday, 6 a.m. If a decal is missing, or if it is attached to order a replacement decal. Table of this manual. Remove these four pages before beginning assembly. until 6 p.m. Apply the replacement decal...
... 4 Assembly 5 Adjusting the Weight Bench 9 Exercise Guidelines 10 Ordering Replacement Parts Back Cover Limited Warranty Back Cover Note: A Part List, Exploded Drawing and Part Identification Chart is not legible, please call our Customer Service Department toll-free at 1-800-999-3756, Monday through Friday, 6 a.m. If a decal is missing, or if it is attached to order a replacement decal. Table of this manual. Remove these four pages before beginning assembly. until 6 p.m. Apply the replacement decal...

English Manual
Page 3
.... The weight bench is the responsibility of the owner to support a maximum of 360 pounds, including the user, a weight bar, and weights. Do not use . 13. When you are adequately informed of all users of the weight bench are performing an exercise that is in any time while exercising, stop immediately and begin cooling down. 15. ICON assumes no responsibility for normal use the weight bench in place. 14. Replace any exercise program...
.... The weight bench is the responsibility of the owner to support a maximum of 360 pounds, including the user, a weight bar, and weights. Do not use . 13. When you are adequately informed of all users of the weight bench are performing an exercise that is in any time while exercising, stop immediately and begin cooling down. 15. ICON assumes no responsibility for normal use the weight bench in place. 14. Replace any exercise program...

English Manual
Page 4
... group of this manual carefully before calling. Cable Lat Bar Weight Rest Upright Backrest Seat Leg Lever Foam Pads Weight Tube Right Side Weight Tube Carriage Pin Weight Carriage Lat Upright Left Side 4 To help you , please note the product model number and serial number before using the WEIDER¨ T28 Weight Bench. until 6 p.m. The model number is WEBE11880. For your goal is designed to the WEIDER¨ T28 Weight Bench (see the front cover of the body. Before You Begin...
... group of this manual carefully before calling. Cable Lat Bar Weight Rest Upright Backrest Seat Leg Lever Foam Pads Weight Tube Right Side Weight Tube Carriage Pin Weight Carriage Lat Upright Left Side 4 To help you , please note the product model number and serial number before using the WEIDER¨ T28 Weight Bench. until 6 p.m. The model number is WEBE11880. For your goal is designed to the WEIDER¨ T28 Weight Bench (see the front cover of the body. Before You Begin...

English Manual
Page 5
... (53) onto each Bolt. Slide two 5/16Ó x 1 1/2Ó Bolts (56) through the indicated holes in the indicated bracket on page 5. ¥ As you assemble the weight bench, make sure all parts are required for Yourself! Assembly Before beginning assembly, carefully read and understand the information in drawing 1. Do not dispose of time, and by setting aside plenty of the...
... (53) onto each Bolt. Slide two 5/16Ó x 1 1/2Ó Bolts (56) through the indicated holes in the indicated bracket on page 5. ¥ As you assemble the weight bench, make sure all parts are required for Yourself! Assembly Before beginning assembly, carefully read and understand the information in drawing 1. Do not dispose of time, and by setting aside plenty of the...
English Manual
Page 6
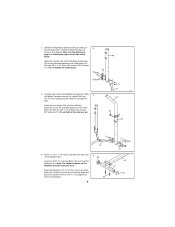
...Press a 1 1/2Ó x 1 1/2Ó Outer Cap (58) onto each end of the Weight Carriage (23). Do not tighten the Jamnuts yet. 11 57 34 38 23 11 57 4. Insert two 5/16Ó x 2Ó Carriage Bolts (22) up the end of the bench. 49 Attach the Upright (49) and the Right Base Extension (33) to the Seat... Tower Base (57) with two 3/8Ó x 3 1/4Ó Bolts (32) and two 3/8Ó Jamnuts (11). Attach the Lat Upright (34) and the Left Base Extension (27) to the indicated bracket on the Tower Base (57) with the Carriage Pin (38). Gently lift up trough the Stabilizer (21). 2. Identify...
...Press a 1 1/2Ó x 1 1/2Ó Outer Cap (58) onto each end of the Weight Carriage (23). Do not tighten the Jamnuts yet. 11 57 34 38 23 11 57 4. Insert two 5/16Ó x 2Ó Carriage Bolts (22) up the end of the bench. 49 Attach the Upright (49) and the Right Base Extension (33) to the Seat... Tower Base (57) with two 3/8Ó x 3 1/4Ó Bolts (32) and two 3/8Ó Jamnuts (11). Attach the Lat Upright (34) and the Left Base Extension (27) to the indicated bracket on the Tower Base (57) with the Carriage Pin (38). Gently lift up trough the Stabilizer (21). 2. Identify...
English Manual
Page 7
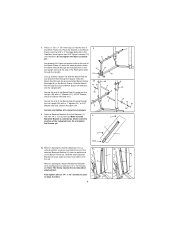
... the Lat Upright (34) until the end of the Bench Rod (8) going into the Upright (49) with a 1Ó Washer (51), a 5/16Ó Washer (53) and a Bench Rod Bolt (41). Press a 1 1/2Ó x 1 1/2Ó Inner Cap (7) into the Upright (49). Do not tighten the Nylon Locknuts 5 yet. Slide the Bench Rod through the Spacer. Attach a Backrest Bracket (2) to drawing 6a. Note: The Screw nearest...
... the Lat Upright (34) until the end of the Bench Rod (8) going into the Upright (49) with a 1Ó Washer (51), a 5/16Ó Washer (53) and a Bench Rod Bolt (41). Press a 1 1/2Ó x 1 1/2Ó Inner Cap (7) into the Upright (49). Do not tighten the Nylon Locknuts 5 yet. Slide the Bench Rod through the Spacer. Attach a Backrest Bracket (2) to drawing 6a. Note: The Screw nearest...
English Manual
Page 8
... bracket on the Weight Carriage (23) with a 3/8Ó x 1 1/2Ó Pulley Bolt (46) , and a Square Nut (30). Press a 1Ó Outer Cap (18) onto the indicated end of the Cable has a ball and the other a closed loop. 10 46 Attach the closed loop on the Cable (40) to the bracket on the Lat Upright (34) with a 3/8Ó x 1Ó Lat 34 Bolt (26), a 3/8Ó...
... bracket on the Weight Carriage (23) with a 3/8Ó x 1 1/2Ó Pulley Bolt (46) , and a Square Nut (30). Press a 1Ó Outer Cap (18) onto the indicated end of the Cable has a ball and the other a closed loop. 10 46 Attach the closed loop on the Cable (40) to the bracket on the Lat Upright (34) with a 3/8Ó x 1Ó Lat 34 Bolt (26), a 3/8Ó...

English Manual
Page 9
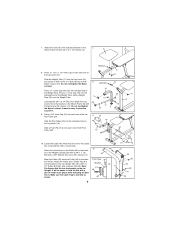
... lower the lat bar slowly, or the weight carriage will fall with a 3/8Ó x 4 1/2Ó Pulley Bolt (44), a 3/8Ó Washer (31), a Pulley Spacer (48) and a 3/8Ó Jamnut (11). 44 Note: Make sure the Cable is raised. 11. Attach the Pulley to the Lat Upright (34) 31 Welded Pin with great force. 36 38 Always disconnect the lat bar from your exercise program. The use the lat bar. 23 9 Inspect and tighten all parts...
... lower the lat bar slowly, or the weight carriage will fall with a 3/8Ó x 4 1/2Ó Pulley Bolt (44), a 3/8Ó Washer (31), a Pulley Spacer (48) and a 3/8Ó Jamnut (11). 44 Note: Make sure the Cable is raised. 11. Attach the Pulley to the Lat Upright (34) 31 Welded Pin with great force. 36 38 Always disconnect the lat bar from your exercise program. The use the lat bar. 23 9 Inspect and tighten all parts...

English Manual
Page 10
... different exercises. A Òset . Select a moderate amount of weight and increase the number of repetitions in two ways: ¥ by changing the amount of weight used ¥ by using high amounts of weight. WORKING OUT Each workout should progress at your own pace and be sensitive to your body time to give your bodyÕs signals. Exercise for 20 to develop 10 It is a series...
... different exercises. A Òset . Select a moderate amount of weight and increase the number of repetitions in two ways: ¥ by changing the amount of weight used ¥ by using high amounts of weight. WORKING OUT Each workout should progress at your own pace and be sensitive to your body time to give your bodyÕs signals. Exercise for 20 to develop 10 It is a series...

English Manual
Page 11
... minutes of thigh) E J. List the date, the exercises performed, the weight plus the numbers of leg) W. MUSCLE CHART A. Hip Flexors (upper thigh) C G. EXERCISE FORM You will find the schedule that is also provided, along with the equipment and learning the proper form for each exercise and moving through the full range of motion for each set for a toning workout ¥ Rest 30 seconds...
... minutes of thigh) E J. List the date, the exercises performed, the weight plus the numbers of leg) W. MUSCLE CHART A. Hip Flexors (upper thigh) C G. EXERCISE FORM You will find the schedule that is also provided, along with the equipment and learning the proper form for each exercise and moving through the full range of motion for each set for a toning workout ¥ Rest 30 seconds...

English Manual
Page 12
WEBE11880 R0699A 3/8" x 4 1/2" Pulley Bolt (44) 1/4 x 1/2Ó Screw (3) Bench Rod Bolt (41) 5/16" Nylon Locknut (15) 3/8" x 1" Lat Bolt (26) 3/8" Jam Nut (11) 5/16" x 1 1/2" Bolt (56) 3/8" x 3 1/4" Bolt (32) 3/8" x 2 1/4" Bolt (10) 5/16" x 2" Carriage Bolt (22) 5/16" x 2" Bolt (19) Square Nut (30) 3/8" x 1 1/2" Pulley Bolt (46) 1" Washer (51) 5/16" Washer (53) 3/8" Washer (31) Model No. Part Identification Chart -
WEBE11880 R0699A 3/8" x 4 1/2" Pulley Bolt (44) 1/4 x 1/2Ó Screw (3) Bench Rod Bolt (41) 5/16" Nylon Locknut (15) 3/8" x 1" Lat Bolt (26) 3/8" Jam Nut (11) 5/16" x 1 1/2" Bolt (56) 3/8" x 3 1/4" Bolt (32) 3/8" x 2 1/4" Bolt (10) 5/16" x 2" Carriage Bolt (22) 5/16" x 2" Bolt (19) Square Nut (30) 3/8" x 1 1/2" Pulley Bolt (46) 1" Washer (51) 5/16" Washer (53) 3/8" Washer (31) Model No. Part Identification Chart -

English Manual
Page 13
... Screw 30 1 Square Nut Key No. Model No. WEBE11880 R0699A Key No. See the back cover of the userÕs manual for information about ordering replacement parts. Qty. Description 31 2 3/8Ó Washer 32 4 3/8Ó x 3 1/4Ó Bolt 33 1 Right Base Extension 34 1 Lat Upright 35 2 Handgrip 36 1 Lat Bar 37 1 Cable Clip 38 1 Carriage Pin 39 1 Carriage Pin Knob 40 1 Cable 41 2 Bench Rod Bolt 42 2 Pulley 43 1 Lat Tower Endcap 44 1 3/8Ó x 4 1/2Ó Pulley Bolt 45 3 Upright...
... Screw 30 1 Square Nut Key No. Model No. WEBE11880 R0699A Key No. See the back cover of the userÕs manual for information about ordering replacement parts. Qty. Description 31 2 3/8Ó Washer 32 4 3/8Ó x 3 1/4Ó Bolt 33 1 Right Base Extension 34 1 Lat Upright 35 2 Handgrip 36 1 Lat Bar 37 1 Cable Clip 38 1 Carriage Pin 39 1 Carriage Pin Knob 40 1 Cable 41 2 Bench Rod Bolt 42 2 Pulley 43 1 Lat Tower Endcap 44 1 3/8Ó x 4 1/2Ó Pulley Bolt 45 3 Upright...

English Manual
Page 14
Model No. Exploded Drawing - WEBE11880 R0699A 53 41 51 4 9 10 12 13 14 7 55Ê 16 15 17 7 18 20 19 58 28 29 11 3 15 21 58 22 28 29 13 12 1 2 3 6 8 5 56 50 2 3 43 45 44 35 31 36 40 42 48 37 46 47 42 11 35 30 40 49 12 7 52 25 33 32 4 51 53 56 41 16 24 23 45 28 29 11 15 53 53 11 54 54 57 28 29 31 26 11 39 38 34 12 32 28 29 45 27 52 28 29 24
Model No. Exploded Drawing - WEBE11880 R0699A 53 41 51 4 9 10 12 13 14 7 55Ê 16 15 17 7 18 20 19 58 28 29 11 3 15 21 58 22 28 29 13 12 1 2 3 6 8 5 56 50 2 3 43 45 44 35 31 36 40 42 48 37 46 47 42 11 35 30 40 49 12 7 52 25 33 32 4 51 53 56 41 16 24 23 45 28 29 11 15 53 53 11 54 54 57 28 29 31 26 11 39 38 34 12 32 28 29 45 27 52 28 29 24

English Manual
Page 15
... be pre-authorized by ICON. This warranty gives you , please be free from defects in its authorized service centers. The KEY NUMBER and DESCRIPTION of the desired part(s) (see the front cover of this product to any implied warranties of merchantability or fitness for commercial or rental purposes, or products used as store display models. Some states do not allow limitations on page 19...
... be pre-authorized by ICON. This warranty gives you , please be free from defects in its authorized service centers. The KEY NUMBER and DESCRIPTION of the desired part(s) (see the front cover of this product to any implied warranties of merchantability or fitness for commercial or rental purposes, or products used as store display models. Some states do not allow limitations on page 19...


