
English Manual
Page 2
...PRECAUTIONS 3 BEFORE YOU BEGIN 4 ASSEMBLY 5 HOW TO USE THE TRAINING SYSTEM 21 WEIGHT RESISTANCE CHART 23 TROUBLE-SHOOTING AND MAINTENANCE 24 CABLE DIAGRAMS 25 ORDERING REPLACEMENT PARTS Back Cover Note: A PART IDENTIFICATION CHART and a PART LIST/EXPLODED DRAWING are attached in the center of purchase.... No other consequential damages of incidental or consequential damages. Accordingly, the above limitation may not apply to the original purchaser. WEIDER is made must be received by ICON. All products for indirect, special or consequential damages arising out of or in its ...
...PRECAUTIONS 3 BEFORE YOU BEGIN 4 ASSEMBLY 5 HOW TO USE THE TRAINING SYSTEM 21 WEIGHT RESISTANCE CHART 23 TROUBLE-SHOOTING AND MAINTENANCE 24 CABLE DIAGRAMS 25 ORDERING REPLACEMENT PARTS Back Cover Note: A PART IDENTIFICATION CHART and a PART LIST/EXPLODED DRAWING are attached in the center of purchase.... No other consequential damages of incidental or consequential damages. Accordingly, the above limitation may not apply to the original purchaser. WEIDER is made must be received by ICON. All products for indirect, special or consequential damages arising out of or in its ...
English Manual
Page 11
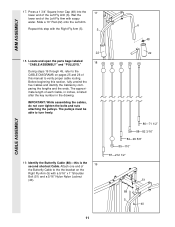
... verify proper cable routing. ARM ASSEMBLY 17. During steps 19 through 45, refer to turn freely. 19. The pulleys must be able to the CABLE DIAGRAMS on the Right Fly Arm (5) with the Right Fly Arm (5). 5 6 48 CABLE ASSEMBLY 22 18. Press a 1 3/4" Square Inner Cap (48) into the 17 lower end...
... verify proper cable routing. ARM ASSEMBLY 17. During steps 19 through 45, refer to turn freely. 19. The pulleys must be able to the CABLE DIAGRAMS on the Right Fly Arm (5) with the Right Fly Arm (5). 5 6 48 CABLE ASSEMBLY 22 18. Press a 1 3/4" Square Inner Cap (48) into the 17 lower end...

English Manual
Page 20
... 1/4" Washer (37) and a 1/4" x 2 1/2" Machine Screw (64). Make sure that the cables move smoothly, find and correct the problem. See the CABLE DIAGRAMS on page 24. 20 MISC. If there is any slack in HOW TO USE THE TRAINING SYSTEM, beginning on page 21 of this manual. Attach...two 1/4" x 3/4" Screws (59). Attach the Curl Pad (11) to the Press Upright (4) above the warning decal, where shown. 51 64 37 WEIDER 9300 4 PRO decal 19 SEAT ASSEMBLY 52. 50. IMPORTANT: If the cables are not properly installed, they may be explained in the cables, you will be damaged...
... 1/4" Washer (37) and a 1/4" x 2 1/2" Machine Screw (64). Make sure that the cables move smoothly, find and correct the problem. See the CABLE DIAGRAMS on page 24. 20 MISC. If there is any slack in HOW TO USE THE TRAINING SYSTEM, beginning on page 21 of this manual. Attach...two 1/4" x 3/4" Screws (59). Attach the Curl Pad (11) to the Press Upright (4) above the warning decal, where shown. 51 64 37 WEIDER 9300 4 PRO decal 19 SEAT ASSEMBLY 52. 50. IMPORTANT: If the cables are not properly installed, they may be explained in the cables, you will be damaged...
English Manual
Page 25
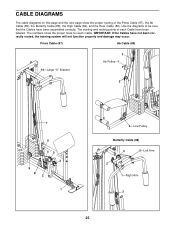
... Press Cable (87) Ab Cable (85) 10-Large "U" Bracket 3 Ab Pulley-1 2 7 6 45 3 9 8 2 1 4-Low Pulley Butterfly Cable (88) 4 5-Left Arm 2 1-Right Arm 3 25 Use the diagrams to be sure that the Cables have not been correctly routed, the training system will not function properly and damage may occur. The numbers show... the proper routing of each Cable. CABLE DIAGRAMS The cable diagrams on this page and the next page show the proper route for each Cable have been labeled.
... Press Cable (87) Ab Cable (85) 10-Large "U" Bracket 3 Ab Pulley-1 2 7 6 45 3 9 8 2 1 4-Low Pulley Butterfly Cable (88) 4 5-Left Arm 2 1-Right Arm 3 25 Use the diagrams to be sure that the Cables have not been correctly routed, the training system will not function properly and damage may occur. The numbers show... the proper routing of each Cable. CABLE DIAGRAMS The cable diagrams on this page and the next page show the proper route for each Cable have been labeled.

