
English Manual
Page 1
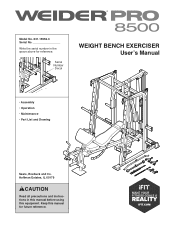
Serial Number Decal WEIGHT BENCH EXERCISER User's Manual • Assembly • Operation • Maintenance • Part List and Drawing Sears, Roebuck and Co. Keep this equipment. Model No. 831.15962.0 Serial No. Hoffman Estates, IL 60179 CAUTION Read all precautions and instructions in the space above for future reference. Write the serial number in this manual before using this manual for reference.
Serial Number Decal WEIGHT BENCH EXERCISER User's Manual • Assembly • Operation • Maintenance • Part List and Drawing Sears, Roebuck and Co. Keep this equipment. Model No. 831.15962.0 Serial No. Hoffman Estates, IL 60179 CAUTION Read all precautions and instructions in the space above for future reference. Write the serial number in this manual before using this manual for reference.
English Manual
Page 2
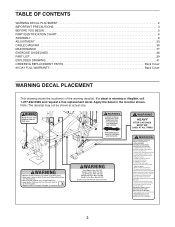
If a decal is missing or illegible, call 1-877-992-5999 and request a free replacement decal. Note: The decal(s) may not be shown at actual size. 2 Apply the decal in the location shown. TABLE OF CONTENTS WARNING DECAL PLACEMENT 2 IMPORTANT PRECAUTIONS 3 BEFORE YOU BEGIN 5 PART IDENTIFICATION CHART 6 ASSEMBLY 8 ADJUSTMENT 33 CABLE DIAGRAM 36 MAINTENANCE 37 EXERCISE GUIDELINES 38 PART LIST 39 EXPLODED DRAWING 41 ORDERING REPLACEMENT PARTS Back Cover 90 DAY FULL WARRANTY Back Cover WARNING DECAL PLACEMENT This drawing shows the location(s) of the warning decal(s).
If a decal is missing or illegible, call 1-877-992-5999 and request a free replacement decal. Note: The decal(s) may not be shown at actual size. 2 Apply the decal in the location shown. TABLE OF CONTENTS WARNING DECAL PLACEMENT 2 IMPORTANT PRECAUTIONS 3 BEFORE YOU BEGIN 5 PART IDENTIFICATION CHART 6 ASSEMBLY 8 ADJUSTMENT 33 CABLE DIAGRAM 36 MAINTENANCE 37 EXERCISE GUIDELINES 38 PART LIST 39 EXPLODED DRAWING 41 ORDERING REPLACEMENT PARTS Back Cover 90 DAY FULL WARRANTY Back Cover WARNING DECAL PLACEMENT This drawing shows the location(s) of the warning decal(s).
English Manual
Page 3
... while using the weight bench. The weight bench is intended for home use the weight bench. The weight bench is not intended for use by persons with pre-existing health problems. 3. Do not put the weight bench in this manual. 5. Place the weight bench on both ends of 300 lbs. (136 kg). Replace any worn parts immediately. 9. Wear appropriate clothes while exercising; do not wear loose clothes that all precautions. 2. The weight bench is used...
... while using the weight bench. The weight bench is intended for home use the weight bench. The weight bench is not intended for use by persons with pre-existing health problems. 3. Do not put the weight bench in this manual. 5. Place the weight bench on both ends of 300 lbs. (136 kg). Replace any worn parts immediately. 9. Wear appropriate clothes while exercising; do not wear loose clothes that all precautions. 2. The weight bench is used...
English Manual
Page 4
... your barbell if you experience pain while exercising, stop immediately and cool down. 4 Always remove the lat bar when performing an exercise that does not require the bench. 22. Always place the same amount of the weight carriage, weight bar, or barbell. 19. Always set both spotters, both barbell rests, and both ends of weight on both barbell spotters at the same...
... your barbell if you experience pain while exercising, stop immediately and cool down. 4 Always remove the lat bar when performing an exercise that does not require the bench. 22. Always place the same amount of the weight carriage, weight bar, or barbell. 19. Always set both spotters, both barbell rests, and both ends of weight on both barbell spotters at the same...
English Manual
Page 5
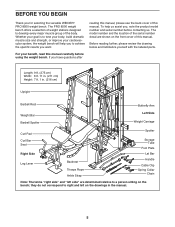
... you want. The model number and the location of this manual. they do not correspond to right and left side" are shown on the drawings in . (216 cm) Upright Barbell Rest Butterfly Arm Weight Bar Barbell Spotter Left Side Weight Carriage Curl Pad Curl Bar Seat Right Side Leg Lever Backrest Triceps Rope Ankle Strap Spotter Storage Tube Foot Plate Lat Bar Handle Cable Clip Spring Collar...
... you want. The model number and the location of this manual. they do not correspond to right and left side" are shown on the drawings in . (216 cm) Upright Barbell Rest Butterfly Arm Weight Bar Barbell Spotter Left Side Weight Carriage Curl Pad Curl Bar Seat Right Side Leg Lever Backrest Triceps Rope Ankle Strap Spotter Storage Tube Foot Plate Lat Bar Handle Cable Clip Spring Collar...

English Manual
Page 6
PART IDENTIFICATION CHART Use the drawings below each drawing is the key number of the part, from the PART LIST near the end of this manual. Note: If a part is missing, call 1-877-992-5999. Extra hardware may be included. If a part is not in parentheses below to see whether it has been preassembled. The number in the hardware kit, check to identify...
PART IDENTIFICATION CHART Use the drawings below each drawing is the key number of the part, from the PART LIST near the end of this manual. Note: If a part is missing, call 1-877-992-5999. Extra hardware may be included. If a part is not in parentheses below to see whether it has been preassembled. The number in the hardware kit, check to identify...
English Manual
Page 8
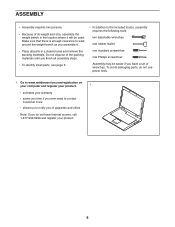
... that there is enough clearance to walk around the weight bench as you do not use power tools. 1. To avoid damaging parts, do not have a set of wrenches. Do not dispose of the packing materials until you finish all parts in the location where it . • Place all assembly steps. • To identify small parts, see page 5. • In addition to...
... that there is enough clearance to walk around the weight bench as you do not use power tools. 1. To avoid damaging parts, do not have a set of wrenches. Do not dispose of the packing materials until you finish all parts in the location where it . • Place all assembly steps. • To identify small parts, see page 5. • In addition to...
English Manual
Page 14
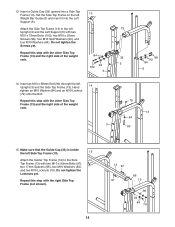
...) through the left Weight Bar Guide (5) and insert it into a Side Top Frame (13). Do not tighten the Screws yet. 13. Make sure that the Guide Cap (33) is inside the left Side Top Frame (13). 15 Attach the Center Top Frame (14) to the left Upright (3) and the Left Support (6) with two M10 x 93mm Bolts (97), two 17mm Spacers...
...) through the left Weight Bar Guide (5) and insert it into a Side Top Frame (13). Do not tighten the Screws yet. 13. Make sure that the Guide Cap (33) is inside the left Side Top Frame (13). 15 Attach the Center Top Frame (14) to the left Upright (3) and the Left Support (6) with two M10 x 93mm Bolts (97), two 17mm Spacers...

English Manual
Page 15
.... Using a plastic bag to keep your fingers clean, apply some of the included grease to an 18 M10 x 85mm Bolt (103) and to the 92 Backrest Upright (8) with the Right Arm (11). 103 12 11 79 31 Grease Grease 31 10 15 Repeat this step with two M10 x 95mm Bolts (92) and two M10 Locknuts (79). Do not tighten the...
.... Using a plastic bag to keep your fingers clean, apply some of the included grease to an 18 M10 x 85mm Bolt (103) and to the 92 Backrest Upright (8) with the Right Arm (11). 103 12 11 79 31 Grease Grease 31 10 15 Repeat this step with two M10 x 95mm Bolts (92) and two M10 Locknuts (79). Do not tighten the...

English Manual
Page 17
... the CABLE DIAGRAM on page 36 to hold the Butterfly Cable in these steps. 77 77 23. Attach the end of the Bolts, Screws, and Locknuts used in the groove of the Butterfly Cable (71) so that the Short Metal Cable Trap is facing downward as you assemble them. 23 Note: Steps 23-45 are shown from the rear. Attach the V-pulley, a Short Metal Cable Trap...
... the CABLE DIAGRAM on page 36 to hold the Butterfly Cable in these steps. 77 77 23. Attach the end of the Bolts, Screws, and Locknuts used in the groove of the Butterfly Cable (71) so that the Short Metal Cable Trap is facing downward as you assemble them. 23 Note: Steps 23-45 are shown from the rear. Attach the V-pulley, a Short Metal Cable Trap...

English Manual
Page 19
... Clip and the Locknut. Route the Low Cable (72) over a 90mm Pulley (58). Then, slide the Cable Stop (52) onto the Clip (53). 100 52 72 53 84 55 79 Next, route the Low Cable (72) through the Backrest Upright (8) and under a 90mm Pulley (58). Attach the 90mm Pulley to the Center Base 30 (2) with an M10 x 43mm Bolt (96) and an...
... Clip and the Locknut. Route the Low Cable (72) over a 90mm Pulley (58). Then, slide the Cable Stop (52) onto the Clip (53). 100 52 72 53 84 55 79 Next, route the Low Cable (72) through the Backrest Upright (8) and under a 90mm Pulley (58). Attach the 90mm Pulley to the Center Base 30 (2) with an M10 x 43mm Bolt (96) and an...

English Manual
Page 25
... 79 58 100 46. Attach the Upright Backrest (29) to the High Cable (54) as described in step 28. Route the High Cable (54) through the right Upright (3) and a Swivel Arm (32). Then, route the High Cable (54) over a 90mm Pulley (58). Attach a Cable Stop (52), a Clip (53), and an M6 Locknut (100) to the Backrest Upright (8) with an M10 x 45mm Bolt (141) and an M10...
... 79 58 100 46. Attach the Upright Backrest (29) to the High Cable (54) as described in step 28. Route the High Cable (54) through the right Upright (3) and a Swivel Arm (32). Then, route the High Cable (54) over a 90mm Pulley (58). Attach a Cable Stop (52), a Clip (53), and an M6 Locknut (100) to the Backrest Upright (8) with an M10 x 45mm Bolt (141) and an M10...
English Manual
Page 32
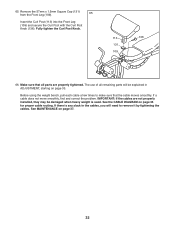
... that all remaining parts will be damaged when heavy weight is any slack in ADJUSTMENT, starting on page 33. See MAINTENANCE on page 36 for proper cable routing. See the CABLE DIAGRAM on page 37. 32 Make sure that the cable moves smoothly. If there is used. 65. Before using the weight bench, pull each cable a few times to remove it by tightening the cables. Fully tighten the Curl Post...
... that all remaining parts will be damaged when heavy weight is any slack in ADJUSTMENT, starting on page 33. See MAINTENANCE on page 36 for proper cable routing. See the CABLE DIAGRAM on page 37. 32 Make sure that the cable moves smoothly. If there is used. 65. Before using the weight bench, pull each cable a few times to remove it by tightening the cables. Fully tighten the Curl Post...
English Manual
Page 33
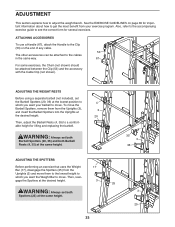
... attached to adjust the weight bench. ADJUSTING THE WEIGHT RESTS Before using a separate barbell (not included), set the Barbell Spotters (20, 36) at 3 the desired height. 20 Then, adjust the Barbell Rests (4, 35) to move. To move . ATTACHING ACCESSORIES To use a Handle (67), attach the Handle to which you want the Weight Bar to a comfortable height for lifting and replacing the barbell. ADJUSTING THE SPOTTERS Before performing an exercise...
... attached to adjust the weight bench. ADJUSTING THE WEIGHT RESTS Before using a separate barbell (not included), set the Barbell Spotters (20, 36) at 3 the desired height. 20 Then, adjust the Barbell Rests (4, 35) to move. To move . ATTACHING ACCESSORIES To use a Handle (67), attach the Handle to which you want the Weight Bar to a comfortable height for lifting and replacing the barbell. ADJUSTING THE SPOTTERS Before performing an exercise...
English Manual
Page 34
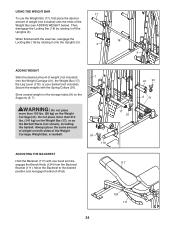
...) on the Supports (6, 7). Then, disengage the Locking Bar (18) by rotating it off the Uprights (3). USING THE WEIGHT BAR 17 To use the Weight Bar (17), first place the desired amount of weight (not included) onto the ends of the Weight Carriage, Weight Bar, or barbell. 91 110 ADJUSTING THE BACKREST Hold the Backrest (117) with one hand and disengage the Bench Knob (124) from...
...) on the Supports (6, 7). Then, disengage the Locking Bar (18) by rotating it off the Uprights (3). USING THE WEIGHT BAR 17 To use the Weight Bar (17), first place the desired amount of weight (not included) onto the ends of the Weight Carriage, Weight Bar, or barbell. 91 110 ADJUSTING THE BACKREST Hold the Backrest (117) with one hand and disengage the Bench Knob (124) from...
English Manual
Page 35
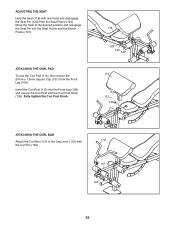
... Bench Frame (107). ATTACHING THE CURL PAD To use the Curl Pad (114), first remove the 57mm x 1.5mm Square Cap (131) from the Seat Frame (122). Fully tighten the Curl Post Knob. 116 123 122 107 114 113 131 109 136 ATTACHING THE CURL BAR Attach the Curl Bar (112) to the desired position and reengage the Seat Pin into the Front Leg...
... Bench Frame (107). ATTACHING THE CURL PAD To use the Curl Pad (114), first remove the 57mm x 1.5mm Square Cap (131) from the Seat Frame (122). Fully tighten the Curl Post Knob. 116 123 122 107 114 113 131 109 136 ATTACHING THE CURL BAR Attach the Curl Bar (112) to the desired position and reengage the Seat Pin into the Front Leg...
English Manual
Page 37
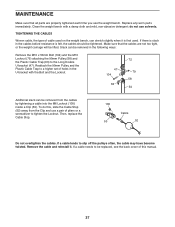
... cables should be replaced, see the back cover of cable used . do this manual. 37 Slack can stretch slightly when it . If a cable tends to be tightened. If a cable needs to slip off the pulleys often, the cable may have become twisted. TIGHTENING THE CABLES Woven cable, the type of this , slide the Cable Stop (52) away from the cables by tightening a cable into the M6 Locknut (100) inside a Clip (53). MAINTENANCE...
... cables should be replaced, see the back cover of cable used . do this manual. 37 Slack can stretch slightly when it . If a cable tends to be tightened. If a cable needs to slip off the pulleys often, the cable may have become twisted. TIGHTENING THE CABLES Woven cable, the type of this , slide the Cable Stop (52) away from the cables by tightening a cable into the M6 Locknut (100) inside a Clip (53). MAINTENANCE...
English Manual
Page 38
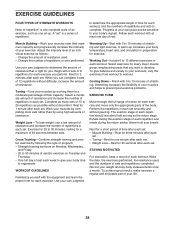
... set . Follow each workout with 5 to determine the amount of repetitions in each workout. Warming Up-Start with at your body's signals. A warm-up . The exertion stage of repetitions. Never hold your body temperature, heart rate, and circulation in each week to give balance and variety to your life. 38 Write the date, the exercises performed, the resistance used . • Change the number...
... set . Follow each workout with 5 to determine the amount of repetitions in each workout. Warming Up-Start with at your body's signals. A warm-up . The exertion stage of repetitions. Never hold your body temperature, heart rate, and circulation in each week to give balance and variety to your life. 38 Write the date, the exercises performed, the resistance used . • Change the number...
English Manual
Page 39
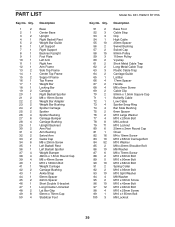
... Carriage Bushing Upright Backrest Arm Pad Arm Bushing Swivel Arm Guide Cap M8 x 20mm Screw Left Barbell Rest Left Barbell Spotter Weight Bumper 48mm x 1.5mm Round Cap M6 x 40mm Screw M10 x 180mm Bolt Weight Carriage Carriage Bushing Ankle Strap 50mm Spacer 24mm Spacer Short Double U-bracket Long Double U-bracket Lat Bar Grip 50mm x 75mm Cap Stabilizer Foot Model No. 831.15962.0 R1115A Key No. Qty...
... Carriage Bushing Upright Backrest Arm Pad Arm Bushing Swivel Arm Guide Cap M8 x 20mm Screw Left Barbell Rest Left Barbell Spotter Weight Bumper 48mm x 1.5mm Round Cap M6 x 40mm Screw M10 x 180mm Bolt Weight Carriage Carriage Bushing Ankle Strap 50mm Spacer 24mm Spacer Short Double U-bracket Long Double U-bracket Lat Bar Grip 50mm x 75mm Cap Stabilizer Foot Model No. 831.15962.0 R1115A Key No. Qty...
English Manual
Page 40
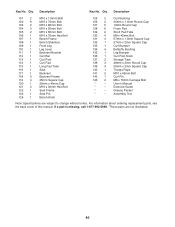
... Bushing Leg Bumper Curl Post Knob Storage Tube 48mm x 2mm Round Cap 50mm x 2mm Square Cap Triceps Rope M10 x 45mm Bolt Curl Pin M8 x 70mm Carriage Bolt User's Manual Exercise Guide Grease Packet Assembly Tool Note: Specifications are not illustrated. 40 If a part is missing, call 1-877-992-5999. *These parts are subject to change without notice. For information about ordering replacement parts, see the back cover of this manual. Qty. Key...
... Bushing Leg Bumper Curl Post Knob Storage Tube 48mm x 2mm Round Cap 50mm x 2mm Square Cap Triceps Rope M10 x 45mm Bolt Curl Pin M8 x 70mm Carriage Bolt User's Manual Exercise Guide Grease Packet Assembly Tool Note: Specifications are not illustrated. 40 If a part is missing, call 1-877-992-5999. *These parts are subject to change without notice. For information about ordering replacement parts, see the back cover of this manual. Qty. Key...


