
English Manual
Page 2
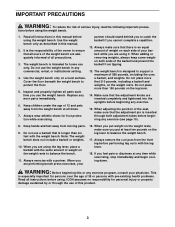
... WARRANTY Back Cover WARNING DECAL PLACEMENT The decal shown at 1-800-999-3756, Monday through Friday, 6 a.m. WEIDER is missing or illegible, please call our Customer Service Department tollfree at the right has been placed on the weight bench in the location shown. Mountain Time, to order a free replacement decal. until 6 p.m. If the decal...
... WARRANTY Back Cover WARNING DECAL PLACEMENT The decal shown at 1-800-999-3756, Monday through Friday, 6 a.m. WEIDER is missing or illegible, please call our Customer Service Department tollfree at the right has been placed on the weight bench in the location shown. Mountain Time, to order a free replacement decal. until 6 p.m. If the decal...
English Manual
Page 3
... WARNING: To reduce the risk of your barbell while you feel pain or dizziness at any exercise program, consult your 16. Use the weight bench only as described in this product. 3 Replace any commercial, rental, or institutional setting. 4. Do not place more that all times. ... begin cooling down. Always make sure that is especially important for foot protection while exercising. Cover the floor beneath the weight bench to balance the weight bench. 17. If you are inserted completely and tightened into the uprights before using it. Make sure that there is inserted...
... WARNING: To reduce the risk of your barbell while you feel pain or dizziness at any exercise program, consult your 16. Use the weight bench only as described in this product. 3 Replace any commercial, rental, or institutional setting. 4. Do not place more that all times. ... begin cooling down. Always make sure that is especially important for foot protection while exercising. Cover the floor beneath the weight bench to balance the weight bench. 17. If you are inserted completely and tightened into the uprights before using it. Make sure that there is inserted...
English Manual
Page 4
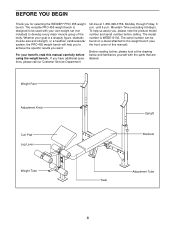
... the front cover of the body. Mountain Time (excluding holidays). To help you to achieve the specific results you for selecting the WEIDER® PRO 455 weight bench. The serial number can be used with the parts that are labeled. Before reading further, please look at 1-800-999-3756, Monday ...through Friday, 6 a.m. BEFORE YOU BEGIN Thank you want. The versatile PRO 455 weight bench is designed to be found on a decal attached to develop every major muscle group of this manual carefully before calling.
... the front cover of the body. Mountain Time (excluding holidays). To help you to achieve the specific results you for selecting the WEIDER® PRO 455 weight bench. The serial number can be used with the parts that are labeled. Before reading further, please look at 1-800-999-3756, Monday ...through Friday, 6 a.m. BEFORE YOU BEGIN Thank you want. The versatile PRO 455 weight bench is designed to be found on a decal attached to develop every major muscle group of this manual carefully before calling.
English Manual
Page 6
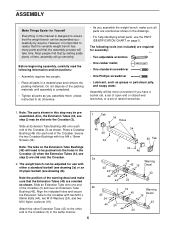
...oriented as you assemble them, unless instructed to the other Extension Tube (43) to do otherwise. • As you assemble the weight bench, make sure that the weight bench can be adjusted for assembly: • Two adjustable wrenches • One rubber mallet • One standard screwdriver • One ...34 3 45 Tab Note: The tabs on page 5. Note: The parts shown in this manual is important to realize that the versatile weight bench has many parts and that the assembly process will need to ensure that the Extension Tubes (43) are oriented as shown. The following ...
...oriented as you assemble them, unless instructed to the other Extension Tube (43) to do otherwise. • As you assemble the weight bench, make sure that the weight bench can be adjusted for assembly: • Two adjustable wrenches • One rubber mallet • One standard screwdriver • One ...34 3 45 Tab Note: The tabs on page 5. Note: The parts shown in this manual is important to realize that the versatile weight bench has many parts and that the assembly process will need to ensure that the Extension Tubes (43) are oriented as shown. The following ...
English Manual
Page 9
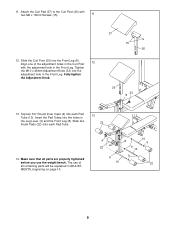
Align one of all parts are properly tightened before you use the weight bench. The use of the adjustment holes in the Curl Post 12 with two M6 x 16mm Screws (15). 11 12. Fully tighten the Adjustment Knob. 27 ...
Align one of all parts are properly tightened before you use the weight bench. The use of the adjustment holes in the Curl Post 12 with two M6 x 16mm Screws (15). 11 12. Fully tighten the Adjustment Knob. 27 ...
English Manual
Page 10
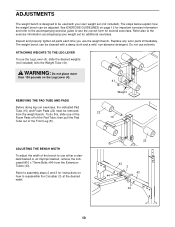
...) and Foam Pads (22) must be adjusted. Do not use the weight bench. then pull the Pad Tube out of the bench to use the Leg Lever (4), slide the desired weights (not included) onto the Weight Tube (41). Inspect and properly tighten all parts each time you use ... or an Olympic barbell, remove the indicated M10 x 73mm Bolts (44) from the weight bench. The weight bench can be removed from the Extension Tubes (43). ADJUSTMENTS The weight bench is designed to be cleaned with your weight set (not included). Refer also to reassemble the Crossbar (3) at the desired width....
...) and Foam Pads (22) must be adjusted. Do not use the weight bench. then pull the Pad Tube out of the bench to use the Leg Lever (4), slide the desired weights (not included) onto the Weight Tube (41). Inspect and properly tighten all parts each time you use ... or an Olympic barbell, remove the indicated M10 x 73mm Bolts (44) from the weight bench. The weight bench can be removed from the Extension Tubes (43). ADJUSTMENTS The weight bench is designed to be cleaned with your weight set (not included). Refer also to reassemble the Crossbar (3) at the desired width....
English Manual
Page 11
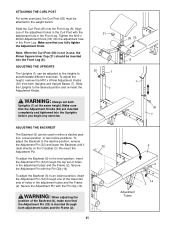
... The Uprights (1) can be used in use, the 45mm Square Inner Cap (21) should be inserted into the Front Leg (8). Slide the Uprights to the weight bench. ATTACHING THE CURL POST For some exercises, the Curl Post (26) must be attached to the desired position and re-insert the Adjustment Knobs.
... The Uprights (1) can be used in use, the 45mm Square Inner Cap (21) should be inserted into the Front Leg (8). Slide the Uprights to the weight bench. ATTACHING THE CURL POST For some exercises, the Curl Post (26) must be attached to the desired position and re-insert the Adjustment Knobs.
English Manual
Page 16
..., please be prepared to give the following information when calling: • The MODEL NUMBER of the product (WEBE13102) • The NAME of the product (WEIDER® PRO 455 weight bench) • The SERIAL NUMBER of the product (see the front cover of this manual) • The KEY NUMBER and DESCRIPTION of the desired part(s) (see...
..., please be prepared to give the following information when calling: • The MODEL NUMBER of the product (WEBE13102) • The NAME of the product (WEIDER® PRO 455 weight bench) • The SERIAL NUMBER of the product (see the front cover of this manual) • The KEY NUMBER and DESCRIPTION of the desired part(s) (see...


