

English Manual
Page 1
... hot line will guarantee complete satisfaction through direct assistance from our factory. TO AVOID UNNECESSARY DELAYS, PLEASE CALL DIRECT TO OUR TOLL-FREE CUSTOMER HOT LINE. USERÕS MANUAL Serial Number Decal QUESTIONS? Save this equipment. ¨ Model No. Patent Pending Visit our website at www.weiderfitness.com new products, prizes, fitness tips, and much more! CUSTOMER HOT LINE...
... hot line will guarantee complete satisfaction through direct assistance from our factory. TO AVOID UNNECESSARY DELAYS, PLEASE CALL DIRECT TO OUR TOLL-FREE CUSTOMER HOT LINE. USERÕS MANUAL Serial Number Decal QUESTIONS? Save this equipment. ¨ Model No. Patent Pending Visit our website at www.weiderfitness.com new products, prizes, fitness tips, and much more! CUSTOMER HOT LINE...

English Manual
Page 2
... the location shown. 2 Apply the replacement decal to order a replacement decal. Warning Decal Placement The decals shown below have been placed on the weight bench. Table of Contents Warning Decal Placement 2 Important Precautions 3 Before You Begin 4 Assembly 5 Adjusting the Weight Bench 9 Exercise Guidelines 10 Ordering Replacement Parts Back Cover Limited Warranty Back Cover Note: A Part List, Exploded Drawing, and Part Identification Chart are attached in the center of this manual. Remove these four...
... the location shown. 2 Apply the replacement decal to order a replacement decal. Warning Decal Placement The decals shown below have been placed on the weight bench. Table of Contents Warning Decal Placement 2 Important Precautions 3 Before You Begin 4 Assembly 5 Adjusting the Weight Bench 9 Exercise Guidelines 10 Ordering Replacement Parts Back Cover Limited Warranty Back Cover Note: A Part List, Exploded Drawing, and Part Identification Chart are attached in the center of this manual. Remove these four...

English Manual
Page 3
... weight bench. 1. Read all users of the weight bench are fully inserted and in the lower position, insert Cover the floor beneath the weight bench for foot protection while exercising. 8. ICON assumes no responsibility for home use the weight bench in the seat frame as described in this product. 3 It is designed to the upright position, always insert the locking pin into the hole in any time while exercising, stop...
... weight bench. 1. Read all users of the weight bench are fully inserted and in the lower position, insert Cover the floor beneath the weight bench for foot protection while exercising. 8. ICON assumes no responsibility for home use the weight bench in the seat frame as described in this product. 3 It is designed to the upright position, always insert the locking pin into the hole in any time while exercising, stop...

English Manual
Page 4
... Service Department toll-free at 1-800-999-3756, Before reading further, please review the drawing below and familiarize yourself with the parts that are determined relative to what is a shapely figure, dramatic muscle size and strength or a healthier cardiovascular system, the PRO 300se Weight Bench will help you achieve the specific results you , please note the product model number and serial number before using the WEIDER...
... Service Department toll-free at 1-800-999-3756, Before reading further, please review the drawing below and familiarize yourself with the parts that are determined relative to what is a shapely figure, dramatic muscle size and strength or a healthier cardiovascular system, the PRO 300se Weight Bench will help you achieve the specific results you , please note the product model number and serial number before using the WEIDER...

English Manual
Page 5
... important to make sure all parts as grease or petroleum jelly plus soapy water. Before assembling this manual is completed. ¥ Tighten all parts are required for assembly: ¥ Two (2) adjustable wrenches ¥ One (1) rubber mallet ¥ One (1) standard screwdriver ¥ One (1) phillips screwdriver ¥ Lubricant, such as you assemble them, unless instructed to ensure that the assembly of our products can...
... important to make sure all parts as grease or petroleum jelly plus soapy water. Before assembling this manual is completed. ¥ Tighten all parts are required for assembly: ¥ Two (2) adjustable wrenches ¥ One (1) rubber mallet ¥ One (1) standard screwdriver ¥ One (1) phillips screwdriver ¥ Lubricant, such as you assemble them, unless instructed to ensure that the assembly of our products can...

English Manual
Page 6
... M10 Nylon Locknuts (18). Locate the Front Stabilizer (3) and note the indentations around the holes. Tighten the Adjustment Knob fully into the end of the Leg (6). 1 Press a 25mm Square Inner Cap (24) into the welded nut. 1 21 6 Hole Welded Nut 23 7 6 Slide the Adjustment Leg (7) up into the indentations. Press a Square Bushing (22) onto the lower end of the sidearm...
... M10 Nylon Locknuts (18). Locate the Front Stabilizer (3) and note the indentations around the holes. Tighten the Adjustment Knob fully into the end of the Leg (6). 1 Press a 25mm Square Inner Cap (24) into the welded nut. 1 21 6 Hole Welded Nut 23 7 6 Slide the Adjustment Leg (7) up into the indentations. Press a Square Bushing (22) onto the lower end of the sidearm...

English Manual
Page 7
... Locking Pin (16) through the welded tube on the Main Frame. Place the Backrest Frame (4) onto the Main Frame (1) and line up with four M6 x 16mm Screws 7 (15). 29 4 Round Hole Adjustment Holes 1 18 28 8 4 15 15 7 Note that the bracket on the Backrest Frame (4) has four sets of oval adjustment holes and one set of adjustment...
... Locking Pin (16) through the welded tube on the Main Frame. Place the Backrest Frame (4) onto the Main Frame (1) and line up with four M6 x 16mm Screws 7 (15). 29 4 Round Hole Adjustment Holes 1 18 28 8 4 15 15 7 Note that the bracket on the Backrest Frame (4) has four sets of oval adjustment holes and one set of adjustment...

English Manual
Page 8
... following the instructions given above. 10 11 32 32 13 31 12 13 5 32 11 32 6 8 Attach the Seat (9) to the brackets on the Seat Frame (5) with an M10 Nylon Locknut (18). Slide the Pad Tube through the bracket and the welded tube in the Seat Frame. Note: The Locking Pin w/Ring (...Pad Tube (12). Tube A goes through tube B to the indicated hole in the bracket on the Leg (6) by following step. Insert the M10 x 95mm Bolt (20) through the hole in the Seat Frame. Secure the Bolt with four M6 x 16mm Screws (15). 8 20 30 5 14 25 9 Welded Tube A 26 9 15 15 14 Welded ...
... following the instructions given above. 10 11 32 32 13 31 12 13 5 32 11 32 6 8 Attach the Seat (9) to the brackets on the Seat Frame (5) with an M10 Nylon Locknut (18). Slide the Pad Tube through the bracket and the welded tube in the Seat Frame. Note: The Locking Pin w/Ring (...Pad Tube (12). Tube A goes through tube B to the indicated hole in the bracket on the Leg (6) by following step. Insert the M10 x 95mm Bolt (20) through the hole in the Seat Frame. Secure the Bolt with four M6 x 16mm Screws (15). 8 20 30 5 14 25 9 Welded Tube A 26 9 15 15 14 Welded ...
English Manual
Page 9
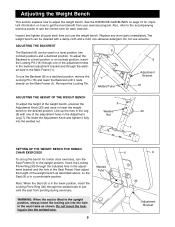
... Adjustment Knob and tighten it rests directly on how to prevent the seat from your exercise program. Insert the Locking Pin/w Ring (30) through the welded tube to get the most benefit from pivoting during exercises. Also, refer to the accompanying exercise poster to the upright position. Line up the bench for roman chair exercises, turn the Seat Frame (5) to see the correct form for important information...
... Adjustment Knob and tighten it rests directly on how to prevent the seat from your exercise program. Insert the Locking Pin/w Ring (30) through the welded tube to get the most benefit from pivoting during exercises. Also, refer to the accompanying exercise poster to the upright position. Line up the bench for roman chair exercises, turn the Seat Frame (5) to see the correct form for important information...

English Manual
Page 10
... overdoing it . When you . Toning You can complete 3 sets of 12 repetitions without pausing. Work your muscles by completing more sets rather than by increasing circulation, raising your body temperature and delivering more strenuous exercise by using high amounts of weight. Cross Training Many people desire a complete and well-balanced fitness program, and cross training is a very efficient way to your muscles. The...
... overdoing it . When you . Toning You can complete 3 sets of 12 repetitions without pausing. Work your muscles by completing more sets rather than by increasing circulation, raising your body temperature and delivering more strenuous exercise by using high amounts of weight. Cross Training Many people desire a complete and well-balanced fitness program, and cross training is a very efficient way to your muscles. The...

English Manual
Page 11
... weight and key body measurements at the end of stretching. Remember, the key to achieving the greatest results is to 10 minutes of each workout is very effective for each set . STAYING MOTIVATED For motivation, keep a record of each workout with the equipment and learning the proper form for increasing flexibility. List the date, the exercises performed, the weight plus the numbers...
... weight and key body measurements at the end of stretching. Remember, the key to achieving the greatest results is to 10 minutes of each workout is very effective for each set . STAYING MOTIVATED For motivation, keep a record of each workout with the equipment and learning the proper form for increasing flexibility. List the date, the exercises performed, the weight plus the numbers...

English Manual
Page 12
.... Part ListÐModel No. See the back cover of the userÕs manual for information about ordering replacement parts. Description Key No. Description 1 1 Main Frame 2 1 Rear Stabilizer 3 1 Front Stabilizer 4 1 Backrest Frame 5 1 Seat Frame 6 1 Leg 7 1 Adjustment Leg 8 1 Backrest 9 1 Seat 10 4 76mm Round Endcap 11 4 Foam Pad 12 1 Long Pad Tube 13 4 19mm Round Inner Cap 14 3 25mm x 50mm Inner Cap 15 8 M6 x 16mm Screw 16 1 Locking Pin 17...
.... Part ListÐModel No. See the back cover of the userÕs manual for information about ordering replacement parts. Description Key No. Description 1 1 Main Frame 2 1 Rear Stabilizer 3 1 Front Stabilizer 4 1 Backrest Frame 5 1 Seat Frame 6 1 Leg 7 1 Adjustment Leg 8 1 Backrest 9 1 Seat 10 4 76mm Round Endcap 11 4 Foam Pad 12 1 Long Pad Tube 13 4 19mm Round Inner Cap 14 3 25mm x 50mm Inner Cap 15 8 M6 x 16mm Screw 16 1 Locking Pin 17...
English Manual
Page 14
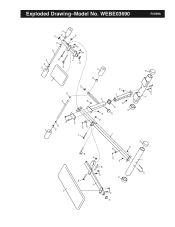
Exploded DrawingÐModel No. WEBE03690 8 29 16 4 18 15 28 14 15 25 26 10 18 18 11 32 13 19 27 17 25 26 18 18 9 31 13 18 6 24 32 11 32 13 20 30 12 14 13 32 11 5 14 18 15 15 11 1 23 22 7 18 18 10 10 2 21 3 10 21 R1099A
Exploded DrawingÐModel No. WEBE03690 8 29 16 4 18 15 28 14 15 25 26 10 18 18 11 32 13 19 27 17 25 26 18 18 9 31 13 18 6 24 32 11 32 13 20 30 12 14 13 32 11 5 14 18 15 15 11 1 23 22 7 18 18 10 10 2 21 3 10 21 R1099A

English Manual
Page 15
... Replacement Parts To order replacement parts, simply call our Customer Service Department toll-free at one of its authorized service centers. Mountain Time (excluding holidays). The NAME of the product (WEBE03690) 2. The SERIAL NUMBER of the product (see the PART LIST and the EXPLODED DRAWING in China © 1999 ICON Health & Fitness, Inc. Limited Warranty ICON Health & Fitness, Inc. (ICON), warrants this warranty is made must be prepared to you specific legal...
... Replacement Parts To order replacement parts, simply call our Customer Service Department toll-free at one of its authorized service centers. Mountain Time (excluding holidays). The NAME of the product (WEBE03690) 2. The SERIAL NUMBER of the product (see the PART LIST and the EXPLODED DRAWING in China © 1999 ICON Health & Fitness, Inc. Limited Warranty ICON Health & Fitness, Inc. (ICON), warrants this warranty is made must be prepared to you specific legal...


