
User Manual
Page 1
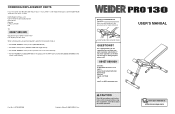
... or damaged parts, please call the ICON Health & Fitness, Ltd. If you have questions, or if there are committed to give the following information: • the MODEL NUMBER of the product (WEEVBE7035.0) • the NAME of the product (WEIDER PRO 130 weight bench) • the SERIAL NUMBER of the product (see the front cover of this manual) • the KEY NUMBER and DESCRIPTION of the part(s) (see the PART LIST and...
... or damaged parts, please call the ICON Health & Fitness, Ltd. If you have questions, or if there are committed to give the following information: • the MODEL NUMBER of the product (WEEVBE7035.0) • the NAME of the product (WEIDER PRO 130 weight bench) • the SERIAL NUMBER of the product (see the front cover of this manual) • the KEY NUMBER and DESCRIPTION of the part(s) (see the PART LIST and...
User Manual
Page 2
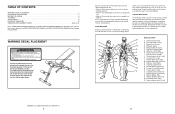
... YOU BEGIN 4 ASSEMBLY 5 ADJUSTMENTS 9 EXERCISE GUIDELINES 10 ORDERING REPLACEMENT PARTS Back Cover Note: A PART IDENTIFICATION CHART and a PART LIST/EXPLODED DRAWING are : • Rest for three minutes after each set for a muscle building workout. • Rest for one minute after each set for both your arms and legs. WARNING DECAL PLACEMENT The decal shown here has been placed on the weight bench in the location shown. If the...
... YOU BEGIN 4 ASSEMBLY 5 ADJUSTMENTS 9 EXERCISE GUIDELINES 10 ORDERING REPLACEMENT PARTS Back Cover Note: A PART IDENTIFICATION CHART and a PART LIST/EXPLODED DRAWING are : • Rest for three minutes after each set for a muscle building workout. • Rest for one minute after each set for both your arms and legs. WARNING DECAL PLACEMENT The decal shown here has been placed on the weight bench in the location shown. If the...
User Manual
Page 3
... your workouts, vary the exercises from both strength training and aerobic exercise for a maximum of their maximum capacity. Warming up . This requires moving parts. 9. When the seat is important. A "set . Once you , stick with 3 sets of rest. Proper breathing is in each repetition should be sensitive to prevent the seat from the weight bench at least one sit-up. Inspect and tighten all instructions before using . ICON...
... your workouts, vary the exercises from both strength training and aerobic exercise for a maximum of their maximum capacity. Warming up . This requires moving parts. 9. When the seat is important. A "set . Once you , stick with 3 sets of rest. Proper breathing is in each repetition should be sensitive to prevent the seat from the weight bench at least one sit-up. Inspect and tighten all instructions before using . ICON...

User Manual
Page 4
... your exercise program. The serial number can be found on the front cover of the upper body. SETTING UP THE WEIGHT BENCH FOR ROMAN CHAIR EXERCISES Raise the Seat Frame (5) to adjust the weight bench. If you have questions, please call the telephone number on a decal attached to the weight bench (see the correct form for important information about how to prevent the Seat from your benefit, read this manual. The model number is...
... your exercise program. The serial number can be found on the front cover of the upper body. SETTING UP THE WEIGHT BENCH FOR ROMAN CHAIR EXERCISES Raise the Seat Frame (5) to adjust the weight bench. If you have questions, please call the telephone number on a decal attached to the weight bench (see the correct form for important information about how to prevent the Seat from your benefit, read this manual. The model number is...

User Manual
Page 5
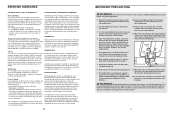
... grease, and the following information and instructions: • Assembly requires two people. • Place all parts as you assemble them, unless instructed ...parts, use the PART IDENTIFICATION CHART. Make sure that the weight bench can be required for Yourself Everything in this step with three M8 x 67mm Bolts (34), an M8 Washer (32), and three M8 Nylon Locknuts (35). For help identifying small parts, use the PART IDENTIFICATION CHART in the Leg (6). Before beginning assembly, make sure you assemble the weight bench, make sure all parts have a socket set, a set of open...
... grease, and the following information and instructions: • Assembly requires two people. • Place all parts as you assemble them, unless instructed ...parts, use the PART IDENTIFICATION CHART. Make sure that the weight bench can be required for Yourself Everything in this step with three M8 x 67mm Bolts (34), an M8 Washer (32), and three M8 Nylon Locknuts (35). For help identifying small parts, use the PART IDENTIFICATION CHART in the Leg (6). Before beginning assembly, make sure you assemble the weight bench, make sure all parts have a socket set, a set of open...
User Manual
Page 6
...). Attach the Short Pin (16) to the Bench Frame (1) 8 with four M6 x 16mm Screws (15). 4 18 19 27 8 15 4 15 15 6 7. Insert the Pin into the Adjustment Leg and the Leg. Attach the Backrest Bracket (27) to the Bench Frame (1) with an M10 x 122mm Bolt (20) and an M10 Nylon Locknut (18). 3. Do not tighten the Locknuts yet. 4. Insert the Pin into the Bench...
...). Attach the Short Pin (16) to the Bench Frame (1) 8 with four M6 x 16mm Screws (15). 4 18 19 27 8 15 4 15 15 6 7. Insert the Pin into the Adjustment Leg and the Leg. Attach the Backrest Bracket (27) to the Bench Frame (1) with an M10 x 122mm Bolt (20) and an M10 Nylon Locknut (18). 3. Do not tighten the Locknuts yet. 4. Insert the Pin into the Bench...
User Manual
Page 7
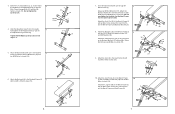
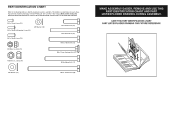
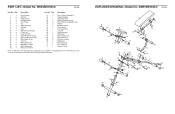
... Screw (15) M8 Nylon Locknut (35) M8 x 35mm Bolt (29) M8 x 67mm Bolt (34) M10 x 70mm Bolt (19) M8 x 72mm Carriage Bolt (21) M10 Nylon Locknut (18) M10 x 80mm Bolt (17) 81 M8 Washer (32) M10 x 122mm Bolt (20) If a part is the key number of this manual. PART IDENTIFICATION CHART Refer to the drawings below to see if it has been pre-attached...
... Screw (15) M8 Nylon Locknut (35) M8 x 35mm Bolt (29) M8 x 67mm Bolt (34) M10 x 70mm Bolt (19) M8 x 72mm Carriage Bolt (21) M10 Nylon Locknut (18) M10 x 80mm Bolt (17) 81 M8 Washer (32) M10 x 122mm Bolt (20) If a part is the key number of this manual. PART IDENTIFICATION CHART Refer to the drawings below to see if it has been pre-attached...
User Manual
Page 8
... 1 Adjustment Knob 24 1 25mm Square Inner Cap 25 2 M4 x 16mm Self-tapping Screw 26 2 Bumper 27 1 Backrest Bracket 28 2 10mm Spacer 29 1 M8 x 35mm Bolt 30 1 Long Pin 31 1 Short Pad Tube 32 1 M8 Washer 33 2 M4 x 12mm Screw 34 3 M8 x 67mm Bolt 35 8 M8 Nylon Locknut 36 2 M6 Washer # 1 Exercise Guide # 1 User's Manual # 1 Grease Packet Note: "#" indicates a non-illustrated part. Description Key No. PART LIST-Model...
... 1 Adjustment Knob 24 1 25mm Square Inner Cap 25 2 M4 x 16mm Self-tapping Screw 26 2 Bumper 27 1 Backrest Bracket 28 2 10mm Spacer 29 1 M8 x 35mm Bolt 30 1 Long Pin 31 1 Short Pad Tube 32 1 M8 Washer 33 2 M4 x 12mm Screw 34 3 M8 x 67mm Bolt 35 8 M8 Nylon Locknut 36 2 M6 Washer # 1 Exercise Guide # 1 User's Manual # 1 Grease Packet Note: "#" indicates a non-illustrated part. Description Key No. PART LIST-Model...


