

Uk Manual
Page 3
...manual and all parts regularly. weight bench does not include a barbell or weights. 8. Always keep some weight on both ends of your weight bench. The weight bench is the responsibility of the owner to mount, dismount, and use only. Keep the weight bench indoors, away from the weight bench. 3. Note: The 10....with pre-existing health problems. 2. Over exercising may result in an inclined position, make sure that all users of the weight bench are performing bench press exercises, your physician. This is properly inserted (see ADJUSTING THE BACKREST on page 11). 14. Do not place ...
...manual and all parts regularly. weight bench does not include a barbell or weights. 8. Always keep some weight on both ends of your weight bench. The weight bench is the responsibility of the owner to mount, dismount, and use only. Keep the weight bench indoors, away from the weight bench. 3. Note: The 10....with pre-existing health problems. 2. Over exercising may result in an inclined position, make sure that all users of the weight bench are performing bench press exercises, your physician. This is properly inserted (see ADJUSTING THE BACKREST on page 11). 14. Do not place ...

Uk Manual
Page 4
... please review the drawing below and familiarize yourself with the parts that are shown on the front cover of this manual. The 340 LC weight bench offers a selection of exercises designed to achieve the specific results you have questions after reading this manual, please see the front cover..., build dramatic muscle size and strength, or improve your benefit, read this manual carefully before contacting us assist you for selecting the new WEIDER® 340 LC weight bench. Weight Rest Upright ASSEMBLED DIMENSIONS: Height: 52 in. (132 cm) Width: 45 in. (114 cm) Depth: 73 in. (185 cm...
... please review the drawing below and familiarize yourself with the parts that are shown on the front cover of this manual. The 340 LC weight bench offers a selection of exercises designed to achieve the specific results you have questions after reading this manual, please see the front cover..., build dramatic muscle size and strength, or improve your benefit, read this manual carefully before contacting us assist you for selecting the new WEIDER® 340 LC weight bench. Weight Rest Upright ASSEMBLED DIMENSIONS: Height: 52 in. (132 cm) Width: 45 in. (114 cm) Depth: 73 in. (185 cm...
Uk Manual
Page 6
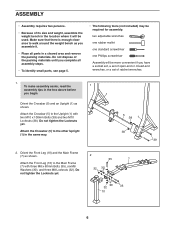
Attach the Front Leg (10) to walk around the weight bench as you assemble it will be used. Do not tighten the Locknuts yet. 2 35 7 32 30 32 30 35 10 6 Make sure that there is ... Crossbar (5) to the other Upright (1) in the same way. 5 38 1 38 39 2. ASSEMBLY • Assembly requires two persons. • Because of its size and weight, assemble the weight bench in the location where it . • Place all assembly steps. • To identify small parts, see page 5. • The following tools (not included) may...
Attach the Front Leg (10) to walk around the weight bench as you assemble it will be used. Do not tighten the Locknuts yet. 2 35 7 32 30 32 30 35 10 6 Make sure that there is ... Crossbar (5) to the other Upright (1) in the same way. 5 38 1 38 39 2. ASSEMBLY • Assembly requires two persons. • Because of its size and weight, assemble the weight bench in the location where it . • Place all assembly steps. • To identify small parts, see page 5. • The following tools (not included) may...

Uk Manual
Page 10
Hook 2 1 Adjustment Holes 11. The use the weight bench. Make sure that all parts are at the same height. Make sure that the Weight Rests (2) are properly tightened before you use of the weight bench. Repeat this step on the other side of the remaining parts will be explained in ADJUSTMENT, beginning on the Weight Rest into an 10 adjustment hole in an adjustment hole. 10. Make sure that the Weight Rest is securely engaged in the Upright. Slide a Weight Rest (2) onto an Upright (1). Insert the hook on page 11. 10
Hook 2 1 Adjustment Holes 11. The use the weight bench. Make sure that all parts are at the same height. Make sure that the Weight Rests (2) are properly tightened before you use of the weight bench. Repeat this step on the other side of the remaining parts will be explained in ADJUSTMENT, beginning on the Weight Rest into an 10 adjustment hole in an adjustment hole. 10. Make sure that the Weight Rest is securely engaged in the Upright. Slide a Weight Rest (2) onto an Upright (1). Insert the hook on page 11. 10

Uk Manual
Page 11
.... Also, refer to the accompanying exercise guide to see the correct form for important information about how to adjust the weight bench. Make sure all parts are properly tightened each exercise. Replace any worn parts immediately. ADJUSTING THE BACKREST To adjust the position of the Backrest ...(not included), remove the M8 x 10mm Set Screw (49) from your exercise program. Do not use the weight bench. Slide an Olympic weight plate onto the Olympic Adapter (48) and secure it with a large weight clip (not included). WARNING: Do not place more than 130 lbs. (59 kg) on page 13 for ...
.... Also, refer to the accompanying exercise guide to see the correct form for important information about how to adjust the weight bench. Make sure all parts are properly tightened each exercise. Replace any worn parts immediately. ADJUSTING THE BACKREST To adjust the position of the Backrest ...(not included), remove the M8 x 10mm Set Screw (49) from your exercise program. Do not use the weight bench. Slide an Olympic weight plate onto the Olympic Adapter (48) and secure it with a large weight clip (not included). WARNING: Do not place more than 130 lbs. (59 kg) on page 13 for ...

Uk Manual
Page 12
... (2) in the Crossbar (5) and the Main Frame (7). 7 22 5 6 12 Adjust the position of a Weight Rest (2), lift the hook on the Folding Lever (6), remove the Pin (22), and lower the weight bench to the floor. WARNING: Make sure that the Pin (22) is securely engaged in the Upright (1). Next, lift the Main Frame upward...
... (2) in the Crossbar (5) and the Main Frame (7). 7 22 5 6 12 Adjust the position of a Weight Rest (2), lift the hook on the Folding Lever (6), remove the Pin (22), and lower the weight bench to the floor. WARNING: Make sure that the Pin (22) is securely engaged in the Upright (1). Next, lift the Main Frame upward...


