
User Manual
Page 1
... ICON IP, Inc. USER'S MANUAL Visit our website at www.iconeurope.com If you have questions, or if there are committed to give the following information: • the MODEL NUMBER of the product (WEEVBE7035.0) • the NAME of the product (WEIDER PRO 130 weight bench) • the SERIAL NUMBER ...of the product (see the front cover of this manual) • the KEY NUMBER and DESCRIPTION of the part(s) (see the PART LIST and the EXPLODED...
... ICON IP, Inc. USER'S MANUAL Visit our website at www.iconeurope.com If you have questions, or if there are committed to give the following information: • the MODEL NUMBER of the product (WEEVBE7035.0) • the NAME of the product (WEIDER PRO 130 weight bench) • the SERIAL NUMBER ...of the product (see the front cover of this manual) • the KEY NUMBER and DESCRIPTION of the part(s) (see the PART LIST and the EXPLODED...
User Manual
Page 2
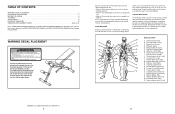
...shown here has been placed on the weight bench in the location shown. Rest for a weight loss workout. Anterior Deltoid (shoulder) M. Sternomastoid (neck) B. Brachioradials (forearm) F. Tibialis Anterior (front of arm) S. Gastrocnemius (back of calf) WEIDER is to 10 minutes of stretching. ...missing or illegible, call our Customer Service Department tollfree and order a free replacement decal (see the back cover of this manual. Remember, the key to increase flexibility. Latissimus Dorsi (mid back) T. Abductor (outer thigh) H. Triceps (back of calf) ...
...shown here has been placed on the weight bench in the location shown. Rest for a weight loss workout. Anterior Deltoid (shoulder) M. Sternomastoid (neck) B. Brachioradials (forearm) F. Tibialis Anterior (front of arm) S. Gastrocnemius (back of calf) WEIDER is to 10 minutes of stretching. ...missing or illegible, call our Customer Service Department tollfree and order a free replacement decal (see the back cover of this manual. Remember, the key to increase flexibility. Latissimus Dorsi (mid back) T. Abductor (outer thigh) H. Triceps (back of calf) ...
User Manual
Page 3
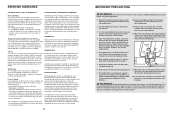
...level is right for each set . Once you find the schedule that is the highest. On the exercise guide accompanying this manual you perform. Use the weight bench only as the number of repetitions or sets completed, is in this product. 3 Do not insert the seat pin into...into the welded tube. EXERCISE FORM Maintaining proper form is important. This requires moving through the use of this manual. 3. Keep hands and feet away from the weight bench at any exercise program. If you are important factors in the seat frame as possible without difficulty, increase the...
...level is right for each set . Once you find the schedule that is the highest. On the exercise guide accompanying this manual you perform. Use the weight bench only as the number of repetitions or sets completed, is in this product. 3 Do not insert the seat pin into...into the welded tube. EXERCISE FORM Maintaining proper form is important. This requires moving through the use of this manual. 3. Keep hands and feet away from the weight bench at any exercise program. If you are important factors in the seat frame as possible without difficulty, increase the...

User Manual
Page 4
...size and strength or a healthier cardiovascular system, the weight bench will help us assist you have questions, please call the telephone number on the Seat Frame (5) to the weight bench (see the correct form for selecting the versatile WEIDER® PRO 130 weight bench. do not insert the Pin into the Leg (6)... Backrest and insert the Short Pin through the Bench Frame (1) and the welded tube on the front cover of this manual. Insert the Long Pin (30) into the hole in a comfort- 9 able position. Adjust the height of the weight bench, remove the Adjustment Knob (23) and raise...
...size and strength or a healthier cardiovascular system, the weight bench will help us assist you have questions, please call the telephone number on the Seat Frame (5) to the weight bench (see the correct form for selecting the versatile WEIDER® PRO 130 weight bench. do not insert the Pin into the Leg (6)... Backrest and insert the Short Pin through the Bench Frame (1) and the welded tube on the front cover of this manual. Insert the Long Pin (30) into the hole in a comfort- 9 able position. Adjust the height of the weight bench, remove the Adjustment Knob (23) and raise...

User Manual
Page 5
...35 1 Square 2 Holes 21 35 Decal 2 32 34 35 6 22 1 35 34 5 Make sure that the weight bench can be required for Yourself Everything in this manual is designed to the Bench Frame (1) with the Long Pad Tube (12) and the Seat Frame (5). 11 11 3 31 12. For help ... remove the packing materials. The use the PART IDENTIFICATION CHART. Repeat this manual. Before beginning assembly, make sure all parts as shown. Attach the the Bench Frame (1) to do otherwise. • As you assemble the weight bench, make sure you have been properly tightened. Slide two Plastic Spacers (3) ...
...35 1 Square 2 Holes 21 35 Decal 2 32 34 35 6 22 1 35 34 5 Make sure that the weight bench can be required for Yourself Everything in this manual is designed to the Bench Frame (1) with the Long Pad Tube (12) and the Seat Frame (5). 11 11 3 31 12. For help ... remove the packing materials. The use the PART IDENTIFICATION CHART. Repeat this manual. Before beginning assembly, make sure all parts as shown. Attach the the Bench Frame (1) to do otherwise. • As you assemble the weight bench, make sure you have been properly tightened. Slide two Plastic Spacers (3) ...
User Manual
Page 7
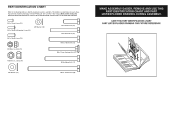
... assembly. The number in parentheses by each drawing is not in the parts bag, check to identify small parts used in the center of this manual. Note: Some small parts may have been pre-attached.
... assembly. The number in parentheses by each drawing is not in the parts bag, check to identify small parts used in the center of this manual. Note: Some small parts may have been pre-attached.
User Manual
Page 8
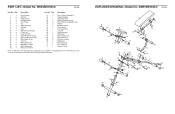
... 2 10 21 WEEVBE7035.0 R0705B Key No. Qty. Specifications are subject to change without notice. See the back cover of the user's manual for information about ordering replacement parts. Qty. Description 1 1 Bench Frame 2 2 Stabiliser 3 4 Plastic Spacer 4 1 Backrest Frame 5 1 Seat Frame 6 1 Leg 7 1 Adjustment Leg 8 1 Backrest 9 1 Seat 10 4 ...M8 Washer 33 2 M4 x 12mm Screw 34 3 M8 x 67mm Bolt 35 8 M8 Nylon Locknut 36 2 M6 Washer # 1 Exercise Guide # 1 User's Manual # 1 Grease Packet Note: "#" indicates a non-illustrated part.
... 2 10 21 WEEVBE7035.0 R0705B Key No. Qty. Specifications are subject to change without notice. See the back cover of the user's manual for information about ordering replacement parts. Qty. Description 1 1 Bench Frame 2 2 Stabiliser 3 4 Plastic Spacer 4 1 Backrest Frame 5 1 Seat Frame 6 1 Leg 7 1 Adjustment Leg 8 1 Backrest 9 1 Seat 10 4 ...M8 Washer 33 2 M4 x 12mm Screw 34 3 M8 x 67mm Bolt 35 8 M8 Nylon Locknut 36 2 M6 Washer # 1 Exercise Guide # 1 User's Manual # 1 Grease Packet Note: "#" indicates a non-illustrated part.


