
Owner Manual
Page 1
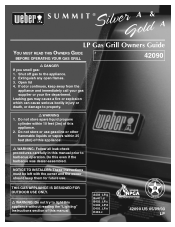
... store or use . NOTICE TO INSTALLER: These instructions must be left with the owner and the owner should keep away from the appliance and immediately call your gas supplier or your fire department. SUMMIT® & LP Gas Grill Owners Guide YOU MUST READ THIS OWNERS GUIDE # BEFORE OPERATING YOUR GAS GRILL 42090 ƽ DANGER If you smell gas: 1. Shut off gas to barbecue operation. Do not store spare liquid propane cylinder within 25...
... store or use . NOTICE TO INSTALLER: These instructions must be left with the owner and the owner should keep away from the appliance and immediately call your gas supplier or your fire department. SUMMIT® & LP Gas Grill Owners Guide YOU MUST READ THIS OWNERS GUIDE # BEFORE OPERATING YOUR GAS GRILL 42090 ƽ DANGER If you smell gas: 1. Shut off gas to barbecue operation. Do not store spare liquid propane cylinder within 25...

Owner Manual
Page 2
... liquid propane cylinder. 2. Open the lid and wait five minutes before use . ƽ You should exercise reasonable care when operating your Weber® gas barbecue. ƽ Never lean over open grill or place hands or fingers on the front edge of the cooking box. ƽ Should a grease fire occur, turn all gas valves off all parts are in place. See instructions in this barbecue. ƽ Improper assembly...
... liquid propane cylinder. 2. Open the lid and wait five minutes before use . ƽ You should exercise reasonable care when operating your Weber® gas barbecue. ƽ Never lean over open grill or place hands or fingers on the front edge of the cooking box. ƽ Should a grease fire occur, turn all gas valves off all parts are in place. See instructions in this barbecue. ƽ Improper assembly...

Owner Manual
Page 3
Contents Danger & Warnings A-2 Warranty A-4 General Instructions A-5 Grilling Methods A-6 Cleaning A-6 Exploded Views A-7 Parts List A-11 Assembly Instructions B-a Gas Instructions C-1 Leak Checking C-4 Operating D-1 Grilling Methods D-1 Lighting ...D-3 Manual Lighting D-4 Troubleshooting D-5 Maintenance E-1 Replacing Main Burners E-2 Crossover® Ignition System Operations E-5 A-3
Contents Danger & Warnings A-2 Warranty A-4 General Instructions A-5 Grilling Methods A-6 Cleaning A-6 Exploded Views A-7 Parts List A-11 Assembly Instructions B-a Gas Instructions C-1 Leak Checking C-4 Operating D-1 Grilling Methods D-1 Lighting ...D-3 Manual Lighting D-4 Troubleshooting D-5 Maintenance E-1 Replacing Main Burners E-2 Crossover® Ignition System Operations E-5 A-3
Owner Manual
Page 4
...: Aluminum Castings, lifetime, 1 year paint Stainless Steel Hood Section, 25 years Burners, 10 years Igniter, 3 years Cooking Grates, 7 years Flavorizer® Bars, 5 years no rust through Thermoplastic/Thermoset Parts, 10 years Excluding fading All Remaining Parts, 5 years, when assembled and operated in accordance with the printed instructions accompanying it any other express warrants except as set forth herein and any applicable...
...: Aluminum Castings, lifetime, 1 year paint Stainless Steel Hood Section, 25 years Burners, 10 years Igniter, 3 years Cooking Grates, 7 years Flavorizer® Bars, 5 years no rust through Thermoplastic/Thermoset Parts, 10 years Excluding fading All Remaining Parts, 5 years, when assembled and operated in accordance with the printed instructions accompanying it any other express warrants except as set forth herein and any applicable...
Owner Manual
Page 5
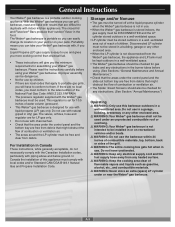
... LP cylinder must be free and clear from any heated surface. ƽ WARNING: Keep the cooking area clear of water column (pressure). • This Weber® gas barbecue is designed for use and gives you more cooking control than charcoal fuel. • These instructions will have to conform to them. Liquid Propane (LP) gas supply is set for assembling your Weber® gas barbecue. This regulator is easy to use...
... LP cylinder must be free and clear from any heated surface. ƽ WARNING: Keep the cooking area clear of water column (pressure). • This Weber® gas barbecue is designed for use and gives you more cooking control than charcoal fuel. • These instructions will have to conform to them. Liquid Propane (LP) gas supply is set for assembling your Weber® gas barbecue. This regulator is easy to use...
Owner Manual
Page 6
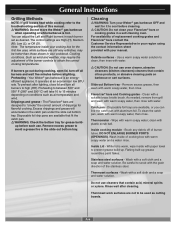
... - Be careful to high (HH). Cleaning ƽ WARNING: Turn your region using the contact information sheet provided with the grain direction of the burner controls to avoid a grease fire in the catch pan under the slide out bottom tray. A-6 Note: The temperature inside with aluminum foil. Stainless steel surfaces - Wash with a suitable brass bristle brush. You can line the catch pan with...
... - Be careful to high (HH). Cleaning ƽ WARNING: Turn your region using the contact information sheet provided with the grain direction of the burner controls to avoid a grease fire in the catch pan under the slide out bottom tray. A-6 Note: The temperature inside with aluminum foil. Stainless steel surfaces - Wash with a suitable brass bristle brush. You can line the catch pan with...

Owner Manual
Page 8
... 2. Negative Ignition Switch Wire 15. Control Knob 20. Left Trim Piece 24. 1/4 - 20 x 1 inch Black Bolt 25. Left Swing-Up Table 28. Door Bushing 31. Hair Pin Cotter 39. Cooking Box Assembly 44. Hose and QCC1 Regulator 50. Summit Catch Pan Holder 52. Rear Panel 56. Tank Scale 61. Right Trim Piece 62. Door Stop 65. Warm-Up™ Basket 5. 12 inch Cooking Grate...
... 2. Negative Ignition Switch Wire 15. Control Knob 20. Left Trim Piece 24. 1/4 - 20 x 1 inch Black Bolt 25. Left Swing-Up Table 28. Door Bushing 31. Hair Pin Cotter 39. Cooking Box Assembly 44. Hose and QCC1 Regulator 50. Summit Catch Pan Holder 52. Rear Panel 56. Tank Scale 61. Right Trim Piece 62. Door Stop 65. Warm-Up™ Basket 5. 12 inch Cooking Grate...
Owner Manual
Page 10
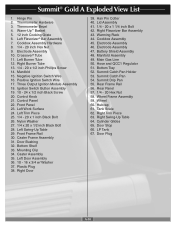
... x 3/4 w/ Washer 37. Hose and QCC1 Regulator 51. Rear Frame Rail 56. Left Burner Tube 12. Positive Ignition Switch Wire 17. Plastic Plug 38. Crossover® Tube 11. Right Swing-Up Table 64. LP Tank 67. Summit® Gold A Exploded View List 1. Thermometer Bezel 4. Hair Pin Cotter 40. Thermometer Hardware 3. Electrode Assembly 47. Electrode Assembly 10. Control Knob 21. Left Trim Piece 25. 1/4 - 20 x 1 inch Black Bolt...
... x 3/4 w/ Washer 37. Hose and QCC1 Regulator 51. Rear Frame Rail 56. Left Burner Tube 12. Positive Ignition Switch Wire 17. Plastic Plug 38. Crossover® Tube 11. Right Swing-Up Table 64. LP Tank 67. Summit® Gold A Exploded View List 1. Thermometer Bezel 4. Hair Pin Cotter 40. Thermometer Hardware 3. Electrode Assembly 47. Electrode Assembly 10. Control Knob 21. Left Trim Piece 25. 1/4 - 20 x 1 inch Black Bolt...

Owner Manual
Page 12
Summit® Silver A Parts List Flavorizor® Bars - 2 Sets Hinge Pin- 2 Hair Pin Cotter- 2 1-1/4 inch Bolts (1/4 x 20 x 1-1/4 inch Bolt) - 2 Stainless Steel Cooking Grates - 2 Bottom Tray - 1 Nut Hex (1/4 x 20 Blk Zinc) - 2 1/2 inch Bolts (1/4 x 20 x 1/2 inch Bolt) - 8 Nylon Washer - 10 Catch-Pan Holder - 1 Wing Nut (10-24) - 2 Catch-Pan - 1 Plastic Washer - 1 Disposable Drip Pans - 2 Wrench - 1 7/16 inch Wrench - 1 LP Tank - 1 A-12
Summit® Silver A Parts List Flavorizor® Bars - 2 Sets Hinge Pin- 2 Hair Pin Cotter- 2 1-1/4 inch Bolts (1/4 x 20 x 1-1/4 inch Bolt) - 2 Stainless Steel Cooking Grates - 2 Bottom Tray - 1 Nut Hex (1/4 x 20 Blk Zinc) - 2 1/2 inch Bolts (1/4 x 20 x 1/2 inch Bolt) - 8 Nylon Washer - 10 Catch-Pan Holder - 1 Wing Nut (10-24) - 2 Catch-Pan - 1 Plastic Washer - 1 Disposable Drip Pans - 2 Wrench - 1 7/16 inch Wrench - 1 LP Tank - 1 A-12

Owner Manual
Page 30
Gas Instructions Fill liquid propane cylinder Note - The phone number is on the LP cylinder before the initial filling. For full instructions on a hot day). Ask your LP tank filled at an authorized liquid propane gas dealer by a qualified attendant, who fills the tank by weight or volume. Check that all burner valves are off Valves are no sparks or open flame to the cylinder. ventilated area. Do not use this...
Gas Instructions Fill liquid propane cylinder Note - The phone number is on the LP cylinder before the initial filling. For full instructions on a hot day). Ask your LP tank filled at an authorized liquid propane gas dealer by a qualified attendant, who fills the tank by weight or volume. Check that all burner valves are off Valves are no sparks or open flame to the cylinder. ventilated area. Do not use this...

Owner Manual
Page 31
... water solution and a rag or brush to the cylinder: 3) Remove the plastic dust cover from the fuel scale. Do not use a wrench to the right. Gas Instructions We utilize various LP tank manufacturers. The connection requires tightening by wetting the fitting with the valve facing away from the valve. 4) Screw the regulator coupling onto the tank valve, clockwise, or to tighten the connection.
... water solution and a rag or brush to the cylinder: 3) Remove the plastic dust cover from the fuel scale. Do not use a wrench to the right. Gas Instructions We utilize various LP tank manufacturers. The connection requires tightening by wetting the fitting with the valve facing away from the valve. 4) Screw the regulator coupling onto the tank valve, clockwise, or to tighten the connection.
Owner Manual
Page 32
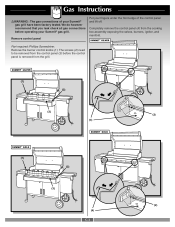
...; gas grill. Remove control panel Put your Summit® gas grill have been factory tested. Completely remove the control panel (4) from the grill. (1) (2) (3) (2) (4) (1) (2) (3) (2) (4) C-3 Gas Instructions ƽWARNING : The gas connections of your fingers under the front edge of the control panel and lift off. We do however recommend that you leak check all gas connections before the control panel is removed from the cooking box assembly exposing the valves, burners, igniter, and manifold.
...; gas grill. Remove control panel Put your Summit® gas grill have been factory tested. Completely remove the control panel (4) from the grill. (1) (2) (3) (2) (4) (1) (2) (3) (2) (4) C-3 Gas Instructions ƽWARNING : The gas connections of your fingers under the front edge of the control panel and lift off. We do however recommend that you leak check all gas connections before the control panel is removed from the cooking box assembly exposing the valves, burners, igniter, and manifold.

Owner Manual
Page 37
... water. s Treat "empty" LP cylinders with your manual. Even when the LP tank is a petroleum product as are gasoline and natural gas. Always close the cylinder valve before running out. s The LP cylinder and connections supplied with the same care as applicable. size (18 1/4 inches high, 12 1/4 inches in low areas and prevent dispersion. s The LP cylinder must match the regulator connection supplied with the Specifications for you can...
... water. s Treat "empty" LP cylinders with your manual. Even when the LP tank is a petroleum product as are gasoline and natural gas. Always close the cylinder valve before running out. s The LP cylinder and connections supplied with the same care as applicable. size (18 1/4 inches high, 12 1/4 inches in low areas and prevent dispersion. s The LP cylinder must match the regulator connection supplied with the Specifications for you can...
Owner Manual
Page 38
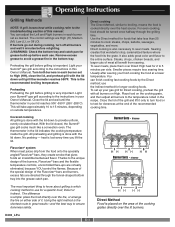
..., because YOU control the flames. Light your Summit® gas grill according to the instructions in this manual. The thermometer in each burner set to sear meats. Thanks to the instructions in your Summit® gas grill according to the unique design of the recommended cooking time. Smaller pieces require less searing time. Preheating the grill before relighting. ƽWARNING: Check the bottom tray and catch pan for a specific food...
..., because YOU control the flames. Light your Summit® gas grill according to the instructions in this manual. The thermometer in each burner set to sear meats. Thanks to the instructions in your Summit® gas grill according to the unique design of the recommended cooking time. Smaller pieces require less searing time. Preheating the grill before relighting. ƽWARNING: Check the bottom tray and catch pan for a specific food...
Owner Manual
Page 39
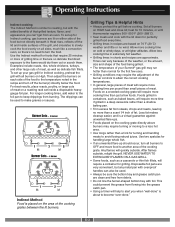
...tray and grease catch pan are approximate. Use two spatulas for turning and handling meats to avoid losing natural juices. To set up should occur, turn the food. Foods grilled in containers, such as delicate fish fillets. D-2 heat for perfectly grilled food every time. • Grilling times in charts and recipes are clean and free...288˚C). • Sear meats and cook with the added benefits of your gas grill for Indirect cooking, gas burners are lit on a crowded cooking grate will help to alert you can also be used. • Always be used to make gravies or...
...tray and grease catch pan are approximate. Use two spatulas for turning and handling meats to avoid losing natural juices. To set up should occur, turn the food. Foods grilled in containers, such as delicate fish fillets. D-2 heat for perfectly grilled food every time. • Grilling times in charts and recipes are clean and free...288˚C). • Sear meats and cook with the added benefits of your gas grill for Indirect cooking, gas burners are lit on a crowded cooking grate will help to alert you can also be used. • Always be used to make gravies or...
Owner Manual
Page 40
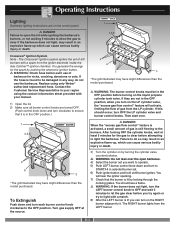
... to light with a match. 8) After the LEFT burner is lit you turn on the LP cylinder valve, the "excess gas flow control" feature will hear the igniter sparking. 7) Check that it . You generate the energy for the spark by pushing the electronic ignition button. ƽ WARNING: Check hose before turning on the liquid propane cylinder tank valve. Replace using the contact information sheet provided with your region using only Weber...
... to light with a match. 8) After the LEFT burner is lit you turn on the LP cylinder valve, the "excess gas flow control" feature will hear the igniter sparking. 7) Check that it . You generate the energy for the spark by pushing the electronic ignition button. ƽ WARNING: Check hose before turning on the liquid propane cylinder tank valve. Replace using the contact information sheet provided with your region using only Weber...
Owner Manual
Page 41
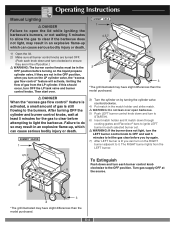
.... 6) Insert match holder and lit match down through cooking grates and Flavorizor® bars to ignite LEFT burner in each selected burner set. ƽ WARNING: If the burner does not light, turn the LEFT burner control knob to OFF and wait 5 minutes to let the gas clear before attempting to light the barbecue. If this should occur, turn each knob down and turn OFF the LP tank valve and burner control knobs. D-4 If...
.... 6) Insert match holder and lit match down through cooking grates and Flavorizor® bars to ignite LEFT burner in each selected burner set. ƽ WARNING: If the burner does not light, turn the LEFT burner control knob to OFF and wait 5 minutes to let the gas clear before attempting to light the barbecue. If this should occur, turn each knob down and turn OFF the LP tank valve and burner control knobs. D-4 If...
Owner Manual
Page 42
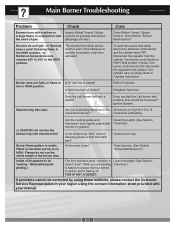
... burner tube. It Clean thoroughly. (See Section cannot "peel". Main Burner Troubleshooting Problem Check Burners burn with a yellow or Inspect Weber® Insect / Spider orange flame, in HIGH position. Is fuel hose bent or kinked? To reset the excess flow safety device turn all burner control knobs and the cylinder valve OFF. Clean bottom tray Burner flame pattern is stainless steel, not paint. the smell of gas. (Blockage of the barbecue...
... burner tube. It Clean thoroughly. (See Section cannot "peel". Main Burner Troubleshooting Problem Check Burners burn with a yellow or Inspect Weber® Insect / Spider orange flame, in HIGH position. Is fuel hose bent or kinked? To reset the excess flow safety device turn all burner control knobs and the cylinder valve OFF. Clean bottom tray Burner flame pattern is stainless steel, not paint. the smell of gas. (Blockage of the barbecue...

Owner Manual
Page 43
Main Burner Flame Pattern The Weber® gas barbecue burners have been factory set for spiders and other insects access to the burner tubes through the air shutter openings. (1) Lightly tap the burner to get debris and dirt out of the burner tubes. Annual Maintenance Inspection and cleaning of the valves. If there is to make sure all the burner ports are clean replace the burners. Remove the manifold. Check...
Main Burner Flame Pattern The Weber® gas barbecue burners have been factory set for spiders and other insects access to the burner tubes through the air shutter openings. (1) Lightly tap the burner to get debris and dirt out of the burner tubes. Annual Maintenance Inspection and cleaning of the valves. If there is to make sure all the burner ports are clean replace the burners. Remove the manifold. Check...
Owner Manual
Page 47
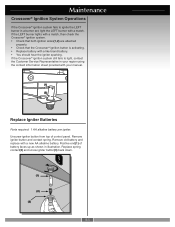
... Service Representative in a burner set, light the LEFT burner with a match. Unscrew igniter button from top of battery faces up as shown in illustration. Replace spring contact(2) and screw igniter button(3) back down. E-5 If the Crossover® ignition system still fails to ignite the LEFT burner in your region using the contact information sheet provided with your manual. (1) (2) Replace Igniter Batteries Parts required: 1 AA alkaline battery per igniter. Positive end(1) of control panel. Remove...
... Service Representative in a burner set, light the LEFT burner with a match. Unscrew igniter button from top of battery faces up as shown in illustration. Replace spring contact(2) and screw igniter button(3) back down. E-5 If the Crossover® ignition system still fails to ignite the LEFT burner in your region using the contact information sheet provided with your manual. (1) (2) Replace Igniter Batteries Parts required: 1 AA alkaline battery per igniter. Positive end(1) of control panel. Remove...


