
Owner Manual
Page 1
... appliance. ƽ WARNING: Follow all leak-check procedures carefully in the vicinity of this even if the barbecue was dealer-assembled. Do this manual. 89373 US 03/03/08 LP US ENGLISH THIS GAS APPLIANCE IS DESIGNED FOR OUTDOOR USE ONLY. ƽ WARNING: Do not try to light this appliance without reading the "Lighting Instructions" section of this manual prior to barbecue operation.
... appliance. ƽ WARNING: Follow all leak-check procedures carefully in the vicinity of this even if the barbecue was dealer-assembled. Do this manual. 89373 US 03/03/08 LP US ENGLISH THIS GAS APPLIANCE IS DESIGNED FOR OUTDOOR USE ONLY. ƽ WARNING: Do not try to light this appliance without reading the "Lighting Instructions" section of this manual prior to barbecue operation.
Owner Manual
Page 2
... disconnect the gas regulator and hose assembly or any built-in or slide in construction. Smokey Joe, Ireland; See instructions in this manual for correct procedures. ƽ Do not operate the Weber® gas barbecue if there is in operation. ƽ A dented or rusty liquid propane cylinder may be very hot. Smokey Joe, Weber, Kettle Silhouette , Genesis, Austria; Kettle Silhouette , Smokey Joe, Weber, Compact Grill Configuration, Botswana; Weber, South...
... disconnect the gas regulator and hose assembly or any built-in or slide in construction. Smokey Joe, Ireland; See instructions in this manual for correct procedures. ƽ Do not operate the Weber® gas barbecue if there is in operation. ƽ A dented or rusty liquid propane cylinder may be very hot. Smokey Joe, Weber, Kettle Silhouette , Genesis, Austria; Kettle Silhouette , Smokey Joe, Weber, Compact Grill Configuration, Botswana; Weber, South...
Owner Manual
Page 12
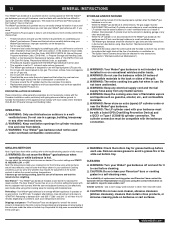
... valves, orifices, hose and regulator are still very reflective, may require the adjustment of replacement cooking grates and Flavorizer® bars contact the Customer Service Representative in a wellventilated area. OPERATING ƽ WARNING: Only use and gives you more cooking control than those specified by children. • If there are free from debris that apply to "smoke" the correct amount of this barbecue outdoors...
... valves, orifices, hose and regulator are still very reflective, may require the adjustment of replacement cooking grates and Flavorizer® bars contact the Customer Service Representative in a wellventilated area. OPERATING ƽ WARNING: Only use and gives you more cooking control than those specified by children. • If there are free from debris that apply to "smoke" the correct amount of this barbecue outdoors...

Owner Manual
Page 13
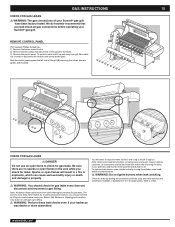
... Nut Propane Regulator DO NOT ENLARGE BURNER PORTS (OPENINGS). While lid is closed. Flaking built-up . Stainless steel surfaces - described in a well-ventilated area. CHECK THAT ALL BURNER VALVES ARE OFF Valves are equipped with the grain direction of the stainless steel. ƽ IMPORTANT: Do not use of cooking box with warm soapy water, then rinse. CONNECTING THE LIQUID PROPANE CYLINDER All Weber® liquid propane gas grill regulators are...
... Nut Propane Regulator DO NOT ENLARGE BURNER PORTS (OPENINGS). While lid is closed. Flaking built-up . Stainless steel surfaces - described in a well-ventilated area. CHECK THAT ALL BURNER VALVES ARE OFF Valves are equipped with the grain direction of the stainless steel. ƽ IMPORTANT: Do not use of cooking box with warm soapy water, then rinse. CONNECTING THE LIQUID PROPANE CYLINDER All Weber® liquid propane gas grill regulators are...
Owner Manual
Page 15
... recheck all gas connections before using your Weber® Gas Barbecue. Rest the control panel against the left side of your Summit® gas grill have been flame-tested. The burners have been factory tested. If your grill has a side burner make sure the side burner is a leak. WWW.WEBER.COM® GAS INSTRUCTIONS CHECK FOR GAS LEAKS ƽ WARNING: The gas connections of the grill (A) exposing the valves, burners, igniter, and manifold. 15...
... recheck all gas connections before using your Weber® Gas Barbecue. Rest the control panel against the left side of your Summit® gas grill have been flame-tested. The burners have been factory tested. If your grill has a side burner make sure the side burner is a leak. WWW.WEBER.COM® GAS INSTRUCTIONS CHECK FOR GAS LEAKS ƽ WARNING: The gas connections of the grill (A) exposing the valves, burners, igniter, and manifold. 15...

Owner Manual
Page 17
.... ƽ WARNING: Replacement LP tanks must match the regulator connection supplied with this for you. • All LP tank supply systems must include a collar to a gas propane dealer, or look up "gas-propane" in leakage of dirt, grease, bugs etc. • The gas connections supplied with your barbecue. • The LP cylinder must be filled at normal use a damaged LP cylinder. Removal of propane. Other types of...
.... ƽ WARNING: Replacement LP tanks must match the regulator connection supplied with this for you. • All LP tank supply systems must include a collar to a gas propane dealer, or look up "gas-propane" in leakage of dirt, grease, bugs etc. • The gas connections supplied with your barbecue. • The LP cylinder must be filled at normal use a damaged LP cylinder. Removal of propane. Other types of...

Owner Manual
Page 20
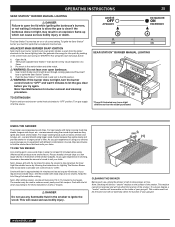
... burner control knob to "OFF" and wait 5 minutes to let the gas clear before you turn on the LP cylinder valve, the "excess gas flow control" feature will take approximately 10 to provide uniform, evenly circulated heat. ARRÊTÉ OFF APAGADO D C B A PREHEATING Preheating the grill before each use. Light your Summit® gas grill according to avoid a grease fire in the bottom tray. All preheating and grilling...
... burner control knob to "OFF" and wait 5 minutes to let the gas clear before you turn on the LP cylinder valve, the "excess gas flow control" feature will take approximately 10 to provide uniform, evenly circulated heat. ARRÊTÉ OFF APAGADO D C B A PREHEATING Preheating the grill before each use. Light your Summit® gas grill according to avoid a grease fire in the bottom tray. All preheating and grilling...
Owner Manual
Page 21
... for handling large whole fish. Searing creates that grilled texture, flavor, and appearance you when "well-done" is about grilling is cooked directly over Direct High heat for Indirect cooking, gas burners are based on a roasting rack set up should be used . It also adds great color and flavor to avoid losing natural juices. use for the first few foods...
... for handling large whole fish. Searing creates that grilled texture, flavor, and appearance you when "well-done" is about grilling is cooked directly over Direct High heat for Indirect cooking, gas burners are based on a roasting rack set up should be used . It also adds great color and flavor to avoid losing natural juices. use for the first few foods...
Owner Manual
Page 22
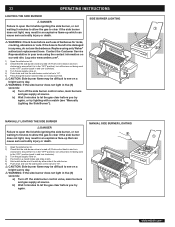
... the side burner control valve to "HI". ƽ CAUTION: Side burner flame may be difficult to see "Manually Lighting the Side Burner"). Contact the Customer Service Representative in your area using only Weber® authorized replacement hose. Log onto www.weber.com®. 1) Open the side burner lid. 2) Check that the side burner valve is turned off the side burner control valve, main burners and gas supply at source. MANUAL SIDE BURNER LIGHTING WWW.WEBER.COM...
... the side burner control valve to "HI". ƽ CAUTION: Side burner flame may be difficult to see "Manually Lighting the Side Burner"). Contact the Customer Service Representative in your area using only Weber® authorized replacement hose. Log onto www.weber.com®. 1) Open the side burner lid. 2) Check that the side burner valve is turned off the side burner control valve, main burners and gas supply at source. MANUAL SIDE BURNER LIGHTING WWW.WEBER.COM...
Owner Manual
Page 23
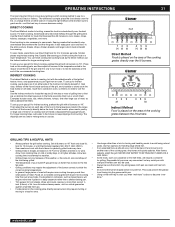
... using only Weber® authorized replacement hose. The Sear Station™ burner has an on HI and ignite the Sear Station Burner (See Sear Station™ lighting Instructions). ADJACENT MAIN BURNER SNAP IGNITION Note: Each main burner control knob snap igniter creates a spark from the cooking grates. If the hose is found to be damaged in any way, do not use of barbecue for searing meats such as steak, poultry parts, fish, and chops). 6 burner...
... using only Weber® authorized replacement hose. The Sear Station™ burner has an on HI and ignite the Sear Station Burner (See Sear Station™ lighting Instructions). ADJACENT MAIN BURNER SNAP IGNITION Note: Each main burner control knob snap igniter creates a spark from the cooking grates. If the hose is found to be damaged in any way, do not use of barbecue for searing meats such as steak, poultry parts, fish, and chops). 6 burner...
Owner Manual
Page 25
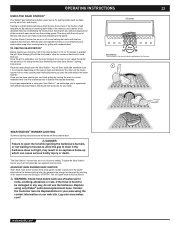
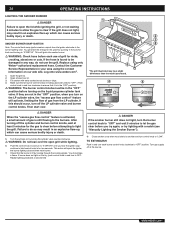
... fluid in the smoker to ignite the wood. USING THE SMOKER The smoker uses presoaked wood chips. Note: Always grill with the lid closed while cooking. CLEANING THE SMOKER Before each burner control knob clockwise to "OFF" position. This residue cannot be removed and will cause serious bodily injury. OPERATING INSTRUCTIONS SEAR STATION™ BURNER MANUAL LIGHTING ƽ DANGER Failure to open barbecue. 4) Insert match holder and lit match down according to...
... fluid in the smoker to ignite the wood. USING THE SMOKER The smoker uses presoaked wood chips. Note: Always grill with the lid closed while cooking. CLEANING THE SMOKER Before each burner control knob clockwise to "OFF" position. This residue cannot be removed and will cause serious bodily injury. OPERATING INSTRUCTIONS SEAR STATION™ BURNER MANUAL LIGHTING ƽ DANGER Failure to open barbecue. 4) Insert match holder and lit match down according to...
Owner Manual
Page 26
... LP cylinder valve and burner control knobs. This will activate, limiting the flow of grill for nicks, cracking, abrasions or cuts. Log onto www.weber.com®. 1) Open the grill lid. 2) Open smoker box lid. 3) Fill smoker with a match (see a flame. Replace using the contact information on the LP cylinder valve, the "excess gas flow control" feature will ignite the smoker burner. ƽ WARNING: Check hose before attempting to light the grill. Contact the Customer Service...
... LP cylinder valve and burner control knobs. This will activate, limiting the flow of grill for nicks, cracking, abrasions or cuts. Log onto www.weber.com®. 1) Open the grill lid. 2) Open smoker box lid. 3) Fill smoker with a match (see a flame. Replace using the contact information on the LP cylinder valve, the "excess gas flow control" feature will ignite the smoker burner. ƽ WARNING: Check hose before attempting to light the grill. Contact the Customer Service...
Owner Manual
Page 27
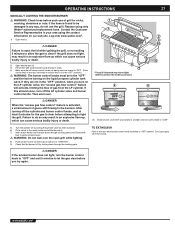
... the gas to the burners. WWW.WEBER.COM® Replace using the contact information on our web site. Turn gas supply off the LP cylinder valve and burner control knobs. Contact the Customer 7 Service Representative in and turn the burner control knob to "OFF" and wait 5 minutes to let the gas clear before attempting to "OFF" position. OPERATING INSTRUCTIONS MANUALLY LIGHTING THE SMOKER BURNER ƽ WARNING: Check hose before turning on the liquid propane cylinder tank valve.
... the gas to the burners. WWW.WEBER.COM® Replace using the contact information on our web site. Turn gas supply off the LP cylinder valve and burner control knobs. Contact the Customer 7 Service Representative in and turn the burner control knob to "OFF" and wait 5 minutes to let the gas clear before attempting to "OFF" position. OPERATING INSTRUCTIONS MANUALLY LIGHTING THE SMOKER BURNER ƽ WARNING: Check hose before turning on the liquid propane cylinder tank valve.

Owner Manual
Page 28
... food before lighting rotisserie burner. Insert the tines of the rotisserie onto the support rollers. 6) The rotisserie shaft should be adequate for outdoor use only. • Remove motor and store in a dry place when not in accordance with the National Electric Code, ANSI / NFPA 70, or Canadian Electrical Code, CSA C22.1. ƽ WARNING: Setup up the rotisserie with a three prong (grounding) power cord for...
... food before lighting rotisserie burner. Insert the tines of the rotisserie onto the support rollers. 6) The rotisserie shaft should be adequate for outdoor use only. • Remove motor and store in a dry place when not in accordance with the National Electric Code, ANSI / NFPA 70, or Canadian Electrical Code, CSA C22.1. ƽ WARNING: Setup up the rotisserie with a three prong (grounding) power cord for...

Owner Manual
Page 29
... liquid propane cylinder tank valve. Turn gas supply off the cylinder and burner control knobs, wait at the source. Replace using the rotisserie with a match. Finish cooking on our web site. TO EXTINGUISH Push in and turn each individual burner. ƽ ATTENTION: READ BEFORE LIGHTING ROTISSERIE BURNER After a period of non-use of 20 seconds before lighting the Rotisserie Burner, a few seconds must be in and turn off the LP cylinder valve and burner control knobs...
... liquid propane cylinder tank valve. Turn gas supply off the cylinder and burner control knobs, wait at the source. Replace using the rotisserie with a match. Finish cooking on our web site. TO EXTINGUISH Push in and turn each individual burner. ƽ ATTENTION: READ BEFORE LIGHTING ROTISSERIE BURNER After a period of non-use of 20 seconds before lighting the Rotisserie Burner, a few seconds must be in and turn off the LP cylinder valve and burner control knobs...

Owner Manual
Page 30
... match holder and strike the match. 6) Hold match holder and lit match by looking for the gas to clear before attempting to "START/HI". Turn off the cylinder and burner control knobs, wait at the source. 30 OPERATING INSTRUCTIONS MANUALLY LIGHTING THE ROTISSERIE BURNER ƽ ATTENTION: READ BEFORE LIGHTING ROTISSERIE BURNER After a period of non-use, before lighting the Rotisserie Burner, a few seconds must be in the "OFF" position before turning on the liquid propane cylinder tank valve...
... match holder and strike the match. 6) Hold match holder and lit match by looking for the gas to clear before attempting to "START/HI". Turn off the cylinder and burner control knobs, wait at the source. 30 OPERATING INSTRUCTIONS MANUALLY LIGHTING THE ROTISSERIE BURNER ƽ ATTENTION: READ BEFORE LIGHTING ROTISSERIE BURNER After a period of non-use, before lighting the Rotisserie Burner, a few seconds must be in the "OFF" position before turning on the liquid propane cylinder tank valve...

Owner Manual
Page 31
... all burner control knobs and the cylinder valve off ? Turn cylinder valve on "HI". WWW.WEBER.COM® Symptoms: Burners do not run the whole length of gas (This is on slowly. Experiencing flare-ups: TROUBLESHOOTING CHECK Inspect Spider/Insect Screens for two seconds after snapping the igniter and seeing the orange flame from the burner lighting tube. Is fuel hose bent or kinked? Does Burner light with a match? Did...
... all burner control knobs and the cylinder valve off ? Turn cylinder valve on "HI". WWW.WEBER.COM® Symptoms: Burners do not run the whole length of gas (This is on slowly. Experiencing flare-ups: TROUBLESHOOTING CHECK Inspect Spider/Insect Screens for two seconds after snapping the igniter and seeing the orange flame from the burner lighting tube. Is fuel hose bent or kinked? Does Burner light with a match? Did...

Owner Manual
Page 33
... ignition does not occur in 5 seconds, turn burner control OFF, wait 5 minutes to let the gas clear before you try again If you fail to "Lighting the Rotisserie Burner"). Press the power button. Call customer service. Refer to the cylinder. Is the lid in the up position with a match, then check the Crossover® Channel on our web site. See assembly illustration. replacement part...
... ignition does not occur in 5 seconds, turn burner control OFF, wait 5 minutes to let the gas clear before you try again If you fail to "Lighting the Rotisserie Burner"). Press the power button. Call customer service. Refer to the cylinder. Is the lid in the up position with a match, then check the Crossover® Channel on our web site. See assembly illustration. replacement part...

Owner Manual
Page 35
c) Remove the control panel. a (A) WWW.WEBER.COM® MAINTENANCE REPLACE MAIN BURNERS 1) Your Summit® gas grill must be off and cool. 2) Turn gas off at source. 3) Disconnect gas supply. 4) Remove cooking grates. 5) Remove smoker box. 6) Remove Flavorizer® bars. a) Remove the burner control knobs. Tilt panel forward and lift up and away from manifold frame and replace with a new burner tube. b Rest the control panel against the left side of the grill (A) exposing the valves, burners, igniter, and manifold. 35...
c) Remove the control panel. a (A) WWW.WEBER.COM® MAINTENANCE REPLACE MAIN BURNERS 1) Your Summit® gas grill must be off and cool. 2) Turn gas off at source. 3) Disconnect gas supply. 4) Remove cooking grates. 5) Remove smoker box. 6) Remove Flavorizer® bars. a) Remove the burner control knobs. Tilt panel forward and lift up and away from manifold frame and replace with a new burner tube. b Rest the control panel against the left side of the grill (A) exposing the valves, burners, igniter, and manifold. 35...

Owner Manual
Page 36
... burner to rotate the burner tube so that the screw at the end of the cookbox. Brush the Spider/Insect screens lightly with hard or sharp tools. Once the Spider/ Insect screens and burners are clean replace the burners. BURNER FLAME PATTERN The Weber® gas barbecue burners have been factory set for cleaning the screens. Log onto www.weber.com®. Check proper assembly before using...
... burner to rotate the burner tube so that the screw at the end of the cookbox. Brush the Spider/Insect screens lightly with hard or sharp tools. Once the Spider/ Insect screens and burners are clean replace the burners. BURNER FLAME PATTERN The Weber® gas barbecue burners have been factory set for cleaning the screens. Log onto www.weber.com®. Check proper assembly before using...


