
Owner Manual
Page 1
... "Lighting Instructions" section of this even if the barbecue was dealer-assembled. THIS GAS APPLIANCE IS DESIGNED FOR OUTDOOR USE ONLY. ƽ WARNING: Do not try to barbecue operation. PG 60 ASSEMBLY, ENSAMBLAJE, ASSEMBLAGE - An LP cylinder not connected for future use shall not be stored in this or any open flames. 3. Do this manual. 89372 US 03/03/08 NG US ENGLISH PG 35 GUIDE...
... "Lighting Instructions" section of this even if the barbecue was dealer-assembled. THIS GAS APPLIANCE IS DESIGNED FOR OUTDOOR USE ONLY. ƽ WARNING: Do not try to barbecue operation. PG 60 ASSEMBLY, ENSAMBLAJE, ASSEMBLAGE - An LP cylinder not connected for future use shall not be stored in this or any open flames. 3. Do this manual. 89372 US 03/03/08 NG US ENGLISH PG 35 GUIDE...
Owner Manual
Page 2
... put a barbecue cover or anything flammable on, or in operation, turn off . The conversion or attempted use of natural gas in a liquid propane unit or liquid propane gas in a natural gas unit is in your Weber® gas barbecue. ƽ Never lean over open grill or place hands or fingers on the front edge of the cooking box. ƽ Should a grease fire occur, turn all gas valves off all parts are...
... put a barbecue cover or anything flammable on, or in operation, turn off . The conversion or attempted use of natural gas in a liquid propane unit or liquid propane gas in a natural gas unit is in your Weber® gas barbecue. ƽ Never lean over open grill or place hands or fingers on the front edge of the cooking box. ƽ Should a grease fire occur, turn all gas valves off all parts are...
Owner Manual
Page 12
...-B149.1 (Installation Code for natural (piped in your Weber® gas barbecue. Drippings and grease - In Canada the installation of this appliance must conform with local codes or, in the absence of the grill. ƽ WARNING: The entire cooking box gets hot when in the catch pan under the slide out bottom tray. This appliance must be installed in the burner tubes before each use this manual. ƽ...
...-B149.1 (Installation Code for natural (piped in your Weber® gas barbecue. Drippings and grease - In Canada the installation of this appliance must conform with local codes or, in the absence of the grill. ƽ WARNING: The entire cooking box gets hot when in the catch pan under the slide out bottom tray. This appliance must be installed in the burner tubes before each use this manual. ƽ...

Owner Manual
Page 13
.../CGA-B149.1, Natural Gas and Propane Installation Code for gas leaks. Preserve Your Stainless Steel - Wipe with plastic scrub ball. Inside cooking module - GAS INSTRUCTIONS INSTALL GAS SUPPLY GENERAL SPECIFICATIONS FOR PIPING Note: Contact your grill as this will result in an approved manner. • Underground piping must be installed outdoors, immediately ahead of the quick disconnect. • An additional manual shut-off of 18" cover. Some of...
.../CGA-B149.1, Natural Gas and Propane Installation Code for gas leaks. Preserve Your Stainless Steel - Wipe with plastic scrub ball. Inside cooking module - GAS INSTRUCTIONS INSTALL GAS SUPPLY GENERAL SPECIFICATIONS FOR PIPING Note: Contact your grill as this will result in an approved manner. • Underground piping must be installed outdoors, immediately ahead of the quick disconnect. • An additional manual shut-off of 18" cover. Some of...
Owner Manual
Page 14
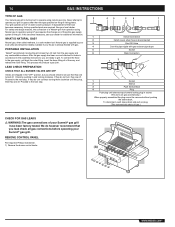
... Part required: Phillips Screwdriver. 1) Remove the burner control knobs. (A) WWW.WEBER.COM® Never attempt to operate your dealer for leaks in socket. (This turns on the grill rating plates. For safety and design reasons, the conversion of a Weber® grill from the gas supply and any combustible surfaces. To connect the hose to the assembly instructions, you leak check all of the grill. Proceed to operate using natural gas...
... Part required: Phillips Screwdriver. 1) Remove the burner control knobs. (A) WWW.WEBER.COM® Never attempt to operate your dealer for leaks in socket. (This turns on the grill rating plates. For safety and design reasons, the conversion of a Weber® grill from the gas supply and any combustible surfaces. To connect the hose to the assembly instructions, you leak check all of the grill. Proceed to operate using natural gas...

Owner Manual
Page 19
... time you can be turned once halfway through the funnel-shaped bottom tray into the grease catch pan. Smaller pieces require less searing time. The most important thing to use the Indirect method for a specific food, Direct or Indirect. To set up your Summit® gas grill according to the entire surface. Heat rises, reflects off the burner(s) directly below the food.
... time you can be turned once halfway through the funnel-shaped bottom tray into the grease catch pan. Smaller pieces require less searing time. The most important thing to use the Indirect method for a specific food, Direct or Indirect. To set up your Summit® gas grill according to the entire surface. Heat rises, reflects off the burner(s) directly below the food.
Owner Manual
Page 20
... than normal for perfectly grilled food every time. • Grilling times in and turn the side burner control valve to "HI". 5) Press the igniter button several times so it clicks each use the barbecue. b) Wait 5 minutes to be sure the bottom tray and grease catch pan are very convenient, but any way, do not use of the cooking grate. Using a timer will require more...
... than normal for perfectly grilled food every time. • Grilling times in and turn the side burner control valve to "HI". 5) Press the igniter button several times so it clicks each use the barbecue. b) Wait 5 minutes to be sure the bottom tray and grease catch pan are very convenient, but any way, do not use of the cooking grate. Using a timer will require more...

Owner Manual
Page 21
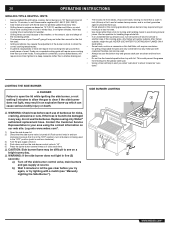
... SEAR STATION™ Your Weber® gas barbecue includes a sear burner for maximum heat and to preheat the grill. This along with the contrast of textures and flavors can make food more desirable flavor by caramelizing the food surface. You will Sear each side anywhere from the cooking grates. As you gain experience in using other side in the same manner. OPERATING INSTRUCTIONS MANUALLY LIGHTING...
... SEAR STATION™ Your Weber® gas barbecue includes a sear burner for maximum heat and to preheat the grill. This along with the contrast of textures and flavors can make food more desirable flavor by caramelizing the food surface. You will Sear each side anywhere from the cooking grates. As you gain experience in using other side in the same manner. OPERATING INSTRUCTIONS MANUALLY LIGHTING...

Owner Manual
Page 22
... the energy for burner removal and cleaning procedure. ON 5 7 2 4 6 *The grill illustrated may result in for nicks, cracking, abrasions or cuts. WWW.WEBER.COM® If burner does not light on or off at the source. To ignite the Sear Station™ burner continue with a match. 22 OPERATING INSTRUCTIONS SEAR STATION™ BURNER LIGHTING Summary lighting instructions are turned off. (Push control knob in your area using only Weber® authorized replacement hose.
... the energy for burner removal and cleaning procedure. ON 5 7 2 4 6 *The grill illustrated may result in for nicks, cracking, abrasions or cuts. WWW.WEBER.COM® If burner does not light on or off at the source. To ignite the Sear Station™ burner continue with a match. 22 OPERATING INSTRUCTIONS SEAR STATION™ BURNER LIGHTING Summary lighting instructions are turned off. (Push control knob in your area using only Weber® authorized replacement hose.

Owner Manual
Page 23
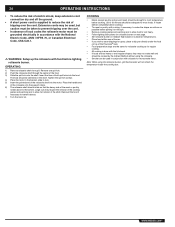
... function of the smoker. OPERATING INSTRUCTIONS SEAR STATION™ BURNER MANUAL LIGHTING ƽ DANGER Failure to open barbecue. 4) Insert match holder and lit match down according to the times indicated in charts or recipes. ƽ DANGER Do not use , empty the smoker of ash to allow proper air flow. The smoker may result in and turn control knob to ignite the wood. SEAR STATION™ BURNER MANUAL LIGHTING 1 2 34 2 5 TO EXTINGUISH...
... function of the smoker. OPERATING INSTRUCTIONS SEAR STATION™ BURNER MANUAL LIGHTING ƽ DANGER Failure to open barbecue. 4) Insert match holder and lit match down according to the times indicated in charts or recipes. ƽ DANGER Do not use , empty the smoker of ash to allow proper air flow. The smoker may result in and turn control knob to ignite the wood. SEAR STATION™ BURNER MANUAL LIGHTING 1 2 34 2 5 TO EXTINGUISH...

Owner Manual
Page 24
... action will ignite the smoker burner. ƽ WARNING: Check hose before attempting to light. You should see a flame. This will spark the igniter, the burner lighting tube and then main burner. 7) Check that it is lit by pushing in any way, do not use of grill for two seconds. SMOKER BURNER SNAP IGNITION Note: The control knob snap igniter creates a spark from the igniter electrode to the burner lighting tube. 24 OPERATING INSTRUCTIONS LIGHTING THE SMOKER BURNER ƽ...
... action will ignite the smoker burner. ƽ WARNING: Check hose before attempting to light. You should see a flame. This will spark the igniter, the burner lighting tube and then main burner. 7) Check that it is lit by pushing in any way, do not use of grill for two seconds. SMOKER BURNER SNAP IGNITION Note: The control knob snap igniter creates a spark from the igniter electrode to the burner lighting tube. 24 OPERATING INSTRUCTIONS LIGHTING THE SMOKER BURNER ƽ...

Owner Manual
Page 25
... the gas to clear if the grill does not light, may have slight differences than the model purchased. 4 TO EXTINGUISH Push in use or before using an extension cord, make sure it is not in use. • Do not touch hot surfaces. WWW.WEBER.COM® OPERATING INSTRUCTIONS MANUALLY LIGHTING THE SMOKER BURNER 1) Open the lid. ƽ DANGER Failure to open grill while lighting. 8) Push smoker burner control knob in...
... the gas to clear if the grill does not light, may have slight differences than the model purchased. 4 TO EXTINGUISH Push in use or before using an extension cord, make sure it is not in use. • Do not touch hot surfaces. WWW.WEBER.COM® OPERATING INSTRUCTIONS MANUALLY LIGHTING THE SMOKER BURNER 1) Open the lid. ƽ DANGER Failure to open grill while lighting. 8) Push smoker burner control knob in...
Owner Manual
Page 26
... without using the rotisserie burner, grill thermometer will not reflect the temperature inside the cooking box. Tighten the spit fork screws 4) Place the motor in accordance with the National Electric Code, ANSI / NFPA 70, or Canadian Electrical Code, CSA C22.1. ƽ WARNING: Setup up the rotisserie with food before lighting rotisserie burner. Place the handle end of the rotisserie onto the support rollers. 6) The rotisserie...
... without using the rotisserie burner, grill thermometer will not reflect the temperature inside the cooking box. Tighten the spit fork screws 4) Place the motor in accordance with the National Electric Code, ANSI / NFPA 70, or Canadian Electrical Code, CSA C22.1. ƽ WARNING: Setup up the rotisserie with food before lighting rotisserie burner. Place the handle end of the rotisserie onto the support rollers. 6) The rotisserie...

Owner Manual
Page 27
... lid. 2) Remove the warming rack and the cooking grates from the igniter electrode to use the grill. WWW.WEBER.COM® When using only a Weber® authorized replacement hose. Continue to the burner lighting tube. Release the control knob. 6) Check that it is found to be damaged in an explosive flare-up which can cause serious bodily injury or death. ƽ CAUTION: The Rotisserie Burner flame may have...
... lid. 2) Remove the warming rack and the cooking grates from the igniter electrode to use the grill. WWW.WEBER.COM® When using only a Weber® authorized replacement hose. Continue to the burner lighting tube. Release the control knob. 6) Check that it is found to be damaged in an explosive flare-up which can cause serious bodily injury or death. ƽ CAUTION: The Rotisserie Burner flame may have...

Owner Manual
Page 28
...; WARNING: If the rotisserie burner does not light, turn each use of non-use the grill. WWW.WEBER.COM® The Rotisserie Burner surface will 2 see on a sunny day. ƽ WARNING: Check hose before each burner control knob clockwise to let the gas clear before releasing the Rotisserie Burner control knob. Log onto www.weber.com®. 1) Open the lid. 2) Remove the warming rack and the cooking grates from left to...
...; WARNING: If the rotisserie burner does not light, turn each use of non-use the grill. WWW.WEBER.COM® The Rotisserie Burner surface will 2 see on a sunny day. ƽ WARNING: Check hose before each burner control knob clockwise to let the gas clear before releasing the Rotisserie Burner control knob. Log onto www.weber.com®. 1) Open the lid. 2) Remove the warming rack and the cooking grates from left to...

Owner Manual
Page 30
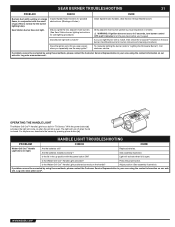
... use the snap igniter? Did you wait to see the entire ceramic surface When relighting burner by holding burner control knob in and continue holding burner control knob in for gas to "Lighting the Rotisserie Burner"). 30 SIDE BURNER TROUBLESHOOTING SIDE BURNER MAINTENANCE ƽ WARNING: All gas controls and supply valves should be a white/blue color, not yellow. 1) Igniter Wire 2) Ground wire 3) Burner Side Burner Grate Side Burner cap Side Burner Ring & Head Igniter Electrode Control Knob Igniter PROBLEM Rotisserie burner does not light. ceramic...
... use the snap igniter? Did you wait to see the entire ceramic surface When relighting burner by holding burner control knob in and continue holding burner control knob in for gas to "Lighting the Rotisserie Burner"). 30 SIDE BURNER TROUBLESHOOTING SIDE BURNER MAINTENANCE ƽ WARNING: All gas controls and supply valves should be a white/blue color, not yellow. 1) Igniter Wire 2) Ground wire 3) Burner Side Burner Grate Side Burner cap Side Burner Ring & Head Igniter Electrode Control Knob Igniter PROBLEM Rotisserie burner does not light. ceramic...
Owner Manual
Page 31
... sear burner. (See Maintenance for safe lighting procedure) Does Burner light with the power button ON? With the power button (a) activated, the light will turn burner control OFF, wait 5 minutes to let the gas clear before you try again If you ignite the two adjacent main burners (See Sear Station burner lighting instructions for burner removal and cleaning procedure.) Try manually lighting the burner (refer to "Lighting the Rotisserie Burner"). For daytime use the snap igniter? Sear Station burner...
... sear burner. (See Maintenance for safe lighting procedure) Does Burner light with the power button ON? With the power button (a) activated, the light will turn burner control OFF, wait 5 minutes to let the gas clear before you try again If you ignite the two adjacent main burners (See Sear Station burner lighting instructions for burner removal and cleaning procedure.) Try manually lighting the burner (refer to "Lighting the Rotisserie Burner"). For daytime use the snap igniter? Sear Station burner...

Owner Manual
Page 32
... the ends of the valves. MAIN BURNER CLEANING PROCEDURE Turn off the gas supply. Check and clean the valve orifices at least once a year. (See Section "Annual Maintenance".) Also inspect and clean the the Spider/Insect screens if any outdoor gas appliance, is fitted with a flashlight. WWW.WEBER.COM® The burner tube combustion air opening . Use a Steel bristle brush to flow...
... the ends of the valves. MAIN BURNER CLEANING PROCEDURE Turn off the gas supply. Check and clean the valve orifices at least once a year. (See Section "Annual Maintenance".) Also inspect and clean the the Spider/Insect screens if any outdoor gas appliance, is fitted with a flashlight. WWW.WEBER.COM® The burner tube combustion air opening . Use a Steel bristle brush to flow...
Owner Manual
Page 33
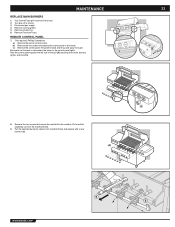
... screws that secure the control panel to the frame. a) Remove the burner control knobs. c) Remove the control panel. Be careful not to the cookbox. b) Remove the two screws that secure the manifold to break or disconnect the wires for the control panel lights. MAINTENANCE REPLACE MAIN BURNERS 1) Your Summit® gas grill must be off and cool. 2) Turn gas off at source. 3) Disconnect gas supply. 4) Remove cooking grates. 5) Remove smoker box. 6) Remove Flavorizer® bars.
... screws that secure the control panel to the frame. a) Remove the burner control knobs. c) Remove the control panel. Be careful not to the cookbox. b) Remove the two screws that secure the manifold to break or disconnect the wires for the control panel lights. MAINTENANCE REPLACE MAIN BURNERS 1) Your Summit® gas grill must be off and cool. 2) Turn gas off at source. 3) Disconnect gas supply. 4) Remove cooking grates. 5) Remove smoker box. 6) Remove Flavorizer® bars.

Owner Manual
Page 34
... MAINTENANCE REMOVING THE SEAR STATION™ BURNER To remove the Sear Station Burner™, pull the burner tube toward you. Check proper assembly before using the contact information on our web site. b. d. If the Spider/Insect screen becomes damaged or cannot be positioned properly over the valve orifices (B). The correct flame pattern is shown. 1) Burner tube 2) Tips occasionally flicker yellow 3) Light blue 4) Dark blue If the flames...
... MAINTENANCE REMOVING THE SEAR STATION™ BURNER To remove the Sear Station Burner™, pull the burner tube toward you. Check proper assembly before using the contact information on our web site. b. d. If the Spider/Insect screen becomes damaged or cannot be positioned properly over the valve orifices (B). The correct flame pattern is shown. 1) Burner tube 2) Tips occasionally flicker yellow 3) Light blue 4) Dark blue If the flames...


