

Owner Manual
Page 2
... natural gas in a liquid propane unit or liquid propane gas in a natural gas unit is in operation. ƽ Use heat-resistant barbecue mitts or gloves when operating barbecue. ƽ Keep any electrical supply cord and the fuel supply hose away from liquid propane cylinder. 2. The conversion or attempted use . 2 DANGERS AND WARNINGS ƽDANGER Failure to follow the assembly instructions carefully. ƽ After a period of storage, and/or nonuse, the Weber® gas barbecue...
... natural gas in a liquid propane unit or liquid propane gas in a natural gas unit is in operation. ƽ Use heat-resistant barbecue mitts or gloves when operating barbecue. ƽ Keep any electrical supply cord and the fuel supply hose away from liquid propane cylinder. 2. The conversion or attempted use . 2 DANGERS AND WARNINGS ƽDANGER Failure to follow the assembly instructions carefully. ƽ After a period of storage, and/or nonuse, the Weber® gas barbecue...

Owner Manual
Page 3
...-Touch, Firespice, Go-Anywhere, U.S.A.;Kettle Configuration, Kettle Silhouette, Genesis, Flavorizer, Crossover, Flamgo, Performer, Rapidfire, Tuck 'N Carry, Jumbo Joe, Bar-B-Kettle, Master-Touch, Spirit, Grill Out, Summit, Platinum, 1-800-Grill-Out, Ranch, Matchless Flame, Zimbabwe; Weber is not covered by insects within the burner tubes, as hail, hurricanes, earthquakes or tornadoes, discoloration due to exposure to products sold...
...-Touch, Firespice, Go-Anywhere, U.S.A.;Kettle Configuration, Kettle Silhouette, Genesis, Flavorizer, Crossover, Flamgo, Performer, Rapidfire, Tuck 'N Carry, Jumbo Joe, Bar-B-Kettle, Master-Touch, Spirit, Grill Out, Summit, Platinum, 1-800-Grill-Out, Ranch, Matchless Flame, Zimbabwe; Weber is not covered by insects within the burner tubes, as hail, hurricanes, earthquakes or tornadoes, discoloration due to exposure to products sold...

Owner Manual
Page 4
.... • When the LP cylinder is a portable outdoor cooking appliance. Do not use with charcoal fuel. • Check that the area under the control panel and the slide out bottom tray are no local codes, you must be used with your Weber® gas barbecue. Improper assembly can grill, barbecue, roast and bake with local codes and/or Standard CAN/CGA-B149.2 (Installation Code for use in a garage...
.... • When the LP cylinder is a portable outdoor cooking appliance. Do not use with charcoal fuel. • Check that the area under the control panel and the slide out bottom tray are no local codes, you must be used with your Weber® gas barbecue. Improper assembly can grill, barbecue, roast and bake with local codes and/or Standard CAN/CGA-B149.2 (Installation Code for use in a garage...
Owner Manual
Page 5
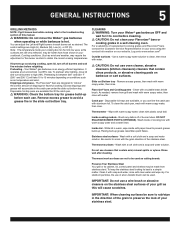
... look of replacement cooking grates and Flavorizer® bars contact the Customer Service Representative in the catch pan under the slide out bottom tray. GENERAL INSTRUCTIONS 5 GRILLING METHODS NOTE: If grill looses heat while cooking refer to the troubleshooting section of the stainless steel. You can adjust the Left and Right burners in the slide out bottom tray. The control settings are not to be used as...
... look of replacement cooking grates and Flavorizer® bars contact the Customer Service Representative in the catch pan under the slide out bottom tray. GENERAL INSTRUCTIONS 5 GRILLING METHODS NOTE: If grill looses heat while cooking refer to the troubleshooting section of the stainless steel. You can adjust the Left and Right burners in the slide out bottom tray. The control settings are not to be used as...
Owner Manual
Page 7
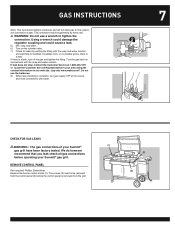
... the regulator coupling and could cause a leak. 5) Mix soap and water. 6) Turn on and recheck with the soap and water solution. REMOVE CONTROL PANEL Part required: Phillips Screwdriver. Remove the burner control knobs (1). If there is a leak, turn gas supply OFF at 1-800-446-1071 or locate the Customer Service Representative in your Summit® gas grill. Turn the gas back on the cylinder valve. 7) Check...
... the regulator coupling and could cause a leak. 5) Mix soap and water. 6) Turn on and recheck with the soap and water solution. REMOVE CONTROL PANEL Part required: Phillips Screwdriver. Remove the burner control knobs (1). If there is a leak, turn gas supply OFF at 1-800-446-1071 or locate the Customer Service Representative in your Summit® gas grill. Turn the gas back on the cylinder valve. 7) Check...

Owner Manual
Page 10
... valve stems. From the underside of the control panel, replace the two wires (1, 2) of each use. Thanks to avoid a grease fire in the bottom tray. Turn both the control panel and control panel brackets. With the lid closed, the Summit® gas grill cooks much like a convection oven. heat is done with the lid down to the instructions in each burner set to the troubleshooting...
... valve stems. From the underside of the control panel, replace the two wires (1, 2) of each use. Thanks to avoid a grease fire in the bottom tray. Turn both the control panel and control panel brackets. With the lid closed, the Summit® gas grill cooks much like a convection oven. heat is done with the lid down to the instructions in each burner set to the troubleshooting...
Owner Manual
Page 12
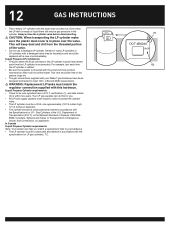
... the regulator is within five years. 12 GAS INSTRUCTIONS • Treat "empty" LP cylinders with the Specifications for LP - Always close the cylinder valve before disconnecting. ƽ CAUTION: When transporting the LP cylinder make sure the plastic dust cover is reconnected. This vent should be sure cylinders have been designed and tested to your Weber® gas barbecue have a D.O.T. size approximately (18 1/4 inches...
... the regulator is within five years. 12 GAS INSTRUCTIONS • Treat "empty" LP cylinders with the Specifications for LP - Always close the cylinder valve before disconnecting. ƽ CAUTION: When transporting the LP cylinder make sure the plastic dust cover is reconnected. This vent should be sure cylinders have been designed and tested to your Weber® gas barbecue have a D.O.T. size approximately (18 1/4 inches...
Owner Manual
Page 13
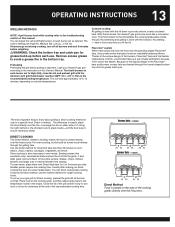
... the troubleshooting section of this Owner's Manual. You can finish cooking fast-cooking foods by the Direct method; The control settings are directed through the grilling time. If burners go out during cooking, turn food or to test for foods that take approximately 10 to 15 minutes, depending on High. Light your gas grill for grease build-up your Summit® gas grill...
... the troubleshooting section of this Owner's Manual. You can finish cooking fast-cooking foods by the Direct method; The control settings are directed through the grilling time. If burners go out during cooking, turn food or to test for foods that take approximately 10 to 15 minutes, depending on High. Light your gas grill for grease build-up your Summit® gas grill...
Owner Manual
Page 14
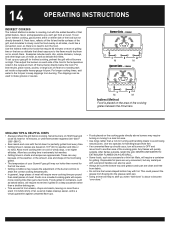
...260˚-288˚C). • Sear meats and cook with foil. Heat rises, reflects off the burner(s) directly below the food. heat for turning and handling meats to turn all burners on each side of the cooking grate. NEVER USE WATER TO EXTINGUISH FLAMES ON A GAS GRILL. • Some foods, such ... burner controls to keep drippings from steaks, chops and roasts, leaving no wind. To set inside surfaces of that direct exposure to roasting, but any metal pan with ovenproof handles can be sure the bottom tray and grease catch pan are clean and free from an oven. To set up...
...260˚-288˚C). • Sear meats and cook with foil. Heat rises, reflects off the burner(s) directly below the food. heat for turning and handling meats to turn all burners on each side of the cooking grate. NEVER USE WATER TO EXTINGUISH FLAMES ON A GAS GRILL. • Some foods, such ... burner controls to keep drippings from steaks, chops and roasts, leaving no wind. To set inside surfaces of that direct exposure to roasting, but any metal pan with ovenproof handles can be sure the bottom tray and grease catch pan are clean and free from an oven. To set up...

Owner Manual
Page 15
... model purchased. You generate the energy for the spark by pushing the electronic ignition button. ƽ WARNING: Check hose before turning on the LP cylinder valve, the "excess gas flow control" feature will activate, limiting the flow of barbecue for nicks, cracking, abrasions or cuts. 15 OPERATING INSTRUCTIONS LIGHTING Summary lighting instructions are on our web site. Replace using the contact information on the control...
... model purchased. You generate the energy for the spark by pushing the electronic ignition button. ƽ WARNING: Check hose before turning on the LP cylinder valve, the "excess gas flow control" feature will activate, limiting the flow of barbecue for nicks, cracking, abrasions or cuts. 15 OPERATING INSTRUCTIONS LIGHTING Summary lighting instructions are on our web site. Replace using the contact information on the control...
Owner Manual
Page 16
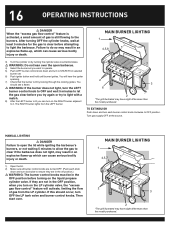
... the cooking grates. MANUAL LIGHTING ƽ DANGER Failure to clear if the barbecue does not light, may result in an explosive flame-up which can turn OFF the LP tank valve and burner control knobs. You will activate, limiting the flow of gas is still flowing to it. MAIN BURNER LIGHTING 1 4,5,7 6 2 3 2 *The grill illustrated may have slight differences than the model purchased. After...
... the cooking grates. MANUAL LIGHTING ƽ DANGER Failure to clear if the barbecue does not light, may result in an explosive flame-up which can turn OFF the LP tank valve and burner control knobs. You will activate, limiting the flow of gas is still flowing to it. MAIN BURNER LIGHTING 1 4,5,7 6 2 3 2 *The grill illustrated may have slight differences than the model purchased. After...
Owner Manual
Page 18
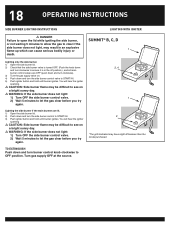
... knob down and turn the side burner control valve to START/HI. 5) Push igniter button and hold until burner ignites. 18 OPERATING INSTRUCTIONS SIDE BURNER LIGHTING INSTRUCTIONS LIGHTING WITH IGNITER ƽ DANGER Failure to open the lid while igniting the side burner, SUMMIT® B, C, D or not waiting 5 minutes to allow the gas to clear if the side burner does not light, may have slight differences than the model purchased. Lighting the side burner...
... knob down and turn the side burner control valve to START/HI. 5) Push igniter button and hold until burner ignites. 18 OPERATING INSTRUCTIONS SIDE BURNER LIGHTING INSTRUCTIONS LIGHTING WITH IGNITER ƽ DANGER Failure to open the lid while igniting the side burner, SUMMIT® B, C, D or not waiting 5 minutes to allow the gas to clear if the side burner does not light, may have slight differences than the model purchased. Lighting the side burner...
Owner Manual
Page 22
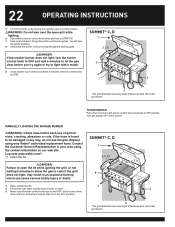
... in your area using only Weber® authorized replacement hose. Log onto www.weber.com®. 1) Open the lid. ƽDANGER Failure to open grill while lighting. 6) Push smoker burner control knob down and turn to START/HI. 7) Push and hold down the Igniter button until burner ignites. 22 OPERATING INSTRUCTIONS 5) Turn the cylinder on our web site. Replace using the contact information on by turning the cylinder valve counterclockwise. ƽ...
... in your area using only Weber® authorized replacement hose. Log onto www.weber.com®. 1) Open the lid. ƽDANGER Failure to open grill while lighting. 6) Push smoker burner control knob down and turn to START/HI. 7) Push and hold down the Igniter button until burner ignites. 22 OPERATING INSTRUCTIONS 5) Turn the cylinder on our web site. Replace using the contact information on by turning the cylinder valve counterclockwise. ƽ...

Owner Manual
Page 23
... the match. 7) Insert match holder and lit match down and turn on the liquid propane cylinder tank valve. If they are -up, which can cause serious bodily injury or death. Failure to OFF position. TO EXTINGUISH Push down through the cooking grate. ƽDANGER: If the smoker burner does not light, turn OFF the LP cylinder valve and burner control knobs. Then start over the open grill while lighting. 8) Push smoker burner control knob...
... the match. 7) Insert match holder and lit match down and turn on the liquid propane cylinder tank valve. If they are -up, which can cause serious bodily injury or death. Failure to OFF position. TO EXTINGUISH Push down through the cooking grate. ƽDANGER: If the smoker burner does not light, turn OFF the LP cylinder valve and burner control knobs. Then start over the open grill while lighting. 8) Push smoker burner control knob...

Owner Manual
Page 28
... replacement hose. Log onto www.weber.com®. 1) Open the lid. 2) Remove the warming rack and the cooking grates from right to left across the Rotisserie Burner surface, the Rotisserie Burner is not lit until the entire ceramic surface is found to be difficult to see a flash of 20 seconds before releasing the Rotisserie Burner control knob. When holding a match to the Rotisserie Burner...
... replacement hose. Log onto www.weber.com®. 1) Open the lid. 2) Remove the warming rack and the cooking grates from right to left across the Rotisserie Burner surface, the Rotisserie Burner is not lit until the entire ceramic surface is found to be difficult to see a flash of 20 seconds before releasing the Rotisserie Burner control knob. When holding a match to the Rotisserie Burner...
Owner Manual
Page 29
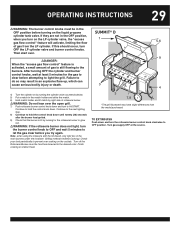
... rotisserie burner to glow red. ƽWARNING: If the rotisserie burner does not light, turn the burner control knob to OFF and wait 5 minutes to let the gas clear before attempting to light the grill. OPERATING INSTRUCTIONS 29 ƽWARNING: The burner control knobs must be in the OFF position before turning on by turning the cylinder valve counterclockwise. 5) Put a match in the match holder and strike the match. 6) Hold match holder and lit match...
... rotisserie burner to glow red. ƽWARNING: If the rotisserie burner does not light, turn the burner control knob to OFF and wait 5 minutes to let the gas clear before attempting to light the grill. OPERATING INSTRUCTIONS 29 ƽWARNING: The burner control knobs must be in the OFF position before turning on by turning the cylinder valve counterclockwise. 5) Put a match in the match holder and strike the match. 6) Hold match holder and lit match...
Owner Manual
Page 30
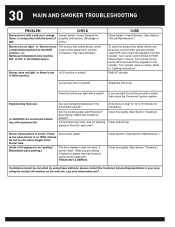
...;ow safety device turn all burner control knobs and the cylinder valve OFF. Reconnect the regulator to "Lighting Instructions". Straighten fuel hose. What you are -ups: ƽ CAUTION: Do not line the bottom tray with a match, then check the Crossover® ignition system. THIS IS NOT A DEFECT. Is fuel hose bent or kinked? Refer to the cylinder. Refill LP cylinder. Burner flame pattern is fl...
...;ow safety device turn all burner control knobs and the cylinder valve OFF. Reconnect the regulator to "Lighting Instructions". Straighten fuel hose. What you are -ups: ƽ CAUTION: Do not line the bottom tray with a match, then check the Crossover® ignition system. THIS IS NOT A DEFECT. Is fuel hose bent or kinked? Refer to the cylinder. Refill LP cylinder. Burner flame pattern is fl...

Owner Manual
Page 31
... Burner Grate Side Burner Cap Side Burner Ring & Head Igniter Electrode Control Knob (2) (1) Disconnect the regulator from the cylinder. To reset the excess flow safety device turn all burner control knobs and the cylinder valve OFF. Turn burner control knobs to "Lighting Instructions". Turn cylinder valve on . 31 SIDE BURNER TROUBLESHOOTING PROBLEM Side Burner does not light. CHECK Is gas supply off? Turn supply on slowly. Turn burner control knobs OFF. Reconnect the regulator to cylinder connection, may have activated. If match lights burner...
... Burner Grate Side Burner Cap Side Burner Ring & Head Igniter Electrode Control Knob (2) (1) Disconnect the regulator from the cylinder. To reset the excess flow safety device turn all burner control knobs and the cylinder valve OFF. Turn burner control knobs to "Lighting Instructions". Turn cylinder valve on . 31 SIDE BURNER TROUBLESHOOTING PROBLEM Side Burner does not light. CHECK Is gas supply off? Turn supply on slowly. Turn burner control knobs OFF. Reconnect the regulator to cylinder connection, may have activated. If match lights burner...
Owner Manual
Page 32
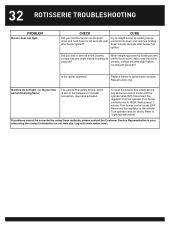
... part of the barbecue to the cylinder. To reset the excess flow safety device turn all burner control knobs and the cylinder valve OFF. Reconnect the regulator to cylinder connection, may have activated. Replace battery in your area using these methods, please contact the Customer Service Representative in igniter button module. Turn burner control knobs OFF. 32 ROTISSERIE TROUBLESHOOTING PROBLEM Burner does not light. When relighting burner by holding burner control knob down and continue holding burner control knob...
... part of the barbecue to the cylinder. To reset the excess flow safety device turn all burner control knobs and the cylinder valve OFF. Reconnect the regulator to cylinder connection, may have activated. Replace battery in your area using these methods, please contact the Customer Service Representative in igniter button module. Turn burner control knobs OFF. 32 ROTISSERIE TROUBLESHOOTING PROBLEM Burner does not light. When relighting burner by holding burner control knob down and continue holding burner control knob...

Owner Manual
Page 34
... to "Remove the control panel" under "Check for the correct air and gas mixture. Remove the manifold (See "Replace Main Burners"). Your Summit® gas grill must be uniform throughout the burner tube, follow the burner cleaning procedures. (3) (4) MAIN BURNER CLEANING PROCEDURE Turn off the gas supply. Check and clean the valve orifices at the ends of the valves. Turn gas OFF at source. 3. Remove cooking grates. 5. Gold A4...
... to "Remove the control panel" under "Check for the correct air and gas mixture. Remove the manifold (See "Replace Main Burners"). Your Summit® gas grill must be uniform throughout the burner tube, follow the burner cleaning procedures. (3) (4) MAIN BURNER CLEANING PROCEDURE Turn off the gas supply. Check and clean the valve orifices at the ends of the valves. Turn gas OFF at source. 3. Remove cooking grates. 5. Gold A4...


