

Owner Manual
Page 1
... owner should keep them for future use this number in registering your fire department. 98633 10/97 NOTICE TO INSTALLER: These instructions must be left with the factory. WARNING: Do not try to light this appliance without reading "Lighting" instructions section of this manual. Open lid. 4. FOR YOUR SAFETY Do not store or use gasoline or other appliance. GENESIS® 3000 Series Natural Gas Barbecue Owner's Manual WEBER WEBER...
... owner should keep them for future use this number in registering your fire department. 98633 10/97 NOTICE TO INSTALLER: These instructions must be left with the factory. WARNING: Do not try to light this appliance without reading "Lighting" instructions section of this manual. Open lid. 4. FOR YOUR SAFETY Do not store or use gasoline or other appliance. GENESIS® 3000 Series Natural Gas Barbecue Owner's Manual WEBER WEBER...
Owner Manual
Page 2
... is out. ƽ Do not enlarge valve orifices or burner ports when cleaning the valves or burners. ƽ The Weber Gas Barbecue should exercise reasonable care when operating your barbecue is in operation. ƽ Use heat-resistant barbecue mitts or gloves when operating barbecue. Do not attempt to correct the problem yourself. 3. Please carefully follow the Dangers, Warnings and Cautions contained in this Owner's Manual may result in serious bodily injury...
... is out. ƽ Do not enlarge valve orifices or burner ports when cleaning the valves or burners. ƽ The Weber Gas Barbecue should exercise reasonable care when operating your barbecue is in operation. ƽ Use heat-resistant barbecue mitts or gloves when operating barbecue. Do not attempt to correct the problem yourself. 3. Please carefully follow the Dangers, Warnings and Cautions contained in this Owner's Manual may result in serious bodily injury...

Owner Manual
Page 3
... by this Weber Gas Barbecue that it will return parts to replace such parts without charge. If you . WARRANTY Weber-Stephen Products Co. (Weber) hereby warrants to return defective parts, transportation charges must be prepaid. This Limited Warranty shall be limited to the repair or replacement of parts which prove defective under normal use , removal, return, or replacement of purchase. There are defective. Customer Service Center...
... by this Weber Gas Barbecue that it will return parts to replace such parts without charge. If you . WARRANTY Weber-Stephen Products Co. (Weber) hereby warrants to return defective parts, transportation charges must be prepaid. This Limited Warranty shall be limited to the repair or replacement of parts which prove defective under normal use , removal, return, or replacement of purchase. There are defective. Customer Service Center...

Owner Manual
Page 5
.... i) Catch pan catches excess grease. Flavorizer Bars heat just the right amount of drippings for additional cooking or warming space. g) Side burner for additional portability. 5 b) Heavy gauge porcelain-on-steel lid seals in use. e) Weber Warm-Up Basket for flavoring, letting excess fat drip past to help prevent flare-ups. Contents WARNINGS 2 Warranty & Patents 3-4 General Instructions 6 Assembly 7-21 Operating Instructions Lighting 22...
.... i) Catch pan catches excess grease. Flavorizer Bars heat just the right amount of drippings for additional cooking or warming space. g) Side burner for additional portability. 5 b) Heavy gauge porcelain-on-steel lid seals in use. e) Weber Warm-Up Basket for flavoring, letting excess fat drip past to help prevent flare-ups. Contents WARNINGS 2 Warranty & Patents 3-4 General Instructions 6 Assembly 7-21 Operating Instructions Lighting 22...
Owner Manual
Page 6
... control panel and the bottom tray are local codes that system at the pressure equal to or less than charcoal fuel. s If there are free from the gas supply piping system during any pressure testing of that apply to portable gas grills, you will give you move. Do not use Liquid Propane (LP) bottled gas.The valves, orifices and hose are for assembling your Weber Gas Barbecue...
... control panel and the bottom tray are local codes that system at the pressure equal to or less than charcoal fuel. s If there are free from the gas supply piping system during any pressure testing of that apply to portable gas grills, you will give you move. Do not use Liquid Propane (LP) bottled gas.The valves, orifices and hose are for assembling your Weber Gas Barbecue...
Owner Manual
Page 7
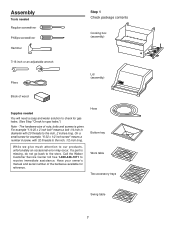
... Step "Check for gas leaks.") Note - Hose Bottom tray Work table Two accessory trays Swing table 7 Call the Weber Customer Service Center toll free 1-800-446-1071 to our products, unfortunately an occasional error may occur. Have your owner's manual and serial number of wood Supplies needed Regular screwdriver Phillips screwdriver Hammer Step 1 Check package contents Cooking box (assembly) 7/16 inch or an adjustable...
... Step "Check for gas leaks.") Note - Hose Bottom tray Work table Two accessory trays Swing table 7 Call the Weber Customer Service Center toll free 1-800-446-1071 to our products, unfortunately an occasional error may occur. Have your owner's manual and serial number of wood Supplies needed Regular screwdriver Phillips screwdriver Hammer Step 1 Check package contents Cooking box (assembly) 7/16 inch or an adjustable...
Owner Manual
Page 12
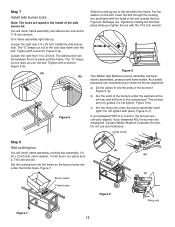
... cooking box to the left front of the side burner lid. You will need : frame assembly, two side burner lock and a 7/16 inch wrench. Loosen the right front 1/4 x 20 bolt. Figure 8 Your Weber Gas Barbecue burner assembly has been factory assembled, pressure and flame tested. Insert the bolt through the cooking box and frame with pliers. The screws are only guides. Do not use your barbecue.
... cooking box to the left front of the side burner lid. You will need : frame assembly, two side burner lock and a 7/16 inch wrench. Loosen the right front 1/4 x 20 bolt. Figure 8 Your Weber Gas Barbecue burner assembly has been factory assembled, pressure and flame tested. Insert the bolt through the cooking box and frame with pliers. The screws are only guides. Do not use your barbecue.

Owner Manual
Page 13
... 10. s Copper tubing must be installed in the branch fuel line in contact with the open ends of Local Codes, you check for building codes regulating outdoor gas barbecue installations. s Gas piping in an accessible location near the supply line. Step 9 Install gas supply General Specifications for outdoor, underground use. s The quick disconnect connects to property. 13 Typical natural gas supply installation. tube. The hose must be tin-lined if the gas contains more...
... 10. s Copper tubing must be installed in the branch fuel line in contact with the open ends of Local Codes, you check for building codes regulating outdoor gas barbecue installations. s Gas piping in an accessible location near the supply line. Step 9 Install gas supply General Specifications for outdoor, underground use. s The quick disconnect connects to property. 13 Typical natural gas supply installation. tube. The hose must be tin-lined if the gas contains more...

Owner Manual
Page 15
... side burner control knob down and turn clockwise. Figure 15. Step 13 Install side burner You will need : manifold bracket Hook the bracket onto the manifold at the center burner valve. The side burner hose is OFF. Slide the collar closed. Manifold bracket Frame brace Figure 15 Male fitting of the quick disconnect on the manifold. Figure 14a. Lift the bracket, manifold and cooking box...
... side burner control knob down and turn clockwise. Figure 15. Step 13 Install side burner You will need : manifold bracket Hook the bracket onto the manifold at the center burner valve. The side burner hose is OFF. Slide the collar closed. Manifold bracket Frame brace Figure 15 Male fitting of the quick disconnect on the manifold. Figure 14a. Lift the bracket, manifold and cooking box...

Owner Manual
Page 16
As a safety precaution you should recheck all connections should check for leaks before using your barbecue was dealer or store assembled. Slide the collar closed. If bubbles form or if a bubble grows there is ...burner is OFF. Figure 17 (a). To barbecue Locking shut off (a) Male fitting Outside house wall (b) Collar Quick disconnect engaged Figure 17 ƽWARNING: Do not ignite burners while leak checking. Since some leaks test solutions, including soap and water, may have been flame tested. Remove valve control knob and screws. Turn on gas supply. Remove...
As a safety precaution you should recheck all connections should check for leaks before using your barbecue was dealer or store assembled. Slide the collar closed. If bubbles form or if a bubble grows there is ...burner is OFF. Figure 17 (a). To barbecue Locking shut off (a) Male fitting Outside house wall (b) Collar Quick disconnect engaged Figure 17 ƽWARNING: Do not ignite burners while leak checking. Since some leaks test solutions, including soap and water, may have been flame tested. Remove valve control knob and screws. Turn on gas supply. Remove...

Owner Manual
Page 17
... burner hose to quick disconnect connection. e) Hose to side burner connection. d) Valves to manifold connection. DO NOT OPERATE THE BARBECUE. Contact Weber-Stephen Customer Service. Figure 19 The open "U" of the cooking grates goes down. b) Manifold to back in the upper position in the cooking box. Figure 18 (c). When leak checks are complete, turn OFF the gas. Figure 20. (c) Figure 20 (d) Figure 18 (e) 17 Set...
... burner hose to quick disconnect connection. e) Hose to side burner connection. d) Valves to manifold connection. DO NOT OPERATE THE BARBECUE. Contact Weber-Stephen Customer Service. Figure 19 The open "U" of the cooking grates goes down. b) Manifold to back in the upper position in the cooking box. Figure 18 (c). When leak checks are complete, turn OFF the gas. Figure 20. (c) Figure 20 (d) Figure 18 (e) 17 Set...

Owner Manual
Page 21
... 1 3/4 inch screw, insert screws through frame and slide bar assembly and add nylon washers and hex nuts. Figure 31 (a). Set the work table, two accessory trays, Warm-Up Basket, warming rack, thermometer, three tubing plugs and a hammer. Figure 31 (b). Figure 31 (f). To raise table, lift table up to tap them lightly with a hammer. Tighten nuts using a screwdriver...
... 1 3/4 inch screw, insert screws through frame and slide bar assembly and add nylon washers and hex nuts. Figure 31 (a). Set the work table, two accessory trays, Warm-Up Basket, warming rack, thermometer, three tubing plugs and a hammer. Figure 31 (b). Figure 31 (f). To raise table, lift table up to tap them lightly with a hammer. Tighten nuts using a screwdriver...

Owner Manual
Page 22
...., Customer Service Center or authorized dealer. Replace using only Weber authorized replacement hose. Figure 1. 2) Make sure all burner control knobs are on the control panel. ƽ DANGER Failure to open barbecue. Always light the FRONT burner first. You generate the energy for the spark by looking through the matchlight hole on the front of barbecue for nicks, cracking, abrasions or cuts. OPERATING INSTRUCTIONS Lighting Summary lighting instructions are turned...
...., Customer Service Center or authorized dealer. Replace using only Weber authorized replacement hose. Figure 1. 2) Make sure all burner control knobs are on the control panel. ƽ DANGER Failure to open barbecue. Always light the FRONT burner first. You generate the energy for the spark by looking through the matchlight hole on the front of barbecue for nicks, cracking, abrasions or cuts. OPERATING INSTRUCTIONS Lighting Summary lighting instructions are turned...

Owner Manual
Page 24
... the side burner control valve. Figure 4. 1) Open the side burner lid. 2) Push down and turn the side burner control to HI. 3) Press the side burner igniter button several times so it clicks each time. 1 4 2 3 Figure 4 ƽCAUTION: Side burner flame may be difficult to clear if the side burner does not light, may be difficult to light with a match. 5 Figure 3 ƽCAUTION: Side burner flame may...
... the side burner control valve. Figure 4. 1) Open the side burner lid. 2) Push down and turn the side burner control to HI. 3) Press the side burner igniter button several times so it clicks each time. 1 4 2 3 Figure 4 ƽCAUTION: Side burner flame may be difficult to clear if the side burner does not light, may be difficult to light with a match. 5 Figure 3 ƽCAUTION: Side burner flame may...
Owner Manual
Page 25
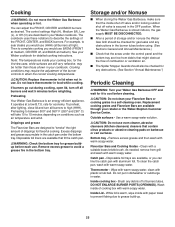
... in a self-cleaning oven. Remove excess grease to high (HHH). s After a period of burners tubes. Do not leave thermometer in water. Replacement cooking grates and Flavorizer Bars are designed to grease build-up. 25 Thermometer - Inside cooking box - Cooking ƽWARNING: Do not move the Weber Gas Barbecue when operating or hot. You can line the catch pan with paper towel to prevent flaking...
... in a self-cleaning oven. Remove excess grease to high (HHH). s After a period of burners tubes. Do not leave thermometer in water. Replacement cooking grates and Flavorizer Bars are designed to grease build-up. 25 Thermometer - Inside cooking box - Cooking ƽWARNING: Do not move the Weber Gas Barbecue when operating or hot. You can line the catch pan with paper towel to prevent flaking...
Owner Manual
Page 26
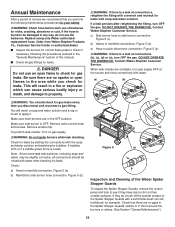
... dirt on gas supply. ƽWARNING: Do not ignite burners while leak checking. Check that you check for gas leaks. Annual Maintenance After a period of nonuse we recommend that there are in the OFF position. Clean if necessary, following maintenance procedures for your safety. ƽWARNING: Check hose before each use of barbecue for example). Remove valve control knob and screws...
... dirt on gas supply. ƽWARNING: Do not ignite burners while leak checking. Check that you check for gas leaks. Annual Maintenance After a period of nonuse we recommend that there are in the OFF position. Clean if necessary, following maintenance procedures for your safety. ƽWARNING: Check hose before each use of barbecue for example). Remove valve control knob and screws...

Owner Manual
Page 27
... gas mixture. Main Burner Flame Pattern The Weber Genesis Gas Barbecue burners have been factory set for spiders and other insects access to flow back out of gas in and around the air shutter section of the burner tube and the valve, thereby preventing spiders and other insects. Clean the inside cooking box Tips occasionally yellowish Light blue Flames Figure 8 Dark blue If the flames do not ignite...
... gas mixture. Main Burner Flame Pattern The Weber Genesis Gas Barbecue burners have been factory set for spiders and other insects access to flow back out of gas in and around the air shutter section of the burner tube and the valve, thereby preventing spiders and other insects. Clean the inside cooking box Tips occasionally yellowish Light blue Flames Figure 8 Dark blue If the flames do not ignite...
Owner Manual
Page 30
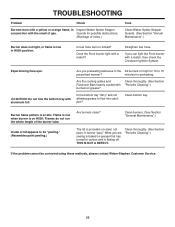
... Crossover Ignition System. Burner flame pattern is porcelain-on HIGH. Flames do not run the whole length of gas. What you preheating barbecue in the All burners on grease that has turned to be corrected using these methods, please contact Weber-Stephen Customer Service. 30 Clean bottom tray. Straighten fuel hose. THIS IS NOT A DEFECT. Is fuel hose bent or kinked? Does the Front burner light...
... Crossover Ignition System. Burner flame pattern is porcelain-on HIGH. Flames do not run the whole length of gas. What you preheating barbecue in the All burners on grease that has turned to be corrected using these methods, please contact Weber-Stephen Customer Service. 30 Clean bottom tray. Straighten fuel hose. THIS IS NOT A DEFECT. Is fuel hose bent or kinked? Does the Front burner light...

Owner Manual
Page 31
Flame is tight. If match lights burner, check igniter (see below). To remove side burner cover, remove control knob and screws that igniter lock nut is low in the OFF position. Adjust igniter electrode. Side Burner Troubleshooting ƽWARNING: Before attempting any troubleshooting steps, all gas controls and supply valves should be in HIGH position. Inspect the Weber Spider Stopper Guard for possible obstructions. (Blockage of electrode to burner. Side Burner Maintenance ƽ...
Flame is tight. If match lights burner, check igniter (see below). To remove side burner cover, remove control knob and screws that igniter lock nut is low in the OFF position. Adjust igniter electrode. Side Burner Troubleshooting ƽWARNING: Before attempting any troubleshooting steps, all gas controls and supply valves should be in HIGH position. Inspect the Weber Spider Stopper Guard for possible obstructions. (Blockage of electrode to burner. Side Burner Maintenance ƽ...
Owner Manual
Page 33
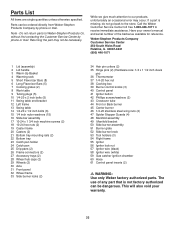
... Crossover tube 44 Front or Back burner 45 Center burner 46 1/4-20 stainless steel wing nuts (2) 47 Spider Stopper Guards (4) 48 Manifold assembly 49 Manifold bracket 50 Side burner assembly 51 Burner grate 52 Side burner knob 53 Tool holders (3) 54 Right frame 55 Igniter 56 Igniter lock nut 57 Igniter wire (black) 58 Igniter wire (white) 59 Gas catcher ignition chamber 60 Hose 61 Control panel inserts (2) ƽ WARNING: Use only Weber factory authorized parts...
... Crossover tube 44 Front or Back burner 45 Center burner 46 1/4-20 stainless steel wing nuts (2) 47 Spider Stopper Guards (4) 48 Manifold assembly 49 Manifold bracket 50 Side burner assembly 51 Burner grate 52 Side burner knob 53 Tool holders (3) 54 Right frame 55 Igniter 56 Igniter lock nut 57 Igniter wire (black) 58 Igniter wire (white) 59 Gas catcher ignition chamber 60 Hose 61 Control panel inserts (2) ƽ WARNING: Use only Weber factory authorized parts...


