
Owner Manual
Page 1
... open flame. 3. An LP tank not connected for future use. Shut off gas to light this appliance without reading "Lighting" instructions section of this or any correspondence with the owner and the owner should keep them for use shall not be left with the factory. Open lid. 4. Serial Number Please use this number in registering your fire department. 98641 10/97 GENESIS® 2000 LX Series LP Gas Barbecue Owner's Manual...
... open flame. 3. An LP tank not connected for future use. Shut off gas to light this appliance without reading "Lighting" instructions section of this or any correspondence with the owner and the owner should keep them for use shall not be left with the factory. Open lid. 4. Serial Number Please use this number in registering your fire department. 98641 10/97 GENESIS® 2000 LX Series LP Gas Barbecue Owner's Manual...

Owner Manual
Page 2
... use an LP tank with your Weber Gas Barbecue. ƽ Do not attempt to disconnect the gas regulator or any gas fitting while your barbecue is supplied with a damaged valve. ƽ Although your liquid propane supplier. See instructions in this manual for correct procedures. ƽ Do not operate the Weber Gas Barbecue if there is not natural gas. The conversion or attempted use of natural gas in an LP unit or LP gas in a natural gas...
... use an LP tank with your Weber Gas Barbecue. ƽ Do not attempt to disconnect the gas regulator or any gas fitting while your barbecue is supplied with a damaged valve. ƽ Although your liquid propane supplier. See instructions in this manual for correct procedures. ƽ Do not operate the Weber Gas Barbecue if there is not natural gas. The conversion or attempted use of natural gas in an LP unit or LP gas in a natural gas...

Owner Manual
Page 3
... by insects within the burner tubes, as follows: Aluminum Castings, 10 years, Recycled Work Surfaces, 10 years Cooking Grates and Flavorizer Bars, 3 years, All Remaining Parts, 5 years, when assembled and operated in the atmosphere, is not covered by this limitation may not apply to you have a question regarding the tank, call Weber-Stephen Products Co., Customer Service Center. 3 Before returning...
... by insects within the burner tubes, as follows: Aluminum Castings, 10 years, Recycled Work Surfaces, 10 years Cooking Grates and Flavorizer Bars, 3 years, All Remaining Parts, 5 years, when assembled and operated in the atmosphere, is not covered by this limitation may not apply to you have a question regarding the tank, call Weber-Stephen Products Co., Customer Service Center. 3 Before returning...

Owner Manual
Page 4
...Weber, , Genesis, Flavorizer and Crossover are covered under the following patent nos.: U.S.A. #4,677,964; 4,727,853; #4,777,927; #4,829,978; #4,860,724; #4,941,817; #4,966,125; #5,070,776; #D293,067; #D316,355; Canada: Rd 1987 Reg. #58,034; #1,279,540; #1,283,586; #1,300,994; #1,300,995. Genesis Gas Barbecues are registered U.S. Perma-Mount, Gas... Catcher, FlameCheck, Steam-N-Chips, Spider Stopper, and Warm-Up are U.S. PATENTS AND TRADEMARKS © 1997 Weber. trademarks of Weber-Stephen Products Co., 200 East...
...Weber, , Genesis, Flavorizer and Crossover are covered under the following patent nos.: U.S.A. #4,677,964; 4,727,853; #4,777,927; #4,829,978; #4,860,724; #4,941,817; #4,966,125; #5,070,776; #D293,067; #D316,355; Canada: Rd 1987 Reg. #58,034; #1,279,540; #1,283,586; #1,300,994; #1,300,995. Genesis Gas Barbecues are registered U.S. Perma-Mount, Gas... Catcher, FlameCheck, Steam-N-Chips, Spider Stopper, and Warm-Up are U.S. PATENTS AND TRADEMARKS © 1997 Weber. trademarks of Weber-Stephen Products Co., 200 East...

Owner Manual
Page 5
... Gas Catcher Ignition Chamber. Contents WARNINGS 2 Warranty & Patents 3-4 General Instructions 6 Assembly 7-21 Operating Instructions Lighting 22-23 Cooking 24 Storage and/or Nonuse 24 Cleaning 24 LP Tank Information 25-27 e a Troubleshooting & Maintenance Annual Maintenance 28 General Maintenance 29-31 Troubleshooting 32 Parts Listing 35 b c d f a j FEATURES: i a a) Convenient tables and racks. Uncontrolled flareups are eliminated (versus lava rock systems on -steel lid seals in heat...
... Gas Catcher Ignition Chamber. Contents WARNINGS 2 Warranty & Patents 3-4 General Instructions 6 Assembly 7-21 Operating Instructions Lighting 22-23 Cooking 24 Storage and/or Nonuse 24 Cleaning 24 LP Tank Information 25-27 e a Troubleshooting & Maintenance Annual Maintenance 28 General Maintenance 29-31 Troubleshooting 32 Parts Listing 35 b c d f a j FEATURES: i a a) Convenient tables and racks. Uncontrolled flareups are eliminated (versus lava rock systems on -steel lid seals in heat...
Owner Manual
Page 6
... pressure regulator supplied with the Weber Gas Barbecue must comply with liquid propane (LP) gas only. s Never use and gives you must be stored in a well-ventilated space. s These instructions will have to conform to be disconnected and the LP tank stored outdoors in a building, garage or any heated surface. s Your Weber Gas Barbecue is set for LP gas only. Please read the instructions carefully before using your Weber Gas Barbecue under...
... pressure regulator supplied with the Weber Gas Barbecue must comply with liquid propane (LP) gas only. s Never use and gives you must be stored in a well-ventilated space. s These instructions will have to conform to be disconnected and the LP tank stored outdoors in a building, garage or any heated surface. s Your Weber Gas Barbecue is set for LP gas only. Please read the instructions carefully before using your Weber Gas Barbecue under...
Owner Manual
Page 7
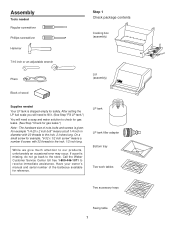
... your owner's manual and serial number of the barbecue available for safety. Assembly Tools needed Regular screwdriver Phillips screwdriver Hammer Step 1 Check package contents Cooking box (assembly) 7/16 inch or an adjustable wrench Pliers Block of wood Lid (assembly) ® ® Supplies needed Your LP tank is given. Call the Weber Customer Service Center toll free 1-800-446-1071 to the inch, 1/2 inch long. If a part...
... your owner's manual and serial number of the barbecue available for safety. Assembly Tools needed Regular screwdriver Phillips screwdriver Hammer Step 1 Check package contents Cooking box (assembly) 7/16 inch or an adjustable wrench Pliers Block of wood Lid (assembly) ® ® Supplies needed Your LP tank is given. Call the Weber Customer Service Center toll free 1-800-446-1071 to the inch, 1/2 inch long. If a part...

Owner Manual
Page 12
... with pliers. Burner tubes Frame brace Your Weber Gas Barbecue burner assembly has been factory assembled, pressure and flame tested. Figure 7 (b). Take the spacer bracket and hold it up . Step 7 Add cooking box You will need: frame assembly, cooking box assembly, 1/4-20 x 2 inch bolt, 1/4 inch nylon washer, 1/4-20 keps nut, pliers and a 7/16 inch wrench. Contact Weber-Stephen Customer Service. Do not tighten with a wrench. Guide screw Figure 6 Slide...
... with pliers. Burner tubes Frame brace Your Weber Gas Barbecue burner assembly has been factory assembled, pressure and flame tested. Figure 7 (b). Take the spacer bracket and hold it up . Step 7 Add cooking box You will need: frame assembly, cooking box assembly, 1/4-20 x 2 inch bolt, 1/4 inch nylon washer, 1/4-20 keps nut, pliers and a 7/16 inch wrench. Contact Weber-Stephen Customer Service. Do not tighten with a wrench. Guide screw Figure 6 Slide...

Owner Manual
Page 15
... tank scale is a new LP tank. Your LP tank is held up gas-propane in Figure 13. Step 12 Set LP fuel scale You will need: LP tank (empty). For full instructions on "E". Tighten so the lock is equipped with an empty tank. LP tank should not be set on safe handling of tanks are not compatible with the valve facing away from tank...
... tank scale is a new LP tank. Your LP tank is held up gas-propane in Figure 13. Step 12 Set LP fuel scale You will need: LP tank (empty). For full instructions on "E". Tighten so the lock is equipped with an empty tank. LP tank should not be set on safe handling of tanks are not compatible with the valve facing away from tank...

Owner Manual
Page 17
... is a leak. ƽWARNING: Do not ignite burners while leak checking. (d) Figure 18 17 As a safety precaution you disconnect and reconnect a gas fitting. This will need: a soap and water solution and a rag or brush to tank connection. DO NOT OPERATE THE BARBECUE. DO NOT OPERATE THE BARBECUE. Contact Weber-Stephen Customer Service. Check: a) Hose to manifold connection. Since some leaks test solutions...
... is a leak. ƽWARNING: Do not ignite burners while leak checking. (d) Figure 18 17 As a safety precaution you disconnect and reconnect a gas fitting. This will need: a soap and water solution and a rag or brush to tank connection. DO NOT OPERATE THE BARBECUE. DO NOT OPERATE THE BARBECUE. Contact Weber-Stephen Customer Service. Check: a) Hose to manifold connection. Since some leaks test solutions...

Owner Manual
Page 21
.... (a) Slide Support rod View from front of the Weber Warm-Up Basket into the hole in the left and right side rails. Figure 30 (a). Set the accessory trays between the two frame connectors. Position slide bar assembly on the outside of the lid and the other end into its holder. Put a nylon washer on each 1 3/4 inch screw...
.... (a) Slide Support rod View from front of the Weber Warm-Up Basket into the hole in the left and right side rails. Figure 30 (a). Set the accessory trays between the two frame connectors. Position slide bar assembly on the outside of the lid and the other end into its holder. Put a nylon washer on each 1 3/4 inch screw...
Owner Manual
Page 22
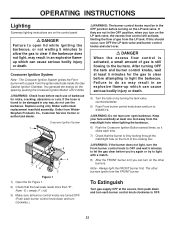
... an explosive flame-up which can turn to OFF. 22 Replace using only Weber authorized replacement manifold assembly. E = empty; F = full. 3) Make sure all burner control knobs are turned OFF. (Push each time. 7) Check that the fuel scale reads more than "E". The other burners. Crossover Ignition System 1 3 8 4 7 56 2 Figure 1 1) Open the lid. OPERATING INSTRUCTIONS Lighting Summary lighting instructions are on the control panel. ƽ DANGER Failure to open barbecue. If...
... an explosive flame-up which can turn to OFF. 22 Replace using only Weber authorized replacement manifold assembly. E = empty; F = full. 3) Make sure all burner control knobs are turned OFF. (Push each time. 7) Check that the fuel scale reads more than "E". The other burners. Crossover Ignition System 1 3 8 4 7 56 2 Figure 1 1) Open the lid. OPERATING INSTRUCTIONS Lighting Summary lighting instructions are on the control panel. ƽ DANGER Failure to open barbecue. If...

Owner Manual
Page 23
... at the source, then push down and turn each burner control knob down and turn OFF the LP tank valve and burner control knobs and start over open lid while igniting the barbecue, or not waiting 5 minutes to allow the gas to clear if the barbecue does not light, may result in an explosive flame-up which can cause serious bodily injury or death...
... at the source, then push down and turn each burner control knob down and turn OFF the LP tank valve and burner control knobs and start over open lid while igniting the barbecue, or not waiting 5 minutes to allow the gas to clear if the barbecue does not light, may result in an explosive flame-up which can cause serious bodily injury or death...
Owner Manual
Page 24
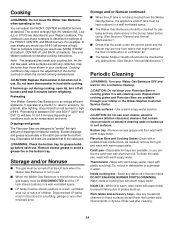
... pan under the bottom tray. Use a warm soapy water solution. ƽCAUTION: Do not use . Thermometer - s LP tanks must not be turned off , and BACK at high). Flavorizer Bars and Cooking Grates- Do not put in dishwasher or submerge in the bottom tray. Preheating Your Weber Genesis Gas Barbecue is warm, wipe inside of the burner controls to "smoke" the right amount of burners tubes...
... pan under the bottom tray. Use a warm soapy water solution. ƽCAUTION: Do not use . Thermometer - s LP tanks must not be turned off , and BACK at high). Flavorizer Bars and Cooking Grates- Do not put in dishwasher or submerge in the bottom tray. Preheating Your Weber Genesis Gas Barbecue is warm, wipe inside of the burner controls to "smoke" the right amount of burners tubes...

Owner Manual
Page 27
... about spare LP tanks, please call Weber-Stephen Customer Service. As the pressure is a liquid. Other LP tanks are gasoline and natural gas. Note - Dented or rusty LP tanks or LP tanks with a damaged valve may collect in the tank. s Be sure the regulator is mounted with your LP tank, make sure you . Safe handling tips for LP Gas s Liquid Propane (LP) gas is a petroleum...
... about spare LP tanks, please call Weber-Stephen Customer Service. As the pressure is a liquid. Other LP tanks are gasoline and natural gas. Note - Dented or rusty LP tanks or LP tanks with a damaged valve may collect in the tank. s Be sure the regulator is mounted with your LP tank, make sure you . Safe handling tips for LP Gas s Liquid Propane (LP) gas is a petroleum...

Owner Manual
Page 28
...gas. b) Regulator to regulator connection. d) Hose to tank connection. DO NOT OPERATE THE BARBECUE. Make sure main burners are in the "General Maintenance" section of this manual. Check that you check for example). Check: a) Hose to manifold connection. Contact Weber-Stephen Customer Service... Co., Customer Service Center or authorized dealer. Figure 8 (a). Replace using only Weber authorized replacement manifold assembly. Clean if necessary, following maintenance procedures for your safety. ƽWARNING: Check hose before each use of barbecue for nicks, ...
...gas. b) Regulator to regulator connection. d) Hose to tank connection. DO NOT OPERATE THE BARBECUE. Make sure main burners are in the "General Maintenance" section of this manual. Check that you check for example). Check: a) Hose to manifold connection. Contact Weber-Stephen Customer Service... Co., Customer Service Center or authorized dealer. Figure 8 (a). Replace using only Weber authorized replacement manifold assembly. Clean if necessary, following maintenance procedures for your safety. ƽWARNING: Check hose before each use of barbecue for nicks, ...

Owner Manual
Page 29
... off the burner control knobs. Figure 9. Figure 12. b) Turn gas OFF at least once a year. (See section "Annual Maintenance".) Also inspect and clean the Spider Stopper Guards if any outdoor gas appliance, is a target for the correct air and gas mixture. Check and clean the valve orifices at the ends of the valves. Main Burner Flame Pattern The Weber Gas Barbecue burners have been factory set for...
... off the burner control knobs. Figure 9. Figure 12. b) Turn gas OFF at least once a year. (See section "Annual Maintenance".) Also inspect and clean the Spider Stopper Guards if any outdoor gas appliance, is a target for the correct air and gas mixture. Check and clean the valve orifices at the ends of the valves. Main Burner Flame Pattern The Weber Gas Barbecue burners have been factory set for...
Owner Manual
Page 31
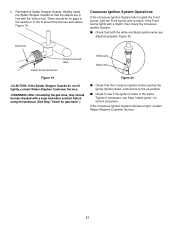
... gas lines, they should be leak checked with the Venturi fins. Crossover Ignition System Operations If the Crossover Ignition System fails to light, contact Weber-Stephen Customer Service. 31 Figure 20. Slightly rotate the Spider Stopper Guards so that both the white and black ignition wires are in the frame. Venturi fin Check fit around valve Check fit around the burners...
... gas lines, they should be leak checked with the Venturi fins. Crossover Ignition System Operations If the Crossover Ignition System fails to light, contact Weber-Stephen Customer Service. 31 Figure 20. Slightly rotate the Spider Stopper Guards so that both the white and black ignition wires are in the frame. Venturi fin Check fit around valve Check fit around the burners...
Owner Manual
Page 32
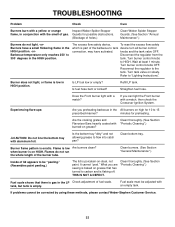
...˚ to be corrected by using these methods, please contact Weber-Stephen Customer Service. 32 knobs and the tank valve OFF. Clean bottom tray. Refer to HIGH. THIS IS NOT A DEFECT. Clean thoroughly. (See Section "Periodic Cleaning".) Fuel scale shows that has turned to flow into catch pan? Flame is erratic. Turn burner control knobs to "Lighting Instructions". TROUBLESHOOTING Problem Check Cure Burners burn with a yellow or...
...˚ to be corrected by using these methods, please contact Weber-Stephen Customer Service. 32 knobs and the tank valve OFF. Clean bottom tray. Refer to HIGH. THIS IS NOT A DEFECT. Clean thoroughly. (See Section "Periodic Cleaning".) Fuel scale shows that has turned to flow into catch pan? Flame is erratic. Turn burner control knobs to "Lighting Instructions". TROUBLESHOOTING Problem Check Cure Burners burn with a yellow or...
Owner Manual
Page 35
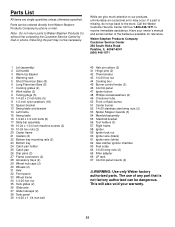
... nut 44 Cooking box 45 Burner control knobs (3) 46 Control panel 47 Igniter button 48 Phillips screws/washers (2) 49 Crossover tube 50 Front or Back burner 51 Center burner 52 1/4-20 stainless steel wing nuts (2) 53 Spider Stopper Guards (3) 54 Manifold assembly 55 Manifold bracket 56 Tool holders (3) 57 Right frame 58 Igniter 59 Igniter lock nut 60 Igniter wire (black) 61 Igniter wire (white) 62 Gas catcher ignition chamber 63...
... nut 44 Cooking box 45 Burner control knobs (3) 46 Control panel 47 Igniter button 48 Phillips screws/washers (2) 49 Crossover tube 50 Front or Back burner 51 Center burner 52 1/4-20 stainless steel wing nuts (2) 53 Spider Stopper Guards (3) 54 Manifold assembly 55 Manifold bracket 56 Tool holders (3) 57 Right frame 58 Igniter 59 Igniter lock nut 60 Igniter wire (black) 61 Igniter wire (white) 62 Gas catcher ignition chamber 63...


