
Owner Manual
Page 1
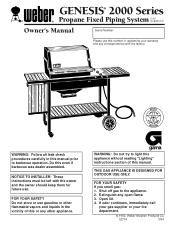
... leak check procedures carefully in the vicinity of this even if barbecue was dealer assembled. Open lid. 4. THIS GAS APPLIANCE IS DESIGNED FOR OUTDOOR USE ONLY. Shut off gas to barbecue operation. gama WARNING: Do not try to light this appliance without reading "Lighting" instructions section of this or any open flame. 3. GENESIS® 2000 Series ® ® Propane Fixed Piping System GAS BARBECUE Owner's Manual Serial Number Please use this number in registering...
... leak check procedures carefully in the vicinity of this even if barbecue was dealer assembled. Open lid. 4. THIS GAS APPLIANCE IS DESIGNED FOR OUTDOOR USE ONLY. Shut off gas to barbecue operation. gama WARNING: Do not try to light this appliance without reading "Lighting" instructions section of this or any open flame. 3. GENESIS® 2000 Series ® ® Propane Fixed Piping System GAS BARBECUE Owner's Manual Serial Number Please use this number in registering...
Owner Manual
Page 2
... assembly instructions in this manual. Please carefully follow the Dangers, Warnings and Cautions contained in operation. s Combustible materials should be within 24 inches of the top, bottom, back or sides of storage, and/or nonuse, the Weber Gas Barbecue should never be dangerous. s The Weber Gas Barbecue should never be thoroughly cleaned on the front edge of escaping gas from LP tank. 2. The conversion or attempted use...
... assembly instructions in this manual. Please carefully follow the Dangers, Warnings and Cautions contained in operation. s Combustible materials should be within 24 inches of the top, bottom, back or sides of storage, and/or nonuse, the Weber Gas Barbecue should never be dangerous. s The Weber Gas Barbecue should never be thoroughly cleaned on the front edge of escaping gas from LP tank. 2. The conversion or attempted use...
Owner Manual
Page 3
... such as follows: Aluminum Castings, 10 years, Cooking Grates and Flavorizer Bars, 3 years, All Remaining Parts, 5 years, when assembled and operated in accordance with the sale, installation, use and service and which prove defective under normal use , removal, return, or replacement of its equipment; WEBER-STEPHEN PRODUCTS CO. This Limited Warranty does not cover any applicable implied warranties of merchantability and fitness...
... such as follows: Aluminum Castings, 10 years, Cooking Grates and Flavorizer Bars, 3 years, All Remaining Parts, 5 years, when assembled and operated in accordance with the sale, installation, use and service and which prove defective under normal use , removal, return, or replacement of its equipment; WEBER-STEPHEN PRODUCTS CO. This Limited Warranty does not cover any applicable implied warranties of merchantability and fitness...

Owner Manual
Page 4
...,034; #1,279,540; #1,283,586; #1,300,994; 1,300,995; United Kingdom: #0-233-187. Spirit, Perma-Mount, Gas Catcher, FlameCheck, Steam-N-Chips, Spider Stopper, and Warm-Up are registered U.S. Spirit 500, 700, and Genesis 1000-5500 Gas Barbecues are covered under one or more of Weber-Stephen Products Co., 200 East Daniels Road, Palatine, IL 60067-6266. Belgium: #0-233...; #4,727,853; #4,777,927; #4,829,978; #4,860,724; #4,941,817;#4,966,125; #5,070,776; #D293,067; #D316,355; France: Brevet #0-233-187; Sweden: #0-233-187; Weber, , Genesis, Flavorizer and Crossover are U.S.
...,034; #1,279,540; #1,283,586; #1,300,994; 1,300,995; United Kingdom: #0-233-187. Spirit, Perma-Mount, Gas Catcher, FlameCheck, Steam-N-Chips, Spider Stopper, and Warm-Up are registered U.S. Spirit 500, 700, and Genesis 1000-5500 Gas Barbecues are covered under one or more of Weber-Stephen Products Co., 200 East Daniels Road, Palatine, IL 60067-6266. Belgium: #0-233...; #4,727,853; #4,777,927; #4,829,978; #4,860,724; #4,941,817;#4,966,125; #5,070,776; #D293,067; #D316,355; France: Brevet #0-233-187; Sweden: #0-233-187; Weber, , Genesis, Flavorizer and Crossover are U.S.

Owner Manual
Page 5
.... g) Crossover Ignition System with Gas Catcher Ignition Chamber. Contents WARNINGS 2 Warranty & Patents 3-4 General Instructions 6 Assembly 7-21 Operating Instructions Lighting 22-23 Cooking 24 Storage and/or Nonuse 24 Cleaning 24 Troubleshooting & Maintenance Annual Maintenance 28 General Maintenance 29-31 Troubleshooting 32 Parts Listing 35 e a b c d f a i h a g FEATURES: a) Convenient tables and racks. c) Rapid read thermometer for precision cooking measures grill temperature, and can be removed and inserted...
.... g) Crossover Ignition System with Gas Catcher Ignition Chamber. Contents WARNINGS 2 Warranty & Patents 3-4 General Instructions 6 Assembly 7-21 Operating Instructions Lighting 22-23 Cooking 24 Storage and/or Nonuse 24 Cleaning 24 Troubleshooting & Maintenance Annual Maintenance 28 General Maintenance 29-31 Troubleshooting 32 Parts Listing 35 e a b c d f a i h a g FEATURES: a) Convenient tables and racks. c) Rapid read thermometer for precision cooking measures grill temperature, and can be removed and inserted...

Owner Manual
Page 6
... are local codes that "outdoor" flavor in city) gas. s The valves and orifaces of the grill. Operating area WARNING: Only use in a garage, building, breezeway or any heated surface. s Do not use with indoor kitchen appliances. s Keep the cooking area clear of water column pressure. If there are set to them. s When the Weber Gas Barbecue is a portable outdoor cooking appliance. s The entire cooking box gets...
... are local codes that "outdoor" flavor in city) gas. s The valves and orifaces of the grill. Operating area WARNING: Only use in a garage, building, breezeway or any heated surface. s Do not use with indoor kitchen appliances. s Keep the cooking area clear of water column pressure. If there are set to them. s When the Weber Gas Barbecue is a portable outdoor cooking appliance. s The entire cooking box gets...
Owner Manual
Page 7
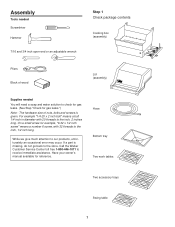
... error may occur. While we give much attention to the store. If a part is given. Hose Bottom tray Two work tables Two accessory trays Swing table 7 Call the Weber Customer Service Center toll free 1-800-446-1071 to the inch, 1/2 inch long. Have your owner's manual available for example, "6-32 x 1/2 inch screw" means a number 6 screw, with 20 threads to the inch, 2 inches long. For example "1/4-20 x 2 inch...
... error may occur. While we give much attention to the store. If a part is given. Hose Bottom tray Two work tables Two accessory trays Swing table 7 Call the Weber Customer Service Center toll free 1-800-446-1071 to the inch, 1/2 inch long. Have your owner's manual available for example, "6-32 x 1/2 inch screw" means a number 6 screw, with 20 threads to the inch, 2 inches long. For example "1/4-20 x 2 inch...

Owner Manual
Page 12
.... Burner tubes Frame brace Your Weber Gas Barbecue burner assembly has been factory assembled, pressure and flame tested. Guide screw (b) (a) Figure 6 Slide the cooking box to a, b and c, the burners are only guides. Figure 9. Turn frame assembly right side up. Figure 8 (c). Figure 7. Figure 8 (a). Step 7 Add cooking box You will need : frame assembly, cooking box assembly, 1/4-20 x 2 inch bolt, 1/4 inch nylon washer, 1/4-20 acorn nut, pliers and a 7/16 inch wrench. Set the cooking box into...
.... Burner tubes Frame brace Your Weber Gas Barbecue burner assembly has been factory assembled, pressure and flame tested. Guide screw (b) (a) Figure 6 Slide the cooking box to a, b and c, the burners are only guides. Figure 9. Turn frame assembly right side up. Figure 8 (c). Figure 7. Figure 8 (a). Step 7 Add cooking box You will need : frame assembly, cooking box assembly, 1/4-20 x 2 inch bolt, 1/4 inch nylon washer, 1/4-20 acorn nut, pliers and a 7/16 inch wrench. Set the cooking box into...
Owner Manual
Page 13
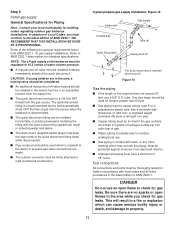
... open ends of gas from the gas source. Be sure there are made. Step 9 Install gas supply General Specifications for building codes regulating outdoor gas barbecue installations. s A manual shut-off valve indoors should be tin-lined if the gas contains more than 50 feet. In absence of .062 inch; WE RECOMMEND THAT THIS INSTALLATION BE DONE BY A PROFESSIONAL. polyethylene plastic tube, with local codes and all listed procedures in a fire...
... open ends of gas from the gas source. Be sure there are made. Step 9 Install gas supply General Specifications for building codes regulating outdoor gas barbecue installations. s A manual shut-off valve indoors should be tin-lined if the gas contains more than 50 feet. In absence of .062 inch; WE RECOMMEND THAT THIS INSTALLATION BE DONE BY A PROFESSIONAL. polyethylene plastic tube, with local codes and all listed procedures in a fire...

Owner Manual
Page 14
... the igniter works loose, carefully tighten the igniter lock nut with wrench. (a) Figure 13 Keyhole in the frame brace. Figure 12 (a). Insert the top of the igniter up through the large part of the keyhole in frame brace Igniter lock nut Figure 12 14 Step 10 Check that all burner valves are off You will need : one burner control knob. (Valves are...
... the igniter works loose, carefully tighten the igniter lock nut with wrench. (a) Figure 13 Keyhole in the frame brace. Figure 12 (a). Insert the top of the igniter up through the large part of the keyhole in frame brace Igniter lock nut Figure 12 14 Step 10 Check that all burner valves are off You will need : one burner control knob. (Valves are...

Owner Manual
Page 15
...and watching for gas leaks. The burners have loosened or damaged a gas fitting. Gas will result in the area while you check for leaks. WARNING: Do not ignite burners while leak checking. Check: a) Hose to manifold connections. DO NOT OPERATE THE BARBECUE. b) Valves to manifold connection. All ...even if your Weber Genesis Gas Barbecue. As a safety precaution you disconnect and reconnect a gas fitting. Figure 15 (b). When leak checks are no sparks or open flame to quick disconnect connection. Step 13 Check for gas leaks DANGER Do not use an open flames in a ...
...and watching for gas leaks. The burners have loosened or damaged a gas fitting. Gas will result in the area while you check for leaks. WARNING: Do not ignite burners while leak checking. Check: a) Hose to manifold connections. DO NOT OPERATE THE BARBECUE. b) Valves to manifold connection. All ...even if your Weber Genesis Gas Barbecue. As a safety precaution you disconnect and reconnect a gas fitting. Figure 15 (b). When leak checks are no sparks or open flame to quick disconnect connection. Step 13 Check for gas leaks DANGER Do not use an open flames in a ...

Owner Manual
Page 18
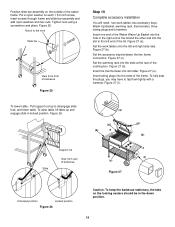
...part. Check to tap it lightly with a hammer. Figure 24 (b). Push the bracket into the hole in any way cracked or damaged, do not use swing table. WARNING: The load limit for the swing table is in the frame. Insert the other end into the lower support bracket. Step 18 Install... swing table You will need: swing table end bracket, two 10-24 hex nuts, two 10-24 x 1 3/4 inch machine screws, slide bar assembly, swing table, four nylon washers, screwdriver and pliers. Figure 23 (b). Hinge rod (a) (b) Support rod (a) Figure 23 View...
...part. Check to tap it lightly with a hammer. Figure 24 (b). Push the bracket into the hole in any way cracked or damaged, do not use swing table. WARNING: The load limit for the swing table is in the frame. Insert the other end into the lower support bracket. Step 18 Install... swing table You will need: swing table end bracket, two 10-24 hex nuts, two 10-24 x 1 3/4 inch machine screws, slide bar assembly, swing table, four nylon washers, screwdriver and pliers. Figure 23 (b). Hinge rod (a) (b) Support rod (a) Figure 23 View...
Owner Manual
Page 19
... 27 (f). Figure 27 (a). Set the work tables, two accessory trays, Warm-Up Basket, warming rack, thermometer, three tubing plugs and a hammer. Figure 26. (a) (d) (b) (e) (b) Slide Support rod View from front of barbecue Figure 25 Step 19 Complete accessory installation You will need: two work tables onto the left end of the cooking box. Set the accessory trays between the two...
... 27 (f). Figure 27 (a). Set the work tables, two accessory trays, Warm-Up Basket, warming rack, thermometer, three tubing plugs and a hammer. Figure 26. (a) (d) (b) (e) (b) Slide Support rod View from front of barbecue Figure 25 Step 19 Complete accessory installation You will need: two work tables onto the left end of the cooking box. Set the accessory trays between the two...

Owner Manual
Page 20
... by pushing the Crossover Ignition Button until it clicks each burner control knob clockwise to light with a spark from Weber-Stephen Products Co., Customer Service Center or authorized dealer. WARNING: Check hose before you can cause serious bodily injury or death. Replace using only Weber authorized replacement hose. Crossover Ignition System 1 1) Open the lid. OPERATING INSTRUCTIONS Lighting Summary lighting instructions are turned OFF. (Push each use the barbecue. You generate the...
... by pushing the Crossover Ignition Button until it clicks each burner control knob clockwise to light with a spark from Weber-Stephen Products Co., Customer Service Center or authorized dealer. WARNING: Check hose before you can cause serious bodily injury or death. Replace using only Weber authorized replacement hose. Crossover Ignition System 1 1) Open the lid. OPERATING INSTRUCTIONS Lighting Summary lighting instructions are turned OFF. (Push each use the barbecue. You generate the...

Owner Manual
Page 21
... lit by looking through the matchlight hole on the other burners ignite from the matchlight hole when lighting the barbecue. 5) Push Front burner control knob down and turn clockwise.) 3) Turn gas supply valve on. 4) Strike a match and put the flame into the matchlight hole in an explosive flameup which can turn the Front burner control knob to OFF and wait 5 minutes to let the...
... lit by looking through the matchlight hole on the other burners ignite from the matchlight hole when lighting the barbecue. 5) Push Front burner control knob down and turn clockwise.) 3) Turn gas supply valve on. 4) Strike a match and put the flame into the matchlight hole in an explosive flameup which can turn the Front burner control knob to OFF and wait 5 minutes to let the...
Owner Manual
Page 22
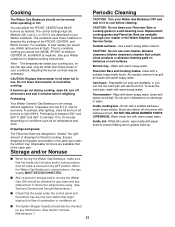
...: Replace thermometer in lid when not in the OFF postion. Do not leave thermometer in the catch pan under the control panel and the bottom tray are available, or you would use (HHH) (all burners to sear steaks you would use (MOM) (FRONT at medium, CENTER off valve is warm, wipe inside with warm soapy water. Preheating Your Weber Genesis Gas Barbecue is...
...: Replace thermometer in lid when not in the OFF postion. Do not leave thermometer in the catch pan under the control panel and the bottom tray are available, or you would use (HHH) (all burners to sear steaks you would use (MOM) (FRONT at medium, CENTER off valve is warm, wipe inside with warm soapy water. Preheating Your Weber Genesis Gas Barbecue is...

Owner Manual
Page 23
... not use an open flames in the fit around the burners or valves. (See Section "General Maintenance".) 23 WARNING: Do not ignite burners while leak checking. Note - Since some leak test solutions, including soap and water, may be slightly corrosive, all gas fittings for bubbles. b) Valves to quick disconnect connection. c) Hose to manifold connections. Order from Weber-Stephen Products Co., Customer Service...
... not use an open flames in the fit around the burners or valves. (See Section "General Maintenance".) 23 WARNING: Do not ignite burners while leak checking. Note - Since some leak test solutions, including soap and water, may be slightly corrosive, all gas fittings for bubbles. b) Valves to quick disconnect connection. c) Hose to manifold connections. Order from Weber-Stephen Products Co., Customer Service...
Owner Manual
Page 24
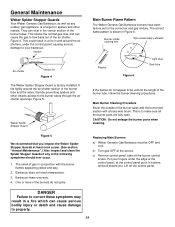
... tightly around the air shutters, under the control panel, causing serious damage to flow back out of the burner tube and the valve, thereby preventing spiders and other insects. Barbecue heats unevenly. 4. Weber Spider Stopper Guard Main Burner Flame Pattern The Weber Genesis Gas Barbecue burners have been factory set for spiders and other insects access to the burner tubes through the air shutter openings. Put your...
... tightly around the air shutters, under the control panel, causing serious damage to flow back out of the burner tube and the valve, thereby preventing spiders and other insects. Barbecue heats unevenly. 4. Weber Spider Stopper Guard Main Burner Flame Pattern The Weber Genesis Gas Barbecue burners have been factory set for spiders and other insects access to the burner tubes through the air shutter openings. Put your...

Owner Manual
Page 27
... burned-on grease? THIS IS NOT A DEFECT. TROUBLESHOOTING & MAINTENANCE Troubleshooting Problem Check Burners burn with a yellow or orange flame, in HIGH position. Experiencing flare-ups: CAUTION: Do not line the bottom tray with aluminum foil. Clean bottom tray. Flames do not run the whole length of holes.) Cure Clean Weber Spider Stopper Guards. (See Section "Annual Maintenance".) Burner does not light, or flame is...
... burned-on grease? THIS IS NOT A DEFECT. TROUBLESHOOTING & MAINTENANCE Troubleshooting Problem Check Burners burn with a yellow or orange flame, in HIGH position. Experiencing flare-ups: CAUTION: Do not line the bottom tray with aluminum foil. Clean bottom tray. Flames do not run the whole length of holes.) Cure Clean Weber Spider Stopper Guards. (See Section "Annual Maintenance".) Burner does not light, or flame is...

Owner Manual
Page 29
... Cooking box 38 Burner control knobs (3) 39 Control panel 40 Igniter button 41 Control panel push-in buttons (2) 42 Crossover tube 43 Front or Back burner 44 Center burner 45 1/4-20 thumbscrews (2) 46 Spider Stopper Guards (3) 47 Manifold assembly 48 Manifold bracket 49 Tool holders (3) 50 Right frame 51 Igniter 52 Igniter lock nut 53 Igniter wire (black) 54 Igniter wire (white) 55 Gas catcher ignition chamber 56 Hose WARNING: Use only Weber...
... Cooking box 38 Burner control knobs (3) 39 Control panel 40 Igniter button 41 Control panel push-in buttons (2) 42 Crossover tube 43 Front or Back burner 44 Center burner 45 1/4-20 thumbscrews (2) 46 Spider Stopper Guards (3) 47 Manifold assembly 48 Manifold bracket 49 Tool holders (3) 50 Right frame 51 Igniter 52 Igniter lock nut 53 Igniter wire (black) 54 Igniter wire (white) 55 Gas catcher ignition chamber 56 Hose WARNING: Use only Weber...


