
Owner Manual
Page 1
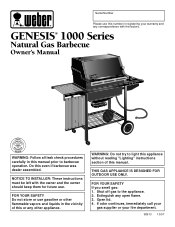
... reading "Lighting" instructions section of this or any other flammable vapors and liquids in this manual prior to the appliance. 2. Serial Number Please use this number in registering your fire department. 98613 10/97 GENESIS® 1000 Series Natural Gas Barbecue Owner's Manual WEBER WEBER ® WARNING: Follow all leak check procedures carefully in the vicinity of this even if barbecue was dealer assembled. NOTICE TO INSTALLER: These instructions must...
... reading "Lighting" instructions section of this or any other flammable vapors and liquids in this manual prior to the appliance. 2. Serial Number Please use this number in registering your fire department. 98613 10/97 GENESIS® 1000 Series Natural Gas Barbecue Owner's Manual WEBER WEBER ® WARNING: Follow all leak check procedures carefully in the vicinity of this even if barbecue was dealer assembled. NOTICE TO INSTALLER: These instructions must...
Owner Manual
Page 2
... valve. ƽ Although your liquid propane supplier. LP GAS UNITS ONLY: ƽ Use the regulator that is in operation. ƽ Use heat-resistant barbecue mitts or gloves when operating barbecue. Open the lid and wait five minutes before using the lighting instructions. ƽ Do not use a flame to check for gas leaks and burner obstructions before attempting to disconnect the gas regulator or any gas fitting while your barbecue is not natural gas. Do...
... valve. ƽ Although your liquid propane supplier. LP GAS UNITS ONLY: ƽ Use the regulator that is in operation. ƽ Use heat-resistant barbecue mitts or gloves when operating barbecue. Open the lid and wait five minutes before using the lighting instructions. ƽ Do not use a flame to check for gas leaks and burner obstructions before attempting to disconnect the gas regulator or any gas fitting while your barbecue is not natural gas. Do...
Owner Manual
Page 3
THEREFORE, YOU SHOULD RETAIN YOUR SALES SLIP OR INVOICE. Weber is not covered by insects within the burner tubes, as follows: Aluminum Castings, 10 years, Cooking Grates and Flavorizer Bars, 3 years, All Remaining Parts, 5 years, when assembled and operated in accordance with the sale, installation, use and service and which on how long an implied warranty lasts, so this limitation may not...
THEREFORE, YOU SHOULD RETAIN YOUR SALES SLIP OR INVOICE. Weber is not covered by insects within the burner tubes, as follows: Aluminum Castings, 10 years, Cooking Grates and Flavorizer Bars, 3 years, All Remaining Parts, 5 years, when assembled and operated in accordance with the sale, installation, use and service and which on how long an implied warranty lasts, so this limitation may not...

Owner Manual
Page 4
trademarks; Printed in the U.S.A. 4 Genesis Gas Barbecues are registered U.S. Weber, , Genesis, Flavorizer and Crossover are covered under the following patent nos.: U.S.A. #4,677,964; 4,727,853; #4,777,927; #4,829,978; #4,860,724; #4,941,817; #4,966,125; #5,070,776; #D293,067; #D316,355; PATENTS AND TRADEMARKS © 1997 Weber. U.S.A. Canada: Rd 1987 Reg. #58,034; #1,279,540; #1,283,586; #1,300...
trademarks; Printed in the U.S.A. 4 Genesis Gas Barbecues are registered U.S. Weber, , Genesis, Flavorizer and Crossover are covered under the following patent nos.: U.S.A. #4,677,964; 4,727,853; #4,777,927; #4,829,978; #4,860,724; #4,941,817; #4,966,125; #5,070,776; #D293,067; #D316,355; PATENTS AND TRADEMARKS © 1997 Weber. U.S.A. Canada: Rd 1987 Reg. #58,034; #1,279,540; #1,283,586; #1,300...
Owner Manual
Page 5
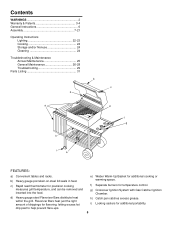
... & Patents 3-4 General Instructions 6 Assembly 7-21 Operating Instructions Lighting 22-23 Cooking 24 Storage and/or Nonuse 24 Cleaning 24 Troubleshooting & Maintenance Annual Maintenance 25 General Maintenance 26-28 Troubleshooting 29 Parts Listing 31 b e a h i a c d f g FEATURES: a) Convenient tables and racks. b) Heavy gauge porcelain-on-steel lid seals in heat. Flavorizer Bars heat just the right amount of drippings for temperature control. f) Separate burners for flavoring, letting...
... & Patents 3-4 General Instructions 6 Assembly 7-21 Operating Instructions Lighting 22-23 Cooking 24 Storage and/or Nonuse 24 Cleaning 24 Troubleshooting & Maintenance Annual Maintenance 25 General Maintenance 26-28 Troubleshooting 29 Parts Listing 31 b e a h i a c d f g FEATURES: a) Convenient tables and racks. b) Heavy gauge porcelain-on-steel lid seals in heat. Flavorizer Bars heat just the right amount of drippings for temperature control. f) Separate burners for flavoring, letting...

Owner Manual
Page 6
.... With the Weber Gas Barbecue you must be disconnected. Please read the instructions carefully before using your patio. Improper assembly can grill, barbecue, roast and bake with local codes and/or Standard CAN/CGA-B149.1 (Installation Code for assembling your Weber Gas Barbecue under the control panel and the bottom tray are difficult to be turned OFF at low pressures. Do not use your Weber Gas Barbecue. s Do not use this appliance must...
.... With the Weber Gas Barbecue you must be disconnected. Please read the instructions carefully before using your patio. Improper assembly can grill, barbecue, roast and bake with local codes and/or Standard CAN/CGA-B149.1 (Installation Code for assembling your Weber Gas Barbecue under the control panel and the bottom tray are difficult to be turned OFF at low pressures. Do not use your Weber Gas Barbecue. s Do not use this appliance must...
Owner Manual
Page 7
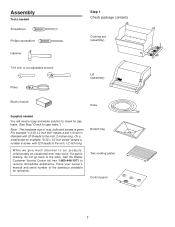
... owner's manual and serial number of the barbecue available for gas leaks.") Note - While we give much attention to receive immediate assistance. Bottom tray Two cooking grates Control panel 7 On a small screw for example, "6-32 x 1/2 inch screw" means a number 6 screw, with 20 threads to the store. Call the Weber Customer Service Center toll free 1-800-446-1071 to our products, unfortunately an occasional error...
... owner's manual and serial number of the barbecue available for gas leaks.") Note - While we give much attention to receive immediate assistance. Bottom tray Two cooking grates Control panel 7 On a small screw for example, "6-32 x 1/2 inch screw" means a number 6 screw, with 20 threads to the store. Call the Weber Customer Service Center toll free 1-800-446-1071 to our products, unfortunately an occasional error...
Owner Manual
Page 13
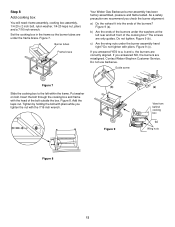
... nut. The screws are correctly aligned. Guide screw Figure 7 (b) Slide the cooking box to a, b and c, the burners are only guides. Figure 9 (c). Step 8 Add cooking box You will need: frame assembly, cooking box assembly, 1/4-20 x 2 inch bolt, nylon washer, 1/4-20 keps nut, pliers and a 7/16 inch wrench. Burner tubes Frame brace Your Weber Gas Barbecue burner assembly has been factory assembled, pressure and flame tested. b) Are the ends of the...
... nut. The screws are correctly aligned. Guide screw Figure 7 (b) Slide the cooking box to a, b and c, the burners are only guides. Figure 9 (c). Step 8 Add cooking box You will need: frame assembly, cooking box assembly, 1/4-20 x 2 inch bolt, nylon washer, 1/4-20 keps nut, pliers and a 7/16 inch wrench. Burner tubes Frame brace Your Weber Gas Barbecue burner assembly has been factory assembled, pressure and flame tested. b) Are the ends of the...

Owner Manual
Page 15
... 50 feet, use a 5/8" O.D. Step 11 Install gas supply General Specifications for building codes regulating outdoor gas barbecue installations. Contact your local municipality for Piping Note - s Pipe compound should be tin-lined if the gas contains more than 50 feet. s Gas piping may corrode the piping, must be installed in the branch fuel line in the latest edition of 18" cover. or standard weight (schedule 40) steel or wrought...
... 50 feet, use a 5/8" O.D. Step 11 Install gas supply General Specifications for building codes regulating outdoor gas barbecue installations. Contact your local municipality for Piping Note - s Pipe compound should be tin-lined if the gas contains more than 50 feet. s Gas piping may corrode the piping, must be installed in the branch fuel line in the latest edition of 18" cover. or standard weight (schedule 40) steel or wrought...

Owner Manual
Page 17
... manifold connection. When leak checks are no sparks or open flame to check for gas leaks. To barbecue (a) Locking shut off Outside house wall Check: a) Hose to quick disconnect connection. b) Valves to property. ƽWARNING: You should be slightly corrosive, all fittings for gas leaks every time you should recheck all connections should check for leaks before using...
... manifold connection. When leak checks are no sparks or open flame to check for gas leaks. To barbecue (a) Locking shut off Outside house wall Check: a) Hose to quick disconnect connection. b) Valves to property. ƽWARNING: You should be slightly corrosive, all fittings for gas leaks every time you should recheck all connections should check for leaks before using...
Owner Manual
Page 20
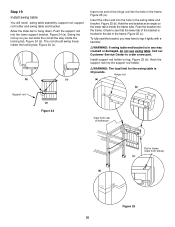
... any way cracked or damaged, do not use swing table. Call our Customer Service Center to hang down. Hinge rod (a) (b) (a) Figure 24 View from below) (c) (d) Figure 25 20 Step 19 Install swing table You will need: swing table assembly, support rod, support rod holder and swing table end bracket. Figure 24 ...lower tab of barbecue Slot in the swing table end bracket. Install support rod holder on leg. Push the bracket into the hole in frame (view from rear of the bracket is 30 pounds. The rod should swing freely inside the frame tube. Check to tap it lightly with a hammer...
... any way cracked or damaged, do not use swing table. Call our Customer Service Center to hang down. Hinge rod (a) (b) (a) Figure 24 View from below) (c) (d) Figure 25 20 Step 19 Install swing table You will need: swing table assembly, support rod, support rod holder and swing table end bracket. Figure 24 ...lower tab of barbecue Slot in the swing table end bracket. Install support rod holder on leg. Push the bracket into the hole in frame (view from rear of the bracket is 30 pounds. The rod should swing freely inside the frame tube. Check to tap it lightly with a hammer...

Owner Manual
Page 21
...holder. Figure 26 (f). (b) (c) (a) (e) (f) (d) Figure 26 ƽCAUTION: To keep the barbecue stationary, the tabs on the locking casters should be in the down position. 21 Figure 26 (a). Figure 26 (d). Set the work table, accessory rack, three tubing plugs, thermometer and a hammer. Insert the thermometer into the slots at the rear of the cooking box.... Insert the tubing plugs into the slot in place between the two frame connectors. To fully seat the plugs, you may have to tap them lightly with a hammer. Step 20 Complete accessory installation You will need...
...holder. Figure 26 (f). (b) (c) (a) (e) (f) (d) Figure 26 ƽCAUTION: To keep the barbecue stationary, the tabs on the locking casters should be in the down position. 21 Figure 26 (a). Figure 26 (d). Set the work table, accessory rack, three tubing plugs, thermometer and a hammer. Insert the thermometer into the slots at the rear of the cooking box.... Insert the tubing plugs into the slot in place between the two frame connectors. To fully seat the plugs, you may have to tap them lightly with a hammer. Step 20 Complete accessory installation You will need...

Owner Manual
Page 22
.... Replace using only Weber authorized replacement hose. Order from the FRONT burner. The Crossover Ignition System ignites the Front burner with a match. 7) After the FRONT burner is lit by pushing the Crossover Ignition Button until it clicks. ƽWARNING: Check hose before you can cause serious bodily injury or death. OPERATING INSTRUCTIONS Lighting Summary lighting instructions are turned OFF. (Push each burner control knob down and turn clockwise.) 3) Turn gas supply valve on...
.... Replace using only Weber authorized replacement hose. Order from the FRONT burner. The Crossover Ignition System ignites the Front burner with a match. 7) After the FRONT burner is lit by pushing the Crossover Ignition Button until it clicks. ƽWARNING: Check hose before you can cause serious bodily injury or death. OPERATING INSTRUCTIONS Lighting Summary lighting instructions are turned OFF. (Push each burner control knob down and turn clockwise.) 3) Turn gas supply valve on...

Owner Manual
Page 23
... burner control knob to OFF and wait 5 minutes to let the gas clear before you try again or try to light with a match. 7) After the FRONT burner is lit by looking through the matchlight hole on the other burners ignite from the matchlight hole when lighting the barbecue. 5) Push Front burner control knob down and turn clockwise.) 3) Turn gas supply valve on. 4) Strike a match and put the flame...
... burner control knob to OFF and wait 5 minutes to let the gas clear before you try again or try to light with a match. 7) After the FRONT burner is lit by looking through the matchlight hole on the other burners ignite from the matchlight hole when lighting the barbecue. 5) Push Front burner control knob down and turn clockwise.) 3) Turn gas supply valve on. 4) Strike a match and put the flame...

Owner Manual
Page 24
... box, for grease buildup before each use (HHH) (all burners and wait 5 minutes before using. (See Sections General and Annual Maintenance.) s Check that the areas under the bottom tray. Note: The temperatures inside shut off valve and/or locking outdoor shut off all burners at a low B.T.U. Storage and/or Nonuse s When storing the Weber Gas Barbecue, make sure that fit the catch pan...
... box, for grease buildup before each use (HHH) (all burners and wait 5 minutes before using. (See Sections General and Annual Maintenance.) s Check that the areas under the bottom tray. Note: The temperatures inside shut off valve and/or locking outdoor shut off all burners at a low B.T.U. Storage and/or Nonuse s When storing the Weber Gas Barbecue, make sure that fit the catch pan...
Owner Manual
Page 25
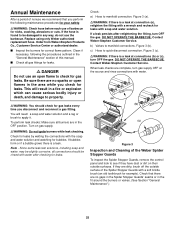
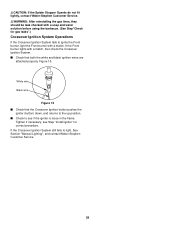
... Stopper Guards To inspect the Spider Stopper Guards, remove the control panel and look to manifold connections. s Inspect the burners for gas leaks. c) Hose to check for correct flame pattern. Contact Weber-Stephen Customer Service. If they have dust or dirt on gas supply. ƽWARNING: Do not ignite burners while leak checking. Be sure there are no gaps in the Spider...
... Stopper Guards To inspect the Spider Stopper Guards, remove the control panel and look to manifold connections. s Inspect the burners for gas leaks. c) Hose to check for correct flame pattern. Contact Weber-Stephen Customer Service. If they have dust or dirt on gas supply. ƽWARNING: Do not ignite burners while leak checking. Be sure there are no gaps in the Spider...

Owner Manual
Page 26
... the air shutters, under the control panel, causing serious damage to flow back out of the burners with a flashlight. Barbecue heats unevenly. 4. Check and clean the air shutter opening at the base of the burner tube and the valve, thereby preventing spiders and other insects. Venturi Main Burner Flame Pattern The Weber Gas Barbecue burners have been factory set for spiders and other insects...
... the air shutters, under the control panel, causing serious damage to flow back out of the burners with a flashlight. Barbecue heats unevenly. 4. Check and clean the air shutter opening at the base of the burner tube and the valve, thereby preventing spiders and other insects. Venturi Main Burner Flame Pattern The Weber Gas Barbecue burners have been factory set for spiders and other insects...
Owner Manual
Page 28
... not fit tightly, contact Weber-Stephen Customer Service. ƽWARNING: After reinstalling the gas lines, they should be leak checked with a soap and water solution before using the barbecue. (See Step"Check for correct procedure. s Check that the Crossover Ignition button pushes the igniter (button) down, and returns to light, See Section "Manual Lighting", and contact Weber-Stephen Customer Service. 28 White wire...
... not fit tightly, contact Weber-Stephen Customer Service. ƽWARNING: After reinstalling the gas lines, they should be leak checked with a soap and water solution before using the barbecue. (See Step"Check for correct procedure. s Check that the Crossover Ignition button pushes the igniter (button) down, and returns to light, See Section "Manual Lighting", and contact Weber-Stephen Customer Service. 28 White wire...
Owner Manual
Page 29
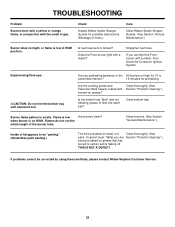
... not line the bottom tray with a match? Flame is erratic. Check Inspect Weber Spider Stopper Guards for preheating. Straighten fuel hose. Are the cooking grates and Flavorizer Bars heavily coated with burned-on grease that has turned to carbon and is on high for 10 to prescribed manner? 15 minutes for possible obstructions. (Blockage of the burner tube. TROUBLESHOOTING Problem Burners burn with...
... not line the bottom tray with a match? Flame is erratic. Check Inspect Weber Spider Stopper Guards for preheating. Straighten fuel hose. Are the cooking grates and Flavorizer Bars heavily coated with burned-on grease that has turned to carbon and is on high for 10 to prescribed manner? 15 minutes for possible obstructions. (Blockage of the burner tube. TROUBLESHOOTING Problem Burners burn with...
Owner Manual
Page 31
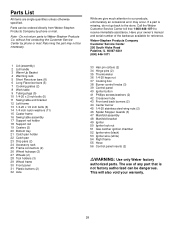
... and back burners (2) 44 Center burner 45 1/4-20 stainless steel wing nuts (2) 46 Spider Stopper Guards (3) 47 Manifold assembly 48 Manifold bracket 49 Igniter 50 Igniter lock nut 51 Gas catcher ignition chamber 52 Igniter wire (black) 53 Igniter wire (white) 54 Right frame 55 Hose 56 Control panel inserts (2) ƽWARNING: Use only Weber factory authorized parts. This will also void your owner's manual and serial number of any part that...
... and back burners (2) 44 Center burner 45 1/4-20 stainless steel wing nuts (2) 46 Spider Stopper Guards (3) 47 Manifold assembly 48 Manifold bracket 49 Igniter 50 Igniter lock nut 51 Gas catcher ignition chamber 52 Igniter wire (black) 53 Igniter wire (white) 54 Right frame 55 Hose 56 Control panel inserts (2) ƽWARNING: Use only Weber factory authorized parts. This will also void your owner's manual and serial number of any part that...


