
Instruction Sheet
Page 2
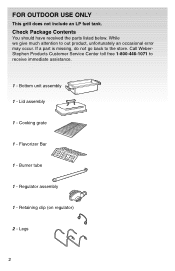
Flavorizer Bar 1 - Legs 2 Retaining clip (on regulator) 2 - If a part is missing, do not go back to receive immediate assistance. 1 - FOR OUTDOOR USE ONLY This grill does not include an LP fuel tank. Check Package Contents You should have received the parts listed below. Cooking grate 1 - Burner tube 1 - Call WeberStephen Products Customer Service Center toll free 1-800-446-1071 to the store. Bottom unit assembly 1 - Lid assembly 1 - Regulator assembly 1 - While we give much attention to out product, unfortunately an occasional error may occur.
Flavorizer Bar 1 - Legs 2 Retaining clip (on regulator) 2 - If a part is missing, do not go back to receive immediate assistance. 1 - FOR OUTDOOR USE ONLY This grill does not include an LP fuel tank. Check Package Contents You should have received the parts listed below. Cooking grate 1 - Burner tube 1 - Call WeberStephen Products Customer Service Center toll free 1-800-446-1071 to the store. Bottom unit assembly 1 - Lid assembly 1 - Regulator assembly 1 - While we give much attention to out product, unfortunately an occasional error may occur.
Instruction Sheet
Page 8
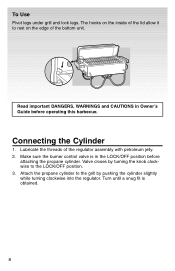
.../OFF position before operating this barbecue. Connecting the Cylinder 1. Lubricate the threads of the bottom unit. Attach the propane cylinder to the grill by turning the knob clockwise to rest on the edge of the regulator assembly with petroleum jelly. 2. Valve closes by pushing the cylinder slightly while turning clockwise into the...
.../OFF position before operating this barbecue. Connecting the Cylinder 1. Lubricate the threads of the bottom unit. Attach the propane cylinder to the grill by turning the knob clockwise to rest on the edge of the regulator assembly with petroleum jelly. 2. Valve closes by pushing the cylinder slightly while turning clockwise into the...
Instruction Sheet
Page 9
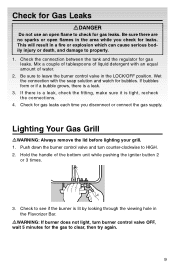
... in the LOCK/OFF position. Be sure there are no sparks or open flame to check for the gas to clear, then try again. 9 Check for leaks. Check the connection between the tank and the regulator for bubbles. Mix a couple of tablespoons of liquid detergent with the soap solution and watch for.... 2. Check to see if the burner is a leak. 3. If there is a leak, check the fitting, make sure it is tight, recheck the connections. 4. Lighting Your Gas Grill ƽWARNING: Always remove the lid before lighting your...
... in the LOCK/OFF position. Be sure there are no sparks or open flame to check for the gas to clear, then try again. 9 Check for leaks. Check the connection between the tank and the regulator for bubbles. Mix a couple of tablespoons of liquid detergent with the soap solution and watch for.... 2. Check to see if the burner is a leak. 3. If there is a leak, check the fitting, make sure it is tight, recheck the connections. 4. Lighting Your Gas Grill ƽWARNING: Always remove the lid before lighting your...
Instruction Sheet
Page 10
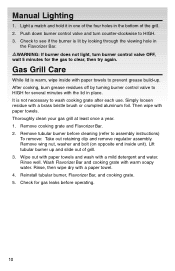
... valve to HIGH. 3. It is warm, wipe inside unit). Then wipe with a paper towel. 4. Rinse, then wipe dry with paper towels. Gas Grill Care While lid is not necessary to clear, then try again. Remove cooking grate and Flavorizer Bar. 2. Lift tubular burner up . Reinstall tubular burner... and bolt (on opposite end inside with paper towels to assembly instructions) To remove: Take out retaining clip and remove regulator assembly. Rinse well. Wash Flavorizer Bar and cooking grate with a mild detergent and water. Remove tubular burner before operating. 10 Check for...
... valve to HIGH. 3. It is warm, wipe inside unit). Then wipe with a paper towel. 4. Rinse, then wipe dry with paper towels. Gas Grill Care While lid is not necessary to clear, then try again. Remove cooking grate and Flavorizer Bar. 2. Lift tubular burner up . Reinstall tubular burner... and bolt (on opposite end inside with paper towels to assembly instructions) To remove: Take out retaining clip and remove regulator assembly. Rinse well. Wash Flavorizer Bar and cooking grate with a mild detergent and water. Remove tubular burner before operating. 10 Check for...


