
Instruction Sheet
Page 2
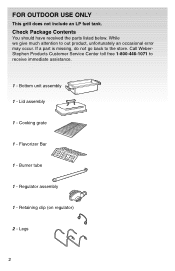
Check Package Contents You should have received the parts listed below. Retaining clip (on regulator) 2 - If a part is missing, do not go back to out product, unfortunately an occasional error may occur. Lid assembly 1 - Regulator assembly 1 - While we give much attention to the store. Cooking grate 1 - Flavorizer Bar 1 - Bottom unit assembly 1 - Call WeberStephen Products Customer Service Center toll free 1-800-446-1071 to receive immediate assistance. 1 - Legs 2 Burner tube 1 - FOR OUTDOOR USE ONLY This grill does not include an LP fuel tank.
Check Package Contents You should have received the parts listed below. Retaining clip (on regulator) 2 - If a part is missing, do not go back to out product, unfortunately an occasional error may occur. Lid assembly 1 - Regulator assembly 1 - While we give much attention to the store. Cooking grate 1 - Flavorizer Bar 1 - Bottom unit assembly 1 - Call WeberStephen Products Customer Service Center toll free 1-800-446-1071 to receive immediate assistance. 1 - Legs 2 Burner tube 1 - FOR OUTDOOR USE ONLY This grill does not include an LP fuel tank.

Instruction Sheet
Page 3
Igniter 3 Leg Lock 1 - 1/4-20 wing nut 1 - 5/16" Washer 1 - 1/4-20 x 1/2 bolt 2 - 10-24 screws 2 - 10-24 wing nuts 6 - 1/4" Flat washers 1 - 1 -
Igniter 3 Leg Lock 1 - 1/4-20 wing nut 1 - 5/16" Washer 1 - 1/4-20 x 1/2 bolt 2 - 10-24 screws 2 - 10-24 wing nuts 6 - 1/4" Flat washers 1 - 1 -

Instruction Sheet
Page 4
...washers on the straight part of the legs. Repeat with other leg. To lock the legs in bottom unit. Be careful not to scratch the porcelain finish while installing the legs. Install Leg Lock Position curved end of leg lock at corner of the straight portion of the cooking box rests on leg ...ends and insert ends into holes in place turn the leg lock around so that the rounded part sets on the...
...washers on the straight part of the legs. Repeat with other leg. To lock the legs in bottom unit. Be careful not to scratch the porcelain finish while installing the legs. Install Leg Lock Position curved end of leg lock at corner of the straight portion of the cooking box rests on leg ...ends and insert ends into holes in place turn the leg lock around so that the rounded part sets on the...
Instruction Sheet
Page 5
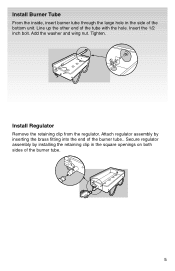
Tighten. Install Burner Tube From the inside, insert burner tube through the large hole in the square openings on both sides of the burner tube.. Secure regulator assembly by inserting the brass fitting into the end of the burner tube. 5 Line up the other end of the bottom unit. Add the washer and wing nut. Install Regulator Remove the retaining clip from the regulator. Insert the 1/2 inch bolt. Attach regulator assembly by installing the retaining clip in the side of the tube with the hole.
Tighten. Install Burner Tube From the inside, insert burner tube through the large hole in the square openings on both sides of the burner tube.. Secure regulator assembly by inserting the brass fitting into the end of the burner tube. 5 Line up the other end of the bottom unit. Add the washer and wing nut. Install Regulator Remove the retaining clip from the regulator. Insert the 1/2 inch bolt. Attach regulator assembly by installing the retaining clip in the side of the tube with the hole.
Instruction Sheet
Page 6
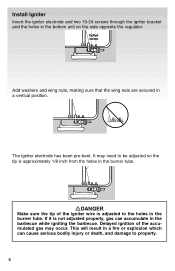
...the tip is approximately 1/8 inch from the holes in the burner tube. ƽDANGER Make sure the tip of the accumulated gas may occur. Install Igniter Insert the igniter electrode and two 10-24 screws through the igniter bracket and the holes in...regulator. The igniter electrode has been pre-bent. This will result in a fire or explosion which can accumulate in the burner tube. If it is adjusted to property. 6 Delayed ignition of the igniter wire is not adjusted properly, gas can cause serious bodily injury or death, and damage to the holes in the barbecue while igniting the barbecue...
...the tip is approximately 1/8 inch from the holes in the burner tube. ƽDANGER Make sure the tip of the accumulated gas may occur. Install Igniter Insert the igniter electrode and two 10-24 screws through the igniter bracket and the holes in...regulator. The igniter electrode has been pre-bent. This will result in a fire or explosion which can accumulate in the burner tube. If it is adjusted to property. 6 Delayed ignition of the igniter wire is not adjusted properly, gas can cause serious bodily injury or death, and damage to the holes in the barbecue while igniting the barbecue...
Instruction Sheet
Page 7
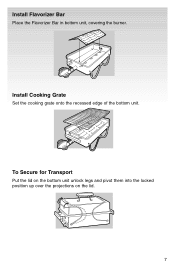
Install Flavorizer Bar Place the Flavorizer Bar in bottom unit, covering the burner. Install Cooking Grate Set the cooking grate onto the recessed edge of the bottom unit. To Secure for Transport Put the lid on the bottom unit unlock legs and pivot them into the locked position up over the projections on the lid. 7
Install Flavorizer Bar Place the Flavorizer Bar in bottom unit, covering the burner. Install Cooking Grate Set the cooking grate onto the recessed edge of the bottom unit. To Secure for Transport Put the lid on the bottom unit unlock legs and pivot them into the locked position up over the projections on the lid. 7
Instruction Sheet
Page 8
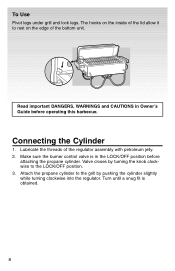
... the regulator assembly with petroleum jelly. 2. Connecting the Cylinder 1. Attach the propane cylinder to rest on the inside of the lid allow it to the grill by turning the knob clockwise to the LOCK/OFF position. 3. Make sure the burner control valve is obtained. 8 Valve closes by pushing the cylinder slightly while turning clockwise into the regulator. Turn until a snug fit is in Owner's Guide...
... the regulator assembly with petroleum jelly. 2. Connecting the Cylinder 1. Attach the propane cylinder to rest on the inside of the lid allow it to the grill by turning the knob clockwise to the LOCK/OFF position. 3. Make sure the burner control valve is obtained. 8 Valve closes by pushing the cylinder slightly while turning clockwise into the regulator. Turn until a snug fit is in Owner's Guide...
Instruction Sheet
Page 9
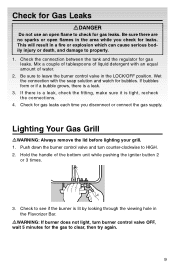
... burner does not light, turn counter-clockwise to leave the burner control valve in the LOCK/OFF position. Push down the burner control valve and turn burner control valve OFF, wait 5 minutes for the gas to see if the burner is tight, recheck the connections. 4. Be sure there are no sparks or open flame to property. 1. Check the connection between the tank and the regulator for...
... burner does not light, turn counter-clockwise to leave the burner control valve in the LOCK/OFF position. Push down the burner control valve and turn burner control valve OFF, wait 5 minutes for the gas to see if the burner is tight, recheck the connections. 4. Be sure there are no sparks or open flame to property. 1. Check the connection between the tank and the regulator for...
Instruction Sheet
Page 10
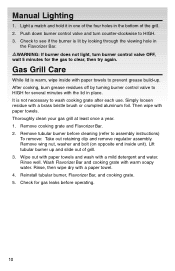
Manual Lighting 1. Gas Grill Care While lid is warm, wipe inside unit). Remove wing nut, washer and bolt (on opposite end inside with paper towels to HIGH. 3. Check for gas leaks before cleaning (refer to wash cooking grate after each use. Light a match and hold it in one of the four holes in the bottom of grill. 3. Push down burner control valve and turn burner control valve OFF, wait...
Manual Lighting 1. Gas Grill Care While lid is warm, wipe inside unit). Remove wing nut, washer and bolt (on opposite end inside with paper towels to HIGH. 3. Check for gas leaks before cleaning (refer to wash cooking grate after each use. Light a match and hold it in one of the four holes in the bottom of grill. 3. Push down burner control valve and turn burner control valve OFF, wait...
Instruction Sheet
Page 11
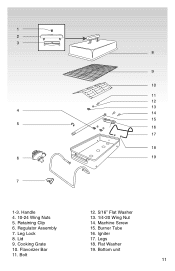
Leg Lock 8. Flavorizer Bar 11. Burner Tube 16. Regulator Assembly 7. Lid 9. Cooking Grate 10. Igniter 17. Bottom unit 11 Retaining Clip 6. Bolt 8 9 10 11 12 13 14 15 16 17 18 19 12. 5/16" Flat Washer 13. 1/4-20 Wing Nut 14. 1 2 3 4 5 6 7 1-3. Machine Screw 15. Legs 18. Handle 4. 10-24 Wing Nuts 5. Flat Washer 19.
Leg Lock 8. Flavorizer Bar 11. Burner Tube 16. Regulator Assembly 7. Lid 9. Cooking Grate 10. Igniter 17. Bottom unit 11 Retaining Clip 6. Bolt 8 9 10 11 12 13 14 15 16 17 18 19 12. 5/16" Flat Washer 13. 1/4-20 Wing Nut 14. 1 2 3 4 5 6 7 1-3. Machine Screw 15. Legs 18. Handle 4. 10-24 Wing Nuts 5. Flat Washer 19.

Instruction Sheet
Page 12
Printed in other nations globally. © 1999 Weber-Stephen Products Co., Weber, the ® silhouette, and the kettle configuration are registered trademarks of WeberStephen Products Co., 200 East Daniels Road, Palatine, IL, 60067-6266, U.S.A. This product is covered by one or more United States patents and patents in the U.S.A.
Printed in other nations globally. © 1999 Weber-Stephen Products Co., Weber, the ® silhouette, and the kettle configuration are registered trademarks of WeberStephen Products Co., 200 East Daniels Road, Palatine, IL, 60067-6266, U.S.A. This product is covered by one or more United States patents and patents in the U.S.A.


