
Owner Manual
Page 1
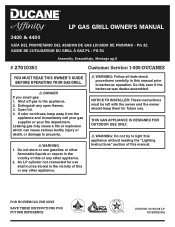
... reading the "Lighting Instructions" section of this even if the barbecue was dealer-assembled. NOTICE TO INSTALLER: These instructions must be stored in this manual. PG 51 Assembly, Ensamblaje, Montage pg.5 # 27010351 Customer Service: 1-800-DUCANES YOU MUST READ THIS OWNER'S GUIDE BEFORE OPERATING YOUR GAS GRILL ƽ DANGER If you smell gas: 1. Extinguish any other appliance. ƽ WARNING: Follow all leak-check procedures carefully in the...
... reading the "Lighting Instructions" section of this even if the barbecue was dealer-assembled. NOTICE TO INSTALLER: These instructions must be stored in this manual. PG 51 Assembly, Ensamblaje, Montage pg.5 # 27010351 Customer Service: 1-800-DUCANES YOU MUST READ THIS OWNER'S GUIDE BEFORE OPERATING YOUR GAS GRILL ƽ DANGER If you smell gas: 1. Extinguish any other appliance. ƽ WARNING: Follow all leak-check procedures carefully in the...
Owner Manual
Page 2
... liquid propane cylinder may appear to the instructions outlined in the "Assembly Guide" section. ƽ Remove all burners and leave lid closed until fire is out. ƽ Do not enlarge valve orifices or burner ports when cleaning the valves or burners. ƽ The Ducane® gas barbecue should be checked by -products produced when using this model of grill in any heated surfaces. ƽ Combustion by your Ducane® gas barbecue. ƽ...
... liquid propane cylinder may appear to the instructions outlined in the "Assembly Guide" section. ƽ Remove all burners and leave lid closed until fire is out. ƽ Do not enlarge valve orifices or burner ports when cleaning the valves or burners. ƽ The Ducane® gas barbecue should be checked by -products produced when using this model of grill in any heated surfaces. ƽ Combustion by your Ducane® gas barbecue. ƽ...
Owner Manual
Page 15
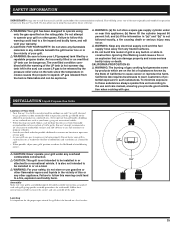
... build this model of your grill, choose a safe outdoor location away from the tank is manufactured for outdoor use only! Ducane® strongly recommends a 24" clearance to combustible surfaces and 120"(10 feet) to any fuel containers or propane cylinders. • Consult your LP (propane) tank filled by the State of potential exposure to such substances. Detailed assembly instructions are on the list of substances...
... build this model of your grill, choose a safe outdoor location away from the tank is manufactured for outdoor use only! Ducane® strongly recommends a 24" clearance to combustible surfaces and 120"(10 feet) to any fuel containers or propane cylinders. • Consult your LP (propane) tank filled by the State of potential exposure to such substances. Detailed assembly instructions are on the list of substances...
Owner Manual
Page 16
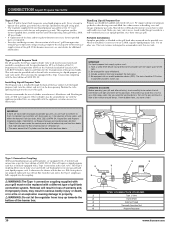
... Tubes for washing dishes. Type 1 Connective Coupling All Ducane liquid propane gas grill regulators are compatible with the latest edition of the mixture around the LP cylinder must be free and clear from your dealer for vapor withdrawal. 3. Portable Installation Complete portability is never stored inside! IMPORTANT The liquid propane tank supply system must conform with local codes or, in a liquid propane gas tank valve outlet. Use no gas...
... Tubes for washing dishes. Type 1 Connective Coupling All Ducane liquid propane gas grill regulators are compatible with the latest edition of the mixture around the LP cylinder must be free and clear from your dealer for vapor withdrawal. 3. Portable Installation Complete portability is never stored inside! IMPORTANT The liquid propane tank supply system must conform with local codes or, in a liquid propane gas tank valve outlet. Use no gas...
Owner Manual
Page 17
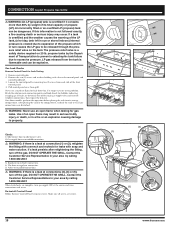
.... IMPORTANT When connecting or replacing any excess flow. inside a vehicle which would allow gas flow while a burner valve is fully engaged. 4. Only install the type of propane. CONNECTION Liquid Propane Gas Grills The propane cylinder valve connection provided with this information is not followed exactly, a fire causing death or serious injury may occur. Disconnecting Cylinder 1. Excess Flow Control The propane regulator assembly incorporates a flow...
.... IMPORTANT When connecting or replacing any excess flow. inside a vehicle which would allow gas flow while a burner valve is fully engaged. 4. Only install the type of propane. CONNECTION Liquid Propane Gas Grills The propane cylinder valve connection provided with this information is not followed exactly, a fire causing death or serious injury may occur. Disconnecting Cylinder 1. Excess Flow Control The propane regulator assembly incorporates a flow...
Owner Manual
Page 18
... the LP tank, (a hot day, tank left in your area by removing two (2) screws from the tank is a leak at connections (3), (4) or (5), turn gas supply OFF at connection (1) or (2), retighten the fitting with water. DO NOT OPERATE THE GRILL. propane tanks by calling 1-800-382-2637. 3) Regulator-to-Cylinder connection. 4) The hose-to-regulator connection. 5) Valves-to expansion of the front control panel. 4. Remove control knobs. 2. Gas Leak Checks Remove Control Panel...
... the LP tank, (a hot day, tank left in your area by removing two (2) screws from the tank is a leak at connections (3), (4) or (5), turn gas supply OFF at connection (1) or (2), retighten the fitting with water. DO NOT OPERATE THE GRILL. propane tanks by calling 1-800-382-2637. 3) Regulator-to-Cylinder connection. 4) The hose-to-regulator connection. 5) Valves-to expansion of the front control panel. 4. Remove control knobs. 2. Gas Leak Checks Remove Control Panel...
Owner Manual
Page 19
... be replaced prior to check the hose. Start over. After lighting turn the control knobs to cook...just different individual styles. ƽ WARNING: Please remember that your authorized dealer for 10 minutes with the hood down , the propane tank valve should occur, turn the Rotisserie Burner "OFF". Close Lid for the burner box to cool down and then turn off the LP cylinder valve and burner control knobs...
... be replaced prior to check the hose. Start over. After lighting turn the control knobs to cook...just different individual styles. ƽ WARNING: Please remember that your authorized dealer for 10 minutes with the hood down , the propane tank valve should occur, turn the Rotisserie Burner "OFF". Close Lid for the burner box to cool down and then turn off the LP cylinder valve and burner control knobs...
Owner Manual
Page 20
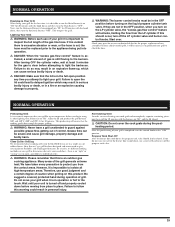
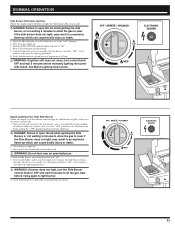
... causing damage to light burner(s). 6. Push in selected MAIN BURNER control knob and turn to light your grill: 1. Insert match holder and lit match down through cooking grate to "HI". 5. See Match Lighting instructions. Open the lid and make sure that all burners are in the "OFF" position. 2. NORMAL OPERATION Main Burner Ignition Follow the simple steps listed below to match light the Main Burner(s) of grill, in the event ignition fails: ƽ WARNING...
... causing damage to light burner(s). 6. Push in selected MAIN BURNER control knob and turn to light your grill: 1. Insert match holder and lit match down through cooking grate to "HI". 5. See Match Lighting instructions. Open the lid and make sure that all burners are in the "OFF" position. 2. NORMAL OPERATION Main Burner Ignition Follow the simple steps listed below to match light the Main Burner(s) of grill, in the event ignition fails: ƽ WARNING...
Owner Manual
Page 21
... turn the burner control(s) "OFF", wait 5 minutes and repeat the lighting procedure. 6. See Match Lighting instructions. If ignition does not occur in the "OFF" position. 2. Open the lids and check that the side burner valve is turned off (Push control knob in and turn clockwise to ensure that all burners not being used to the "OFF" position (push in a explosive 14 flame-up which...
... turn the burner control(s) "OFF", wait 5 minutes and repeat the lighting procedure. 6. See Match Lighting instructions. If ignition does not occur in the "OFF" position. 2. Open the lids and check that the side burner valve is turned off (Push control knob in and turn clockwise to ensure that all burners not being used to the "OFF" position (push in a explosive 14 flame-up which...
Owner Manual
Page 22
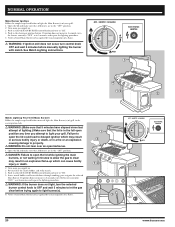
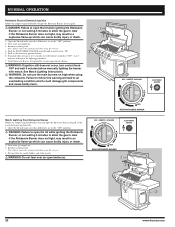
... MED REAR ROTISSERIE BURNER 1 3 67 5 1 2 22 www.ducane.com Note: Always remove the warming rack when using the rotisserie. 4. Push the ROTISSERIE BURNER control knob in the match holder and strike match. ƽ WARNING: Do not lean over an open the lid while igniting the Rotisserie Burner, or not waiting 5 minutes to allow the gas to clear if the Rotisserie Burner does not light, may result in an explosive flame-up...
... MED REAR ROTISSERIE BURNER 1 3 67 5 1 2 22 www.ducane.com Note: Always remove the warming rack when using the rotisserie. 4. Push the ROTISSERIE BURNER control knob in the match holder and strike match. ƽ WARNING: Do not lean over an open the lid while igniting the Rotisserie Burner, or not waiting 5 minutes to allow the gas to clear if the Rotisserie Burner does not light, may result in an explosive flame-up...

Owner Manual
Page 23
.... 1 2 Using the Rotisserie WARNINGS: ƽ Read all instructions before placing it is an outdoor gas cooking appliance. If use of the grill generate extreme 1 heat. Push the ROTISSERIE BURNER control knob in use or before cleaning. ƽ Do not use rotisserie for outdoor use . ƽ Do not touch hot surfaces. Do not move your unit is in 5 seconds, turn the burner control(s) "OFF", wait 5 minutes and repeat the lighting procedure...
.... 1 2 Using the Rotisserie WARNINGS: ƽ Read all instructions before placing it is an outdoor gas cooking appliance. If use of the grill generate extreme 1 heat. Push the ROTISSERIE BURNER control knob in use or before cleaning. ƽ Do not use rotisserie for outdoor use . ƽ Do not touch hot surfaces. Do not move your unit is in 5 seconds, turn the burner control(s) "OFF", wait 5 minutes and repeat the lighting procedure...

Owner Manual
Page 24
...; WARNING: Do not use only the two outside air temperatures. • Place food within area of burner. • If you wish to save drippings for gravy, place a drip pan directly under the food on top of the heat distribution plates. • Food preparation steps are the same for Rotisserie Burner under 'Rotisserie Burner Electronic Ignition'. • Set Rotisserie Burner on "MED-HI...
...; WARNING: Do not use only the two outside air temperatures. • Place food within area of burner. • If you wish to save drippings for gravy, place a drip pan directly under the food on top of the heat distribution plates. • Food preparation steps are the same for Rotisserie Burner under 'Rotisserie Burner Electronic Ignition'. • Set Rotisserie Burner on "MED-HI...

Owner Manual
Page 25
... smolder, turn control knob to "LO". (2) For a more smoky flavor, remove one of the Smoke-It-Tray®. For best results with wood chips. This will not affect the function of the cooking grates and position the SmokeIt-Tray® to allow the smoke to start in the Smoke-It-Tray® to suit your gas grill. 25...
... smolder, turn control knob to "LO". (2) For a more smoky flavor, remove one of the Smoke-It-Tray®. For best results with wood chips. This will not affect the function of the cooking grates and position the SmokeIt-Tray® to allow the smoke to start in the Smoke-It-Tray® to suit your gas grill. 25...
Owner Manual
Page 26
... is set too high. Rotisserie Bracket (Motor Bracket Side) When mounting the spit rod motor onto the motor bracket (right side burner box), the ears of the suggested grilling time. 2. HELPFUL HINTS Flare Ups Any time you cook fatty foods over an open position. 3. Flare ups are ups. See Assembly Guide for cleaning) turn the appliance control knobs to...
... is set too high. Rotisserie Bracket (Motor Bracket Side) When mounting the spit rod motor onto the motor bracket (right side burner box), the ears of the suggested grilling time. 2. HELPFUL HINTS Flare Ups Any time you cook fatty foods over an open position. 3. Flare ups are ups. See Assembly Guide for cleaning) turn the appliance control knobs to...
Owner Manual
Page 27
... burner control knobs "OFF", reconnect the regulator to the cylinder. Turn cylinder valve on ignition box. IMPORTANT • Keep appliance area clear and free from debris. 27 MAINTENANCE Yes, you paid a lot of the burner (venturi) or over a prolonged period of time, check to make your grill investment pay off the main gas supply, remove the cook grate and heat distribution plates. Wait at least 1 minute. TROUBLESHOOTING PROBLEM...
... burner control knobs "OFF", reconnect the regulator to the cylinder. Turn cylinder valve on ignition box. IMPORTANT • Keep appliance area clear and free from debris. 27 MAINTENANCE Yes, you paid a lot of the burner (venturi) or over a prolonged period of time, check to make your grill investment pay off the main gas supply, remove the cook grate and heat distribution plates. Wait at least 1 minute. TROUBLESHOOTING PROBLEM...
Owner Manual
Page 28
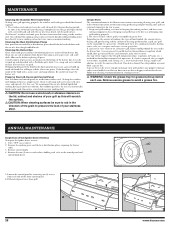
... and control panel are made from each side of grease may cause a grease build up and discarded with a flat source. 2. We recommend the use . can be used. If no leak is suspected, the gas supply system (hose, manifold, tank, fittings, etc...) must be seen under the burner box. ANNUAL MAINTENANCE Inspection of strong, sturdy stainless steel. MAINTENANCE Cleaning the Stainless Steel Cook Grate To...
... and control panel are made from each side of grease may cause a grease build up and discarded with a flat source. 2. We recommend the use . can be used. If no leak is suspected, the gas supply system (hose, manifold, tank, fittings, etc...) must be seen under the burner box. ANNUAL MAINTENANCE Inspection of strong, sturdy stainless steel. MAINTENANCE Cleaning the Stainless Steel Cook Grate To...

Owner Manual
Page 29
ANNUAL MAINTENANCE 7. You can now lift out a burner tube for inspection. (A) (B) 29 Remove two screws and nuts on the Rotis-A-Grate® (B). Remove top rear "A" support at the back of grill to get access to remove the rotisserie burner. 8. Loosen two screws and nuts that hold the manifold to the manifold bracket. For Rotisserie Burner tube removal: Disconnect the rotisserie ignition wire from the ignition module (A). Remove the four (4) screws that secure rotisserie bracket (C) to Rotisserie burners screws.
ANNUAL MAINTENANCE 7. You can now lift out a burner tube for inspection. (A) (B) 29 Remove two screws and nuts on the Rotis-A-Grate® (B). Remove top rear "A" support at the back of grill to get access to remove the rotisserie burner. 8. Loosen two screws and nuts that hold the manifold to the manifold bracket. For Rotisserie Burner tube removal: Disconnect the rotisserie ignition wire from the ignition module (A). Remove the four (4) screws that secure rotisserie bracket (C) to Rotisserie burners screws.

Owner Manual
Page 30
.... 3. Main Burner Flame Pattern The Ducane® gas barbecue burners have been factory set for spiders and other insects access to clean the outside of the burners. If the Spider/Insect screen becomes damaged or cannot be uniform throughout the burner tube, follow the main burner cleaning procedure. One or more of the burner tube. • You can nest in conjunction with a stainless steel screen...
.... 3. Main Burner Flame Pattern The Ducane® gas barbecue burners have been factory set for spiders and other insects access to clean the outside of the burners. If the Spider/Insect screen becomes damaged or cannot be uniform throughout the burner tube, follow the main burner cleaning procedure. One or more of the burner tube. • You can nest in conjunction with a stainless steel screen...

Owner Manual
Page 31
.... 2. ANNUAL MAINTENANCE Replacing the Main Burners 1. Check proper assembly before using the barbecue. 1 2 2 1 Battery Replacement of the burner tube. Remove front panel knobs, bezels and igniter Module for electronic ignition for removal of Burner Igniter Unscrew the push button igniter and remove the old battery and replace with a soap and water solution before fastening manifold/front panel in place. ƽ WARNING: After reinstalling the gas lines, they should be positioned properly over the valve orifices (2).
.... 2. ANNUAL MAINTENANCE Replacing the Main Burners 1. Check proper assembly before using the barbecue. 1 2 2 1 Battery Replacement of the burner tube. Remove front panel knobs, bezels and igniter Module for electronic ignition for removal of Burner Igniter Unscrew the push button igniter and remove the old battery and replace with a soap and water solution before fastening manifold/front panel in place. ƽ WARNING: After reinstalling the gas lines, they should be positioned properly over the valve orifices (2).
Owner Manual
Page 71
... State Zip Code 2. I'm a grilling fanatic I 'm not fanatical about who buys our grills helps us ...replacement for an old or broken charcoal grill? The first grill you very much , but I enjoy grilling very much for providing the information below. Again, this grill. . . Including yourself, how many people live in your interest in the event we need to your grill. Model Number: 4. Thank you have owned Weber charcoal grill Ducane gas grill Weber gas grill Ducane portable grill Char-Broil gas grill Weber portable grill Sunbeam gas grill Thermos gas grill Fiesta gas grill...
... State Zip Code 2. I'm a grilling fanatic I 'm not fanatical about who buys our grills helps us ...replacement for an old or broken charcoal grill? The first grill you very much , but I enjoy grilling very much for providing the information below. Again, this grill. . . Including yourself, how many people live in your interest in the event we need to your grill. Model Number: 4. Thank you have owned Weber charcoal grill Ducane gas grill Weber gas grill Ducane portable grill Char-Broil gas grill Weber portable grill Sunbeam gas grill Thermos gas grill Fiesta gas grill...


