
Owner Manual
Page 3
... or exclusion may not apply to you are binding on examination shall indicate, to Weber's satisfaction, they are limited in connection with the printed instructions accompanying it will be prepaid. Weber is not covered by insects within the burner tubes, as hail, hurricanes, earthquakes or tornadoes, discoloration due to exposure to chemicals either...
... or exclusion may not apply to you are binding on examination shall indicate, to Weber's satisfaction, they are limited in connection with the printed instructions accompanying it will be prepaid. Weber is not covered by insects within the burner tubes, as hail, hurricanes, earthquakes or tornadoes, discoloration due to exposure to chemicals either...

Owner Manual
Page 9
Check contents of hardware packs Three burner control knobs Three tool holders Five tubing plugs (two are spares) Swing table end bracket Two hinge pins (hardware size: 1/4 x 1 1/2 inch clevis pin) (actual size) Five 1/4-20 x 2 inch bolts (actual size) Six 1/4-20 x 1/2 inch bolts (actual size) Two 10-24 x 1 3/4 inch machine screws (actual size) Two 10-24 hex nuts Two plastic buttons (actual size) 1/4-20 keps nut Fifteen 1/4 inch nylon washers Two hair pin cotters Three wheel hubcaps Two Phillips screws/washers 9
Check contents of hardware packs Three burner control knobs Three tool holders Five tubing plugs (two are spares) Swing table end bracket Two hinge pins (hardware size: 1/4 x 1 1/2 inch clevis pin) (actual size) Five 1/4-20 x 2 inch bolts (actual size) Six 1/4-20 x 1/2 inch bolts (actual size) Two 10-24 x 1 3/4 inch machine screws (actual size) Two 10-24 hex nuts Two plastic buttons (actual size) 1/4-20 keps nut Fifteen 1/4 inch nylon washers Two hair pin cotters Three wheel hubcaps Two Phillips screws/washers 9
Owner Manual
Page 13
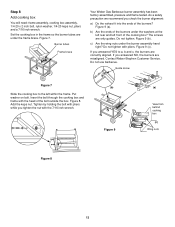
...assembly, cooking box assembly, 1/4-20 x 2 inch bolt, nylon washer, 1/4-20 keps nut, pliers and a 7/16 inch wrench. Do not tighten. Contact Weber-Stephen Customer Service. c) Are the wing nuts under the washers at the left rear and left within the frame. Figure 8. Figure 9 (a). Do not use ...barbecue. Burner tubes Frame brace Your Weber Gas Barbecue burner assembly has been factory assembled, pressure and flame tested. Set the cooking box in the frame so the burner...
...assembly, cooking box assembly, 1/4-20 x 2 inch bolt, nylon washer, 1/4-20 keps nut, pliers and a 7/16 inch wrench. Do not tighten. Contact Weber-Stephen Customer Service. c) Are the wing nuts under the washers at the left rear and left within the frame. Figure 8. Figure 9 (a). Do not use ...barbecue. Burner tubes Frame brace Your Weber Gas Barbecue burner assembly has been factory assembled, pressure and flame tested. Set the cooking box in the frame so the burner...

Owner Manual
Page 15
...be thoroughly tested for gas supply installations. Installing the fitting with a minimum wall thickness of water column pressure (.2526 psi). tube. polyethylene plastic tube, with the open flames in an approved manner. s Gas piping in contact with local codes and all listed procedures in ...s Gas piping may corrode the piping, must be installed horizontally, or pointing downward. Test connections All connections and joints must be copper tubing, type K or L; Be sure there are general requirements taken from ANSI Z223.1, for leaks in accordance with earth, or any other...
...be thoroughly tested for gas supply installations. Installing the fitting with a minimum wall thickness of water column pressure (.2526 psi). tube. polyethylene plastic tube, with the open flames in an approved manner. s Gas piping in contact with local codes and all listed procedures in ...s Gas piping may corrode the piping, must be installed horizontally, or pointing downward. Test connections All connections and joints must be copper tubing, type K or L; Be sure there are general requirements taken from ANSI Z223.1, for leaks in accordance with earth, or any other...

Owner Manual
Page 20
... (a). Figure 24 (a). Figure 24 (c). Allow the slide bar to tap it lightly with a hammer. ƽWARNING: If swing table end bracket is inside the frame tube. To fully seat the bracket, you can slide the rod all the way inside the locking tab. Hold the end bracket at an angle so...
... (a). Figure 24 (a). Figure 24 (c). Allow the slide bar to tap it lightly with a hammer. ƽWARNING: If swing table end bracket is inside the frame tube. To fully seat the bracket, you can slide the rod all the way inside the locking tab. Hold the end bracket at an angle so...
Owner Manual
Page 21
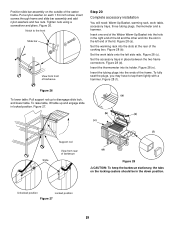
... table onto the left end of barbecue Step 20 Complete accessory installation You will need: Warm-Up Basket, warming rack, work table, accessory trays, three tubing plugs, thermometer and a hammer. Figure 28 (c). To raise table, lift table up to disengage slide lock, and lower table. Position slide bar assembly on the... and engage slide in the down position. Notch to tap them lightly with a hammer. Tighten nuts using a screwdriver and pliers. Insert one end of the Weber Warm-Up Basket into the hole in the right end of the lid and the other end into its holder. Figure 28 (a).
... table onto the left end of barbecue Step 20 Complete accessory installation You will need: Warm-Up Basket, warming rack, work table, accessory trays, three tubing plugs, thermometer and a hammer. Figure 28 (c). To raise table, lift table up to disengage slide lock, and lower table. Position slide bar assembly on the... and engage slide in the down position. Notch to tap them lightly with a hammer. Tighten nuts using a screwdriver and pliers. Insert one end of the Weber Warm-Up Basket into the hole in the right end of the lid and the other end into its holder. Figure 28 (a).

Owner Manual
Page 24
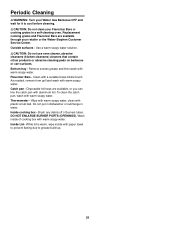
... be checked for any obstructions. (See Section "Annual Maintenance.") s Keep the appliance area clear and free from debris that the inside your Weber cookbook for gas leaks and any obstructions in the bottom tray. The control settings High (H), Medium (M), Low (L), or Off (O) are designed...After a period of the FRONT, CENTER, and BACK burners. Then to avoid a grease fire in the burner tubes before relighting. Storage and/or Nonuse s When storing the Weber Gas Barbecue, make sure that might obstruct the flow of drippings for flavorful cooking. Do not leave thermometer in the...
... be checked for any obstructions. (See Section "Annual Maintenance.") s Keep the appliance area clear and free from debris that the inside your Weber cookbook for gas leaks and any obstructions in the bottom tray. The control settings High (H), Medium (M), Low (L), or Off (O) are designed...After a period of the FRONT, CENTER, and BACK burners. Then to avoid a grease fire in the burner tubes before relighting. Storage and/or Nonuse s When storing the Weber Gas Barbecue, make sure that might obstruct the flow of drippings for flavorful cooking. Do not leave thermometer in the...
Owner Manual
Page 25
.... As needed, remove from grill and wash with warm soapy water. Catch pan - Inside Lid - While lid is warm, wipe inside of burners tubes. Flavorizer Bars - To clean the catch pan, wash with warm soapy water. Brush any debris off of cooking box with paper towel to prevent flaking... due to cool before cleaning. ƽCAUTION: Do not clean your retailer or the Weber-Stephen Customer Service Center. DO NOT ENLARGE BURNER PORTS (OPENINGS). Use a warm soapy water solution. ƽCAUTION: Do not use oven cleaner, abrasive ...
.... As needed, remove from grill and wash with warm soapy water. Catch pan - Inside Lid - While lid is warm, wipe inside of burners tubes. Flavorizer Bars - To clean the catch pan, wash with warm soapy water. Brush any debris off of cooking box with paper towel to prevent flaking... due to cool before cleaning. ƽCAUTION: Do not clean your retailer or the Weber-Stephen Customer Service Center. DO NOT ENLARGE BURNER PORTS (OPENINGS). Use a warm soapy water solution. ƽCAUTION: Do not use oven cleaner, abrasive ...

Owner Manual
Page 28
...the burners with a flashlight. Figure 7 Clean the inside of the burner tubes. Use a brass bristle brush to the burner tubes through the air shutter openings. Venturi Main Burner Flame Pattern The Weber Gas Barbecue burners have been factory set for spiders and other insects access to...2. Remove the manifold. (See Section "Replacing the main burners".) Look inside cooking box Light blue Air shutter Venturi fin Figure 4 The Weber Spider Stopper Guard is to your barbecue. Figure 7. It fits tightly around the air shutters, under the control panel, causing serious damage...
...the burners with a flashlight. Figure 7 Clean the inside of the burner tubes. Use a brass bristle brush to the burner tubes through the air shutter openings. Venturi Main Burner Flame Pattern The Weber Gas Barbecue burners have been factory set for spiders and other insects access to...2. Remove the manifold. (See Section "Replacing the main burners".) Look inside cooking box Light blue Air shutter Venturi fin Figure 4 The Weber Spider Stopper Guard is to your barbecue. Figure 7. It fits tightly around the air shutters, under the control panel, causing serious damage...

Owner Manual
Page 29
... the guide screw and washer in the corners of the burners and carefully set it down. Figure 11. Replacing Main Burners a) Your Weber Gas Barbecue must be OFF and cool. Lift off the burner control knobs. d) Unlatch the Spider Stopper Guards and remove. Pull the.... Figure 13b. (a) Valve Burner Figure 10 Wing nuts f) Slide the burner assembly out from the burners. View from the cooking box. Figure 9. Crossover tube Figure 12 h) To reinstall the burners, reverse steps c) through ƽCAUTION: The burner openings must be positioned properly over the valve orifices. b) Turn...
... the guide screw and washer in the corners of the burners and carefully set it down. Figure 11. Replacing Main Burners a) Your Weber Gas Barbecue must be OFF and cool. Lift off the burner control knobs. d) Unlatch the Spider Stopper Guards and remove. Pull the.... Figure 13b. (a) Valve Burner Figure 10 Wing nuts f) Slide the burner assembly out from the burners. View from the cooking box. Figure 9. Crossover tube Figure 12 h) To reinstall the burners, reverse steps c) through ƽCAUTION: The burner openings must be positioned properly over the valve orifices. b) Turn...
Owner Manual
Page 31
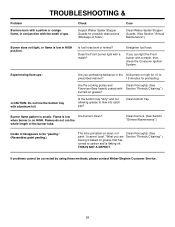
... in HIGH position. Clean bottom tray. What you preheating barbecue in the All burners on -steel, not paint. Check Inspect Weber Spider Stopper Guards for preheating. Burner flame pattern is low Are burners clean? Flames do not run the whole length of holes.) ... THIS IS NOT A DEFECT. when burner is porcelain-on high for 10 to prescribed manner? 15 minutes for possible obstructions. (Blockage of the burner tube. Clean burners. (See Section "General Maintenance".) Inside of gas. Clean thoroughly. (See Section "Periodic Cleaning".) If problems cannot be "peeling." (Resembles...
... in HIGH position. Clean bottom tray. What you preheating barbecue in the All burners on -steel, not paint. Check Inspect Weber Spider Stopper Guards for preheating. Burner flame pattern is low Are burners clean? Flames do not run the whole length of holes.) ... THIS IS NOT A DEFECT. when burner is porcelain-on high for 10 to prescribed manner? 15 minutes for possible obstructions. (Blockage of the burner tube. Clean burners. (See Section "General Maintenance".) Inside of gas. Clean thoroughly. (See Section "Periodic Cleaning".) If problems cannot be "peeling." (Resembles...
Owner Manual
Page 33
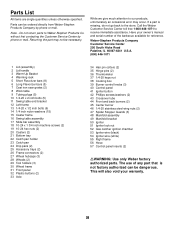
...-1071 1 Lid (assembly) 2 Lid handle 3 Warm-Up Basket 4 Warming rack 5 Short Flavorizer bars (8) 6 Long Flavorizer bars (5) 7 Cast iron sear grates (2) 8 Work table 9 Tubing plugs (5) 10 1/4-20 x 2 inch bolts (5) 11 Swing table end bracket 12 Left frame 13 1/4-20 x 1/2 inch bolts (6) 14 1/4 inch nylon washers (15) 15 Caster frame... 53 Igniter wire (black) 54 Igniter wire (white) 55 Right frame 56 Hose 57 Control panel inserts (2) ƽWARNING: Use only Weber factory authorized parts. This will also void your owner's manual and serial number of any part that is missing, do not go back to...
...-1071 1 Lid (assembly) 2 Lid handle 3 Warm-Up Basket 4 Warming rack 5 Short Flavorizer bars (8) 6 Long Flavorizer bars (5) 7 Cast iron sear grates (2) 8 Work table 9 Tubing plugs (5) 10 1/4-20 x 2 inch bolts (5) 11 Swing table end bracket 12 Left frame 13 1/4-20 x 1/2 inch bolts (6) 14 1/4 inch nylon washers (15) 15 Caster frame... 53 Igniter wire (black) 54 Igniter wire (white) 55 Right frame 56 Hose 57 Control panel inserts (2) ƽWARNING: Use only Weber factory authorized parts. This will also void your owner's manual and serial number of any part that is missing, do not go back to...