

User Manual
Page 1
Battery Pack 6. Parts Check List: 1. Base Unit 3. Wall mounting bracket INTRODUCTION HANDSET BASE UNIT TELEPHONE LINE CORD AC ADAPTER BATTERY PACK WALL MOUNT BRACKET 1 Telephone line cord 4. Handset 2. AC adapter 5.
Battery Pack 6. Parts Check List: 1. Base Unit 3. Wall mounting bracket INTRODUCTION HANDSET BASE UNIT TELEPHONE LINE CORD AC ADAPTER BATTERY PACK WALL MOUNT BRACKET 1 Telephone line cord 4. Handset 2. AC adapter 5.

User Manual
Page 2
... service or repair work to restore the product to the product. 6. Opening or removing cabinet parts other than a cordless type) during an electrical storm. d) If the product does not operate ...home, consult your telephone equipment, basic safety precautions should never be a remote risk of electric shock from lighting. 14. Never push objects of any kind on it from the type of power source indicated on the product. 3. Do not overload wall outlets and extension cords as they may touch dangerous voltage points or short out parts that are covered by the operating instructions...
... service or repair work to restore the product to the product. 6. Opening or removing cabinet parts other than a cordless type) during an electrical storm. d) If the product does not operate ...home, consult your telephone equipment, basic safety precautions should never be a remote risk of electric shock from lighting. 14. Never push objects of any kind on it from the type of power source indicated on the product. 3. Do not overload wall outlets and extension cords as they may touch dangerous voltage points or short out parts that are covered by the operating instructions...
User Manual
Page 3
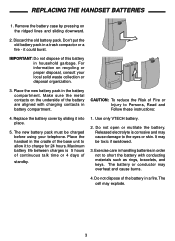
... Injury to charge for 24 hours. REPLACING THE HANDSET BATTERIES 1. IMPORTANT: Do not dispose of the battery in battery compartment. Place the new battery pack in a trash compactor or a fire - The cell may cause damage to short the battery with charging contacts in a fire. it into place. 5. Make sure the metal contacts on the ridged lines and sliding downward. 2. Remove the battery case by...
... Injury to charge for 24 hours. REPLACING THE HANDSET BATTERIES 1. IMPORTANT: Do not dispose of the battery in battery compartment. Place the new battery pack in a trash compactor or a fire - The cell may cause damage to short the battery with charging contacts in a fire. it into place. 5. Make sure the metal contacts on the ridged lines and sliding downward. 2. Remove the battery case by...
User Manual
Page 4
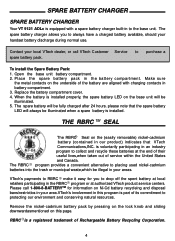
... base unit battery compartment. 2. Please call 1-800-8-BATTERYTM for you to always have a charged battery available, should your local VTech dealer, or call VTech Customer Service to purchase a spare battery pack. Contact your handset battery discharge during normal use. To install the Spare Battery Pack: 1. The spare battery will be illegal in your area.VTech's involvement in our product) indicates that the spare battery LED will be illuminated when a spare battery...
... base unit battery compartment. 2. Please call 1-800-8-BATTERYTM for you to always have a charged battery available, should your local VTech dealer, or call VTech Customer Service to purchase a spare battery pack. Contact your handset battery discharge during normal use. To install the Spare Battery Pack: 1. The spare battery will be illegal in your area.VTech's involvement in our product) indicates that the spare battery LED will be illuminated when a spare battery...
User Manual
Page 5
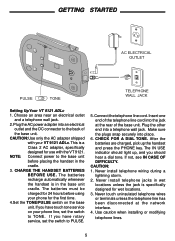
... 2 AC adapter, specifically designed for the first time. 4.Set the TONE/PULSE switch on your phone line, set the switch to the back of the base unit. If you should light up the handset and press the PHONE key. CAUTION: 1. Never install telephone jacks in the base unit cradle. Insert one end of the telephone line cord into an electrical outlet and the DC connector to PULSE. 5. CHECK FOR A DIAL TONE. The IN USE indicator should hear a dial tone. CAUTION:Use only...
... 2 AC adapter, specifically designed for the first time. 4.Set the TONE/PULSE switch on your phone line, set the switch to the back of the base unit. If you should light up the handset and press the PHONE key. CAUTION: 1. Never install telephone jacks in the base unit cradle. Insert one end of the telephone line cord into an electrical outlet and the DC connector to PULSE. 5. CHECK FOR A DIAL TONE. The IN USE indicator should hear a dial tone. CAUTION:Use only...

User Manual
Page 6
... your phone line, set the switch to be controlled by a wall switch. Position the power cord to TONE. make sure there is to PULSE. 6 Insert the other end of the base unit. If you have rotary service, set the switch to extend down on . If the switch is six feet long; The power cord is ever turned off, the phone will fit into an electrical outlet. 6.Set the dial mode switch...
... your phone line, set the switch to be controlled by a wall switch. Position the power cord to TONE. make sure there is to PULSE. 6 Insert the other end of the base unit. If you have rotary service, set the switch to extend down on . If the switch is six feet long; The power cord is ever turned off, the phone will fit into an electrical outlet. 6.Set the dial mode switch...

User Manual
Page 7
... lights when the phone line is being used by the handset. * It flashes in memory is: PHONE, MEM, Number Button (0-9). TONE/ * KEY * In PULSE dialing mode, this key is used with an incoming ring. * It flashes quickly during PGM mode. * It flashes slowly when a low battery is in use will dial out the last number that was called on the current channel. See Programming Speed Dial Numbers for details. CHAN KEY * Pressing the CHAN key when the handset is detected. MEM KEY * Press the MEM key to enter MEMORY mode...
... lights when the phone line is being used by the handset. * It flashes in memory is: PHONE, MEM, Number Button (0-9). TONE/ * KEY * In PULSE dialing mode, this key is used with an incoming ring. * It flashes quickly during PGM mode. * It flashes slowly when a low battery is in use will dial out the last number that was called on the current channel. See Programming Speed Dial Numbers for details. CHAN KEY * Pressing the CHAN key when the handset is detected. MEM KEY * Press the MEM key to enter MEMORY mode...

User Manual
Page 8
... the OFF key. POWER LED * The POWER LED illuminates when AC POWER is present. PAGE KEY * Press the PAGE key to page the handset. * Press it a second time to indicate that the handset battery is being charged. TONE/PULSE SWITCH * This switch will switch the phone between TONE dialing and PULSE dialing. 8 these keys are used during initial set up. BASE UNIT FEATURES CHARGING LED * The CHARGING LED illuminates steadily when the handset is in the base unit charge cradle.
... the OFF key. POWER LED * The POWER LED illuminates when AC POWER is present. PAGE KEY * Press the PAGE key to page the handset. * Press it a second time to indicate that the handset battery is being charged. TONE/PULSE SWITCH * This switch will switch the phone between TONE dialing and PULSE dialing. 8 these keys are used during initial set up. BASE UNIT FEATURES CHARGING LED * The CHARGING LED illuminates steadily when the handset is in the base unit charge cradle.
User Manual
Page 9
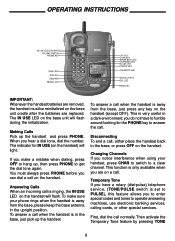
... USE (on the base unit will flash. You must be reinitialized on the handset will flash during the initialization. Answering Calls When an incoming call is set to PULSE), this feature allows you can dial a call on a call normally. Temporary Tone If you hear a dial tone, dial the number. OPERATING INSTRUCTIONS IMPORTANT: Whenever the handset batteries are removed, the handset must always press PHONE before you to enter special codes and tones to operate answering machines, use electronic banking services, calling cards, or other special services...
... USE (on the base unit will flash. You must be reinitialized on the handset will flash during the initialization. Answering Calls When an incoming call is set to PULSE), this feature allows you can dial a call on a call normally. Temporary Tone If you hear a dial tone, dial the number. OPERATING INSTRUCTIONS IMPORTANT: Whenever the handset batteries are removed, the handset must always press PHONE before you to enter special codes and tones to operate answering machines, use electronic banking services, calling cards, or other special services...
User Manual
Page 10
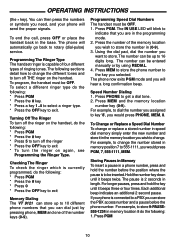
... # key * Press 5 to turn off the ringer on the handset, do the following: 1. Press PGM. The phone now exits PGM mode and you assigned to store. Press PHONE to store 9-PAUSE555-1234 in speed dial memory simply enter the new number and store it beeps three or four times. To Change or Replace a Speed Dial Number To change the different tones and to rotary (dial-pulse) service. The pause is 2 seconds in the base. For...
... # key * Press 5 to turn off the ringer on the handset, do the following: 1. Press PGM. The phone now exits PGM mode and you assigned to store. Press PHONE to store 9-PAUSE555-1234 in speed dial memory simply enter the new number and store it beeps three or four times. To Change or Replace a Speed Dial Number To change the different tones and to rotary (dial-pulse) service. The pause is 2 seconds in the base. For...
User Manual
Page 12
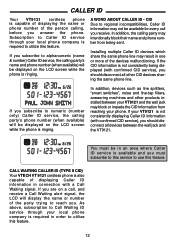
... products installed between the wall jack and the VT9121. If you subscribe to numeric (number only) Caller ID service, the calling party's phone number (when available) will display the name or number of the party trying to alphanumeric (name & number) Caller ID service, the calling party's name and phone number (when available) will be displayed on the LCD screen while the phone is ringing. CALL WAITING CALLER ID (TYPE II CID) Your VTECH VT 9121 cordless phone...
... products installed between the wall jack and the VT9121. If you subscribe to numeric (number only) Caller ID service, the calling party's phone number (when available) will display the name or number of the party trying to alphanumeric (name & number) Caller ID service, the calling party's name and phone number (when available) will be displayed on the LCD screen while the phone is ringing. CALL WAITING CALLER ID (TYPE II CID) Your VTECH VT 9121 cordless phone...
User Manual
Page 13
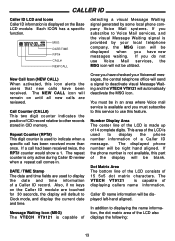
... a specific call has been received more than once. Message Waiting Icon (MSG) The VTECH VT9121 is capable of the LCD is used to use Voice Mail services, the MSG icon will be right hand aligned. The NEW CALL icon will default to display the phone number information of the display will be utilized. The displayed phone number will automatically deactivate the MSG icon. Repeat Counter (RPT#) This digit counter is used to Clock mode...
... a specific call has been received more than once. Message Waiting Icon (MSG) The VTECH VT9121 is capable of the LCD is used to use Voice Mail services, the MSG icon will be right hand aligned. The NEW CALL icon will default to display the phone number information of the display will be utilized. The displayed phone number will automatically deactivate the MSG icon. Repeat Counter (RPT#) This digit counter is used to Clock mode...
User Manual
Page 14
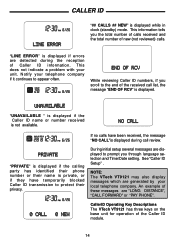
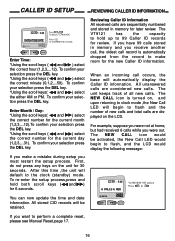
... (standby) mode. NOTE: The VTech VT9121 may also display messages which are detected during call list, the message "END OF RCV" is displayed. CallerID Operating Key Descriptions The VTech VT9121 has three keys on the base unit for operation of new (not reviewed) calls. This information tells you the total number of calls received and the total number of the Caller ID module. 14 While reviewing Caller ID numbers, if you through language selection and Time/Date setting. "LINE ERROR" is displayed during...
... (standby) mode. NOTE: The VTech VT9121 may also display messages which are detected during call list, the message "END OF RCV" is displayed. CallerID Operating Key Descriptions The VTech VT9121 has three keys on the base unit for operation of new (not reviewed) calls. This information tells you the total number of calls received and the total number of the Caller ID module. 14 While reviewing Caller ID numbers, if you through language selection and Time/Date setting. "LINE ERROR" is displayed during...
User Manual
Page 15
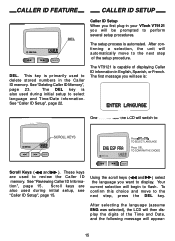
... VTech VT9121 you will be prompted to review the Caller ID memory. DEL. These keys are also used to display. Your current selection will begin to select language and Time/Date information. The DEL key is also used to perform several setup procedures. The VT9121 is automated. The setup process is capable of the Time and Date, and the following message will then display the digits of displaying Caller ID information in the Caller ID memory. See "Reviewing Caller...
... VTech VT9121 you will be prompted to review the Caller ID memory. DEL. These keys are also used to display. Your current selection will begin to select language and Time/Date information. The DEL key is also used to perform several setup procedures. The VT9121 is automated. The setup process is capable of the Time and Date, and the following message will then display the digits of displaying Caller ID information in the Caller ID memory. See "Reviewing Caller...
User Manual
Page 16
... DEL key. All stored CID records will be activated, the New Call LED would display the following message: You can now update the time and date information. The VT9121 has the capacity to hold both scroll keys ( and ) for later review. For example, suppose you were not at home, but had received 6 calls while you want to flash, and the LCD would begin to make a mistake during setup...
... DEL key. All stored CID records will be activated, the New Call LED would display the following message: You can now update the time and date information. The VT9121 has the capacity to hold both scroll keys ( and ) for later review. For example, suppose you were not at home, but had received 6 calls while you want to flash, and the LCD would begin to make a mistake during setup...

User Manual
Page 17
... Time / Date information displayed for this record will be reset to initial setup state.Also ,if there is a POWER failure for 6 seconds. Deleting Caller ID Memory While in Caller ID review mode, the calling party's name and telephone number are displayed on , then the current number being displayed was repeated. Just press and hold the DEL key for 6 seconds. The digit below the RPT# icon indicates the number if times this number. This will be erased. The unit...
... Time / Date information displayed for this record will be reset to initial setup state.Also ,if there is a POWER failure for 6 seconds. Deleting Caller ID Memory While in Caller ID review mode, the calling party's name and telephone number are displayed on , then the current number being displayed was repeated. Just press and hold the DEL key for 6 seconds. The digit below the RPT# icon indicates the number if times this number. This will be erased. The unit...
User Manual
Page 18
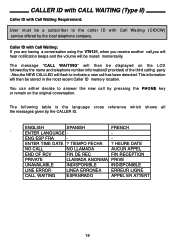
... decide to answer the new call by the CALLER ID. . The message "CALL WAITING" will flash to indicate a new call has been detected. ENG ESP FRA - - CALLER ID with CALL WAITING (Type II) Caller ID with Call Waiting Requirement: User must be a subscriber to the caller ID with Call Waiting: If you are having a conversation using the VT9121, when you receive another call,you will hear notification beeps and the volume will then be muted momentarily. FRENCH...
... decide to answer the new call by the CALLER ID. . The message "CALL WAITING" will flash to indicate a new call has been detected. ENG ESP FRA - - CALLER ID with CALL WAITING (Type II) Caller ID with Call Waiting Requirement: User must be a subscriber to the caller ID with Call Waiting: If you are having a conversation using the VT9121, when you receive another call,you will hear notification beeps and the volume will then be muted momentarily. FRENCH...
User Manual
Page 19
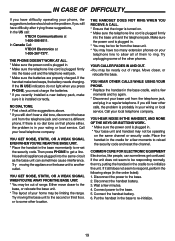
... into the same circuit as the base unit can sometimes get a line. Call your wiring or local service. In Canada Call: VTECH Electronics at 1-800-595-9511. THE PHONE DOESN'T WORK AT ALL. * Make sure the power cord is installed correctly. If you still have too many extension phones on . * Make sure the telephone line cord is no dial tone on the same channel or security code. If the handset make sure it still does not...
... into the same circuit as the base unit can sometimes get a line. Call your wiring or local service. In Canada Call: VTECH Electronics at 1-800-595-9511. THE PHONE DOESN'T WORK AT ALL. * Make sure the power cord is installed correctly. If you still have too many extension phones on . * Make sure the telephone line cord is no dial tone on the same channel or security code. If the handset make sure it still does not...
User Manual
Page 21
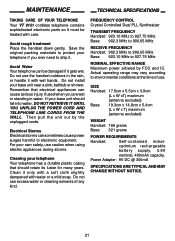
..., DO NOT RETRIEVE IT UNTIL YOU UNPLUG THE POWER CORD AND TELEPHONE LINE CORDS FROM THE WALL. FREQUENCY CONTROL Crystal Controlled Dual PLL Synthesizer TRANSMIT FREQUENCY Handset: 923.10 MHz to 927.75 MHz Base: 902.3 MHz to 906.65 MHz RECEIVE FREQUENCY Handset: 902.3 MHz to 906.65 MHz Base: 923.10 MHz to electronic equipment. Power Adapter: 9V DC @ 300mA SPECIFICATIONS ARE TYPICAL AND MAY CHANGE WITHOUT NOTICE. 21 If your base unit near a sink...
..., DO NOT RETRIEVE IT UNTIL YOU UNPLUG THE POWER CORD AND TELEPHONE LINE CORDS FROM THE WALL. FREQUENCY CONTROL Crystal Controlled Dual PLL Synthesizer TRANSMIT FREQUENCY Handset: 923.10 MHz to 927.75 MHz Base: 902.3 MHz to 906.65 MHz RECEIVE FREQUENCY Handset: 902.3 MHz to 906.65 MHz Base: 923.10 MHz to electronic equipment. Power Adapter: 9V DC @ 300mA SPECIFICATIONS ARE TYPICAL AND MAY CHANGE WITHOUT NOTICE. 21 If your base unit near a sink...

User Manual
Page 22
... that you may discontinue your service if your right to your area. Your telephone company may connect to file a complaint with regulations RSS-210 and CS-03 of the base unit containing either the FCC registration number and Ringer Equivalence Number (REN) or the IC registration number and Load Number. During notification, you will notify you receive a call. The general rule is malfunctioning, the...
... that you may discontinue your service if your right to your area. Your telephone company may connect to file a complaint with regulations RSS-210 and CS-03 of the base unit containing either the FCC registration number and Ringer Equivalence Number (REN) or the IC registration number and Load Number. During notification, you will notify you receive a call. The general rule is malfunctioning, the...


