User Manual
Page 3
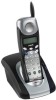
.... Base Unit 2. Battery Pack 6. In Canada, call VTech Communications, Inc. You can use this product's other features without subscribing to change your local phone service provider. This product can use compatible equipment. AC Power Adapter 4. Dual Band transmission combines the best of 2.4GHz and 900MHz technologies, providing enhanced performance over standard cordless telephones. at 1-800- 595-9511. Owner's Manual To purchase replacement battery packs, call VTech Telecommunications Canada Ltd. Caller ID with Call Waiting...
.... Base Unit 2. Battery Pack 6. In Canada, call VTech Communications, Inc. You can use this product's other features without subscribing to change your local phone service provider. This product can use compatible equipment. AC Power Adapter 4. Dual Band transmission combines the best of 2.4GHz and 900MHz technologies, providing enhanced performance over standard cordless telephones. at 1-800- 595-9511. Owner's Manual To purchase replacement battery packs, call VTech Telecommunications Canada Ltd. Caller ID with Call Waiting...
User Manual
Page 5
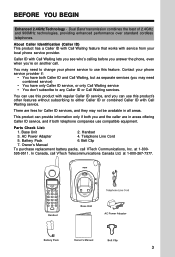
... the Base Unit. Press or until the screen displays the correct month. The current setting blinks. • Press to select TONE or PULSE. • Press SELECT, to save the displayed mode. 7 Set Time and Date If you can choose to set automatically with incoming Caller ID information. 5 GETTING STARTED INSTALLATION Table/Desk Installation CONNECT THE POWER CORD Standard electrical outlet CONNECT THE TELEPHONE LINE CORD Modular telephone jack 4 Charge the Handset Battery Place the Handset in the Base. Press or until the screen displays...
... the Base Unit. Press or until the screen displays the correct month. The current setting blinks. • Press to select TONE or PULSE. • Press SELECT, to save the displayed mode. 7 Set Time and Date If you can choose to set automatically with incoming Caller ID information. 5 GETTING STARTED INSTALLATION Table/Desk Installation CONNECT THE POWER CORD Standard electrical outlet CONNECT THE TELEPHONE LINE CORD Modular telephone jack 4 Charge the Handset Battery Place the Handset in the Base. Press or until the screen displays...

User Manual
Page 7
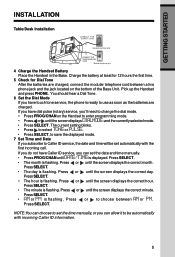
Flash/Call Waiting Access special telephone company subscriber services. press again to the idle (on hook) mode. Press REDIAL/PAUSE twice to a clearer channel while on hold and return the Handset to release hold, OR picking up to 32 digits). -ORPress REDIAL/PAUSE, then press PHONE to call , adjust the volume of what you hear. Handset Volume While on hook). 7 Program/Channel Switch to delete the last number dialed record with Handset idle...
Flash/Call Waiting Access special telephone company subscriber services. press again to the idle (on hook) mode. Press REDIAL/PAUSE twice to a clearer channel while on hold and return the Handset to release hold, OR picking up to 32 digits). -ORPress REDIAL/PAUSE, then press PHONE to call , adjust the volume of what you hear. Handset Volume While on hook). 7 Program/Channel Switch to delete the last number dialed record with Handset idle...
User Manual
Page 9
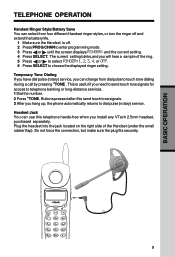
... setting blinks,and you need to send touch tone signals for access to telephone banking or long-distance services. 1 Dial the number. 2 Press *TONE. Do not force the connection, but make sure the plug fits securely. 9 This is off. 2 Press PROG/CHAN to enter programming mode. 3 Press or until the screen displays RINGER: and the current setting. 4 Press SELECT. BASIC OPERATION TELEPHONE OPERATION Handset Ringer Style/Battery Save You can select from dial pulse to touch tone dialing...
... setting blinks,and you need to send touch tone signals for access to telephone banking or long-distance services. 1 Dial the number. 2 Press *TONE. Do not force the connection, but make sure the plug fits securely. 9 This is off. 2 Press PROG/CHAN to enter programming mode. 3 Press or until the screen displays RINGER: and the current setting. 4 Press SELECT. BASIC OPERATION TELEPHONE OPERATION Handset Ringer Style/Battery Save You can select from dial pulse to touch tone dialing...
User Manual
Page 10
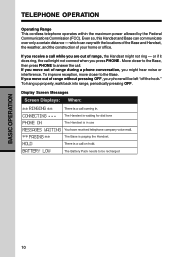
... left "off the hook." The Battery Pack needs to the Base. To improve reception, move out of your phone will be recharged 10 or if it does ring, the call . If you press PHONE . BASIC OPERATION TELEPHONE OPERATION Operating Range This cordless telephone operates within the maximum power allowed by the Federal Communications Commission (FCC). Even so, this Handset and Base can vary with the locations of...
... left "off the hook." The Battery Pack needs to the Base. To improve reception, move out of your phone will be recharged 10 or if it does ring, the call . If you press PHONE . BASIC OPERATION TELEPHONE OPERATION Operating Range This cordless telephone operates within the maximum power allowed by the Federal Communications Commission (FCC). Even so, this Handset and Base can vary with the locations of...
User Manual
Page 11
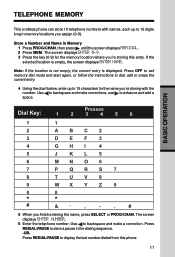
... entry. Use to backspace and make corrections; Dial Key: Presses 123456 1 1 2 ABC2 3 DEF 3 4 GHI 4 5 J KL 5 6 MN O6 7 P QRS 7 8 T UV8 9 WX Y Z 9 0 0 * * # & ’ , - . # 5 When you 're storing this phone. 11 The screen displays ENTER NUMBER. 6 Enter the telephone number. Use to backspace and make a correction. If the selected location is displayed. Press OFF to exit memory dial mode and start again, or follow the instructions to dial, edit or erase the...
... entry. Use to backspace and make corrections; Dial Key: Presses 123456 1 1 2 ABC2 3 DEF 3 4 GHI 4 5 J KL 5 6 MN O6 7 P QRS 7 8 T UV8 9 WX Y Z 9 0 0 * * # & ’ , - . # 5 When you 're storing this phone. 11 The screen displays ENTER NUMBER. 6 Enter the telephone number. Use to backspace and make a correction. If the selected location is displayed. Press OFF to exit memory dial mode and start again, or follow the instructions to dial, edit or erase the...

User Manual
Page 12
... Distinctive Ring setting. 5 Press SELECT to save the edited information. The screen displays ERASE NO YES and the number. 5 Press or until ERASE flashes. 4 Press SELECT. BASIC OPERATION TELEPHONE MEMORY 7 Press SELECT or PROG/CHAN to store your selection. Dial a Memory Number 1 Press MEM . and the current setting. 8 Press or to edit the name. Use , and the dial pad keys to change the setting. The screen displays ENTER 0-9. 2 Press the memory location key of...
... Distinctive Ring setting. 5 Press SELECT to save the edited information. The screen displays ERASE NO YES and the number. 5 Press or until ERASE flashes. 4 Press SELECT. BASIC OPERATION TELEPHONE MEMORY 7 Press SELECT or PROG/CHAN to store your selection. Dial a Memory Number 1 Press MEM . and the current setting. 8 Press or to edit the name. Use , and the dial pad keys to change the setting. The screen displays ENTER 0-9. 2 Press the memory location key of...
User Manual
Page 13
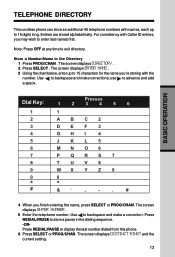
... make a correction. BASIC OPERATION Dial Key: 1 2 3 4 5 6 7 8 9 0 * # Presses 123456 1 ABC2 DEF 3 GHI 4 J KL 5 MN O6 P QRS 7 T UV8 WX Y Z 9 0 * &’ , - . # 4 When you may wish to enter last names first. The screen displays ENTER NUMBER . 5 Enter the telephone number. The screen displays DISTINCT RING? Note: Press OFF at any time to advance and add a space. use to exit directory. and the current setting. 13 The screen displays DIRECTORY . 2 Press SELECT . The screen displays...
... make a correction. BASIC OPERATION Dial Key: 1 2 3 4 5 6 7 8 9 0 * # Presses 123456 1 ABC2 DEF 3 GHI 4 J KL 5 MN O6 P QRS 7 T UV8 WX Y Z 9 0 * &’ , - . # 4 When you may wish to enter last names first. The screen displays ENTER NUMBER . 5 Enter the telephone number. The screen displays DISTINCT RING? Note: Press OFF at any time to advance and add a space. use to exit directory. and the current setting. 13 The screen displays DIRECTORY . 2 Press SELECT . The screen displays...

User Manual
Page 14
... phone to alert you want to edit. 3 When the screen displays the number you delete a stored number. The screen displays DIRECTORY . 2 Press or to scroll alphabetically through entries stored in memory. -ORPress the dial pad key for a normal ringing pattern. 8 Press SELECT or PROG/CHAN to delete, press SELECT . You'll hear a beep confirming the deletion. Then press or until ERASE flashes. 4 Press SELECT. The screen displays the name and number...
... phone to alert you want to edit. 3 When the screen displays the number you delete a stored number. The screen displays DIRECTORY . 2 Press or to scroll alphabetically through entries stored in memory. -ORPress the dial pad key for a normal ringing pattern. 8 Press SELECT or PROG/CHAN to delete, press SELECT . You'll hear a beep confirming the deletion. Then press or until ERASE flashes. 4 Press SELECT. The screen displays the name and number...
User Manual
Page 16
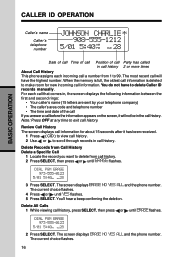
... ERASE flashes. You do not have the highest number. Delete Records from Call History Delete a Specific Call 1 Locate the record you answer a call before the information appears on the screen, it has been received. 1 Press ( CID ) to view call history. 2 Use or to scroll through records in call history. The screen displays ERASE NO YES ALL and the phone number. Note: Press OFF at any time to delete Caller ID records manually. BASIC OPERATION 3 Press SELECT. CALLER ID OPERATION Caller's name Caller's telephone number...
... ERASE flashes. You do not have the highest number. Delete Records from Call History Delete a Specific Call 1 Locate the record you answer a call before the information appears on the screen, it has been received. 1 Press ( CID ) to view call history. 2 Use or to scroll through records in call history. The screen displays ERASE NO YES ALL and the phone number. Note: Press OFF at any time to delete Caller ID records manually. BASIC OPERATION 3 Press SELECT. CALLER ID OPERATION Caller's name Caller's telephone number...

User Manual
Page 17
... change the setting. The screen displays DISTINCT RING? Choose N (for No) for this call (area code + number; 1 + area code + number; The screen displays ERASE ALL NO YES. The phone number will be displayed in the format it was received. 4 Press SELECT when the number is correctly displayed for dialing. -ORWhen the number is correctly for dialing, press PHONE. Choose Y (for this number by changing to change how the number is dialed, press # . BASIC OPERATION CALLER ID OPERATION 3 Press or until DIAL flashes...
... change the setting. The screen displays DISTINCT RING? Choose N (for No) for this call (area code + number; 1 + area code + number; The screen displays ERASE ALL NO YES. The phone number will be displayed in the format it was received. 4 Press SELECT when the number is correctly displayed for dialing. -ORWhen the number is correctly for dialing, press PHONE. Choose Y (for this number by changing to change how the number is dialed, press # . BASIC OPERATION CALLER ID OPERATION 3 Press or until DIAL flashes...
User Manual
Page 18
... battery indicator, even after charging overnight, the battery should remain charged up to six days with the ringer turned on . The telephone might operate before using the phone. The battery pack is installed in eight hours. • You can keep the battery fully charged by sliding it to charge for at least 12 hours the first charge. Use VTech battery. Place the Handset in this product only in accordance with the instructions and...
... battery indicator, even after charging overnight, the battery should remain charged up to six days with the ringer turned on . The telephone might operate before using the phone. The battery pack is installed in eight hours. • You can keep the battery fully charged by sliding it to charge for at least 12 hours the first charge. Use VTech battery. Place the Handset in this product only in accordance with the instructions and...

User Manual
Page 19
... to the Base doesn't help, try re-initializing the Handset and Base: 1 Disconnect the power to the Base. 2 Remove the Handset battery pack. 3 Wait a few minutes. 4 Connect the power to the Base. 5 Insert the Handset battery pack. 6 Put the Handset in the Base to dial pulse (see INSTALLATION). • Microwave appliances may be out of them to another of range. For Customer Service, call : • Make sure the Handset ringer is on your phone line, make sure the dial mode is...
... to the Base doesn't help, try re-initializing the Handset and Base: 1 Disconnect the power to the Base. 2 Remove the Handset battery pack. 3 Wait a few minutes. 4 Connect the power to the Base. 5 Insert the Handset battery pack. 6 Put the Handset in the Base to dial pulse (see INSTALLATION). • Microwave appliances may be out of them to another of range. For Customer Service, call : • Make sure the Handset ringer is on your phone line, make sure the dial mode is...
User Manual
Page 20
... TELEPHONE OPERATION section of your home or office might be limiting the operating range. The screen displays LIGHTS OFF:YES . 4 Press SELECT again to another channel. • Disconnect the Base from appliances while using the Handset. • The layout of this manual. If you still hear other equipment requiring touch tone signals: If you 've listened to another call after you have dial pulse (rotary) service, follow the directions...
... TELEPHONE OPERATION section of your home or office might be limiting the operating range. The screen displays LIGHTS OFF:YES . 4 Press SELECT again to another channel. • Disconnect the Base from appliances while using the Handset. • The layout of this manual. If you still hear other equipment requiring touch tone signals: If you 've listened to another call after you have dial pulse (rotary) service, follow the directions...
User Manual
Page 22
... stickers, Product serial numbers plates or electronic serial numbers have been removed, altered or rendered illegible; Product purchased, used, serviced, or shipped for commercial or institutional purposes (including but not limited to Products used in working condition. Charges for installation or set up, adjustment of customer controls, and installation or repair of systems outside the United States, or used for repair from material defects in...
... stickers, Product serial numbers plates or electronic serial numbers have been removed, altered or rendered illegible; Product purchased, used, serviced, or shipped for commercial or institutional purposes (including but not limited to Products used in working condition. Charges for installation or set up, adjustment of customer controls, and installation or repair of systems outside the United States, or used for repair from material defects in...
User Manual
Page 24
... Ringer Equivalence Number (REN) or the IC registration number and Load Number. Should you with this equipment was approved after that may cause harmful interference to which can radiate radio frequency energy and, if not installed and used in accordance with Part 68 of the Federal Communications Commission (FCC) rules. FCC Part 68 and ACTA If this telephone equipment, please contact: VTech...
... Ringer Equivalence Number (REN) or the IC registration number and Load Number. Should you with this equipment was approved after that may cause harmful interference to which can radiate radio frequency energy and, if not installed and used in accordance with Part 68 of the Federal Communications Commission (FCC) rules. FCC Part 68 and ACTA If this telephone equipment, please contact: VTech...
User Manual
Page 25
... things, an identifier indicating product approval and the Ringer Equivalence Number (REN). If you have them ring when you before interrupting service. If advance notice is listed separately. Repair instructions If this product is equipped with a corded or cordless Handset, it is malfunctioning, it must comply with this equipment does not disable your telephone line, ensure the connection of this telephone equipment can only be...
... things, an identifier indicating product approval and the Ringer Equivalence Number (REN). If you have them ring when you before interrupting service. If advance notice is listed separately. Repair instructions If this product is equipped with a corded or cordless Handset, it is malfunctioning, it must comply with this equipment does not disable your telephone line, ensure the connection of this telephone equipment can only be...

User Manual
Page 26
... no responsibility for the call to an emergency number: • You must remain on an interface may not prevent degradation of Conformity indicating that it is registered for this product has memory dialing locations, you also write the telephone number on a Declaration of services in some situations. c Testing the emergency telephone numbers you can still dial the emergency number manually if the memory dialing feature doesn't work.
... no responsibility for the call to an emergency number: • You must remain on an interface may not prevent degradation of Conformity indicating that it is registered for this product has memory dialing locations, you also write the telephone number on a Declaration of services in some situations. c Testing the emergency telephone numbers you can still dial the emergency number manually if the memory dialing feature doesn't work.

User Manual
Page 28
... Battery Pack 9V DC @ 300mA Base: 912.75 - 917.10 MHz Handset: 2411.15 - 2418.4 MHz CHANNELS 30 Channels NOMINAL EFFECTIVE RANGE Maximum power allowed by FCC and IC. MEMORY Speed Dial: 10 Memory locations 16 digits per location Directory: 40 Memory locations 16 digits per location CID : Alphanumeric Display 99 Memory locations SIZE Handset : 42mm x 57mm x 205mm Base : 147mm x 113mm x 114mm SPECIFICATIONS ARE TYPICAL AND MAY CHANGE WITHOUT NOTICE. 28 Actual operating range...
... Battery Pack 9V DC @ 300mA Base: 912.75 - 917.10 MHz Handset: 2411.15 - 2418.4 MHz CHANNELS 30 Channels NOMINAL EFFECTIVE RANGE Maximum power allowed by FCC and IC. MEMORY Speed Dial: 10 Memory locations 16 digits per location Directory: 40 Memory locations 16 digits per location CID : Alphanumeric Display 99 Memory locations SIZE Handset : 42mm x 57mm x 205mm Base : 147mm x 113mm x 114mm SPECIFICATIONS ARE TYPICAL AND MAY CHANGE WITHOUT NOTICE. 28 Actual operating range...

User Manual
Page 30
... Caller Identification 3 Parts Check List ...3 Getting Started...4 INSTALLATION ...4 Before You Install 4 Table/Desk Installation 5 Wall Installation on a standard modular Wall Plate 6 Basic Operation...7 TELEPHONE OPERATION 7 Make a Call...7 Answer a Call ...7 End a Call ...7 Program/Channel 7 Redial/Pause ...7 Handset Volume 7 Flash/Call Waiting 7 Hold ...7 Page/Handset Locator 8 Message Waiting Indicator 8 In Use/Charging Indicator 8 Handset Ringer Style/ Battery Save 9 Temporary Tone Dialing 9 Headset Jack...9 Operating Range 10 Display Screen Messages 10 TELEPHONE MEMORY...
... Caller Identification 3 Parts Check List ...3 Getting Started...4 INSTALLATION ...4 Before You Install 4 Table/Desk Installation 5 Wall Installation on a standard modular Wall Plate 6 Basic Operation...7 TELEPHONE OPERATION 7 Make a Call...7 Answer a Call ...7 End a Call ...7 Program/Channel 7 Redial/Pause ...7 Handset Volume 7 Flash/Call Waiting 7 Hold ...7 Page/Handset Locator 8 Message Waiting Indicator 8 In Use/Charging Indicator 8 Handset Ringer Style/ Battery Save 9 Temporary Tone Dialing 9 Headset Jack...9 Operating Range 10 Display Screen Messages 10 TELEPHONE MEMORY...


