
User Manual
Page 2
...outstanding 3D graphics, fast-paced game play, real video and pictures, and three unique modes of violent video games. an educational video game system designed for themselves, and parents want to play to provide a state of the art experience that they want to be healthy and beneficial ... children. Game Zone offers fast-paced video game fun, with the important job of helping your child explore a new world of learning! With V.FLASHTM - At VTech® we also understand parents' reluctance to play independently, and make choices for kids 6-10 - Also, V.FLASHTM can play and...
...outstanding 3D graphics, fast-paced game play, real video and pictures, and three unique modes of violent video games. an educational video game system designed for themselves, and parents want to play to provide a state of the art experience that they want to be healthy and beneficial ... children. Game Zone offers fast-paced video game fun, with the important job of helping your child explore a new world of learning! With V.FLASHTM - At VTech® we also understand parents' reluctance to play independently, and make choices for kids 6-10 - Also, V.FLASHTM can play and...

User Manual
Page 3
CONTENT • INTRODUCTION 1 Packaging Contents 1 Product Features 2 • GETTING STARTED 4 AC Adaptor 4 Connecting to a TV 5 Connecting to a VCR 6 Connecting the V.FLASHTM Controller 6 • SYSTEM OPERATION 7 To begin play 7 To change a V.DISCTM 7 To play an audio CD 8 To stop an audio CD 8 • ACCESSING THE MAIN MENU 9 Icon descriptions 9 Memory ...
CONTENT • INTRODUCTION 1 Packaging Contents 1 Product Features 2 • GETTING STARTED 4 AC Adaptor 4 Connecting to a TV 5 Connecting to a VCR 6 Connecting the V.FLASHTM Controller 6 • SYSTEM OPERATION 7 To begin play 7 To change a V.DISCTM 7 To play an audio CD 8 To stop an audio CD 8 • ACCESSING THE MAIN MENU 9 Icon descriptions 9 Memory ...

User Manual
Page 4
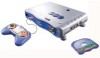
...is occurring. I N TRODUCTION Thank you for purchasing the VTech® V.FLASHTM Home Edutainment System! USER'S MANUAL V.FLASHTM MAIN UNIT AV CABLE AC ADAPTOR CONTROLLER V.DISCTM SHEATH INTRODUCTION V.DISCTM AUDIO CD DISC TRAY The package contents • V.FLASHTM Home Edutainment System Main Unit • One V.FLASHTM Controller • One...DISCTM sheath 1 With V.FLASHTM, kids can choose to finish the race or save the world, real learning is woven seamlessly into the game play , learn and explore at their own 3D models and animations. They play , so while they're having ...
...is occurring. I N TRODUCTION Thank you for purchasing the VTech® V.FLASHTM Home Edutainment System! USER'S MANUAL V.FLASHTM MAIN UNIT AV CABLE AC ADAPTOR CONTROLLER V.DISCTM SHEATH INTRODUCTION V.DISCTM AUDIO CD DISC TRAY The package contents • V.FLASHTM Home Edutainment System Main Unit • One V.FLASHTM Controller • One...DISCTM sheath 1 With V.FLASHTM, kids can choose to finish the race or save the world, real learning is woven seamlessly into the game play , learn and explore at their own 3D models and animations. They play , so while they're having ...

User Manual
Page 5
Make sure it is operating. • Do not lift or move the product during operation. • All packing materials such as tape, plastic sheets, wire ties and tags are missing, contact our technical support line number on your child's safety. Plug the V.FLASHTM Controller into this toy and should be discarded for your warranty card for specific information on a hard flat surface (carpet is not recommended) with sufficient space between the product and other items. Do not tap or hit the product while it is ON to a memory card. Press this button when the unit is placed on how to ...
Make sure it is operating. • Do not lift or move the product during operation. • All packing materials such as tape, plastic sheets, wire ties and tags are missing, contact our technical support line number on your child's safety. Plug the V.FLASHTM Controller into this toy and should be discarded for your warranty card for specific information on a hard flat surface (carpet is not recommended) with sufficient space between the product and other items. Do not tap or hit the product while it is ON to a memory card. Press this button when the unit is placed on how to ...

User Manual
Page 6
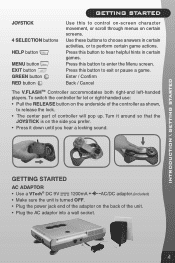
VOLUME button Control the volume of the microphone. NEXT button Press this port. AV output port Connect the AV cable jacks to this button to perform certain game actions. Controller LEFT button ENTER button JOYSTICK HELP button MENU button EXIT button RIGHT button RED button YELLOW button GREEN button BLUE button INTRODUCTION 4 ABCD buttons ENTER button 3 RELEASE button Press this before removing a V.DISCTM. Always do this button to make a selection, or to play an audio CD. HEADPHONE port Insert standard headphones into this port. (not included) MIC VOLUME ...
VOLUME button Control the volume of the microphone. NEXT button Press this port. AV output port Connect the AV cable jacks to this button to perform certain game actions. Controller LEFT button ENTER button JOYSTICK HELP button MENU button EXIT button RIGHT button RED button YELLOW button GREEN button BLUE button INTRODUCTION 4 ABCD buttons ENTER button 3 RELEASE button Press this before removing a V.DISCTM. Always do this button to make a selection, or to play an audio CD. HEADPHONE port Insert standard headphones into this port. (not included) MIC VOLUME ...
User Manual
Page 7
... right-handed use: • Pull the RELEASE button on the back of controller will pop up. INTRODUCTION \ GETTING STARTED GETTING STARTED AC ADAPTOR • Use a VTech® DC 9V 1200mA AC/DC adaptor.(included) • Make sure the unit is on certain screens. GETTING STARTED JOYSTICK 4 SELECTION buttons HELP button MENU...
... right-handed use: • Pull the RELEASE button on the back of controller will pop up. INTRODUCTION \ GETTING STARTED GETTING STARTED AC ADAPTOR • Use a VTech® DC 9V 1200mA AC/DC adaptor.(included) • Make sure the unit is on certain screens. GETTING STARTED JOYSTICK 4 SELECTION buttons HELP button MENU...

User Manual
Page 8
CONNECTING TO A TV NOTE: Before you begin making connections. Connect the V.FLASHTM to your TV or monitor by children under 3 years of age. • Only use the recommended adaptor with the toy. • The adaptor is not a toy. • Never clean a plugged-in toy with liquid. • Never use more than one adaptor. • Do not leave the toy plugged-in use for extended periods of time, it is recommended to unplug the adaptor and remove the adaptor from the Main Unit. For TVs with stereo audio inputs: - Connect the white and red plugs on the V.FLASHTM cable to the white ...
CONNECTING TO A TV NOTE: Before you begin making connections. Connect the V.FLASHTM to your TV or monitor by children under 3 years of age. • Only use the recommended adaptor with the toy. • The adaptor is not a toy. • Never clean a plugged-in toy with liquid. • Never use more than one adaptor. • Do not leave the toy plugged-in use for extended periods of time, it is recommended to unplug the adaptor and remove the adaptor from the Main Unit. For TVs with stereo audio inputs: - Connect the white and red plugs on the V.FLASHTM cable to the white ...

User Manual
Page 9
CONNECTING THE V.FLASHTM CONTROLLER Plug the controller into the PLAYER 1 port located on your VCR. Connect the yellow plug on the V.FLASHTM cable to the yellow video input terminal on your TV set, you can connect V.FLASHTM to the white and red audio input terminals on the front panel of the Main Unit as illustrated. GETTING STARTED GETTING STARTED CONNECTING TO A VCR If there is ON, please don't insert or eject the V.FLASHTM controller, MEMORY CARD or other accessories. 6 Connect the white and red plugs on the V.FLASHTM cable to a VCR. - When the power is no video IN and audio ...
CONNECTING THE V.FLASHTM CONTROLLER Plug the controller into the PLAYER 1 port located on your VCR. Connect the yellow plug on the V.FLASHTM cable to the yellow video input terminal on your TV set, you can connect V.FLASHTM to the white and red audio input terminals on the front panel of the Main Unit as illustrated. GETTING STARTED GETTING STARTED CONNECTING TO A VCR If there is ON, please don't insert or eject the V.FLASHTM controller, MEMORY CARD or other accessories. 6 Connect the white and red plugs on the V.FLASHTM cable to a VCR. - When the power is no video IN and audio ...

User Manual
Page 10
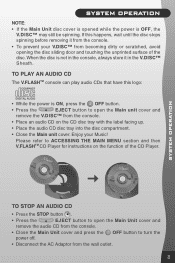
... please refer to your V.FLASHTM, press the OFF button and EJECT button to remove the V.DISC™. • Close the Main Unit cover. SYSTEM OPERATION SYSTEM OPERATION TO BEGIN PLAY • Make sure the unit is turned OFF. • Press the EJECT button to open the Main Unit cover and ... Unit cover. • Place the V.DISC™, label and printed side up, into the console and the wall outlet. • Turn the V.FLASHTM Home Edutainment System on by pressing the ON button. NOTE: • If you don't see the V.FLASHTM logo screen on TV, press the RESTART button and wait for...
... please refer to your V.FLASHTM, press the OFF button and EJECT button to remove the V.DISC™. • Close the Main Unit cover. SYSTEM OPERATION SYSTEM OPERATION TO BEGIN PLAY • Make sure the unit is turned OFF. • Press the EJECT button to open the Main Unit cover and ... Unit cover. • Place the V.DISC™, label and printed side up, into the console and the wall outlet. • Turn the V.FLASHTM Home Edutainment System on by pressing the ON button. NOTE: • If you don't see the V.FLASHTM logo screen on TV, press the RESTART button and wait for...
User Manual
Page 11
SYSTEM OPERATION TO STOP AN AUDIO CD • Press the STOP button . • Press the EJECT button to open the Main unit cover and remove the V..... • Disconnect the AC Adaptor from becoming dirty or scratched, avoid opening the disc sliding door and touching the unprinted surface of the CD Player. SYSTEM OPERATION NOTE: • If the Main Unit disc cover is opened while the power is not in the console, always store it from the console...
SYSTEM OPERATION TO STOP AN AUDIO CD • Press the STOP button . • Press the EJECT button to open the Main unit cover and remove the V..... • Disconnect the AC Adaptor from becoming dirty or scratched, avoid opening the disc sliding door and touching the unprinted surface of the CD Player. SYSTEM OPERATION NOTE: • If the Main Unit disc cover is opened while the power is not in the console, always store it from the console...

User Manual
Page 12
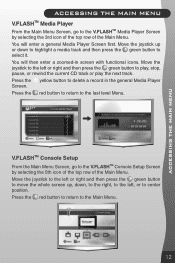
Play the audio CD which is no V.DISC™ loaded in the console. View pictures stored on a memory card. JOYSTICK Delete Select Quit current screen and return to different menus as shown below. ACCESSING THE MAIN MENU To go to the Main Menu Screen, use one inserted into the unit. Play audio tracks stored on a memory card. Application Screen Main Menu, Memory Card Management Main Menu, V.FLASHTM CD Player Main Menu, V.FLASHTM Picture Viewer Main Menu, V.FLASHTM Media Player 9 Use the controller buttons on the controller to change to last level menu Icon brief ...
Play the audio CD which is no V.DISC™ loaded in the console. View pictures stored on a memory card. JOYSTICK Delete Select Quit current screen and return to different menus as shown below. ACCESSING THE MAIN MENU To go to the Main Menu Screen, use one inserted into the unit. Play audio tracks stored on a memory card. Application Screen Main Menu, Memory Card Management Main Menu, V.FLASHTM CD Player Main Menu, V.FLASHTM Picture Viewer Main Menu, V.FLASHTM Media Player 9 Use the controller buttons on the controller to change to last level menu Icon brief ...

User Manual
Page 13
Main Menu, Console Setup Play, Pause, Stop, Rewind, Fast V.FLASHTM CD Player Backward, Fast Forward current CD track or play the Next CD track. is closed and the console is headphones. A picture will be shown here. Viewer Move the whole screen up, down,to Console Setup the right, to the left, and to view the Zoomed-in V.FLASHTM Picture previous or next picture. Press the yellow button on . Left and right cursor to center position. turned on the memory card. Move the joystick to the Main Menu. Press the red button on it or the card itself. 10 This may cause damage...
Main Menu, Console Setup Play, Pause, Stop, Rewind, Fast V.FLASHTM CD Player Backward, Fast Forward current CD track or play the Next CD track. is closed and the console is headphones. A picture will be shown here. Viewer Move the whole screen up, down,to Console Setup the right, to the left, and to view the Zoomed-in V.FLASHTM Picture previous or next picture. Press the yellow button on . Left and right cursor to center position. turned on the memory card. Move the joystick to the Main Menu. Press the red button on it or the card itself. 10 This may cause damage...

User Manual
Page 14
... to select it. You will next see a zoomed-in screen of an enlarged picture. V.FLASHTM Picture Viewer From the Main Menu Screen, go to the V.FLASH™ CD Player Screen by selecting the 4th icon of the top row of the Main Menu. Press the red button to return to play...
... to select it. You will next see a zoomed-in screen of an enlarged picture. V.FLASHTM Picture Viewer From the Main Menu Screen, go to the V.FLASH™ CD Player Screen by selecting the 4th icon of the top row of the Main Menu. Press the red button to return to play...
User Manual
Page 15
Press the yellow button to center position. Move the joystick to the left or right and then press the green button to move the whole screen up or down , to the right, to the left or right and then press the green button to the V.FLASHTM Console Setup Screen by selecting the 3rd icon of the top row of the Main Menu. You will enter a general Media Player Screen first. V.FLASHTM Console Setup From the Main Menu Screen, go to select it. Move the joystick to the left , or to delete a record in screen with functional icons. Press the red button to return to the last level Menu....
Press the yellow button to center position. Move the joystick to the left or right and then press the green button to move the whole screen up or down , to the right, to the left or right and then press the green button to the V.FLASHTM Console Setup Screen by selecting the 3rd icon of the top row of the Main Menu. You will enter a general Media Player Screen first. V.FLASHTM Console Setup From the Main Menu Screen, go to select it. Move the joystick to the left , or to delete a record in screen with functional icons. Press the red button to return to the last level Menu....

User Manual
Page 16
... prolonged period of time may experience epileptic seizures or momentary loss of consciousness when viewing certain types of heat. 3. While the V.FLASHTM Home Edutainment System does not contribute to the cord, plug, enclosure and other parts. Unplug the adaptor and remove the adaptor from water. 6. Avoid dropping... it out of direct sunlight and away from direct sources of flashing colors or patterns, especially on your physician. In the event of such damage, the V.FLASHTM must not be regularly examined for ...
... prolonged period of time may experience epileptic seizures or momentary loss of consciousness when viewing certain types of heat. 3. While the V.FLASHTM Home Edutainment System does not contribute to the cord, plug, enclosure and other parts. Unplug the adaptor and remove the adaptor from water. 6. Avoid dropping... it out of direct sunlight and away from direct sources of flashing colors or patterns, especially on your physician. In the event of such damage, the V.FLASHTM must not be regularly examined for ...

User Manual
Page 17
Check the connections between the V.FLASHTM and the TV or VCR (if used ) and review the appropriate connection in this connection is made. 3. Try to the appropriate input channel. Power Indicator 1. Wait for a few seconds, press the ON button again. 4. lines Sound is OK, it is buzzing 1. Make sure that all controllers and accessories (e.g. Make sure that the joytsick on the Controller is centered when the unit is turned on 1. Check the audio and video connections between the console and the TV or VCR (if used ). 5. when pressing 2. If it may be a problem with...
Check the connections between the V.FLASHTM and the TV or VCR (if used ) and review the appropriate connection in this connection is made. 3. Try to the appropriate input channel. Power Indicator 1. Wait for a few seconds, press the ON button again. 4. lines Sound is OK, it is buzzing 1. Make sure that all controllers and accessories (e.g. Make sure that the joytsick on the Controller is centered when the unit is turned on 1. Check the audio and video connections between the console and the TV or VCR (if used ). 5. when pressing 2. If it may be a problem with...

User Manual
Page 18
.... Internet : www.vtechkids.com Phone : 1-800-521-2010 in Canada 15 Before requesting support, please be solved by wiping with any type of your V.FLASHTM Home Edutainment System, please visit us online or contact our Consumer Services Department with a soft cotton cloth (don't use paper) from the CD tray; check for your product...
.... Internet : www.vtechkids.com Phone : 1-800-521-2010 in Canada 15 Before requesting support, please be solved by wiping with any type of your V.FLASHTM Home Edutainment System, please visit us online or contact our Consumer Services Department with a soft cotton cloth (don't use paper) from the CD tray; check for your product...

User Manual
Page 19
...dead battery, or repairs. and its suppliers assume no responsibility for any damage or loss caused by the party responsible for help. VTech® Electronics North America, L.L.C. Caution: changes or modifications not expressly approved by deletion of data as a result of the FCC... Rules. OTHER INFO OTHER INFO OTHER INFO DISCLAIMER AND LIMITATION OF LIABILITY VTech® Electronics North America, L.L.C. Increase the separation between the equipment and receiver. -- and its suppliers assume no responsibility for a Class...
...dead battery, or repairs. and its suppliers assume no responsibility for any damage or loss caused by the party responsible for help. VTech® Electronics North America, L.L.C. Caution: changes or modifications not expressly approved by deletion of data as a result of the FCC... Rules. OTHER INFO OTHER INFO OTHER INFO DISCLAIMER AND LIMITATION OF LIABILITY VTech® Electronics North America, L.L.C. Increase the separation between the equipment and receiver. -- and its suppliers assume no responsibility for a Class...

User Manual
Page 20
2006 © VTech Printed in China 91-02177-000-000
2006 © VTech Printed in China 91-02177-000-000