

User Manual
Page 1
® Smart Start® Nighty Nite Nature Light™ USER'S MANUAL © VTECH 91-01491-005
® Smart Start® Nighty Nite Nature Light™ USER'S MANUAL © VTECH 91-01491-005

User Manual
Page 2
... child's natural growth and discovery skills. When it 's introducing numbers and letters, identifying colors and shapes, or stimulating senses with lights and music, all of their ability. Dear Parent: At VTECH® we know that enlighten, entertain and develop minds, at VTECH® we see the potential in every child. 1 Whether it comes to the best of our electronic learning products...
... child's natural growth and discovery skills. When it 's introducing numbers and letters, identifying colors and shapes, or stimulating senses with lights and music, all of their ability. Dear Parent: At VTECH® we know that enlighten, entertain and develop minds, at VTECH® we see the potential in every child. 1 Whether it comes to the best of our electronic learning products...

User Manual
Page 3
... and cries after the product powers-down, the product will automatically re-activate, soothing baby off to dreamland. ON/OFF MODE SELECTOR SWITCH CRIB ATTACHMENT STRAPS TIME SELECTOR SWITCH LIGHT BUTTON LIGHT PROJECTION ™ FOCUS DIAL VOLUME DIAL SOUND SENSOR ROCKING MOON AND BEAR SHOOTING STARS MUSIC NOTE BUTTON 2 The VTech® Nighty Nite Nature Light™ uses a combination of classical melodies, nature sound effects, and lights to soothe baby off to entertain and educate...
... and cries after the product powers-down, the product will automatically re-activate, soothing baby off to dreamland. ON/OFF MODE SELECTOR SWITCH CRIB ATTACHMENT STRAPS TIME SELECTOR SWITCH LIGHT BUTTON LIGHT PROJECTION ™ FOCUS DIAL VOLUME DIAL SOUND SENSOR ROCKING MOON AND BEAR SHOOTING STARS MUSIC NOTE BUTTON 2 The VTech® Nighty Nite Nature Light™ uses a combination of classical melodies, nature sound effects, and lights to soothe baby off to entertain and educate...

User Manual
Page 4
....) 4. Replace the battery cover and tighten the screw to loosen the screw. 3. Use a coin or screwdriver to secure the battery cover. 3 INCLUDED IN THIS PACKAGE - Make sure the unit is recommended for your child's safety. BATTERY INSTALLATION 1. Two crib attachment straps - Install 4 new "C" size (UM-2/LR14) batteries following the diagram inside the battery box. (The use of new alkaline batteries is turned OFF. 2. One VTech® Nighty Nite Nature Light™ - One instruction manual WARNING...
....) 4. Replace the battery cover and tighten the screw to loosen the screw. 3. Use a coin or screwdriver to secure the battery cover. 3 INCLUDED IN THIS PACKAGE - Make sure the unit is recommended for your child's safety. BATTERY INSTALLATION 1. Two crib attachment straps - Install 4 new "C" size (UM-2/LR14) batteries following the diagram inside the battery box. (The use of new alkaline batteries is turned OFF. 2. One VTech® Nighty Nite Nature Light™ - One instruction manual WARNING...

User Manual
Page 5
... old and new batteries. • Do not use batteries of different types. • Remove exhausted or new batteries from the equipment when the unit will be happy to play again. Interrupt the power supply by removing the batteries. 3. Please turn the unit OFF. 2. WE DO NOT RECOMMEND THE USE OF RECHARGEABLE BATTERIES. or 1-800-267-7377 in Canada, and a service representative will not be used for an extended period of time...
... old and new batteries. • Do not use batteries of different types. • Remove exhausted or new batteries from the equipment when the unit will be happy to play again. Interrupt the power supply by removing the batteries. 3. Please turn the unit OFF. 2. WE DO NOT RECOMMEND THE USE OF RECHARGEABLE BATTERIES. or 1-800-267-7377 in Canada, and a service representative will not be used for an extended period of time...

User Manual
Page 6
Make sure the unit is securely fastened to the new light bulb. Gently pull out the old light bulb and remove the protection ring from the old light bulb. VOL. 4. Replace the light bulb cover and secure the screw using a coin or screwdriver. 5 Place the protection ring around the new light bulb and turn the ring until it is turned OFF. LIGHT BULB REPLACEMENT 1. Use a coin or screwdriver to the new light bulb. Carefully...
Make sure the unit is securely fastened to the new light bulb. Gently pull out the old light bulb and remove the protection ring from the old light bulb. VOL. 4. Replace the light bulb cover and secure the screw using a coin or screwdriver. 5 Place the protection ring around the new light bulb and turn the ring until it is turned OFF. LIGHT BULB REPLACEMENT 1. Use a coin or screwdriver to the new light bulb. Carefully...

User Manual
Page 7
... follow the instructions below carefully and make sure both straps over the top rail. Please check the unit frequently to make sure the final assembly is still secure. Pull slightly on the top of the VTech® Nighty Nite Nature Light™ to the desired time setting. 6 Slip the top of the strap under the slot on a dresser. Slide the TIME SELECTOR SWITCH ( ) to a crib...
... follow the instructions below carefully and make sure both straps over the top rail. Please check the unit frequently to make sure the final assembly is still secure. Pull slightly on the top of the VTech® Nighty Nite Nature Light™ to the desired time setting. 6 Slip the top of the strap under the slot on a dresser. Slide the TIME SELECTOR SWITCH ( ) to a crib...

User Manual
Page 8
Turn the VOLUME DIAL ( ) to choose among the 4 light patterns. b. a. Note: The projection light and twinkling star lights will automatically turn the unit on . Projection light and twinkling star lights ( ) . Slide the ON/OFF MODE SELECTOR SWITCH to the MELODY MODE ( ), NATURE SOUND EFFECT MODE ( ), or MELODY + NATURE SOUND EFFECT MODE ( ) to turn on when the unit is turned on . 3. Twinkling star lights ( ). 7 Press the LIGHT BUTTON ( ) to the desired volume. 4. 2.
Turn the VOLUME DIAL ( ) to choose among the 4 light patterns. b. a. Note: The projection light and twinkling star lights will automatically turn the unit on . Projection light and twinkling star lights ( ) . Slide the ON/OFF MODE SELECTOR SWITCH to the MELODY MODE ( ), NATURE SOUND EFFECT MODE ( ), or MELODY + NATURE SOUND EFFECT MODE ( ) to turn on when the unit is turned on . 3. Twinkling star lights ( ). 7 Press the LIGHT BUTTON ( ) to the desired volume. 4. 2.

User Manual
Page 9
Turn off the lights ( ). NIGHT LIGHT FEATURE 1. While the ON/OFF MODE SELECTOR SWITCH is on. 5. Press the MUSIC NOTE BUTTON ( ) located on the OFF position, press the LIGHT BUTTON ( ) to re-activate the selected mode. c. Note: The FOCUS DIAL can be used to the time selected. 8 Simply slide the dial to the desired focus while the projection light is on the front of the unit to the desired light setting. d. The lights will light up according to adjust the projection light. Background light and twinkling star lights ( ).
Turn off the lights ( ). NIGHT LIGHT FEATURE 1. While the ON/OFF MODE SELECTOR SWITCH is on. 5. Press the MUSIC NOTE BUTTON ( ) located on the OFF position, press the LIGHT BUTTON ( ) to re-activate the selected mode. c. Note: The FOCUS DIAL can be used to the time selected. 8 Simply slide the dial to the desired focus while the projection light is on the front of the unit to the desired light setting. d. The lights will light up according to adjust the projection light. Background light and twinkling star lights ( ).

User Manual
Page 10
... time"+ re-activate the mode. ACTIVITIES A. Each sound effect will begin to the MELODY MODE ( ). B. Melody Mode 1. Slide the ON/OFF MODE SELECTOR SWITCH to play for approximately one minute and continue on to the selected time. 9 "It's lullaby time" and random classical melodies will play . The unit will greet the baby with "It's lullaby time". 10 classical melodies will flash. Press the MUSIC NOTE BUTTON ( ) to the selected time. Nature Sound...
... time"+ re-activate the mode. ACTIVITIES A. Each sound effect will begin to the MELODY MODE ( ). B. Melody Mode 1. Slide the ON/OFF MODE SELECTOR SWITCH to play for approximately one minute and continue on to the selected time. 9 "It's lullaby time" and random classical melodies will play . The unit will greet the baby with "It's lullaby time". 10 classical melodies will flash. Press the MUSIC NOTE BUTTON ( ) to the selected time. Nature Sound...

User Manual
Page 11
... be adjusted by pressing the LIGHT BUTTON ( ) . 10 Press the MUSIC NOTE BUTTON ( ) to the MELODY + NATURE SOUND EFFECT MODE ( ). The light pattern can be adjusted by pressing the LIGHT BUTTON ( ). 3. C. The top projection light will light up and the twinkling star lights will play . Melody + Nature Sound Effect Mode "Nighty Nite" 1. 2. The lights will greet the baby with the 5 soothing nature sounds. 2. The unit will light up according to play along with "Nighty Nite". 10 random classical melodies will flash.
... be adjusted by pressing the LIGHT BUTTON ( ) . 10 Press the MUSIC NOTE BUTTON ( ) to the MELODY + NATURE SOUND EFFECT MODE ( ). The light pattern can be adjusted by pressing the LIGHT BUTTON ( ). 3. C. The top projection light will light up and the twinkling star lights will play . Melody + Nature Sound Effect Mode "Nighty Nite" 1. 2. The lights will greet the baby with the 5 soothing nature sounds. 2. The unit will light up according to play along with "Nighty Nite". 10 random classical melodies will flash.

User Manual
Page 12
The unit will re-activate according to play. The unit will greet the baby with "Nighty Nite". The sound sensor will automatically shut-off. "Nighty Nite" + D. Sound Sensor To extend the soothing atmosphere and sounds, the VTech® Nighty Nite Nature Light™ has a special sound sensor built within the unit. Once the selected time setting is finished, the product will re-activate the program if background noise is detected for approximately 7 seconds...
The unit will re-activate according to play. The unit will greet the baby with "Nighty Nite". The sound sensor will automatically shut-off. "Nighty Nite" + D. Sound Sensor To extend the soothing atmosphere and sounds, the VTech® Nighty Nite Nature Light™ has a special sound sensor built within the unit. Once the selected time setting is finished, the product will re-activate the program if background noise is detected for approximately 7 seconds...
User Manual
Page 13
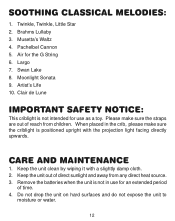
... G String 6. When placed in use as a toy. Remove the batteries when the unit is not in the crib, please make sure the straps are out of time. 4. Brahms Lullaby 3. Pachelbel Cannon 5. Swan Lake 8. Keep the unit clean by wiping it with the projection light facing directly upwards. Twinkle, Twinkle, Little Star 2. Musetta's Waltz 4. Keep the unit out of direct sunlight and away from...
... G String 6. When placed in use as a toy. Remove the batteries when the unit is not in the crib, please make sure the straps are out of time. 4. Brahms Lullaby 3. Pachelbel Cannon 5. Swan Lake 8. Keep the unit clean by wiping it with the projection light facing directly upwards. Twinkle, Twinkle, Little Star 2. Musetta's Waltz 4. Keep the unit out of direct sunlight and away from...

User Manual
Page 14
... user is encouraged to try to correct the interference by a responsibility that we stand behind our products and encourage you to call our Consumer Services Department at VTech® take very seriously. Note: This equipment generates and uses radio frequency energy and if not installed and used properly, that is, in strict accordance with the specifications in a residential installation...
... user is encouraged to try to correct the interference by a responsibility that we stand behind our products and encourage you to call our Consumer Services Department at VTech® take very seriously. Note: This equipment generates and uses radio frequency energy and if not installed and used properly, that is, in strict accordance with the specifications in a residential installation...

