User Manual
Page 3
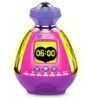
... plug in an external music player to listen to equipment of the light and control the games by moving your favorite radio station with soft lighting, creating a peaceful atmosphere. The toy is only to your hand above the magic sensors! Pull out and discard the packaging lock. 33 This silly, fortune-telling alarm clock features soothing lighting that changes color! Change the color of Class II...
... plug in an external music player to listen to equipment of the light and control the games by moving your favorite radio station with soft lighting, creating a peaceful atmosphere. The toy is only to your hand above the magic sensors! Pull out and discard the packaging lock. 33 This silly, fortune-telling alarm clock features soothing lighting that changes color! Change the color of Class II...
User Manual
Page 4
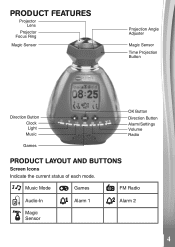
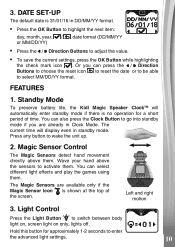
Music Mode Games FM Radio Audio-In Alarm 1 Alarm 2 Magic Sensor 44 PRODUCT FEATURES Projector Lens Projector Focus Ring Magic Sensor Projection Angle Adjuster Magic Sensor Time Projection Button Direction Button Clock Light Music Games OK Button Direction Button Alarm/Settings Volume Radio PRODUCT LAYOUT AND BUTTONS Screen Icons Indicate the current status of each mode.
Music Mode Games FM Radio Audio-In Alarm 1 Alarm 2 Magic Sensor 44 PRODUCT FEATURES Projector Lens Projector Focus Ring Magic Sensor Projection Angle Adjuster Magic Sensor Time Projection Button Direction Button Clock Light Music Games OK Button Direction Button Alarm/Settings Volume Radio PRODUCT LAYOUT AND BUTTONS Screen Icons Indicate the current status of each mode.

User Manual
Page 5
.../Settings Press this button to confirm your selection. Projector Focus Ring Turn this button to change to a different light mode. • Hold this to adjust the focus of the time projection. 55 Light • Press this button to change the light color. When in use, Sleep Mode will activate to save power. Games Press this button to enter Music Mode or exit to Clock Mode. When the clock is connected, press this button to adjust the volume. Music Press this button...
.../Settings Press this button to confirm your selection. Projector Focus Ring Turn this button to change to a different light mode. • Hold this to adjust the focus of the time projection. 55 Light • Press this button to change the light color. When in use, Sleep Mode will activate to save power. Games Press this button to enter Music Mode or exit to Clock Mode. When the clock is connected, press this button to adjust the volume. Music Press this button...
User Manual
Page 6
... Jack Plug in an external music player (not included) using the time projection feature in a dimly lit room to music. 66 Please replace the batteries. Works only when is within the sensor range for an extended period of time and reduces the performance. Magic Sensor Wave your Kidi Magic Speaker ClockTM away from strong light or direct sunlight; Projection Angle Adjuster Adjust the projection angle by rotating...
... Jack Plug in an external music player (not included) using the time projection feature in a dimly lit room to music. 66 Please replace the batteries. Works only when is within the sensor range for an extended period of time and reduces the performance. Magic Sensor Wave your Kidi Magic Speaker ClockTM away from strong light or direct sunlight; Projection Angle Adjuster Adjust the projection angle by rotating...
User Manual
Page 7
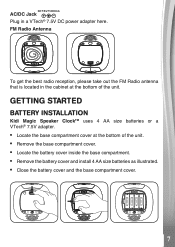
... located in a VTech® 7.5V DC power adapter here. GETTING STARTED BATTERY INSTALLATION Kidi Magic Speaker ClockTM uses 4 AA size batteries or a VTech® 7.5V adapter. • Locate the base compartment cover at the bottom of the unit. • Remove the base compartment cover. • Locate the battery cover inside the base compartment. • Remove the battery cover and install 4 AA size batteries as illustrated. • Close the battery cover and the base compartment cover. 77 AC...
... located in a VTech® 7.5V DC power adapter here. GETTING STARTED BATTERY INSTALLATION Kidi Magic Speaker ClockTM uses 4 AA size batteries or a VTech® 7.5V adapter. • Locate the base compartment cover at the bottom of the unit. • Remove the base compartment cover. • Locate the battery cover inside the base compartment. • Remove the battery cover and install 4 AA size batteries as illustrated. • Close the battery cover and the base compartment cover. 77 AC...

User Manual
Page 8
... NOTICE • Using a VTech® adapter (DC 7.5V) is not a toy. 88 POWER ADAPTER CONNECTION To connect the adapter to be used batteries. • Do not use damaged batteries. • Insert batteries with a transformer for toys. • The transformer is recommended. • This toy shall only be charged under adult supervision. BATTERY NOTICE • Use new alkaline batteries for maximum performance. • Use only batteries of the same or equivalent type as recommended...
... NOTICE • Using a VTech® adapter (DC 7.5V) is not a toy. 88 POWER ADAPTER CONNECTION To connect the adapter to be used batteries. • Do not use damaged batteries. • Insert batteries with a transformer for toys. • The transformer is recommended. • This toy shall only be charged under adult supervision. BATTERY NOTICE • Use new alkaline batteries for maximum performance. • Use only batteries of the same or equivalent type as recommended...
User Manual
Page 9
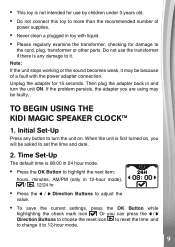
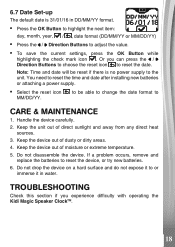
... in 24 hour mode. • Press the OK Button to 12-hour mode. 99 Unplug the adapter for damage to set the time and date. 2. TO BEGIN USING THE KIDI MAGIC SPEAKER CLOCK™ 1. Note: If the unit stops working or the sound becomes weak, it to highlight the next item: hours, minutes, AM/PM (only in toy with the power adapter connection. Time Set-Up The default time is first turned on .
... in 24 hour mode. • Press the OK Button to 12-hour mode. 99 Unplug the adapter for damage to set the time and date. 2. TO BEGIN USING THE KIDI MAGIC SPEAKER CLOCK™ 1. Note: If the unit stops working or the sound becomes weak, it to highlight the next item: hours, minutes, AM/PM (only in toy with the power adapter connection. Time Set-Up The default time is first turned on .
User Manual
Page 10
... Mode To preserve battery life, the Kidi Magic Speaker ClockTM will display even in standby mode. Press any button to switch between body light on, screen light on only, lights off. You can press the / Direction Buttons to choose the reset icon to reset the date or to be able to select MM/DD/YY format. DATE SET-UP The default date is 31/01/16 in Clock Mode...
... Mode To preserve battery life, the Kidi Magic Speaker ClockTM will display even in standby mode. Press any button to switch between body light on, screen light on only, lights off. You can press the / Direction Buttons to choose the reset icon to reset the date or to be able to select MM/DD/YY format. DATE SET-UP The default date is 31/01/16 in Clock Mode...
User Manual
Page 11
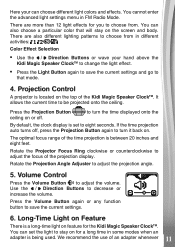
... Kidi Magic Speaker ClockTM to change the light effect. • Press the Light Button again to save the current settings. 6. You cannot enter the advanced light settings menu in some modes when an adapter is located on for a long time in FM Radio Mode. There are also different lighting patterns to turn it back on the screen and body. Projection Control A projector is being used. to choose from . Use the / Direction Buttons...
... Kidi Magic Speaker ClockTM to change the light effect. • Press the Light Button again to save the current settings. 6. You cannot enter the advanced light settings menu in some modes when an adapter is located on for a long time in FM Radio Mode. There are also different lighting patterns to turn it back on the screen and body. Projection Control A projector is being used. to choose from . Use the / Direction Buttons...
User Manual
Page 12
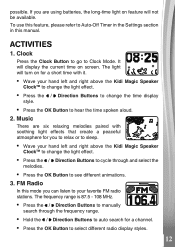
... turn on for a short time with soothing light effects that create a peaceful atmosphere for a channel. • Press the OK Button to hear the time spoken aloud. 2. FM Radio In this manual. If you are six relaxing melodies paired with it. • Wave your hand left and right above the Kidi Magic Speaker ClockTM to change the light effect. • Press the / Direction Buttons to change...
... turn on for a short time with soothing light effects that create a peaceful atmosphere for a channel. • Press the OK Button to hear the time spoken aloud. 2. FM Radio In this manual. If you are six relaxing melodies paired with it. • Wave your hand left and right above the Kidi Magic Speaker ClockTM to change the light effect. • Press the / Direction Buttons to change...
User Manual
Page 13
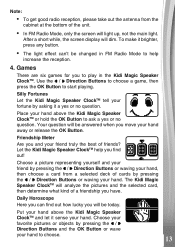
... the unit. • In FM Radio Mode, only the screen will light up, not the main light. Silly Fortunes Let the Kidi Magic Speaker ClockTM tell your fortune by asking it sense your hand. Daily Horoscope Here you to play in FM Radio Mode to help you and your friend truly the best of friends? Use the / Direction Buttons to choose a game, then press the OK Button to start playing...
... the unit. • In FM Radio Mode, only the screen will light up, not the main light. Silly Fortunes Let the Kidi Magic Speaker ClockTM tell your fortune by asking it sense your hand. Daily Horoscope Here you to play in FM Radio Mode to help you and your friend truly the best of friends? Use the / Direction Buttons to choose a game, then press the OK Button to start playing...
User Manual
Page 14
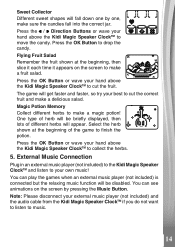
The game will appear. One type of herb will be disabled. You can see animations on the screen to make a magic potion! Note: Please disconnect your hand above the Kidi Magic Speaker ClockTM to music. 1144 Press the OK Button to make a fruit salad. Press the OK Button or wave your external music player (not included) and the audio cable from the Kidi Magic Speaker ClockTM if you do not...
The game will appear. One type of herb will be disabled. You can see animations on the screen to make a magic potion! Note: Please disconnect your hand above the Kidi Magic Speaker ClockTM to music. 1144 Press the OK Button to make a fruit salad. Press the OK Button or wave your external music player (not included) and the audio cable from the Kidi Magic Speaker ClockTM if you do not...
User Manual
Page 15
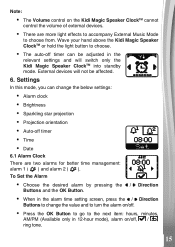
Note: • The Volume control on the Kidi Magic Speaker ClockTM cannot control the volume of external devices. • There are two alarms for better time management: alarm 1 ( ) and alarm 2 ( ). To Set the Alarm • Choose the desired alarm by pressing the / Direction Buttons and the OK Button. • When in the alarm time setting screen, press the / Direction Buttons to change the below settings: • Alarm clock • Brightness •...
Note: • The Volume control on the Kidi Magic Speaker ClockTM cannot control the volume of external devices. • There are two alarms for better time management: alarm 1 ( ) and alarm 2 ( ). To Set the Alarm • Choose the desired alarm by pressing the / Direction Buttons and the OK Button. • When in the alarm time setting screen, press the / Direction Buttons to change the below settings: • Alarm clock • Brightness •...

User Manual
Page 16
... any activity button or wave your hand above the unit to go to change anything, you can press the / Direction Buttons to choose back and choose the edit icon to change the time display orientation. The default setting is used for up to three times. 6.2 Brightness Press the / Direction Buttons to save it . 6.3 Sparkling Star Projection Here you can turn the projected sparkling star animation...
... any activity button or wave your hand above the unit to go to change anything, you can press the / Direction Buttons to choose back and choose the edit icon to change the time display orientation. The default setting is used for up to three times. 6.2 Brightness Press the / Direction Buttons to save it . 6.3 Sparkling Star Projection Here you can turn the projected sparkling star animation...

User Manual
Page 17
... press the / Direction Buttons to choose the reset icon to reset the time or go to the top of the options to select 12-hour mode. 1177 The disable auto-off option is only available when an adapter is in use . 6.6 Time Set-up The default time is on in 12-hour mode), / , 12/24 hour • Press the / Direction Buttons to adjust the value...
... press the / Direction Buttons to choose the reset icon to reset the time or go to the top of the options to select 12-hour mode. 1177 The disable auto-off option is only available when an adapter is in use . 6.6 Time Set-up The default time is on in 12-hour mode), / , 12/24 hour • Press the / Direction Buttons to adjust the value...
User Manual
Page 18
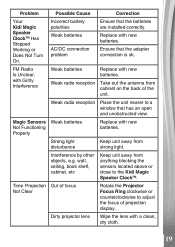
... with operating the Kidi Magic Speaker ClockTM. 1188 TROUBLESHOOTING Check this section if you can press the / Direction Buttons to choose the reset icon to CARE & MAINTENANCE 1. You need to reset the device, or try new batteries. 6. Keep the device out of direct sunlight and away from any direct heat sources. 3. Do not disassemble the device. Note: Time and date will be able to change the...
... with operating the Kidi Magic Speaker ClockTM. 1188 TROUBLESHOOTING Check this section if you can press the / Direction Buttons to choose the reset icon to CARE & MAINTENANCE 1. You need to reset the device, or try new batteries. 6. Keep the device out of direct sunlight and away from any direct heat sources. 3. Do not disassemble the device. Note: Time and date will be able to change the...
User Manual
Page 19
... the lens with new batteries. Ensure that the batteries are installed correctly. FM Radio Is Unclear, with Gritty Interference Weak batteries Replace with new batteries. Problem Possible Cause Correction Your Kidi Magic Speaker ClockTM Has Stopped Working or Does Not Turn On. Incorrect battery polarities Weak batteries AC/DC connection problem Ensure that the adapter connection is ok. Weak radio reception Place the unit nearer to adjust the focus of the unit. Time Projection Out...
... the lens with new batteries. Ensure that the batteries are installed correctly. FM Radio Is Unclear, with Gritty Interference Weak batteries Replace with new batteries. Problem Possible Cause Correction Your Kidi Magic Speaker ClockTM Has Stopped Working or Does Not Turn On. Incorrect battery polarities Weak batteries AC/DC connection problem Ensure that the adapter connection is ok. Weak radio reception Place the unit nearer to adjust the focus of the unit. Time Projection Out...
User Manual
Page 20
... Customer Support link. A service representative will be happy to Part 15 of our products. However, errors sometimes can radiate radio frequency energy and, if not installed and used in accordance with the limits for a Class B digital device, pursuant to help . 2200 Note: This equipment has been tested and found to comply with the instructions, may cause harmful interference to help...
... Customer Support link. A service representative will be happy to Part 15 of our products. However, errors sometimes can radiate radio frequency energy and, if not installed and used in accordance with the limits for a Class B digital device, pursuant to help . 2200 Note: This equipment has been tested and found to comply with the instructions, may cause harmful interference to help...
User Manual
Page 21
CAN ICES-3 (B)/NMB-3(B) Caution: Changes or modifications not expressly approved by the party responsible for compliance could void the user's authority to operate the equipment. 2211 OPERATION IS SUBJECT TO THE FOLLOWING TWO CONDITIONS: (1) THIS DEVICE MAY NOT ... CAUSE UNDESIRED OPERATION. Shure Drive, Suite 200, Arlington Heights, IL 60004 Website: vtechkids.com THIS DEVICE COMPLIES WITH PART 15 OF THE FCC RULES. Supplier's Declaration of Conformity Trade Name: VTech® Model: 1634 Product name: Kidi Magic Speaker ClockTM Responsible Party: VTech Electronics North America,...
CAN ICES-3 (B)/NMB-3(B) Caution: Changes or modifications not expressly approved by the party responsible for compliance could void the user's authority to operate the equipment. 2211 OPERATION IS SUBJECT TO THE FOLLOWING TWO CONDITIONS: (1) THIS DEVICE MAY NOT ... CAUSE UNDESIRED OPERATION. Shure Drive, Suite 200, Arlington Heights, IL 60004 Website: vtechkids.com THIS DEVICE COMPLIES WITH PART 15 OF THE FCC RULES. Supplier's Declaration of Conformity Trade Name: VTech® Model: 1634 Product name: Kidi Magic Speaker ClockTM Responsible Party: VTech Electronics North America,...

User Manual
Page 22
Please examine the toy transformer periodically for conditions that may result in the risk of fire, electric shock, or injury to persons (such as damage to the output cord, blades, housing, or other parts) and that, in an event of such conditions, the transformer should not be used until properly repaired. 2222
Please examine the toy transformer periodically for conditions that may result in the risk of fire, electric shock, or injury to persons (such as damage to the output cord, blades, housing, or other parts) and that, in an event of such conditions, the transformer should not be used until properly repaired. 2222

