
User Manual
Page 1
Instruction Manual TM
Instruction Manual TM
User Manual
Page 2
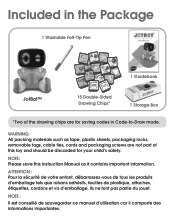
... : Il est conseillé de sauvegarder ce manuel d'utilisation car il comporte des informations importantes. NOTE: Please save this Instruction Manual as tape, plastic sheets, packaging locks, removable tags, cable ties, cords and packaging screws are not part of the drawing chips are for your child's safety. ATTENTION...plastique, attaches, étiquettes, cordons et vis d'emballage. Included in the Package 1 Washable Felt-Tip Pen 1 Guidebook JotBot™ 15 Double-Sided Drawing Chips* 1 Storage Box *Two of this toy and should be discarded for saving codes in Code-to-Draw mode.
... : Il est conseillé de sauvegarder ce manuel d'utilisation car il comporte des informations importantes. NOTE: Please save this Instruction Manual as tape, plastic sheets, packaging locks, removable tags, cable ties, cords and packaging screws are not part of the drawing chips are for your child's safety. ATTENTION...plastique, attaches, étiquettes, cordons et vis d'emballage. Included in the Package 1 Washable Felt-Tip Pen 1 Guidebook JotBot™ 15 Double-Sided Drawing Chips* 1 Storage Box *Two of this toy and should be discarded for saving codes in Code-to-Draw mode.

User Manual
Page 3
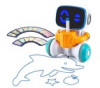
... Code-to -Draw mode. Command JotBot™ to move to your left (west) in Code-to -Draw mode. Press this to confirm, to start drawing. Press this to cancel or to start an activity or to exit an activity. 3 Command to -Draw mode. Switch to power JotBot™ ON. Features Animated Face Control Panel Pen Holder Speaker Drawing Chip Slot Power / Mode Switch Battery Compartment Switch to either or to power JotBot™...
... Code-to -Draw mode. Command JotBot™ to move to your left (west) in Code-to -Draw mode. Press this to confirm, to start drawing. Press this to cancel or to start an activity or to exit an activity. 3 Command to -Draw mode. Switch to power JotBot™ ON. Features Animated Face Control Panel Pen Holder Speaker Drawing Chip Slot Power / Mode Switch Battery Compartment Switch to either or to power JotBot™...

User Manual
Page 4
.... INSTRUCTIONS BATTERY REMOVAL AND INSTALLATION 1. Use a screwdriver to secure. Install 4 new AA (AM-3/LR6) batteries following the diagram inside the battery box. (For best performance, alkaline batteries are not guaranteed to work with this product). 5. Make sure the unit is turned Off. 2. Find the battery cover at the bottom of children. Rechargeable batteries are recommended. Tenir les piles ou accumulateurs hors de portée des enfants. 4 Remove old batteries by pulling...
.... INSTRUCTIONS BATTERY REMOVAL AND INSTALLATION 1. Use a screwdriver to secure. Install 4 new AA (AM-3/LR6) batteries following the diagram inside the battery box. (For best performance, alkaline batteries are not guaranteed to work with this product). 5. Make sure the unit is turned Off. 2. Find the battery cover at the bottom of children. Rechargeable batteries are recommended. Tenir les piles ou accumulateurs hors de portée des enfants. 4 Remove old batteries by pulling...

User Manual
Page 5
... new batteries. • Do not mix alkaline, standard (carbon-zinc) or rechargeable batteries. • Only batteries of batteries safely. Keep the unit out of direct sunlight and away from the toy. • Dispose of the same or equivalent type as recommended are only to be charged under adult supervision. • Do not charge non-rechargeable batteries. Do not dispose of time. 4. Remove...
... new batteries. • Do not mix alkaline, standard (carbon-zinc) or rechargeable batteries. • Only batteries of batteries safely. Keep the unit out of direct sunlight and away from the toy. • Dispose of the same or equivalent type as recommended are only to be charged under adult supervision. • Do not charge non-rechargeable batteries. Do not dispose of time. 4. Remove...

User Manual
Page 6
... you . 6 Let the unit stand for some reason the program/activity stops working or malfunctions, please follow these steps: 1. A service representative will be ready to help you to our website vtechkids.com and filling out our Contact Us form located under the Customer Support link. Please turn the unit OFF. 2. IMPORTANT NOTE: If the problem persists, please call our Consumer Services Department at 1-800...
... you . 6 Let the unit stand for some reason the program/activity stops working or malfunctions, please follow these steps: 1. A service representative will be ready to help you to our website vtechkids.com and filling out our Contact Us form located under the Customer Support link. Please turn the unit OFF. 2. IMPORTANT NOTE: If the problem persists, please call our Consumer Services Department at 1-800...

User Manual
Page 7
Getting Started 1 Insert Batteries (To be done by an adult) • Locate the battery compartment at the bottom of JotBot™. • Loosen the screws of the battery cover using a screwdriver. • Insert 4 AA alkaline batteries as indicated inside the battery compartment. • Replace the battery cover and tighten the screws. See page 4 for more information about battery installation. 7
Getting Started 1 Insert Batteries (To be done by an adult) • Locate the battery compartment at the bottom of JotBot™. • Loosen the screws of the battery cover using a screwdriver. • Insert 4 AA alkaline batteries as indicated inside the battery compartment. • Replace the battery cover and tighten the screws. See page 4 for more information about battery installation. 7

User Manual
Page 8
The pen will lift off the paper by about 1-2mm. NOTE: To prevent the pen's ink from drying, please replace the cap of time. 8 2 Install Pen 1-2mm • Place a scrap sheet of paper under JotBot™. • Turn On JotBot™. • Remove the cap of the bundled pen and insert it into the pen holder. • Push the pen gently down until it is not in use for a long period of the pen when it reaches the paper, and then release the pen.
The pen will lift off the paper by about 1-2mm. NOTE: To prevent the pen's ink from drying, please replace the cap of time. 8 2 Install Pen 1-2mm • Place a scrap sheet of paper under JotBot™. • Turn On JotBot™. • Remove the cap of the bundled pen and insert it into the pen holder. • Push the pen gently down until it is not in use for a long period of the pen when it reaches the paper, and then release the pen.

User Manual
Page 9
Put an extra piece of paper on the surface to draw. 3 Setup Paper • Prepare an 8x11" or larger sheet of the surface to the surface for the best drawing performance. Then, place JotBot™ in the center of the paper to avoid JotBot™ from falling. • Clear any obstacles on a flat, level surface. NOTE: Tape the 4 corners of the paper before JotBot™ begins to protect the surface from the edge of paper. • Place it on or near the paper. Keep the paper at least 5 inches away from staining. 9
Put an extra piece of paper on the surface to draw. 3 Setup Paper • Prepare an 8x11" or larger sheet of the surface to the surface for the best drawing performance. Then, place JotBot™ in the center of the paper to avoid JotBot™ from falling. • Clear any obstacles on a flat, level surface. NOTE: Tape the 4 corners of the paper before JotBot™ begins to protect the surface from the edge of paper. • Place it on or near the paper. Keep the paper at least 5 inches away from staining. 9
User Manual
Page 10
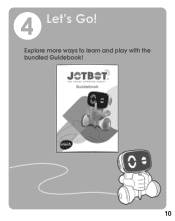
Explore more ways to learn and play with the bundled Guidebook! 10 4 Let's Go!
Explore more ways to learn and play with the bundled Guidebook! 10 4 Let's Go!

User Manual
Page 11
...; Press Go to let JotBot™ suggest an activity. • Place JotBot™ in the center of the paper, and then press the Go button to see JotBot™ start drawing. • Listen and follow the instructions to the drawing. Some drawings may look different each time JotBot™ draws it. How to Play Learning Mode Switch to Learning mode to play with the drawing chips or...
...; Press Go to let JotBot™ suggest an activity. • Place JotBot™ in the center of the paper, and then press the Go button to see JotBot™ start drawing. • Listen and follow the instructions to the drawing. Some drawings may look different each time JotBot™ draws it. How to Play Learning Mode Switch to Learning mode to play with the drawing chips or...

User Manual
Page 12
Drawing Activities Draw Together • JotBot™ will draw and tell a story, then children can draw on top of it using their creativity by drawing on top to complete the drawing and story. 12 Draw-a-Story • JotBot™ will draw something first, then children can show their imagination.
Drawing Activities Draw Together • JotBot™ will draw and tell a story, then children can draw on top of it using their creativity by drawing on top to complete the drawing and story. 12 Draw-a-Story • JotBot™ will draw something first, then children can show their imagination.

User Manual
Page 13
Cartoon Face • JotBot™ will draw part of a picture, children can complete it . Connect the Dots • JotBot™ will draw a picture, leaving some dotted lines for children to connect to complete it . 13 Draw the Other Half • JotBot™ will draw half of a face, so children can then mirror the drawing to complete the drawing.
Cartoon Face • JotBot™ will draw part of a picture, children can complete it . Connect the Dots • JotBot™ will draw a picture, leaving some dotted lines for children to connect to complete it . 13 Draw the Other Half • JotBot™ will draw half of a face, so children can then mirror the drawing to complete the drawing.

User Manual
Page 14
Input the directions that JotBot™ needs to follow to see JotBot™ move. Then, press the Go button to go through the maze using the arrow buttons on top of the maze, with JotBot's pen tip touching the pen symbol . Then, place JotBot™ at the entrance of it using their creativity. 14 Mandala JotBot™ will draw a maze. Maze • JotBot™ will draw a simple mandala, then children can draw patterns on his head.
Input the directions that JotBot™ needs to follow to see JotBot™ move. Then, press the Go button to go through the maze using the arrow buttons on top of the maze, with JotBot's pen tip touching the pen symbol . Then, place JotBot™ at the entrance of it using their creativity. 14 Mandala JotBot™ will draw a maze. Maze • JotBot™ will draw a simple mandala, then children can draw patterns on his head.
User Manual
Page 15
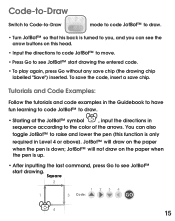
... Code-to-Draw Switch to Code-to-Draw mode to code JotBot™ to draw. • Turn JotBot™ so that his back is turned to you, and you can also toggle JotBot™ to raise and lower the pen (this head. • Input the directions to code JotBot™ to move. • Press Go to see JotBot™ start drawing the entered code. • To play again...
... Code-to-Draw Switch to Code-to-Draw mode to code JotBot™ to draw. • Turn JotBot™ so that his back is turned to you, and you can also toggle JotBot™ to raise and lower the pen (this head. • Input the directions to code JotBot™ to move. • Press Go to see JotBot™ start drawing the entered code. • To play again...
User Manual
Page 16
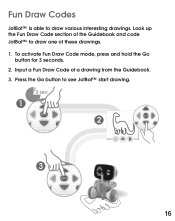
Press the Go button to draw various interesting drawings. To activate Fun Draw Code mode, press and hold the Go button for 3 seconds. 2. Input a Fun Draw Code of these drawings. 1. Look up the Fun Draw Code section of the Guidebook and code JotBot™ to draw one of a drawing from the Guidebook. 3. Fun Draw Codes JotBot™ is able to see JotBot™ start drawing. 3 sec 1 2 3 16
Press the Go button to draw various interesting drawings. To activate Fun Draw Code mode, press and hold the Go button for 3 seconds. 2. Input a Fun Draw Code of these drawings. 1. Look up the Fun Draw Code section of the Guidebook and code JotBot™ to draw one of a drawing from the Guidebook. 3. Fun Draw Codes JotBot™ is able to see JotBot™ start drawing. 3 sec 1 2 3 16

User Manual
Page 17
... the arrow button several times for 3 seconds until the circle looks perfect, and then Press without pressing any arrow buttons. 5. If the end points are overlapped, press once. If the end points are far apart, press once. NOTE: You may have to start JotBot™ drawing a circle. 3. Calibration JotBot™ is not drawing properly after installing new batteries, follow...
... the arrow button several times for 3 seconds until the circle looks perfect, and then Press without pressing any arrow buttons. 5. If the end points are overlapped, press once. If the end points are far apart, press once. NOTE: You may have to start JotBot™ drawing a circle. 3. Calibration JotBot™ is not drawing properly after installing new batteries, follow...

User Manual
Page 18
... soak and rinse them . 18 Q: Can I use for a period of the mode positions to decrease the volume NOTE: In cases where the arrow buttons are free from obstruction and that the metal ball underneath JotBot™ is compatible with new ones. JotBot™ is not stiff and spins freely. Q: What should I use pens other surfaces, use mild soapy water to wipe and clean...
... soak and rinse them . 18 Q: Can I use for a period of the mode positions to decrease the volume NOTE: In cases where the arrow buttons are free from obstruction and that the metal ball underneath JotBot™ is compatible with new ones. JotBot™ is not stiff and spins freely. Q: What should I use pens other surfaces, use mild soapy water to wipe and clean...

User Manual
Page 19
...: Address: Website: VTech ® 5537 JotBot™ VTech Electronics North America, L.L.C. 1156 W. However, there is connected. • Consult the dealer or an experienced radio/TV technician for compliance could void the user's authority to which can radiate radio frequency energy and, if not installed and used in a particular installation. This equipment generates, uses and can be determined by turning the equipment...
...: Address: Website: VTech ® 5537 JotBot™ VTech Electronics North America, L.L.C. 1156 W. However, there is connected. • Consult the dealer or an experienced radio/TV technician for compliance could void the user's authority to which can radiate radio frequency energy and, if not installed and used in a particular installation. This equipment generates, uses and can be determined by turning the equipment...

User Manual
Page 20
vtechkids.com vtechkids.ca Read our complete warranty policy online at vtechkids.com/warranty vtechkids.ca/warranty TM & © 2023 VTech Holdings Limited. Visit our website for more information about our products, downloads, resources and more. IM-553700-005 US CA Version:0 All rights reserved.
vtechkids.com vtechkids.ca Read our complete warranty policy online at vtechkids.com/warranty vtechkids.ca/warranty TM & © 2023 VTech Holdings Limited. Visit our website for more information about our products, downloads, resources and more. IM-553700-005 US CA Version:0 All rights reserved.


