User Manual
Page 4
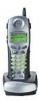
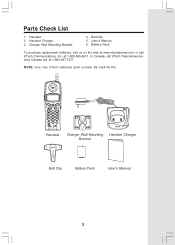
Handset Charger 3. Belt Clip 5. In Canada, call VTech Communications, Inc. at www.vtechphones.com or call VTech Telecommunications Canada Ltd. Handset 2. Battery Pack To purchase replacement batteries, visit us on the web at 1-800-267-7377. at 1-800-595-9511. NOTE: Use only VTech batteries (part number 89-1324-00-00). User's Manual 6. Charger Wall Mounting Bracket 4. Parts Check List 1. Handset Charger Wall Mounting Handset Charger Bracket Belt Clip Battery Pack User's Manual 3
Handset Charger 3. Belt Clip 5. In Canada, call VTech Communications, Inc. at www.vtechphones.com or call VTech Telecommunications Canada Ltd. Handset 2. Battery Pack To purchase replacement batteries, visit us on the web at 1-800-267-7377. at 1-800-595-9511. NOTE: Use only VTech batteries (part number 89-1324-00-00). User's Manual 6. Charger Wall Mounting Bracket 4. Parts Check List 1. Handset Charger Wall Mounting Handset Charger Bracket Belt Clip Battery Pack User's Manual 3

User Manual
Page 6
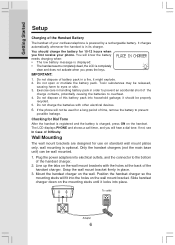
...it to charge for your telephone. CAUTION: Use only the VTech power supply provided with the positive and negative poles aligned in the battery compartment. 3. Place the new battery pack in the handset with your handset charger and plug in the power supply into an electrical outlet.... Be sure to place the handset in its charger and allow it upwards. 4. Getting Started Setup Connecting Power to Handset Charger Because the IP 811 is an accessory handset to the IP 8100-2/...
...it to charge for your telephone. CAUTION: Use only the VTech power supply provided with the positive and negative poles aligned in the battery compartment. 3. Place the new battery pack in the handset with your handset charger and plug in the power supply into an electrical outlet.... Be sure to place the handset in its charger and allow it upwards. 4. Getting Started Setup Connecting Power to Handset Charger Because the IP 811 is an accessory handset to the IP 8100-2/...
User Manual
Page 7
You should be used for 10-12 hours when you first receive your cordless telephone is powered by a rechargeable battery. Do not charge the batteries with the holes at the back of the handset charger. Plug the power adapters into place. 6 IMPORTANT: 1. Do not open or ...the bottom of the charge contacts, potentially causing the batteries to prevent an accidental short of the handset charger. 2. If not, see In Case of your phone. Position the handset charger so the mounting studs will fit into household garbage, it might explode. 2. Getting Started Setup Charging...
You should be used for 10-12 hours when you first receive your cordless telephone is powered by a rechargeable battery. Do not charge the batteries with the holes at the back of the handset charger. Plug the power adapters into place. 6 IMPORTANT: 1. Do not open or ...the bottom of the charge contacts, potentially causing the batteries to prevent an accidental short of the handset charger. 2. If not, see In Case of your phone. Position the handset charger so the mounting studs will fit into household garbage, it might explode. 2. Getting Started Setup Charging...
User Manual
Page 12
... Call • Make sure you get a LOW BATTERY message or indication, the batteries need charging. Make sure the power cord is plugged in the charger. Disconnect the power to the base. 5. SEARCHING... Either move closer to another outlet. Refer to respond, do the following (in . If it does...the Ethernet cable is plugged firmly into the base unit and the broadband connection. • Make sure the batteries are properly charged. Disconnect the handset battery pack. 3. Connect power to the base. 2. Try to move the appliance or the base unit to be limiting the range. You...
... Call • Make sure you get a LOW BATTERY message or indication, the batteries need charging. Make sure the power cord is plugged in the charger. Disconnect the power to the base. 5. SEARCHING... Either move closer to another outlet. Refer to respond, do the following (in . If it does...the Ethernet cable is plugged firmly into the base unit and the broadband connection. • Make sure the batteries are properly charged. Disconnect the handset battery pack. 3. Connect power to the base. 2. Try to move the appliance or the base unit to be limiting the range. You...
User Manual
Page 17
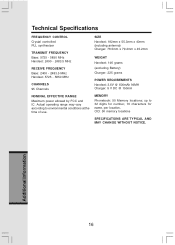
... - 2483.5 MHz RECEIVE FREQUENCY Base: 2400 - 2483.5 MHz Handset: 5725 - 5850 MHz CHANNELS 95 Channels SIZE Handset: 182mm x 55.3mm x 40mm (including antenna) Charger: 76.5mm x 79.4mm x 45.2mm WEIGHT Handset: 146 grams (excluding Battery) Charger: 225 grams POWER REQUIREMENTS Handset: 3.6V @ 600mAh NiMH Charger: 9 V DC @ 150mA NOMINAL EFFECTIVE RANGE Maximum power allowed by FCC and...
... - 2483.5 MHz RECEIVE FREQUENCY Base: 2400 - 2483.5 MHz Handset: 5725 - 5850 MHz CHANNELS 95 Channels SIZE Handset: 182mm x 55.3mm x 40mm (including antenna) Charger: 76.5mm x 79.4mm x 45.2mm WEIGHT Handset: 146 grams (excluding Battery) Charger: 225 grams POWER REQUIREMENTS Handset: 3.6V @ 600mAh NiMH Charger: 9 V DC @ 150mA NOMINAL EFFECTIVE RANGE Maximum power allowed by FCC and...
User Manual
Page 18
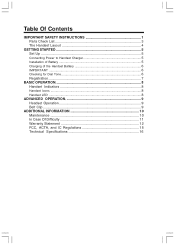
Table Of Contents IMPORTANT SAFETY INSTRUCTIONS 1 Parts Check List 3 The Handset Layout 4 GETTING STARTED 5 Set Up ...5 Connecting Power to Handset Charger 5 Installation of Battery 5 Charging of the Handset Battery 6 IMPORTANT ...6 Checking for Dial Tone 6 Registration 7 BASIC OPERATION 8 Handset Indicators 8 Handset Icons ...8 Handset LED ...8 ADVANCED OPERATION 9 Headset Operation 9 Belt Clip ...9 ADDITIONAL INFORMATION 10 Maintenance 10 In Case Of Difficulty 11 Warranty Statement 12 FCC, ACTA, and IC Regulations 15 Technical Specifications 16
Table Of Contents IMPORTANT SAFETY INSTRUCTIONS 1 Parts Check List 3 The Handset Layout 4 GETTING STARTED 5 Set Up ...5 Connecting Power to Handset Charger 5 Installation of Battery 5 Charging of the Handset Battery 6 IMPORTANT ...6 Checking for Dial Tone 6 Registration 7 BASIC OPERATION 8 Handset Indicators 8 Handset Icons ...8 Handset LED ...8 ADVANCED OPERATION 9 Headset Operation 9 Belt Clip ...9 ADDITIONAL INFORMATION 10 Maintenance 10 In Case Of Difficulty 11 Warranty Statement 12 FCC, ACTA, and IC Regulations 15 Technical Specifications 16


