
User Manual
Page 1
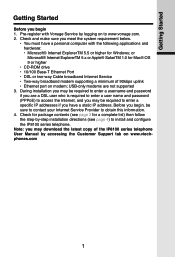
...5.5 or higher for a complete list) then follow the step-by-step installation directions (see page 4) to install and configure the IP8100 series telephone. Check for package contents (see page 3 for Windows; Check and make sure you meet the system requirement below. • You ... Ethernet Port • DSL or two-way Cable broadband Internet Service • Two-way broadband modem supporting a minimum of the IP8100 series telephone User Manual by logging on modem; Getting Started Getting Started Before you begin , be sure to contact your Internet Service Provider to obtain this...
...5.5 or higher for a complete list) then follow the step-by-step installation directions (see page 4) to install and configure the IP8100 series telephone. Check for package contents (see page 3 for Windows; Check and make sure you meet the system requirement below. • You ... Ethernet Port • DSL or two-way Cable broadband Internet Service • Two-way broadband modem supporting a minimum of the IP8100 series telephone User Manual by logging on modem; Getting Started Getting Started Before you begin , be sure to contact your Internet Service Provider to obtain this...
User Manual
Page 6
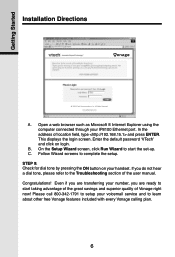
Follow Wizard screens to the Troubleshooting section of the user manual. This displays the login screen. If you do not hear a dial tone, please refer to complete the setup. C. In the address of Vonage right now! ... the set-up. B. Open a web browser such as Microsoft ® Internet Explorer using the computer connected through your handset. Enter the default password 'VTech' and click on your IP8100 Ethernet port. Congratulations! STEP 9: Check for dial tone by pressing the ON button on login. Even if you are ready to learn about...
Follow Wizard screens to the Troubleshooting section of the user manual. This displays the login screen. If you do not hear a dial tone, please refer to complete the setup. C. In the address of Vonage right now! ... the set-up. B. Open a web browser such as Microsoft ® Internet Explorer using the computer connected through your handset. Enter the default password 'VTech' and click on your IP8100 Ethernet port. Congratulations! STEP 9: Check for dial tone by pressing the ON button on login. Even if you are ready to learn about...
User Manual
Page 8
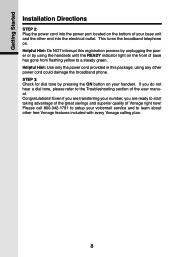
... call 800-342-1791 to setup your number, you are ready to start taking advantage of the great savings and superior quality of the user manual. Getting Started Installation Directions STEP 2: Plug the power cord into the electrical outlet.
... call 800-342-1791 to setup your number, you are ready to start taking advantage of the great savings and superior quality of the user manual. Getting Started Installation Directions STEP 2: Plug the power cord into the electrical outlet.
User Manual
Page 10
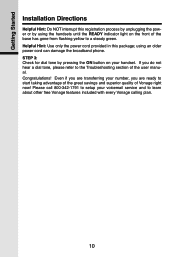
... front of Vonage right now! using the handsets until the READY indicator light on your voicemail service and to the Troubleshooting section of the user manual. If you are transferring your number, you do not hear a dial tone, please refer to learn about other free Vonage features included with every Vonage...
... front of Vonage right now! using the handsets until the READY indicator light on your voicemail service and to the Troubleshooting section of the user manual. If you are transferring your number, you do not hear a dial tone, please refer to learn about other free Vonage features included with every Vonage...

User Manual
Page 18
If your home page does not appear, try the following: • Reboot your computer. • Turn off or unplug your web browser. Your designated home page should appear. Test your connections Re-launch your modem for a few seconds, then turn it back on. • If you still have no Internet access, please refer to the initial wizard screen. The Setup Wizard Setup Completed Screen Click Close Wizard to return to the Troubleshooting section of this manual. 18
If your home page does not appear, try the following: • Reboot your computer. • Turn off or unplug your web browser. Your designated home page should appear. Test your connections Re-launch your modem for a few seconds, then turn it back on. • If you still have no Internet access, please refer to the initial wizard screen. The Setup Wizard Setup Completed Screen Click Close Wizard to return to the Troubleshooting section of this manual. 18
User Manual
Page 21
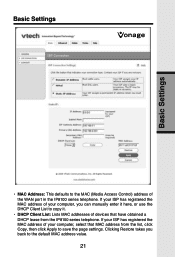
... of your computer, you back to copy it. • DHCP Client List: Lists MAC addresses of the WAN port in the IP8100 series telephone. Clicking Restore takes you can manually enter it here, or use the DHCP Client List to the default MAC address value. 21 Basic Settings Basic Settings • MAC... obtained a DHCP lease from the list, click Copy, then click Apply to the MAC (Media Access Control) address of devices that MAC address from the IP8100 series telephone.
... of your computer, you back to copy it. • DHCP Client List: Lists MAC addresses of the WAN port in the IP8100 series telephone. Clicking Restore takes you can manually enter it here, or use the DHCP Client List to the default MAC address value. 21 Basic Settings Basic Settings • MAC... obtained a DHCP lease from the list, click Copy, then click Apply to the MAC (Media Access Control) address of devices that MAC address from the IP8100 series telephone.

User Manual
Page 23
...: Re-type the password entered. • Maximum Idle Time: (Default 0) This field specifies the number of minutes of inactivity before your IP8100 series telephone terminates the PPPoE session. If your ISP has registered the MAC address of your computer, select that have obtained a DHCP lease from the... append your ISP's domain suffix to the username, i.e., [email protected]. • Password: Enter the password required by your ISP when you can manually enter it here, or use the DHCP Client List to copy it unless advised to do so by your ISP when you connect to the...
...: Re-type the password entered. • Maximum Idle Time: (Default 0) This field specifies the number of minutes of inactivity before your IP8100 series telephone terminates the PPPoE session. If your ISP has registered the MAC address of your computer, select that have obtained a DHCP lease from the... append your ISP's domain suffix to the username, i.e., [email protected]. • Password: Enter the password required by your ISP when you can manually enter it here, or use the DHCP Client List to copy it unless advised to do so by your ISP when you connect to the...
User Manual
Page 25
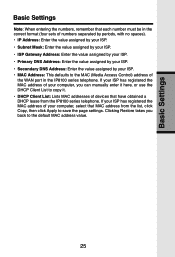
... takes you can manually enter it here, or use the DHCP Client List to copy it. • DHCP Client List: Lists MAC addresses of devices that MAC address from the IP8100 series telephone. Basic Settings Basic Settings Note: When entering the numbers, remember that each number must be in the IP8100 series telephone...
... takes you can manually enter it here, or use the DHCP Client List to copy it. • DHCP Client List: Lists MAC addresses of devices that MAC address from the IP8100 series telephone. Basic Settings Basic Settings Note: When entering the numbers, remember that each number must be in the IP8100 series telephone...

User Manual
Page 41
...a server running the DHCP protocol to automatically assign IP addresses to client stations on a TCP/ IP network. Using DHCP eliminates the need to manually assign IP addresses to each device on your local network. DNS DNS stands for some clients to have . A typical domain name has the ... access to the Internet. DMZs provide a way for Domain Name System. It translates from name to address and from accessing services on the IP8100 series telephone can filter specific LAN IP addresses from the LAN port to Internet connections that obtained a DHCP lease from a DHCP...
...a server running the DHCP protocol to automatically assign IP addresses to client stations on a TCP/ IP network. Using DHCP eliminates the need to manually assign IP addresses to each device on your local network. DNS DNS stands for some clients to have . A typical domain name has the ... access to the Internet. DMZs provide a way for Domain Name System. It translates from name to address and from accessing services on the IP8100 series telephone can filter specific LAN IP addresses from the LAN port to Internet connections that obtained a DHCP lease from a DHCP...

User Manual
Page 45
... telephone: Step 1: Verify physical connectivity by checking for the IP8100 series telephone? If you have an IP address in the same range as well. Software firewalls such as WinPoet or EnterNet300, you have DSL ... important that you do I access the web-based configuration for solid link lights on the computer. Step 3: Check the IP address of this manual is grayed out, then the settings are checked and then click OK. From the Security tab, click the button to restore the settings to restore...
... telephone: Step 1: Verify physical connectivity by checking for the IP8100 series telephone? If you have an IP address in the same range as well. Software firewalls such as WinPoet or EnterNet300, you have DSL ... important that you do I access the web-based configuration for solid link lights on the computer. Step 3: Check the IP address of this manual is grayed out, then the settings are checked and then click OK. From the Security tab, click the button to restore the settings to restore...
User Manual
Page 46
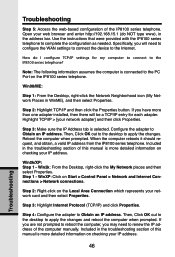
... more than one adapter installed, then there will need to the Internet. Reboot the computer when prompted. Included in the troubleshooting section of the IP8100 series telephone. Step 3: Highlight Internet Protocol (TCP/IP) and click Properties. Specifically, you may need to configure the... WAN settings to connect the device to renew the IP address of this manual is more detailed information on the Local Area Connection which represents your network card and then select Properties. Configure the adapter ...
... more than one adapter installed, then there will need to the Internet. Reboot the computer when prompted. Included in the troubleshooting section of the IP8100 series telephone. Step 3: Highlight Internet Protocol (TCP/IP) and click Properties. Specifically, you may need to configure the... WAN settings to connect the device to renew the IP address of this manual is more detailed information on the Local Area Connection which represents your network card and then select Properties. Configure the adapter ...

User Manual
Page 47
... After selecting the adapter, it doesn't try releasing, then renewing the IP. Your adapter should have a good physical connection between the computer and the IP8100 series telephone. b. Win2k/XP: Step 1: Go to obtain an IP address automatically. Click OK. Win98/ME: Step 1: Go to release the IP ...unable to close the Command prompt. 47 Troubleshooting Included in the troubleshooting section of this manual is connected to obtain a new address. If you have an IP address in the same range as the IP8100 series telephone, 192.168.15.X. Step 4: Click OK to obtain a valid IP...
... After selecting the adapter, it doesn't try releasing, then renewing the IP. Your adapter should have a good physical connection between the computer and the IP8100 series telephone. b. Win2k/XP: Step 1: Go to obtain an IP address automatically. Click OK. Win98/ME: Step 1: Go to release the IP ...unable to close the Command prompt. 47 Troubleshooting Included in the troubleshooting section of this manual is connected to obtain a new address. If you have an IP address in the same range as the IP8100 series telephone, 192.168.15.X. Step 4: Click OK to obtain a valid IP...


