User Manual
Page 1
User's Manual Park & Learn Deluxe Garage™ © 2015 VTech Printed in China 91-003022-004
User's Manual Park & Learn Deluxe Garage™ © 2015 VTech Printed in China 91-003022-004
User Manual
Page 3
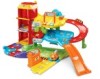
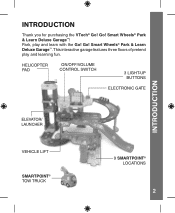
Smart Wheels® Park & Learn Deluxe Garage™. This interactive garage features three floors of pretend play and learn with the Go! Go! Go! HELICOPTER PAD ON/OFF/VOLUME CONTROL SWITCH 3 LIGHT-UP BUTTONS ELECTRONIC GATE INTRODUCTION ELEVATOR/ LAUNCHER VEHICLE LIFT SMARTPOINT® TOW TRUCK 9 SMARTPOINT® LOCATIONS 2 Park, play and learning fun. Smart Wheels® Park & Learn Deluxe Garage™! INTRODUCTION Thank you for purchasing the VTech® Go!
Smart Wheels® Park & Learn Deluxe Garage™. This interactive garage features three floors of pretend play and learn with the Go! Go! Go! HELICOPTER PAD ON/OFF/VOLUME CONTROL SWITCH 3 LIGHT-UP BUTTONS ELECTRONIC GATE INTRODUCTION ELEVATOR/ LAUNCHER VEHICLE LIFT SMARTPOINT® TOW TRUCK 9 SMARTPOINT® LOCATIONS 2 Park, play and learning fun. Smart Wheels® Park & Learn Deluxe Garage™! INTRODUCTION Thank you for purchasing the VTech® Go!

User Manual
Page 5
INCLUDED IN THIS PACKAGE One snap-in large support One medium support One snap-in small support One mini support Two snap-in mini supports Two male/female connector tracks Two male connector tracks One 90-degree female track One 90-degree male track One elevator support piece One label sheet One user's manual 4
INCLUDED IN THIS PACKAGE One snap-in large support One medium support One snap-in small support One mini support Two snap-in mini supports Two male/female connector tracks Two male connector tracks One 90-degree female track One 90-degree male track One elevator support piece One label sheet One user's manual 4

User Manual
Page 6
... child's safety. CAUTION: Adult assembly required. Make sure the unit is fully assembled. NOTE: Please keep this toy, and should be discarded for your child play with the toy until it contains important information. Unlock the packaging locks: Turn the packaging lock counter-clockwise several times. Use a coin or a screwdriver to loosen the screw. 5 GETTING STARTED WARNING: All packing materials, such...
... child's safety. CAUTION: Adult assembly required. Make sure the unit is fully assembled. NOTE: Please keep this toy, and should be discarded for your child play with the toy until it contains important information. Unlock the packaging locks: Turn the packaging lock counter-clockwise several times. Use a coin or a screwdriver to loosen the screw. 5 GETTING STARTED WARNING: All packing materials, such...
User Manual
Page 7
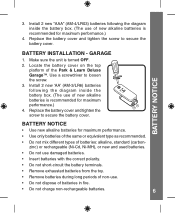
...performance.) 4. Install 2 new 'AA' (AM-3/LR6) batteries following the diagram inside the battery box. (The use of the Park & Learn Deluxe Garage™. 3. BATTERY NOTICE • Use new alkaline batteries for maximum performance.) 4. Install 2 new "AAA" (AM-4/LR03) batteries following the diagram inside the battery box. (The use of new alkaline batteries is turned OFF. 2. BATTERY NOTICE BATTERY INSTALLATION - GARAGE 1. Replace the battery cover and tighten the screw to loosen the screw. 3. Use a screwdriver to secure the battery cover. Replace the battery cover and...
...performance.) 4. Install 2 new 'AA' (AM-3/LR6) batteries following the diagram inside the battery box. (The use of the Park & Learn Deluxe Garage™. 3. BATTERY NOTICE • Use new alkaline batteries for maximum performance.) 4. Install 2 new "AAA" (AM-4/LR03) batteries following the diagram inside the battery box. (The use of new alkaline batteries is turned OFF. 2. BATTERY NOTICE BATTERY INSTALLATION - GARAGE 1. Replace the battery cover and tighten the screw to loosen the screw. 3. Use a screwdriver to secure the battery cover. Replace the battery cover and...

User Manual
Page 8
LABEL INSTRUCTIONS • Remove rechargeable batteries from the toy before charging (if removable). • Rechargeable batteries are only to the playset securely as indicated on the following page: 1 2 17 18 6 5 4 7 9 8 8 11 13 14 15 10 12 16 7 Please adhere the labels to be charged under adult supervision.
LABEL INSTRUCTIONS • Remove rechargeable batteries from the toy before charging (if removable). • Rechargeable batteries are only to the playset securely as indicated on the following page: 1 2 17 18 6 5 4 7 9 8 8 11 13 14 15 10 12 16 7 Please adhere the labels to be charged under adult supervision.
User Manual
Page 10
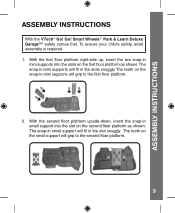
... platform right-side up, insert the two snap-in mini supports will grip to the second floor platform. 9 ASSEMBLY INSTRUCTIONS ASSEMBLY INSTRUCTIONS With the VTech® Go! Smart Wheels® Park & Learn Deluxe Garage™ safety comes first. The tooth on the first floor platform as shown. The teeth on the snap-in mini supports into the slot on the second floor platform as shown...
... platform right-side up, insert the two snap-in mini supports will grip to the second floor platform. 9 ASSEMBLY INSTRUCTIONS ASSEMBLY INSTRUCTIONS With the VTech® Go! Smart Wheels® Park & Learn Deluxe Garage™ safety comes first. The tooth on the first floor platform as shown. The teeth on the snap-in mini supports into the slot on the second floor platform as shown...

User Manual
Page 11
ASSEMBLY INSTRUCTIONS 3. Insert the bottom of the mini support into the second floor platform as shown. Once the vehicle lift is secure. Press down to the second floor platform, it cannot be detached. 5. Insert ... the second floor platform as shown. Flip the second floor platform right-side up. You will hear a "click" sound to the first floor platform as shown. 10 Next, connect the open second floor platform support slots to the snap-in mini supports attached to indicate the vehicle lift is connected to make sure the pieces are securely...
ASSEMBLY INSTRUCTIONS 3. Insert the bottom of the mini support into the second floor platform as shown. Once the vehicle lift is secure. Press down to the second floor platform, it cannot be detached. 5. Insert ... the second floor platform as shown. Flip the second floor platform right-side up. You will hear a "click" sound to the first floor platform as shown. 10 Next, connect the open second floor platform support slots to the snap-in mini supports attached to indicate the vehicle lift is connected to make sure the pieces are securely...
User Manual
Page 12
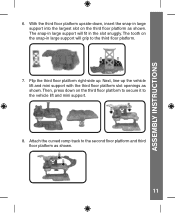
ASSEMBLY INSTRUCTIONS 6. Flip the third floor platform right-side up the vehicle lift and mini support with the third floor platform slot openings as shown. Then, press down , insert the snap-in large support into the largest slot on the third floor platform as shown. Attach the curved ramp track to the vehicle lift and... mini support. 8. With the third floor platform upside-down on the snap-in the slot snuggly. The tooth on the third floor platform to secure it to ...
ASSEMBLY INSTRUCTIONS 6. Flip the third floor platform right-side up the vehicle lift and mini support with the third floor platform slot openings as shown. Then, press down , insert the snap-in large support into the largest slot on the third floor platform as shown. Attach the curved ramp track to the vehicle lift and... mini support. 8. With the third floor platform upside-down on the snap-in the slot snuggly. The tooth on the third floor platform to secure it to ...
User Manual
Page 13
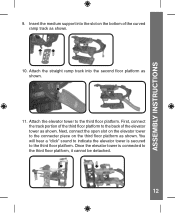
...platform. Insert the medium support into the second floor platform as shown. First, connect the track portion of the third floor platform to the third floor platform, it cannot be detached. 12 You will hear a "click" sound to indicate the elevator tower is connected to the back of the... curved ramp track as shown. Next, connect the open slot on the bottom of the elevator tower as shown. 10. ASSEMBLY INSTRUCTIONS 9. Attach the straight ramp track into ...
...platform. Insert the medium support into the second floor platform as shown. First, connect the track portion of the third floor platform to the third floor platform, it cannot be detached. 12 You will hear a "click" sound to indicate the elevator tower is connected to the back of the... curved ramp track as shown. Next, connect the open slot on the bottom of the elevator tower as shown. 10. ASSEMBLY INSTRUCTIONS 9. Attach the straight ramp track into ...
User Manual
Page 14
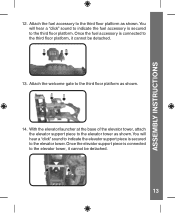
... be detached. 13. Once the fuel accessory is connected to the elevator tower. Attach the welcome gate to the third floor platform as shown. You will hear a "click" sound to indicate the elevator support piece is secured to the elevator tower as shown.... With the elevator/launcher at the base of the elevator tower, attach the elevator support piece to the third floor platform. You will hear a "click" sound to indicate the fuel accessory is secured to the elevator tower, it cannot be detached. 13 ASSEMBLY INSTRUCTIONS...
... be detached. 13. Once the fuel accessory is connected to the elevator tower. Attach the welcome gate to the third floor platform as shown. You will hear a "click" sound to indicate the elevator support piece is secured to the elevator tower as shown.... With the elevator/launcher at the base of the elevator tower, attach the elevator support piece to the third floor platform. You will hear a "click" sound to indicate the fuel accessory is secured to the elevator tower, it cannot be detached. 13 ASSEMBLY INSTRUCTIONS...

User Manual
Page 15
... ( ) position. Go! EXPAND & EXPLORE Connect to other Go! To turn the tow truck ON, slide the ON/OFF SWITCH on the tow truck to play! Smart Wheels® Deluxe Track Set (as shown below) or other Go! PRODUCT FEATURES - Smart Wheels® and Go! ON/OFF SWITCH To turn the tow truck OFF, slide the ON/OFF SWITCH to expand the Park & Play Deluxe Garage and inspire creativity. Smart Wheels® and Go! Go! Go! Smart Animals™ playsets...
... ( ) position. Go! EXPAND & EXPLORE Connect to other Go! To turn the tow truck ON, slide the ON/OFF SWITCH on the tow truck to play! Smart Wheels® Deluxe Track Set (as shown below) or other Go! PRODUCT FEATURES - Smart Wheels® and Go! ON/OFF SWITCH To turn the tow truck OFF, slide the ON/OFF SWITCH to expand the Park & Play Deluxe Garage and inspire creativity. Smart Wheels® and Go! Go! Go! Smart Animals™ playsets...
User Manual
Page 16
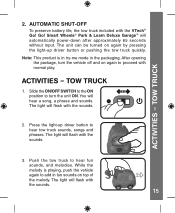
... to hear tow truck sounds, songs and phrases. The light will automatically power-down after approximately 65 seconds without input. Smart Wheels® Park & Learn Deluxe Garage™ will flash with normal play. ACTIVITIES - The light will flash with the VTech® Go! Go! AUTOMATIC SHUT-OFF To preserve battery life, the tow truck included with the sounds. 2. Press the light-up driver button or pushing the tow truck quickly. ACTIVITIES - Slide the ON/OFF SWITCH...
... to hear tow truck sounds, songs and phrases. The light will automatically power-down after approximately 65 seconds without input. Smart Wheels® Park & Learn Deluxe Garage™ will flash with normal play. ACTIVITIES - The light will flash with the VTech® Go! Go! AUTOMATIC SHUT-OFF To preserve battery life, the tow truck included with the sounds. 2. Press the light-up driver button or pushing the tow truck quickly. ACTIVITIES - Slide the ON/OFF SWITCH...
User Manual
Page 17
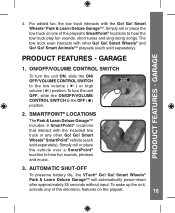
... truck play fun sounds, short tunes and sing-along songs. GARAGE 1. Smart Wheels® Park & Learn Deluxe Garage™. Smart Wheels® and Go! ON/OFF/VOLUME CONTROL SWITCH To turn the unit OFF, slide the ON/OFF/VOLUME CONTROL SWITCH to the low volume ( ) or high volume ( ) position. SMARTPOINT® LOCATIONS The Park & Learn Deluxe Garage™ includes 9 SmartPoint® locations that interact with the Go! Go! For added fun, the tow truck interacts with the included tow truck or any of the electronic...
... truck play fun sounds, short tunes and sing-along songs. GARAGE 1. Smart Wheels® Park & Learn Deluxe Garage™. Smart Wheels® and Go! ON/OFF/VOLUME CONTROL SWITCH To turn the unit OFF, slide the ON/OFF/VOLUME CONTROL SWITCH to the low volume ( ) or high volume ( ) position. SMARTPOINT® LOCATIONS The Park & Learn Deluxe Garage™ includes 9 SmartPoint® locations that interact with the Go! Go! For added fun, the tow truck interacts with the included tow truck or any of the electronic...
User Manual
Page 18
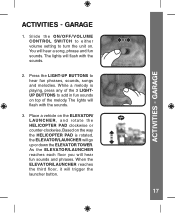
... add in fun sounds on the ELEVATOR/ LAUNCHER, and rotate the HELICOPTER PAD clockwise or counter-clockwise. S l i d e t h e O N / O F F / V O L U M E CONTROL SWITCH to either volume setting to hear fun phrases, sounds, songs and melodies. The lights will hear fun sounds and phrases. As the ELEVATOR/LAUNCHER reaches each floor you will flash with the sounds. 2. Press the LIGHT-UP BUTTONS to turn the unit on. ACTIVITIES - Based on the way the HELICOPTER PAD is playing, press any...
... add in fun sounds on the ELEVATOR/ LAUNCHER, and rotate the HELICOPTER PAD clockwise or counter-clockwise. S l i d e t h e O N / O F F / V O L U M E CONTROL SWITCH to either volume setting to hear fun phrases, sounds, songs and melodies. The lights will hear fun sounds and phrases. As the ELEVATOR/LAUNCHER reaches each floor you will flash with the sounds. 2. Press the LIGHT-UP BUTTONS to turn the unit on. ACTIVITIES - Based on the way the HELICOPTER PAD is playing, press any...
User Manual
Page 19
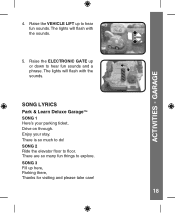
ACTIVITIES - Enjoy your parking ticket, Drive on through. The lights will flash with the sounds. 5. Raise the ELECTRONIC GATE up here, Parking there, Thanks for visiting and please take care! 18 SONG 3 Fill up or down to hear fun sounds and a phrase. SONG LYRICS Park & Learn Deluxe Garage™ SONG 1 Here's your stay. There is so much to explore. There are so many fun things to do! Raise the VEHICLE LIFT up to floor. The lights will flash with the sounds. SONG 2 Ride the elevator floor to hear fun sounds. GARAGE 4.
ACTIVITIES - Enjoy your parking ticket, Drive on through. The lights will flash with the sounds. 5. Raise the ELECTRONIC GATE up here, Parking there, Thanks for visiting and please take care! 18 SONG 3 Fill up or down to hear fun sounds and a phrase. SONG LYRICS Park & Learn Deluxe Garage™ SONG 1 Here's your stay. There is so much to explore. There are so many fun things to do! Raise the VEHICLE LIFT up to floor. The lights will flash with the sounds. SONG 2 Ride the elevator floor to hear fun sounds. GARAGE 4.
User Manual
Page 20
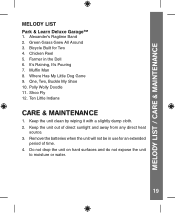
... batteries when the unit will not be in the Dell 6. Bicycle Built for an extended period of direct sunlight and away from any direct heat source. 3. It's Raining, It's Pouring 7. One, Two, Buckle My Shoe 10. MELODY LIST / CARE & MAINTENANCE MELODY LIST Park & Learn Deluxe Garage™ 1. Muffin Man 8. Where Has My Little Dog Gone 9. Keep the unit out of time...
... batteries when the unit will not be in the Dell 6. Bicycle Built for an extended period of direct sunlight and away from any direct heat source. 3. It's Raining, It's Pouring 7. One, Two, Buckle My Shoe 10. MELODY LIST / CARE & MAINTENANCE MELODY LIST Park & Learn Deluxe Garage™ 1. Muffin Man 8. Where Has My Little Dog Gone 9. Keep the unit out of time...
User Manual
Page 21
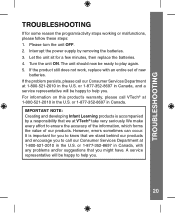
... to play again. 5. If the problem persists, please call VTech® at 1-800-521-2010 in Canada. IMPORTANT NOTE: Creating and developing Infant Learning products is important for you to ensure the accuracy of the information, which forms the value of new batteries. Let the unit sit for some reason the program/activity stops working or malfunctions, please follow these steps: 1. or...
... to play again. 5. If the problem persists, please call VTech® at 1-800-521-2010 in Canada. IMPORTANT NOTE: Creating and developing Infant Learning products is important for you to ensure the accuracy of the information, which forms the value of new batteries. Let the unit sit for some reason the program/activity stops working or malfunctions, please follow these steps: 1. or...

User Manual
Page 22
... energy and, if not installed and used in a residential installation. These limits are designed to provide reasonable protection against harmful interference in accordance with the limits for a Class B digital device, pursuant to operate the equipment. This equipment generates, uses and can be determined by turning the equipment off and on, the user is encouraged to try to...
... energy and, if not installed and used in a residential installation. These limits are designed to provide reasonable protection against harmful interference in accordance with the limits for a Class B digital device, pursuant to operate the equipment. This equipment generates, uses and can be determined by turning the equipment off and on, the user is encouraged to try to...


