User Manual
Page 1
User's Manual Gallop & Go StableTM © 2014 VTech Printed in China 91-003023-000 US CA
User's Manual Gallop & Go StableTM © 2014 VTech Printed in China 91-003023-000 US CA
User Manual
Page 3
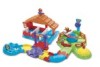
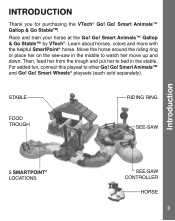
... 5 SMARTPOINT® LOCATIONS SEE-SAW CONTROLLER HORSE 3 Go! Smart Animals™ Gallop & Go Stable™ by VTech®. Race and train your horse at the Go! Learn about horses, colors and more with the helpful SmartPoint® horse. Move the horse around the riding ring or place her on the see-saw in the stable. For added fun, connect this playset to bed in the...
... 5 SMARTPOINT® LOCATIONS SEE-SAW CONTROLLER HORSE 3 Go! Smart Animals™ Gallop & Go Stable™ by VTech®. Race and train your horse at the Go! Learn about horses, colors and more with the helpful SmartPoint® horse. Move the horse around the riding ring or place her on the see-saw in the stable. For added fun, connect this playset to bed in the...
User Manual
Page 4
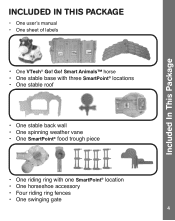
Included In This Package INCLUDED IN THIS PACKAGE • One user's manual • One sheet of labels • One VTech® Go! Smart Animals™ horse • One stable base with three SmartPoint® locations • One stable roof • One stable back wall • One spinning weather vane • One SmartPoint® food trough piece • One riding ring with one SmartPoint® location • One horseshoe accessory • Four riding ring fences • One swinging gate 4 Go!
Included In This Package INCLUDED IN THIS PACKAGE • One user's manual • One sheet of labels • One VTech® Go! Smart Animals™ horse • One stable base with three SmartPoint® locations • One stable roof • One stable back wall • One spinning weather vane • One SmartPoint® food trough piece • One riding ring with one SmartPoint® location • One horseshoe accessory • Four riding ring fences • One swinging gate 4 Go!
User Manual
Page 5
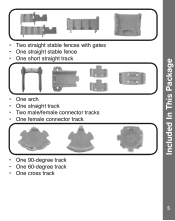
Included In This Package • Two straight stable fences with gates • One straight stable fence • One short straight track • One arch • One straight track • Two male/female connector tracks • One female connector track • One 90-degree track • One 60-degree track • One cross track 5
Included In This Package • Two straight stable fences with gates • One straight stable fence • One short straight track • One arch • One straight track • Two male/female connector tracks • One female connector track • One 90-degree track • One 60-degree track • One cross track 5
User Manual
Page 6
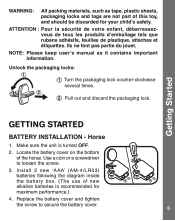
.... Pull out and discard the packaging lock. Make sure the unit is recommended for your child's safety. Use a coin or a screwdriver to secure the battery cover. 6 NOTE: Please keep user's manual as tape, plastic sheets, packaging locks and tags are not part of new alkaline batteries is turned OFF. 2. Getting Started GETTING STARTED BATTERY INSTALLATION - Horse 1. Install 2 new 'AAA' (AM-4/LR03) batteries following the diagram inside the battery box. (The use...
.... Pull out and discard the packaging lock. Make sure the unit is recommended for your child's safety. Use a coin or a screwdriver to secure the battery cover. 6 NOTE: Please keep user's manual as tape, plastic sheets, packaging locks and tags are not part of new alkaline batteries is turned OFF. 2. Getting Started GETTING STARTED BATTERY INSTALLATION - Horse 1. Install 2 new 'AAA' (AM-4/LR03) batteries following the diagram inside the battery box. (The use...

User Manual
Page 7
... new and used batteries. • Do not use damaged batteries. • Insert batteries with the correct polarity. • Do not short-circuit the battery terminals. • Remove exhausted batteries from the toy. • Remove batteries during long periods of non-use. • Do not dispose of batteries in fire. • Do not charge non-rechargeable batteries. • Remove rechargeable batteries from the toy before charging (if removable). • Rechargeable batteries...
... new and used batteries. • Do not use damaged batteries. • Insert batteries with the correct polarity. • Do not short-circuit the battery terminals. • Remove exhausted batteries from the toy. • Remove batteries during long periods of non-use. • Do not dispose of batteries in fire. • Do not charge non-rechargeable batteries. • Remove rechargeable batteries from the toy before charging (if removable). • Rechargeable batteries...
User Manual
Page 8
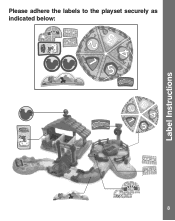
Label Instructions Please adhere the labels to the playset securely as indicated below: 80-180600-001-001 Label size: 240x155mm P/N:92-007509-000-100 8
Label Instructions Please adhere the labels to the playset securely as indicated below: 80-180600-001-001 Label size: 240x155mm P/N:92-007509-000-100 8
User Manual
Page 9
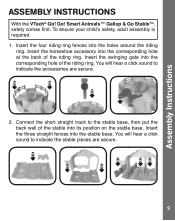
... will hear a click sound to the stable base, then put the back wall of the stable into its position on the stable base. Insert the swinging gate into the corresponding hole at the back of the riding ring. Go! To ensure your child's safety, adult assembly is required. 1. Smart Animals™ Gallop & Go StableTM, safety comes first. Assembly Instructions ASSEMBLY INSTRUCTIONS With the VTech® Go! Insert the...
... will hear a click sound to the stable base, then put the back wall of the stable into its position on the stable base. Insert the swinging gate into the corresponding hole at the back of the riding ring. Go! To ensure your child's safety, adult assembly is required. 1. Smart Animals™ Gallop & Go StableTM, safety comes first. Assembly Instructions ASSEMBLY INSTRUCTIONS With the VTech® Go! Insert the...
User Manual
Page 10
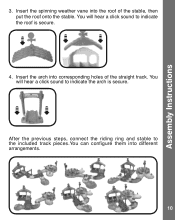
You will hear a click sound to indicate the roof is secure. You will hear a click sound to indicate the arch is secure. 4. Insert the arch into corresponding holes of the stable, then put the roof onto the stable. After the previous steps, connect the riding ring and stable to the included track pieces.You can configure them into the roof of the straight track. Insert the spinning weather vane into different arrangements. 10 Assembly Instructions 3.
You will hear a click sound to indicate the roof is secure. You will hear a click sound to indicate the arch is secure. 4. Insert the arch into corresponding holes of the stable, then put the roof onto the stable. After the previous steps, connect the riding ring and stable to the included track pieces.You can configure them into the roof of the straight track. Insert the spinning weather vane into different arrangements. 10 Assembly Instructions 3.
User Manual
Page 11
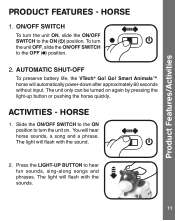
... battery life, the VTech® Go! The light will flash with the sounds. 11 To turn the unit on again by pressing the light-up button or pushing the horse quickly. You will automatically power-down after approximately 60 seconds without input. The light will flash with the sound. 2. Smart Animals™ horse will hear horse sounds, a song and a phrase. HORSE 1. The unit only can be turned on . Press the LIGHT-UP BUTTON...
... battery life, the VTech® Go! The light will flash with the sounds. 11 To turn the unit on again by pressing the light-up button or pushing the horse quickly. You will automatically power-down after approximately 60 seconds without input. The light will flash with the sound. 2. Smart Animals™ horse will hear horse sounds, a song and a phrase. HORSE 1. The unit only can be turned on . Press the LIGHT-UP BUTTON...
User Manual
Page 12
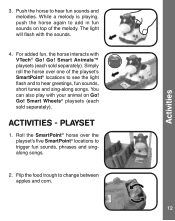
...'s SmartPoint® locations to see the light flash and to change between apples and corn. 12 Go! Roll the SmartPoint® horse over one of the melody. Smart Animals™ playsets (each sold separately). While a melody is playing, push the horse again to add in fun sounds on Go! The light will flash with VTech® Go! Go! Activities 3. PLAYSET 1. For added fun, the horse interacts with the...
...'s SmartPoint® locations to see the light flash and to change between apples and corn. 12 Go! Roll the SmartPoint® horse over one of the melody. Smart Animals™ playsets (each sold separately). While a melody is playing, push the horse again to add in fun sounds on Go! The light will flash with VTech® Go! Go! Activities 3. PLAYSET 1. For added fun, the horse interacts with the...

User Manual
Page 13
Turn the see-saw controller to moisture or water. 13 Do not drop the unit on hard surfaces and do not expose the unit to spin the see-saw around. Keep the unit out of time. 4. CARE & MAINTENANCE 1. Remove the batteries when the unit will not be in use for an extended period of direct sunlight and away from any direct heat. 3. Care & Maintenance 3. Spin the weather vane to hear a clicking sound. 4. Keep the unit clean by wiping it with a slightly damp cloth. 2.
Turn the see-saw controller to moisture or water. 13 Do not drop the unit on hard surfaces and do not expose the unit to spin the see-saw around. Keep the unit out of time. 4. CARE & MAINTENANCE 1. Remove the batteries when the unit will not be in use for an extended period of direct sunlight and away from any direct heat. 3. Care & Maintenance 3. Spin the weather vane to hear a clicking sound. 4. Keep the unit clean by wiping it with a slightly damp cloth. 2.

User Manual
Page 14
... forms the value of batteries. Let the unit stand for some reason the program/activity stops working or malfunctions, please follow these steps: 1. or 1-877-352-8697 in Canada with a new set of our products. A service representative will be happy to play again. 5. Troubleshooting TROUBLESHOOTING If for a few minutes, then replace the batteries. 4. If the problem persists, please call our Consumer Services Department at VTech® take very...
... forms the value of batteries. Let the unit stand for some reason the program/activity stops working or malfunctions, please follow these steps: 1. or 1-877-352-8697 in Canada with a new set of our products. A service representative will be happy to play again. 5. Troubleshooting TROUBLESHOOTING If for a few minutes, then replace the batteries. 4. If the problem persists, please call our Consumer Services Department at VTech® take very...
User Manual
Page 15
...equipment and receiver. • Connect the equipment into an outlet on , the user is no guarantee that to operate the equipment. 15 If this equipment does cause harmful interference to radio or television reception, which the receiver is connected. • Consult the dealer...-3(B) Caution: Changes or modifications not expressly approved by the party responsible for help. However, there is encouraged to try to correct the interference by turning the equipment off and on a circuit different from that interference will not occur in a residential installation. OPERATION IS SUBJECT TO...
...equipment and receiver. • Connect the equipment into an outlet on , the user is no guarantee that to operate the equipment. 15 If this equipment does cause harmful interference to radio or television reception, which the receiver is connected. • Consult the dealer...-3(B) Caution: Changes or modifications not expressly approved by the party responsible for help. However, there is encouraged to try to correct the interference by turning the equipment off and on a circuit different from that interference will not occur in a residential installation. OPERATION IS SUBJECT TO...

User Manual
Page 16
...parts, such as batteries; (b) cosmetic damage, including but not limited to persons or entities outside the permitted or intended uses described by VTech in water, neglect, abuse, battery leakage, or improper installation, improper service, or other external causes; (e) damage caused by operating the product outside the United States of VTech . IF VTECH... OF THE EXPRESS WARRANTY AND TO THE REPLACEMENT SERVICE AS DETERMINED BY VTECH IN ITS SOLE DISCRETION. This Warranty is covered by a 3-month Warranty from this Warranty shall be provided instructions on how to the final and conclusive...
...parts, such as batteries; (b) cosmetic damage, including but not limited to persons or entities outside the permitted or intended uses described by VTech in water, neglect, abuse, battery leakage, or improper installation, improper service, or other external causes; (e) damage caused by operating the product outside the United States of VTech . IF VTECH... OF THE EXPRESS WARRANTY AND TO THE REPLACEMENT SERVICE AS DETERMINED BY VTECH IN ITS SOLE DISCRETION. This Warranty is covered by a 3-month Warranty from this Warranty shall be provided instructions on how to the final and conclusive...

