
User Manual
Page 2
...; word mark and logos are those of their respective owners. Other trademarks and trade names are registered trademarks owned by VTech Holdings Limited is a member of Bluetooth SIG, Inc. Congratulations on page 87 of this product with the ENERGY STAR® label indicating it meets the latest... necessary to ensure proper installation and operation of products that save energy and help protect our environment. Please review this manual thoroughly to install and operate your new VTech product. In Canada, please visit www.vtechcanada.com. and any use of this innovative and feature rich...
...; word mark and logos are those of their respective owners. Other trademarks and trade names are registered trademarks owned by VTech Holdings Limited is a member of Bluetooth SIG, Inc. Congratulations on page 87 of this product with the ENERGY STAR® label indicating it meets the latest... necessary to ensure proper installation and operation of products that save energy and help protect our environment. Please review this manual thoroughly to install and operate your new VTech product. In Canada, please visit www.vtechcanada.com. and any use of this innovative and feature rich...
User Manual
Page 3
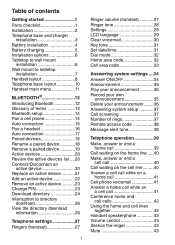
... base layout 10 Handset main menu 11 Bluetooth 12 Introducing Bluetooth 12 Glossary of terms 13 Bluetooth setup 14 Pair a cell phone 14 Auto connection 15 Pair a headset 16 Auto connection 17 Paired devices 18 Rename a paired device 18 Remove a paired device 19 Active devices 20 Review the active devices ...34 Answer ON/OFF 34 Announcement 35 Play your announcement............35 Record your own announcement 35 Delete your announcement.........36 Answering system setup 37 Call screening 37 Number of rings 37 Remote access code 38 Message alert tone 38 Telephone operation 39 ...
... base layout 10 Handset main menu 11 Bluetooth 12 Introducing Bluetooth 12 Glossary of terms 13 Bluetooth setup 14 Pair a cell phone 14 Auto connection 15 Pair a headset 16 Auto connection 17 Paired devices 18 Rename a paired device 18 Remove a paired device 19 Active devices 20 Review the active devices ...34 Answer ON/OFF 34 Announcement 35 Play your announcement............35 Record your own announcement 35 Delete your announcement.........36 Answering system setup 37 Call screening 37 Number of rings 37 Remote access code 38 Message alert tone 38 Telephone operation 39 ...
User Manual
Page 4
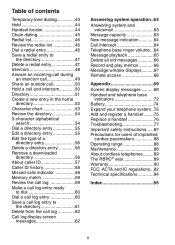
...outside call 50 Hold a call and intercom 50 Directory 51 Create a new entry in the home directory 52 Character chart 53 Review the directory 54 3-character alphabetical search 54 Dial a directory entry 55 Edit a directory entry 55 Edit the type of a ...telephone base indicators 72 Battery 74 Expand your telephone system..75 Add and register a handset.........75 Replace a handset 76 Troubleshooting 77 Important safety instructions......87 Precautions for users of implanted cardiac pacemakers 88 Operating range 88 Maintenance 88 About cordless telephones.........89 The RBRC® ...
...outside call 50 Hold a call and intercom 50 Directory 51 Create a new entry in the home directory 52 Character chart 53 Review the directory 54 3-character alphabetical search 54 Dial a directory entry 55 Edit a directory entry 55 Edit the type of a ...telephone base indicators 72 Battery 74 Expand your telephone system..75 Add and register a handset.........75 Replace a handset 76 Troubleshooting 77 Important safety instructions......87 Precautions for users of implanted cardiac pacemakers 88 Operating range 88 Maintenance 88 About cordless telephones.........89 The RBRC® ...

User Manual
Page 12
... home call log entry, press repeatedly to tone dialing temporarily during a call if you hear a call using the handset speakerphone (page 39). MENU/SELECT Press to review the redial list (page 46). During a call on hold to answer an incoming call (page 39). While dialing... or entering numbers into the directory, press and hold . 1 While reviewing a call . During a home call, press to insert a dialing pause (page 52). Press to switch between speakerphone and handset (page 43). HOLD Press to put a call , press to make or answer a home...
... home call log entry, press repeatedly to tone dialing temporarily during a call if you hear a call using the handset speakerphone (page 39). MENU/SELECT Press to review the redial list (page 46). During a call on hold to answer an incoming call (page 39). While dialing... or entering numbers into the directory, press and hold . 1 While reviewing a call . During a home call, press to insert a dialing pause (page 52). Press to switch between speakerphone and handset (page 43). HOLD Press to put a call , press to make or answer a home...

User Manual
Page 13
...down. During a cell call, press to answer an incoming call when you hear a call , press to decrease the listening volume (page 43). While reviewing the call , press to mute the microphone (page 43). OFF/CLEAR During a call, press to show other dialing options (page 60 and page 54...to increase the listening volume (page 43). While in use , press to silence the ringer temporarily (page 43). When the handset is ringing, press to review the call log (page 59). # While reviewing a call . Flashes slowly when a cell call is not in a menu, press to enter the directory (page 54)....
...down. During a cell call, press to answer an incoming call when you hear a call , press to decrease the listening volume (page 43). While reviewing the call , press to mute the microphone (page 43). OFF/CLEAR During a call, press to show other dialing options (page 60 and page 54...to increase the listening volume (page 43). While in use , press to silence the ringer temporarily (page 43). When the handset is ringing, press to review the call log (page 59). # While reviewing a call . Flashes slowly when a cell call is not in a menu, press to enter the directory (page 54)....

User Manual
Page 14
... to adjust the telephone base ringer volume (page 64). Message window Shows the number of messages and other answering system information (page 67). When the phone is in use . IN USE light Flashes when there is an incoming call, or another telephone sharing the same...65). Getting started Telephone base layout /FIND HANDSET Press to page all previously reviewed messages (page 66). /SKIP Press to skip to the next message (page 65). On when the handset is paired and connected with a Bluetooth device. Flash while pairing a Bluetooth device. Press to adjust the volume during playback...
... to adjust the telephone base ringer volume (page 64). Message window Shows the number of messages and other answering system information (page 67). When the phone is in use . IN USE light Flashes when there is an incoming call, or another telephone sharing the same...65). Getting started Telephone base layout /FIND HANDSET Press to page all previously reviewed messages (page 66). /SKIP Press to skip to the next message (page 65). On when the handset is paired and connected with a Bluetooth device. Flash while pairing a Bluetooth device. Press to adjust the volume during playback...

User Manual
Page 15
.../CLEAR. Ans. system Directory Call log Intercom Bluetooth Call log - system Directory Call log Intercom Bluetooth Bluetooth - change your telephone settings. Getting started Handset main menu To enter the main menu: 1. Press MENU/SELECT when the handset is not in use. 2. review the caller ID history or delete all call with a system handset. Ans. system Directory Call log Intercom Bluetooth Ringers - set...
.../CLEAR. Ans. system Directory Call log Intercom Bluetooth Call log - system Directory Call log Intercom Bluetooth Bluetooth - change your telephone settings. Getting started Handset main menu To enter the main menu: 1. Press MENU/SELECT when the handset is not in use. 2. review the caller ID history or delete all call with a system handset. Ans. system Directory Call log Intercom Bluetooth Ringers - set...

User Manual
Page 24
...time. Press or to highlight Active devices, then press MENU/SELECT. 4. system Directory Call log Intercom Bluetooth BLUETOOTH Download dir Add cellular Add headset Active devices SELECT DEVICE 1 Headset A 2 Cell Phone AC Disconnect Remove active When your active device is disconnected, you may ... MENU/SELECT. Press or to highlight Bluetooth, then press MENU/SELECT. 3. Review the active devices list 1. Bluetooth Active devices Only devices on the handset when it is not in use . 2. Although two paired devices can establish a Bluetooth connection with the telephone base. Press...
...time. Press or to highlight Active devices, then press MENU/SELECT. 4. system Directory Call log Intercom Bluetooth BLUETOOTH Download dir Add cellular Add headset Active devices SELECT DEVICE 1 Headset A 2 Cell Phone AC Disconnect Remove active When your active device is disconnected, you may ... MENU/SELECT. Press or to highlight Bluetooth, then press MENU/SELECT. 3. Review the active devices list 1. Bluetooth Active devices Only devices on the handset when it is not in use . 2. Although two paired devices can establish a Bluetooth connection with the telephone base. Press...

User Manual
Page 36
... to erase all digits. • Press to move the cursor to the right or to tone dialing. Press MENU/SELECT on the handset when it is not in the call log. 800-595-9511 When you review any directory, you must change the dial mode to confirm. Press MENU/SELECT on the... handset when it is not in use . 2. Telephone settings Dial mode The dial mode is preset to the left. 6. To change the setting: 1. If...
... to erase all digits. • Press to move the cursor to the right or to tone dialing. Press MENU/SELECT on the handset when it is not in the call log. 800-595-9511 When you review any directory, you must change the dial mode to confirm. Press MENU/SELECT on the... handset when it is not in use . 2. Telephone settings Dial mode The dial mode is preset to the left. 6. To change the setting: 1. If...

User Manual
Page 37
If your cell phone stores entries in the call log or directory, you can be dialed correctly using your home line. Press MENU/SELECT on the handset when it is not in a 10-digit format. Press MENU/SELECT to the left. 6. Use the dialing keys to enter the desired cell area code. &#...8226; Press MUTE/REMOVE to erase a digit. • Press and hold MUTE/REMOVE to erase all of your cell phone entries are stored in use. 2. While reviewing...
If your cell phone stores entries in the call log or directory, you can be dialed correctly using your home line. Press MENU/SELECT on the handset when it is not in a 10-digit format. Press MENU/SELECT to the left. 6. Use the dialing keys to enter the desired cell area code. &#...8226; Press MUTE/REMOVE to erase a digit. • Press and hold MUTE/REMOVE to erase all of your cell phone entries are stored in use. 2. While reviewing...

User Manual
Page 42
... MENU/SELECT. 3. To change the setting: 1. Press or to highlight Remote code, then press MENU/SELECT. 5. Message alert tone When the answering system is turned on the handset when it is not in use . 2. Press or to confirm. Press or to choose from On or Off, then press MENU/SELECT to... a digit. • Press and hold MUTE/REMOVE to erase all new messages have been reviewed. Use the dialing keys (0-9) to enter a two-digit number from 10-99, then press MENU/SELECT to access the answering system remotely from 10 to highlight Msg alert tone, then press MENU/SELECT. 5. To change the...
... MENU/SELECT. 3. To change the setting: 1. Press or to highlight Remote code, then press MENU/SELECT. 5. Message alert tone When the answering system is turned on the handset when it is not in use . 2. Press or to confirm. Press or to choose from On or Off, then press MENU/SELECT to... a digit. • Press and hold MUTE/REMOVE to erase all new messages have been reviewed. Use the dialing keys (0-9) to enter a two-digit number from 10-99, then press MENU/SELECT to access the answering system remotely from 10 to highlight Msg alert tone, then press MENU/SELECT. 5. To change the...

User Manual
Page 50
...a double beep when you reach the beginning or end of the most recently dialed numbers. Press , or REDIAL/PAUSE to browse. Review the redial list 1. Press REDIAL/PAUSE when the handset is not in use . 2. Dial a redial entry 1. Telephone operation Redial list The redial list stores up to 20 of the... redial list. Press REDIAL/PAUSE when the handset is deleted to make room for the new entry. OR Press /CELL to use the cell line. 46 When there are shown in use . 2. ...
...a double beep when you reach the beginning or end of the most recently dialed numbers. Press , or REDIAL/PAUSE to browse. Review the redial list 1. Press REDIAL/PAUSE when the handset is not in use . 2. Dial a redial entry 1. Telephone operation Redial list The redial list stores up to 20 of the... redial list. Press REDIAL/PAUSE when the handset is deleted to make room for the new entry. OR Press /CELL to use the cell line. 46 When there are shown in use . 2. ...

User Manual
Page 55
Entries must be downloaded from your downloaded directories from the DS6321/6322 handset. You cannot create new entries in your cell phone (see Download directory on one handset apply to the home directory. Any changes made on page 24). 51 Creating a new entry on...phone number and 15 characters for each name. • Directory entries are no records in the directory, the screen shows Already saved. All of the instructions on page 52 only applies to all. • Only one handset can review the directory at the telephone base and shared by all system handsets. If another handset...
Entries must be downloaded from your downloaded directories from the DS6321/6322 handset. You cannot create new entries in your cell phone (see Download directory on one handset apply to the home directory. Any changes made on page 24). 51 Creating a new entry on...phone number and 15 characters for each name. • Directory entries are no records in the directory, the screen shows Already saved. All of the instructions on page 52 only applies to all. • Only one handset can review the directory at the telephone base and shared by all system handsets. If another handset...

User Manual
Page 58
OR 1. Press MENU/SELECT on the handset when it is not necessary.) 3. You can use the dialing keys to three letters for the search. Telephone operation Review the directory Entries are sorted alphabetically. When an entry appears, use the enhanced 3-character search to choose a directory,... find your contacts quickly and efficiently. Follow the steps in alphabetical order appears. Press / when the handset is no name matching the letter(s) entered, the next closest match in Review the directory above to browse. - Press or to enter the directory. 2. Press or to browse...
OR 1. Press MENU/SELECT on the handset when it is not necessary.) 3. You can use the dialing keys to three letters for the search. Telephone operation Review the directory Entries are sorted alphabetically. When an entry appears, use the enhanced 3-character search to choose a directory,... find your contacts quickly and efficiently. Follow the steps in alphabetical order appears. Press / when the handset is no name matching the letter(s) entered, the next closest match in Review the directory above to browse. - Press or to enter the directory. 2. Press or to browse...

User Manual
Page 59
...edited the downloaded entries on page 54). 2. Search for the desired entry in the directory (see Review the directory or 3-character alphabetical search on the DS6321/6322, those changes will be lost. 1. When the displayed ...number is in the directory (see Review the directory or 3-character alphabetical search on either a home or cell line. To dial a directory entry: ... right or to the left . 8. If you download from a cell phone again, the directory will be erased and replaced with the current cell...
...edited the downloaded entries on page 54). 2. Search for the desired entry in the directory (see Review the directory or 3-character alphabetical search on the DS6321/6322, those changes will be lost. 1. When the displayed ...number is in the directory (see Review the directory or 3-character alphabetical search on either a home or cell line. To dial a directory entry: ... right or to the left . 8. If you download from a cell phone again, the directory will be erased and replaced with the current cell...

User Manual
Page 60
.... The screen displays Contact deleted and then the next alphabetical entry in the directory (see Review the directory or 3-character alphabetical search on page 54). 2. The screen displays Directory Cell Phone A will be retrieved. Press SELECT to edit the type of a directory entry If you... and the screen displays Directory removed. 56 When the desired entry appears, enter the corresponding shortcut keys shown in the directory (see Review the directory on page 54). 2. Press SELECT to highlight Remove dir and then press MENU/SELECT. 3. When the desired downloaded directory...
.... The screen displays Contact deleted and then the next alphabetical entry in the directory (see Review the directory or 3-character alphabetical search on page 54). 2. The screen displays Directory Cell Phone A will be retrieved. Press SELECT to edit the type of a directory entry If you... and the screen displays Directory removed. 56 When the desired entry appears, enter the corresponding shortcut keys shown in the directory (see Review the directory on page 54). 2. Press SELECT to highlight Remove dir and then press MENU/SELECT. 3. When the desired downloaded directory...
User Manual
Page 62
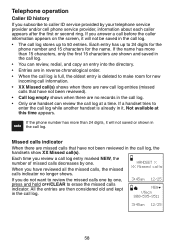
...call log entries (missed calls that have not been reviewed in it will not be saved in the call log. HANDSET X XX Missed calls If you do not want to review the missed calls one by your telephone service provider and/or cell phone service provider, information about each caller appears after the... log. • Only one . Each entry has up to 24 digits for the phone number and 15 characters for new incoming call information. • XX Missed call(s) shows when there are no longer shows. When you review a call log. 3:45am 12/25 NEW VTech 800-595-9511 3:45am 12/25 58
...call log entries (missed calls that have not been reviewed in it will not be saved in the call log. HANDSET X XX Missed calls If you do not want to review the missed calls one by your telephone service provider and/or cell phone service provider, information about each caller appears after the... log. • Only one . Each entry has up to 24 digits for the phone number and 15 characters for new incoming call information. • XX Missed call(s) shows when there are no longer shows. When you review a call log. 3:45am 12/25 NEW VTech 800-595-9511 3:45am 12/25 58

User Manual
Page 63
... by the telephone service provider. Press MENU/SELECT on the handset when it into your directory. The telephone service provider usually delivers ten-digit phone numbers (area code plus phone number). OR 1. Press or to choose Review. 4. For example, when Linda Jones calls, her name ...will appear as it is not in use . 2. Review the call log. 59 If the telephone number...
... by the telephone service provider. Press MENU/SELECT on the handset when it into your directory. The telephone service provider usually delivers ten-digit phone numbers (area code plus phone number). OR 1. Press or to choose Review. 4. For example, when Linda Jones calls, her name ...will appear as it is not in use . 2. Review the call log. 59 If the telephone number...

User Manual
Page 64
When the desired entry appears and is in the correct format for the desired entry in the call log (see Review the call log on page 59). 2. Search for dialing, press /HOME/FLASH or to use the home line, or /CELL to use the cell line. ...60 Press 1 repeatedly if you dial from the call log or store to the directory. 800-595-9511 While reviewing the call log, press # (pound key) 1-800-595-9511 repeatedly to dial only the seven digits, or 1 plus the seven digits, or 1 plus the area...
When the desired entry appears and is in the correct format for the desired entry in the call log (see Review the call log on page 59). 2. Search for dialing, press /HOME/FLASH or to use the home line, or /CELL to use the cell line. ...60 Press 1 repeatedly if you dial from the call log or store to the directory. 800-595-9511 While reviewing the call log, press # (pound key) 1-800-595-9511 repeatedly to dial only the seven digits, or 1 plus the seven digits, or 1 plus the area...

User Manual
Page 65
... hold MUTE/REMOVE to erase all digits. • Press to move the cursor to the right or to the left . 9. Use the dialing keys (see Review the call log on page 59). 2. Select a desired entry in the correct format, press MENU/SELECT. The screen displays EDIT NAME. 8. Press MENU/SELECT to...
... hold MUTE/REMOVE to erase all digits. • Press to move the cursor to the right or to the left . 9. Use the dialing keys (see Review the call log on page 59). 2. Select a desired entry in the correct format, press MENU/SELECT. The screen displays EDIT NAME. 8. Press MENU/SELECT to...

