

User Manual (DS6221-3 User Manual)
Page 3
... 1 Telephone base and charger installation 2 Battery installation and charging 3 Installation options 4 Tabletop to wall mount installation 4 Wall mount to tabletop installation 5 Handset layout 6 Telephone base layout 7 Telephone settings 8 Ringer volume (handset 8 Ringer tone 8 Key tone 8 LCD language 9 Set date/time 9 Clear voicemail 10 Home area code 10 Answering system settings.....11 Answering system set up............11 Number of rings 11 Remote code 11 Message alert tone 11 Announcement 12 Play your announcement ...........12 Record your own announcement 12 Delete...
... 1 Telephone base and charger installation 2 Battery installation and charging 3 Installation options 4 Tabletop to wall mount installation 4 Wall mount to tabletop installation 5 Handset layout 6 Telephone base layout 7 Telephone settings 8 Ringer volume (handset 8 Ringer tone 8 Key tone 8 LCD language 9 Set date/time 9 Clear voicemail 10 Home area code 10 Answering system settings.....11 Answering system set up............11 Number of rings 11 Remote code 11 Message alert tone 11 Announcement 12 Play your announcement ...........12 Record your own announcement 12 Delete...
User Manual (DS6221-3 User Manual)
Page 7
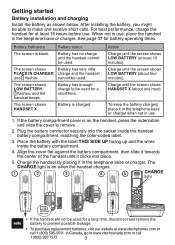
... make and receive short calls. When not in use . 1. Battery has enough charge to www.vtechcanada.com or call 1 (800) 595-9511. cannot be used . Charge the handset by placing it in the telephone base or charger when not in use , place the handset in the telephone base or charger. Getting started Battery installation and charging Install the battery as shown below. Battery indicators Battery status Action The screen is charged. To keep the battery charged, place it in the telephone base...
... make and receive short calls. When not in use . 1. Battery has enough charge to www.vtechcanada.com or call 1 (800) 595-9511. cannot be used . Charge the handset by placing it in the telephone base or charger when not in use , place the handset in the telephone base or charger. Getting started Battery installation and charging Install the battery as shown below. Battery indicators Battery status Action The screen is charged. To keep the battery charged, place it in the telephone base...

User Manual (DS6221-3 User Manual)
Page 10
... silence the ringer temporarily (page 14). While the handset is ringing, press to review the redial list (page 27). During a call (page 16). Getting started Handset layout CHARGE light On when the handset is charging in the telephone base or charger (page 3). /VOL (Directory/volume) Press to enter the directory when the telephone is not in use to erase the missed calls indicator (page 24). While dialing or entering numbers into...
... silence the ringer temporarily (page 14). While the handset is ringing, press to review the redial list (page 27). During a call (page 16). Getting started Handset layout CHARGE light On when the handset is charging in the telephone base or charger (page 3). /VOL (Directory/volume) Press to enter the directory when the telephone is not in use to erase the missed calls indicator (page 24). While dialing or entering numbers into...

User Manual (DS6221-3 User Manual)
Page 13
... be used in all screen displays. 1. RINGER VOLUME RINGER TONE KEY TONE LCD LANGUAGE >SET DATE/TIME SET DATE 12/25/08 MM/DD/YY SET TIME 11:10 AM If the date and time are set ," before each incoming call. Telephone settings LCD language You can be calculated from the caller ID information. 1. Before using the answering system, set . However, the year must be correct so that the day of the message prior to show the menu when the handset...
... be used in all screen displays. 1. RINGER VOLUME RINGER TONE KEY TONE LCD LANGUAGE >SET DATE/TIME SET DATE 12/25/08 MM/DD/YY SET TIME 11:10 AM If the date and time are set ," before each incoming call. Telephone settings LCD language You can be calculated from the caller ID information. 1. Before using the answering system, set . However, the year must be correct so that the day of the message prior to show the menu when the handset...

User Manual (DS6221-3 User Manual)
Page 14
... LANGUAGE SET DATE/TIME CLR VOICEMAIL >HOME AREA CODE 2. The stored home area code appears with a stutter (broken) dial tone. Use the dialing keys to enter the desired home area code. 800 • Press MUTE/REMOVE to delete a digit. • Press and hold MUTE/REMOVE to select >HOME AREA CODE, then press MENU/SELECT. Clearing the voicemail waiting indicator only turns off these indicators: >CLR VOICEMAIL 1. The screen shows TURN OFF INDICATOR? PRESS SELECT TO CONFIRM. 3. PRESS SELECT TO CONFIRM • Your telephone service provider might alert...
... LANGUAGE SET DATE/TIME CLR VOICEMAIL >HOME AREA CODE 2. The stored home area code appears with a stutter (broken) dial tone. Use the dialing keys to enter the desired home area code. 800 • Press MUTE/REMOVE to delete a digit. • Press and hold MUTE/REMOVE to select >HOME AREA CODE, then press MENU/SELECT. Clearing the voicemail waiting indicator only turns off these indicators: >CLR VOICEMAIL 1. The screen shows TURN OFF INDICATOR? PRESS SELECT TO CONFIRM. 3. PRESS SELECT TO CONFIRM • Your telephone service provider might alert...
User Manual (DS6221-3 User Manual)
Page 17
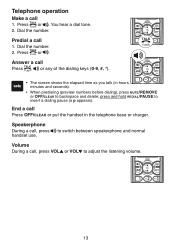
...; When predialing (preview numbers before dialing), press MUTE/REMOVE or OFF/CLEAR to backspace and delete; Press or . press and hold REDIAL/PAUSE to insert a dialing pause (a p appears). You hear a dial tone. 2. Answer a call 1. Predial a call Press , or any of the dialing keys (0-9, #, *). • The screen shows the elapsed time as you talk (in the telephone base or charger. to switch between speakerphone and normal Volume During a call 1. Telephone operation Make a call , press VOL or VOL...
...; When predialing (preview numbers before dialing), press MUTE/REMOVE or OFF/CLEAR to backspace and delete; Press or . press and hold REDIAL/PAUSE to insert a dialing pause (a p appears). You hear a dial tone. 2. Answer a call 1. Predial a call Press , or any of the dialing keys (0-9, #, *). • The screen shows the elapsed time as you talk (in the telephone base or charger. to switch between speakerphone and normal Volume During a call 1. Telephone operation Make a call , press VOL or VOL...
User Manual (DS6221-3 User Manual)
Page 18
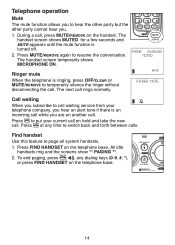
... alert tone if there is turned off. 2. To end paging, press , , any time to call . The handset screen shows MUTED for a few seconds and MUTE appears until the mute function is an incoming call while you are on another call waiting service from your current call on the handset. Press FIND HANDSET on the telephone base. 14 The next call . Find handset Use this feature to resume the conversation. All idle handsets ring and the screens...
... alert tone if there is turned off. 2. To end paging, press , , any time to call . The handset screen shows MUTED for a few seconds and MUTE appears until the mute function is an incoming call while you are on another call waiting service from your current call on the handset. Press FIND HANDSET on the telephone base. 14 The next call . Find handset Use this feature to resume the conversation. All idle handsets ring and the screens...

User Manual (DS6221-3 User Manual)
Page 20
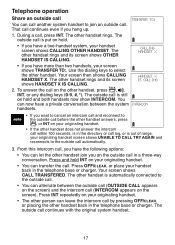
... system handsets at a time. You can register up to 12 handsets to select the other handset. OTHER HANDSET IS CALLING 2. To end the call, press OFF/CLEAR or place the handset in their displays as 10-12, when you receive an incoming outside call If you intercom or transfer to one of range, your handset screen shows CALLING OTHER HANDSET. Use the dialing keys to the telephone base. To answer the intercom call, press , , INT, or any dialing keys...
... system handsets at a time. You can register up to 12 handsets to select the other handset. OTHER HANDSET IS CALLING 2. To end the call, press OFF/CLEAR or place the handset in their displays as 10-12, when you receive an incoming outside call If you intercom or transfer to one of range, your handset screen shows CALLING OTHER HANDSET. Use the dialing keys to the telephone base. To answer the intercom call, press , , INT, or any dialing keys...
User Manual (DS6221-3 User Manual)
Page 21
... of range, your originating handset. • You can transfer the call continues with the original system handset. 17 Your screen shows CALL TRANSFERED. The outside call is automatically connected to select the other handset rings. Use the dialing keys to the outside call. • You can let the other handset, press , , INT, or any dialing keys (0-9, #, *). During a call on the screen) and the intercom call in the telephone base or charger. HANDSET X IS CALLING 2. To answer the call...
... of range, your originating handset. • You can transfer the call continues with the original system handset. 17 Your screen shows CALL TRANSFERED. The outside call is automatically connected to select the other handset rings. Use the dialing keys to the outside call. • You can let the other handset, press , , INT, or any dialing keys (0-9, #, *). During a call on the screen) and the intercom call in the telephone base or charger. HANDSET X IS CALLING 2. To answer the call...
User Manual (DS6221-3 User Manual)
Page 29
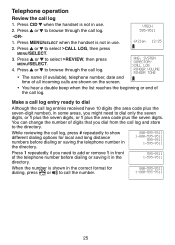
... 1. You can change the number of digits that you dial from the call log. Telephone operation Review the call log. • The name (if available), telephone number, date and time of all incoming calls are shown on the screen. 6:21am 12/25 ANS. Press or to select >REVIEW, then press MENU/SELECT. 4. Make a call log entry ready to dial Although the call log entries received have 10 digits (the area code plus the...
... 1. You can change the number of digits that you dial from the call log. Telephone operation Review the call log. • The name (if available), telephone number, date and time of all incoming calls are shown on the screen. 6:21am 12/25 ANS. Press or to select >REVIEW, then press MENU/SELECT. 4. Make a call log entry ready to dial Although the call log entries received have 10 digits (the area code plus the...
User Manual (DS6221-3 User Manual)
Page 32
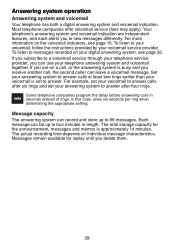
... delete them. 28 To listen to answer calls at least two rings earlier than your digital answering system, see page 10. in seconds instead of rings; The actual recording time depends on your voicemail is approximately 14 minutes. Set your answering system to messages recorded on individual message characteristics. Messages remain available for the announcement, messages and memos is set your voicemail service provider. Answering system operation Answering system and voicemail Your telephone has both a digital answering...
... delete them. 28 To listen to answer calls at least two rings earlier than your digital answering system, see page 10. in seconds instead of rings; The actual recording time depends on your voicemail is approximately 14 minutes. Set your answering system to messages recorded on individual message characteristics. Messages remain available for the announcement, messages and memos is set your voicemail service provider. Answering system operation Answering system and voicemail Your telephone has both a digital answering...
User Manual (DS6221-3 User Manual)
Page 36
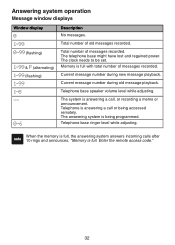
... new message playback. The answering system is answering a call or being programmed. Memory is full with total number of messages recorded. Total number of old messages recorded. Current message number during old message playback. Telephone base speaker volume level while adjusting. The system is being accessed remotely. Answering system operation Message window displays Window display 0 1-99 0-99 (flashing) 1-99 & F (alternating) 1-99 (flashing) 1-99 1-8 -- 0-6 Description No messages. The telephone base might have lost and regained power. Telephone base ringer...
... new message playback. The answering system is answering a call or being programmed. Memory is full with total number of messages recorded. Total number of old messages recorded. Current message number during old message playback. Telephone base speaker volume level while adjusting. The system is being accessed remotely. Answering system operation Message window displays Window display 0 1-99 0-99 (flashing) 1-99 & F (alternating) 1-99 (flashing) 1-99 1-8 -- 0-6 Description No messages. The telephone base might have lost and regained power. Telephone base ringer...
User Manual (DS6221-3 User Manual)
Page 38
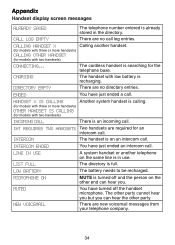
.... The cordless handset is searching for models with two handsets) Another system handset is calling. ENDED You have just ended an intercom call . INCOMING CALL There is an incoming call . INTERCOM The handset is on an intercom call . MICROPHONE ON MUTE is turned off the handset microphone. Appendix Handset display screen messages ALREADY SAVED The telephone number entered is already stored in use. HANDSET X IS CALLING (for models with three or more handsets) OTHER HANDSET IS CALLING (for the telephone base. MUTED NEW VOICEMAIL You have turned off and...
.... The cordless handset is searching for models with two handsets) Another system handset is calling. ENDED You have just ended an intercom call . INCOMING CALL There is an incoming call . INTERCOM The handset is on an intercom call . MICROPHONE ON MUTE is turned off the handset microphone. Appendix Handset display screen messages ALREADY SAVED The telephone number entered is already stored in use. HANDSET X IS CALLING (for models with three or more handsets) OTHER HANDSET IS CALLING (for the telephone base. MUTED NEW VOICEMAIL You have turned off and...

User Manual (DS6221-3 User Manual)
Page 39
... incoming call . The cordless handset locator is no name or number. Appendix Handset display screen messages NO LINE NO SIGNAL, CALL ENDED NOT AVAILABLE AT THIS TIME OUTSIDE CALL **PAGING** PHONE PLACE IN CHARGER RINGER MUTE SAVED SPEAKER UNABLE TO CALL TRY AGAIN UNABLE TO SAVE XX MISSED CALLS There is activated. Communication between handset and telephone base is already viewing the call log or directory and another handset attempts to make an intercom call, but the handset you are unreviewed calls...
... incoming call . The cordless handset locator is no name or number. Appendix Handset display screen messages NO LINE NO SIGNAL, CALL ENDED NOT AVAILABLE AT THIS TIME OUTSIDE CALL **PAGING** PHONE PLACE IN CHARGER RINGER MUTE SAVED SPEAKER UNABLE TO CALL TRY AGAIN UNABLE TO SAVE XX MISSED CALLS There is activated. Communication between handset and telephone base is already viewing the call log or directory and another handset attempts to make an intercom call, but the handset you are unreviewed calls...

User Manual (DS6221-3 User Manual)
Page 40
... USE Flashes when there is an incoming call log entries. On when the answering system is turned on . Handset icons ANS ON MUTE MSG#[ 1/13] NEW NEW VOICEMAIL SPEAKER Answering system is on . Appendix Handset and telephone base indicators Handset lights On when the handset speakerphone is charging in the telephone base or charger. CHARGE On when the handset is in use . On when the handset is fully charged. 36 Message number currently playing and total number of messages recorded. New call or another telephone sharing the same line...
... USE Flashes when there is an incoming call log entries. On when the answering system is turned on . Handset icons ANS ON MUTE MSG#[ 1/13] NEW NEW VOICEMAIL SPEAKER Answering system is on . Appendix Handset and telephone base indicators Handset lights On when the handset speakerphone is charging in the telephone base or charger. CHARGE On when the handset is in use . On when the handset is fully charged. 36 Message number currently playing and total number of messages recorded. New call or another telephone sharing the same line...
User Manual (DS6221-3 User Manual)
Page 42
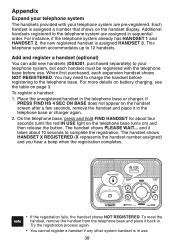
... the button. Add and register a handset (optional) You can add new handsets (DS6201, purchased separately) to charge the handset before use . 38 The handset shows PLEASE WAIT... For instance, if the telephone system already has HANDSET 1 and HANDSET 2, the new registered handset is in sequential order. Place the unregistered handset in . To reset the handset, remove the handset from the telephone base and place it takes about four seconds (until the red IN USE light on the telephone base turns on the handset display.
... the button. Add and register a handset (optional) You can add new handsets (DS6201, purchased separately) to charge the handset before use . 38 The handset shows PLEASE WAIT... For instance, if the telephone system already has HANDSET 1 and HANDSET 2, the new registered handset is in sequential order. Place the unregistered handset in . To reset the handset, remove the handset from the telephone base and place it takes about four seconds (until the red IN USE light on the telephone base turns on the handset display.

User Manual (DS6221-3 User Manual)
Page 45
.... • Make sure the power adapter and telephone line cord are having the same problem, the problem is in the telephone wall jack. Install a new telephone line cord. • Re-install the battery and place the handset in the telephone base or charger. • Wait for this telephone either, the problem is in your local telephone company (charges may apply). • Other electronic products can cause interference to take place. 41 There is no dial tone on this...
.... • Make sure the power adapter and telephone line cord are having the same problem, the problem is in the telephone wall jack. Install a new telephone line cord. • Re-install the battery and place the handset in the telephone base or charger. • Wait for this telephone either, the problem is in your local telephone company (charges may apply). • Other electronic products can cause interference to take place. 41 There is no dial tone on this...

User Manual (DS6221-3 User Manual)
Page 46
... install a DSL filter between the telephone base and the telephone wall jack. My handset beeps and is not performing normally. • Make sure the power cord is interference during a telephone conversation. Install your cordless telephone. Plug the telephone base into a different location. Install your telephone as possible: wireless routers, radios, radio towers, pager towers, cellular telephones, intercoms, room monitors, televisions, personal computers, kitchen appliances and other cordless telephones. • If your local telephone company (charges...
... install a DSL filter between the telephone base and the telephone wall jack. My handset beeps and is not performing normally. • Make sure the power cord is interference during a telephone conversation. Install your cordless telephone. Plug the telephone base into a different location. Install your telephone as possible: wireless routers, radios, radio towers, pager towers, cellular telephones, intercoms, room monitors, televisions, personal computers, kitchen appliances and other cordless telephones. • If your local telephone company (charges...

User Manual (DS6221-3 User Manual)
Page 48
... the telephone base. Use a working electrical outlet not controlled by unplugging the power adapter from the cordless handset. Wait for local calls you speak in the power adapter and re-install the battery. Install your telephone by a wall switch. • Reset your telephone base as far away from communicating with each other 10 digits, see page 25 for instructions on changing the number. • If you dial seven digits for 15 seconds, then plug in a normal tone of voice...
... the telephone base. Use a working electrical outlet not controlled by unplugging the power adapter from the cordless handset. Wait for local calls you speak in the power adapter and re-install the battery. Install your telephone by a wall switch. • Reset your telephone base as far away from communicating with each other 10 digits, see page 25 for instructions on changing the number. • If you dial seven digits for 15 seconds, then plug in a normal tone of voice...
User Manual (DS6221-3 User Manual)
Page 49
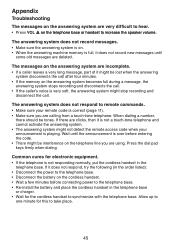
... normally, put the cordless handset in the telephone base. The answering system does not record messages. • Make sure the answering system is on. • When the answering machine memory is full, it is not a touch-tone telephone and cannot activate the answering system. • The answering system might not detect the remote access code when your remote code is correct (page 11). • Make sure you are using. When dialing a number, there should be...
... normally, put the cordless handset in the telephone base. The answering system does not record messages. • Make sure the answering system is on. • When the answering machine memory is full, it is not a touch-tone telephone and cannot activate the answering system. • The answering system might not detect the remote access code when your remote code is correct (page 11). • Make sure you are using. When dialing a number, there should be...


