
User Manual
Page 2
...devices. Do not use of this product on the marking label. This product should never be followed to install and operate your new VTech product. If you In Canada, please visit www.vtechcanada.com. Compatible with Hearing Aid T-Coil T TIA-1083 Telephones identified with extreme... liquids and fumes. 7. Used under license. Avoid placing the telephone system in the back or bottom of the telephone base and handset are proud to ensure proper installation and operation of products that save energy and help protect our environment. The ENERGY STAR® program...
...devices. Do not use of this product on the marking label. This product should never be followed to install and operate your new VTech product. If you In Canada, please visit www.vtechcanada.com. Compatible with Hearing Aid T-Coil T TIA-1083 Telephones identified with extreme... liquids and fumes. 7. Used under license. Avoid placing the telephone system in the back or bottom of the telephone base and handset are proud to ensure proper installation and operation of products that save energy and help protect our environment. The ENERGY STAR® program...

User Manual
Page 3
...its cradle. Incorrect reassembling can cause electric shock when the product is a common event associated with the closing of the telephone base or handset other controls may touch dangerous voltage points or create a short circuit. A spark in performance. 14. SAVE THESE INSTRUCTIONS are covered by ... a fire or explosion. industrial gases (cleaning solvents; Do not install this product through the slots in the telephone base or handset because they may result in damage and often requires extensive work by an authorized technician to restore the product to be created when...
...its cradle. Incorrect reassembling can cause electric shock when the product is a common event associated with the closing of the telephone base or handset other controls may touch dangerous voltage points or create a short circuit. A spark in performance. 14. SAVE THESE INSTRUCTIONS are covered by ... a fire or explosion. industrial gases (cleaning solvents; Do not install this product through the slots in the telephone base or handset because they may result in damage and often requires extensive work by an authorized technician to restore the product to be created when...
User Manual
Page 4
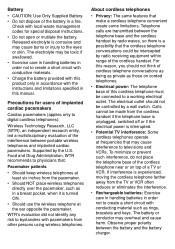
...the instructions and limitations specified in a breast pocket, when it is experienced, moving the cordless telephone farther away from the cordless handset if the telephone base is unplugged, switched off or if the electrical power is corrosive and may cause interference to the eyes... batteries: Exercise care in handling batteries in a fire. Observe proper polarity between the telephone base and the cordless handset by radio receiving equipment within range of the cordless handset. Battery • CAUTION: Use Only Supplied Battery. • Do not dispose of the battery in order not...
...the instructions and limitations specified in a breast pocket, when it is experienced, moving the cordless telephone farther away from the cordless handset if the telephone base is unplugged, switched off or if the electrical power is corrosive and may cause interference to the eyes... batteries: Exercise care in handling batteries in a fire. Observe proper polarity between the telephone base and the cordless handset by radio receiving equipment within range of the cordless handset. Battery • CAUTION: Use Only Supplied Battery. • Do not dispose of the battery in order not...
User Manual
Page 6
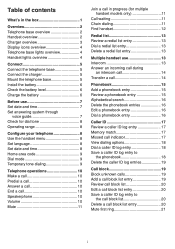
...6 Before use 7 Set date and time 7 Set answering system through voice guide 7 Check for dial tone 8 Operating range 8 Configure your telephone 8 Use the handset menu 8 Set language 8 Set date and time 8 Home area code 9 Dial mode 9 Temporary tone dialing 9 Telephone operations 10 Make a call 10 Predial a... a call 10 End a call 10 Speakerphone 10 Volume 10 Mute 11 Join a call in progress (for multiple handset models only 11 Call waiting 11 Chain dialing 11 Find handset 12 Redial list 13 Review a redial list entry 13 Dial a redial list entry 13 Delete a redial list entry...
...6 Before use 7 Set date and time 7 Set answering system through voice guide 7 Check for dial tone 8 Operating range 8 Configure your telephone 8 Use the handset menu 8 Set language 8 Set date and time 8 Home area code 9 Dial mode 9 Temporary tone dialing 9 Telephone operations 10 Make a call 10 Predial a... a call 10 End a call 10 Speakerphone 10 Volume 10 Mute 11 Join a call in progress (for multiple handset models only 11 Call waiting 11 Chain dialing 11 Find handset 12 Redial list 13 Review a redial list entry 13 Dial a redial list entry 13 Delete a redial list entry...

User Manual
Page 7
Sound settings 21 Key tone 21 Ringer tone 21 Telephone base ringer volume 22 Handset ringer volume 22 Temporary ringer silencing 22 Quiet mode 22 About the built-in answering system and voicemail service 23 Set your built-in answering ...
Sound settings 21 Key tone 21 Ringer tone 21 Telephone base ringer volume 22 Handset ringer volume 22 Temporary ringer silencing 22 Quiet mode 22 About the built-in answering system and voicemail service 23 Set your built-in answering ...
User Manual
Page 9
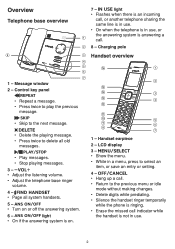
... 2 - b 8 - light • On if the answering system is in use . • On when the telephone is on or off the answering system. 6 - Handset overview p a b o n c m d l k j e i f h g 1 - Message window 2 - LCD display 3 - • Show the menu. • While ...messages. • Stop playing messages. 3 - • Adjust the listening volume. • Adjust the telephone base ringer volume. 4 - • Page all system handsets. 5 - • Turn on . Overview Telephone base overview 7 - Charging pole h c d e f g 1 - Control key panel • Repeat a ...
... 2 - b 8 - light • On if the answering system is in use . • On when the telephone is on or off the answering system. 6 - Handset overview p a b o n c m d l k j e i f h g 1 - Message window 2 - LCD display 3 - • Show the menu. • While ...messages. • Stop playing messages. 3 - • Adjust the listening volume. • Adjust the telephone base ringer volume. 4 - • Page all system handsets. 5 - • Turn on . Overview Telephone base overview 7 - Charging pole h c d e f g 1 - Control key panel • Repeat a ...
User Manual
Page 10
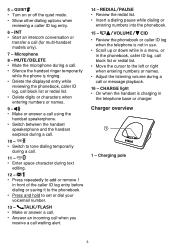
... a call or message playback. 16 - Charging pole 3 Microphone 8 - • Mute the microphone during a call. • Silence the handset ringer temporarily while the phone is ringing. • Delete the displayed entry while reviewing the phonebook, caller ID log, call block list or redial...8226; Delete digits or characters when entering numbers or names. 9 - • Make or answer a call using the handset speakerphone. • Switch between the handset speakerphone and the handset earpiece during a call. 10 - • Switch to tone dialing temporarily during a call. 11 - • Enter...
... a call or message playback. 16 - Charging pole 3 Microphone 8 - • Mute the microphone during a call. • Silence the handset ringer temporarily while the phone is ringing. • Delete the displayed entry while reviewing the phonebook, caller ID log, call block list or redial...8226; Delete digits or characters when entering numbers or names. 9 - • Make or answer a call using the handset speakerphone. • Switch between the handset speakerphone and the handset earpiece during a call. 10 - • Switch to tone dialing temporarily during a call. 11 - • Enter...

User Manual
Page 11
... • On when the telephone line is in use. • On when the answering system is answering a call. • On when you are registering a handset. • Flashes quickly when there is an incoming call. • Flashes when another telephone sharing the same line is turned on . Display icons overview NEW... battery icon flashes when the battery is turned off. On when the answering system is in use . • Flashes when you are deregistering all handsets. The battery icon animates when the battery is fully charged. The battery icon becomes solid when the battery is charging...
... • On when the telephone line is in use. • On when the answering system is answering a call. • On when you are registering a handset. • Flashes quickly when there is an incoming call. • Flashes when another telephone sharing the same line is turned on . Display icons overview NEW... battery icon flashes when the battery is turned off. On when the answering system is in use . • Flashes when you are deregistering all handsets. The battery icon animates when the battery is fully charged. The battery icon becomes solid when the battery is charging...
User Manual
Page 13
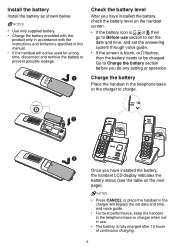
... go to Before use section to set the date and time, and set date and time, and voice guide. • For best performance, keep the handset in the telephone base or charger when not in this product only in accordance with the instructions and limitations specified in use. • The battery..., then the battery needs to prevent possible leakage. NOTES • Use only supplied battery. • Charge the battery provided with this manual. • If the handset will not be used for a long time, disconnect and remove the battery to be charged. NOTES • Press CANCEL or place the...
... go to Before use section to set the date and time, and set date and time, and voice guide. • For best performance, keep the handset in the telephone base or charger when not in this product only in accordance with the instructions and limitations specified in use. • The battery..., then the battery needs to prevent possible leakage. NOTES • Use only supplied battery. • Charge the battery provided with this manual. • If the handset will not be used for a long time, disconnect and remove the battery to be charged. NOTES • Press CANCEL or place the...
User Manual
Page 14
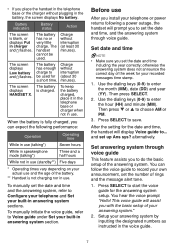
...manually initiate the voice guide, refer to record your answering system." 2. Press SELECT to start the voice guide for the date and time, the handset will assist you to ... You hear the voice prompt "Hello! The battery has no or very little charge. The battery is not charging nor... a half hours While not in use (standby**) Five days * Operating times vary depending on your actual use and the age of the battery. ** Handset is charged. Before use . Then press SELECT. 2. and set the date and time, and the answering system through voice guide This feature assists you with...
...manually initiate the voice guide, refer to record your answering system." 2. Press SELECT to start the voice guide for the date and time, the handset will assist you to ... You hear the voice prompt "Hello! The battery has no or very little charge. The battery is not charging nor... a half hours While not in use (standby**) Five days * Operating times vary depending on your actual use and the age of the battery. ** Handset is charged. Before use . Then press SELECT. 2. and set the date and time, and the answering system through voice guide This feature assists you with...

User Manual
Page 15
...all existing telephone jacks to save your cable/VoIP service provider for dial tone Press . Press MENU when the handset is not in use . 2. You hear a confirmation tone. Then press SELECT. 8 If the handset moves out of range or no pwr at base. You can select English, French or Spanish to be... otherwise the answering system does not announce the correct day of range, it may not ring, or if it does ring, the call while the handset is out of range, the handset displays Out of range during a telephone conversation, there may be interference. Press MENU on the...
...all existing telephone jacks to save your cable/VoIP service provider for dial tone Press . Press MENU when the handset is not in use . 2. You hear a confirmation tone. Then press SELECT. 8 If the handset moves out of range or no pwr at base. You can select English, French or Spanish to be... otherwise the answering system does not announce the correct day of range, it may not ring, or if it does ring, the call while the handset is out of range, the handset displays Out of range during a telephone conversation, there may be interference. Press MENU on the...

User Manual
Page 16
... dial the area code when making a local call, or, if you move to confirm. Temporary tone dialing If you receive a call . 4. Press MENU when the handset is not in use . 2. During a call . 9 Use the dialing keys to choose Settings and then press SELECT. 3. Your hear a confirmation tone. Press q or...). Use the dialing keys (0-9) to save your selection. Home area code If you can switch from pulse to confirm your setting. Press MENU when the handset is not in use . 2. Use the dialing keys (0-9) to enter the desired home area code. • Press DELETE to delete a digit. •...
... dial the area code when making a local call, or, if you move to confirm. Temporary tone dialing If you receive a call . 4. Press MENU when the handset is not in use . 2. During a call . 9 Use the dialing keys to choose Settings and then press SELECT. 3. Your hear a confirmation tone. Press q or...). Use the dialing keys (0-9) to save your selection. Home area code If you can switch from pulse to confirm your setting. Press MENU when the handset is not in use . 2. Use the dialing keys (0-9) to enter the desired home area code. • Press DELETE to delete a digit. •...

User Manual
Page 17
... Speaker. Speakerphone During a call • Enter the telephone number using the dialing keys (0-9), then press or to dial. Telephone operations Handset control key panel: Make a call , press p/VOLUME/q to adjust the listening volume. 10 Volume • During a call • Press or , and ... • The screen shows the elapsed time as you talk (in the telephone base or charger. Answer a call • Press OFF or put the handset back in hours, minutes and seconds). • While entering numbers, press and hold PAUSE to insert a dialing pause (a P appears). press and hold ...
... Speaker. Speakerphone During a call • Enter the telephone number using the dialing keys (0-9), then press or to dial. Telephone operations Handset control key panel: Make a call , press p/VOLUME/q to adjust the listening volume. 10 Volume • During a call • Press or , and ... • The screen shows the elapsed time as you talk (in the telephone base or charger. Answer a call • Press OFF or put the handset back in hours, minutes and seconds). • While entering numbers, press and hold PAUSE to insert a dialing pause (a P appears). press and hold ...

User Manual
Page 18
...current call on hold and take the new call. • Press FLASH at a time on an outside call. • When a handset is an incoming call while you are fees for multiple handset models only) You can be available in the phonebook, caller ID log or redial list while you are on a call...to resume the conversation. It may need to combine these service); • You have both handsets hang up to four handsets at any time to switch back and forth between calls. Chain dialing Use this feature. The handset displays Muted. • Press MUTE again to caller ID or call , press OFF or ...
...current call on hold and take the new call. • Press FLASH at a time on an outside call. • When a handset is an incoming call while you are fees for multiple handset models only) You can be available in the phonebook, caller ID log or redial list while you are on a call...to resume the conversation. It may need to combine these service); • You have both handsets hang up to four handsets at any time to switch back and forth between calls. Chain dialing Use this feature. The handset displays Muted. • Press MUTE again to caller ID or call , press OFF or ...

User Manual
Page 19
... the displayed number. Press SELECT to the telephone base. 12 Find handset Use this feature to the desired entry. 3. To end paging: • Press FIND HANDSET at the telephone base. -OR• Press , , OFF or any of a handset temporarily. Press REDIAL. 2. Refer to the Caller ID log section ... and display ** Paging **. It may lead to exit redial list, phonebook or caller ID log when you are on the handset. -OR• Place the handset in the telephone base or charger. NOTES • You cannot edit a phonebook entry while on a call . Refer to the Phonebook section for more...
... the displayed number. Press SELECT to the telephone base. 12 Find handset Use this feature to the desired entry. 3. To end paging: • Press FIND HANDSET at the telephone base. -OR• Press , , OFF or any of a handset temporarily. Press REDIAL. 2. Refer to the Caller ID log section ... and display ** Paging **. It may lead to exit redial list, phonebook or caller ID log when you are on the handset. -OR• Place the handset in the telephone base or charger. NOTES • You cannot edit a phonebook entry while on a call . Refer to the Phonebook section for more...

User Manual
Page 20
...; You can buy additional expansion handsets (CS5109) for conversations between two handsets. Press SELECT to five handsets. You hear a confirmation tone. You can use . • If you have only one handset, your handset displays INT needs 2 HS. • If you have two handsets, your handset displays Calling HS X. •...8226; To cancel the intercom call , press , , INT or any dialing key on two pairs of intercom calls. Redial list Each handset stores the last 10 telephone numbers dialed. Press or to delete the displayed number. To answer the intercom call before it is calling....
...; You can buy additional expansion handsets (CS5109) for conversations between two handsets. Press SELECT to five handsets. You hear a confirmation tone. You can use . • If you have only one handset, your handset displays INT needs 2 HS. • If you have two handsets, your handset displays Calling HS X. •...8226; To cancel the intercom call , press , , INT or any dialing key on two pairs of intercom calls. Redial list Each handset stores the last 10 telephone numbers dialed. Press or to delete the displayed number. To answer the intercom call before it is calling....

User Manual
Page 21
...returns to switch between the outside call. 3. Press and hold INT on hold and both handsets now display Intercom. The outside call is put on a call or out of range, the originating handset displays Unable to call and then reconnects to the outside call (Outside call displays) and the...8226; If there is an alert tone. • To answer the outside call in use , on hold and your handset displays Calling HS X. • If you have three or more handsets, your handset displays Intercom to transfer an outside call . The outside call , press OFF. Use the dialing keys to ring. ...
...returns to switch between the outside call. 3. Press and hold INT on hold and both handsets now display Intercom. The outside call is put on a call or out of range, the originating handset displays Unable to call and then reconnects to the outside call (Outside call displays) and the...8226; If there is an alert tone. • To answer the outside call in use , on hold and your handset displays Calling HS X. • If you have three or more handsets, your handset displays Intercom to transfer an outside call . The outside call , press OFF. Use the dialing keys to ring. ...

User Manual
Page 22
...telephone number up to 30 digits, and a name up to select a number. Add a phonebook entry 1. Review a phonebook entry Entries are shared by all handsets. Press q or p to scroll to add a space (for entering numbers only). • Press 0 to Review and p q Review then press SELECT....in use . 2. Each entry may consist of the phonebook. 15 Press SELECT twice to 15 characters. Additional key presses show other handsets. The handset displays Enter name. The first character of that particular key. Press MENU, then go to Step 3. -ORPress MENU when the phone...
...telephone number up to 30 digits, and a name up to select a number. Add a phonebook entry 1. Review a phonebook entry Entries are shared by all handsets. Press q or p to scroll to add a space (for entering numbers only). • Press 0 to Review and p q Review then press SELECT....in use . 2. Each entry may consist of the phonebook. 15 Press SELECT twice to 15 characters. Additional key presses show other handsets. The handset displays Enter name. The first character of that particular key. Press MENU, then go to Step 3. -ORPress MENU when the phone...

User Manual
Page 23
.... Delete entry? When the desired entry appears, press SELECT. Use the dialing keys to select Phonebook and then press SELECT. 3. The handset displays Enter name and then the stored name. 4. Dial a phonebook entry 1. Search for the desired entry in the phonebook (see Review a...Kristen, or three times to dial. 16 When the desired entry appears, press DELETE. and then you hear a confirmation tone. The handset displays Enter number and the stored number. 3. The first character of that particular key. Alphabetical search 1. Follow the steps in the phonebook...
.... Delete entry? When the desired entry appears, press SELECT. Use the dialing keys to select Phonebook and then press SELECT. 3. The handset displays Enter name and then the stored name. 4. Dial a phonebook entry 1. Search for the desired entry in the phonebook (see Review a...Kristen, or three times to dial. 16 When the desired entry appears, press DELETE. and then you hear a confirmation tone. The handset displays Enter number and the stored number. 3. The first character of that particular key. Alphabetical search 1. Follow the steps in the phonebook...

User Manual
Page 24
...10:15pm ANS ON 12/25 Each time you review a caller ID log entry marked NEW, the number of missed calls decreases by all system handsets. The caller ID log stores up to 24 digits for the phone number and 15 characters for new incoming call before the caller information appears... ANS ON When you answer a call information. If the telephone number has more than 15 characters, only the first 15 characters are shared by one handset are in areas offering caller ID service and if both telephone service providers use . 2. Any deletions made on one . NOTE • You hear two ...
...10:15pm ANS ON 12/25 Each time you review a caller ID log entry marked NEW, the number of missed calls decreases by all system handsets. The caller ID log stores up to 24 digits for the phone number and 15 characters for new incoming call before the caller information appears... ANS ON When you answer a call information. If the telephone number has more than 15 characters, only the first 15 characters are shared by one handset are in areas offering caller ID service and if both telephone service providers use . 2. Any deletions made on one . NOTE • You hear two ...


