

User Manual
Page 1
® LITTLE SMART USER'S MANUAL © VTECH Printed in China 91-01324-000
® LITTLE SMART USER'S MANUAL © VTECH Printed in China 91-01324-000

User Manual
Page 2
... the ability to the best of our electronic learning products are uniquely designed to develop a child's mind and allow them to learn to do great things. Dear Parent: At VTECH® we see the potential in every child. 1 When it 's introducing numbers and letters, identifying colors and shapes, or stimulating senses with lights and music, all of their ability.
... the ability to the best of our electronic learning products are uniquely designed to develop a child's mind and allow them to learn to do great things. Dear Parent: At VTECH® we see the potential in every child. 1 When it 's introducing numbers and letters, identifying colors and shapes, or stimulating senses with lights and music, all of their ability.

User Manual
Page 3
... discover. Decorated with Baby by recording their own loving message for infants 12 months and up. LITTLE SMART Baby Talk Discoveries™ is one of a family of speaking. 6 STAR LIGHTS BABY BUTTON MICROPHONE RECORDING LIGHT RECORD BUTTON RESET BUTTON ON/OFF SWITCH ACTIVITY SELECTOR 10 CHARACTER OBJECT BUTTONS RECORDING ON/OFF SWITCH BATTERY DOOR(3AA) VOLUME CONTROL SWITCH 2 or 1-800267-7377 in the U.S. Family and friends can share this precious time with twinkling star lights and colorful buttons...
... discover. Decorated with Baby by recording their own loving message for infants 12 months and up. LITTLE SMART Baby Talk Discoveries™ is one of a family of speaking. 6 STAR LIGHTS BABY BUTTON MICROPHONE RECORDING LIGHT RECORD BUTTON RESET BUTTON ON/OFF SWITCH ACTIVITY SELECTOR 10 CHARACTER OBJECT BUTTONS RECORDING ON/OFF SWITCH BATTERY DOOR(3AA) VOLUME CONTROL SWITCH 2 or 1-800267-7377 in the U.S. Family and friends can share this precious time with twinkling star lights and colorful buttons...

User Manual
Page 4
... secure the battery cover. 3 Locate the battery cover on the back of the unit. Make sure the unit is recommended for your child's safety. Replace the battery cover and tighten the screw to loosen the screw. 3. Install 3 new "AA" (UM-3/LR6) batteries following the diagram inside the battery box. (The use of new, alkaline batteries is turned off. 2. INCLUDED IN THIS PACKAGE • One LITTLE SMART Baby Talk Discoveries™ learning toy • One instruction manual WARNING...
... secure the battery cover. 3 Locate the battery cover on the back of the unit. Make sure the unit is recommended for your child's safety. Replace the battery cover and tighten the screw to loosen the screw. 3. Install 3 new "AA" (UM-3/LR6) batteries following the diagram inside the battery box. (The use of new, alkaline batteries is turned off. 2. INCLUDED IN THIS PACKAGE • One LITTLE SMART Baby Talk Discoveries™ learning toy • One instruction manual WARNING...
User Manual
Page 5
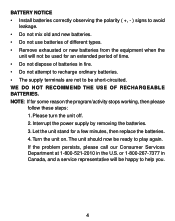
... THE USE OF RECHARGEABLE BATTERIES. Turn the unit on. Interrupt the power supply by removing the batteries. 3. The unit should now be short-circuited. Let the unit stand for some reason the program/activity stops working, then please follow these steps: 1. Please turn the unit off. 2. NOTE: If for a few minutes, then replace the batteries. 4. or 1-800-267-7377 in the U.S. If the problem persists, please call our Consumer Services...
... THE USE OF RECHARGEABLE BATTERIES. Turn the unit on. Interrupt the power supply by removing the batteries. 3. The unit should now be short-circuited. Let the unit stand for some reason the program/activity stops working, then please follow these steps: 1. Please turn the unit off. 2. NOTE: If for a few minutes, then replace the batteries. 4. or 1-800-267-7377 in the U.S. If the problem persists, please call our Consumer Services...
User Manual
Page 6
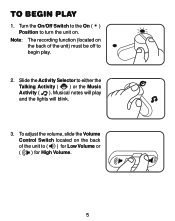
Musical notes will play . 2. Slide the Activity Selector to ( ) for Low Volume or ( ) for High Volume. 5 Note: The recording function (located on the back of the unit to either the Talking Activity ( ) or the Music Activity ( ). To adjust the volume, slide the Volume Control Switch located on . Turn the On/Off Switch to the On ( ) Position to turn the unit on the back of the unit) must be off to begin play and the lights will blink. 3. TO BEGIN PLAY 1.
Musical notes will play . 2. Slide the Activity Selector to ( ) for Low Volume or ( ) for High Volume. 5 Note: The recording function (located on the back of the unit to either the Talking Activity ( ) or the Music Activity ( ). To adjust the volume, slide the Volume Control Switch located on . Turn the On/Off Switch to the On ( ) Position to turn the unit on the back of the unit) must be off to begin play and the lights will blink. 3. TO BEGIN PLAY 1.
User Manual
Page 7
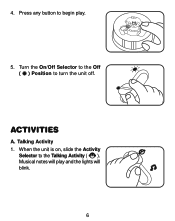
Talking Activity 1. When the unit is on, slide the Activity Selector to turn the unit off. ACTIVITIES A. Musical notes will blink. 6 Turn the On/Off Selector to the Off ( ) Position to the Talking Activity ( ). 4. Press any button to begin play and the lights will play . 5.
Talking Activity 1. When the unit is on, slide the Activity Selector to turn the unit off. ACTIVITIES A. Musical notes will blink. 6 Turn the On/Off Selector to the Off ( ) Position to the Talking Activity ( ). 4. Press any button to begin play and the lights will play . 5.
User Manual
Page 8
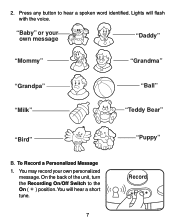
Press any button to the On ( ) position.You will flash with the voice. "Baby" or your own personalized message. Lights will hear a short tune. 7 "Puppy" Record To Record a Personalized Message 1. 2. On the back of the unit, turn the Recording On/Off Switch to hear a spoken word identified. You may record your own message "Daddy" "Mommy" "Grandma" "Grandpa" "Ball" "Milk" "Teddy Bear" "Bird" B.
Press any button to the On ( ) position.You will flash with the voice. "Baby" or your own personalized message. Lights will hear a short tune. 7 "Puppy" Record To Record a Personalized Message 1. 2. On the back of the unit, turn the Recording On/Off Switch to hear a spoken word identified. You may record your own message "Daddy" "Mommy" "Grandma" "Grandpa" "Ball" "Milk" "Teddy Bear" "Bird" B.

User Manual
Page 9
... is changed. 8 Press the Baby Button on the back of the unit to restore the built-in phrase. To record a new message, press the Reset Button and repeat the recording process. 2. Record 4. Note: The recorded phrase will be erased when the battery is full, the light will turn off and recording will light up for 5 seconds of the unit at any time to hear...
... is changed. 8 Press the Baby Button on the back of the unit to restore the built-in phrase. To record a new message, press the Reset Button and repeat the recording process. 2. Record 4. Note: The recorded phrase will be erased when the battery is full, the light will turn off and recording will light up for 5 seconds of the unit at any time to hear...
User Manual
Page 10
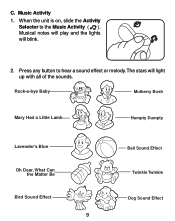
C. Musical notes will play and the lights will light up with all of the sounds. Music Activity 1. When the unit is on, slide the Activity Selector to hear a sound effect or melody. The stars will blink. 2. Rock-a-bye Baby Mulberry Bush Mary Had a Little Lamb Humpty Dumpty Lavender's Blue Oh Dear, What Can the Matter Be Bird Sound Effect 9 Ball Sound Effect Twinkle Twinkle Dog Sound Effect Press any button to the Music Activity ( ).
C. Musical notes will play and the lights will light up with all of the sounds. Music Activity 1. When the unit is on, slide the Activity Selector to hear a sound effect or melody. The stars will blink. 2. Rock-a-bye Baby Mulberry Bush Mary Had a Little Lamb Humpty Dumpty Lavender's Blue Oh Dear, What Can the Matter Be Bird Sound Effect 9 Ball Sound Effect Twinkle Twinkle Dog Sound Effect Press any button to the Music Activity ( ).

User Manual
Page 11
... preserve battery life, the VTECH® LITTLE SMART Baby Talk Discoveries™ learning toy will be turned on again by pressing the on hard surfaces and do not expose the unit to moisture or water. We make every effort to ensure the accuracy of the information which forms the value of direct sunlight and away from any problems and/or suggestions that we stand behind...
... preserve battery life, the VTECH® LITTLE SMART Baby Talk Discoveries™ learning toy will be turned on again by pressing the on hard surfaces and do not expose the unit to moisture or water. We make every effort to ensure the accuracy of the information which forms the value of direct sunlight and away from any problems and/or suggestions that we stand behind...
User Manual
Page 12
...type tested and found to comply within the limits for a Class B computing device in accordance with the specifications in Sub-part J of Part 15 FCC Rules, which can be determined by turning the equipment off and on, the user... equipment does cause interference with the manufacturer's instructions, it may cause interference to provide reasonable protection against such interference in a residential installation. If this product away from the receiver ...: This equipment generates and uses radio frequency energy and if not installed and used properly, that is no guarantee that interference will not occur ...
...type tested and found to comply within the limits for a Class B computing device in accordance with the specifications in Sub-part J of Part 15 FCC Rules, which can be determined by turning the equipment off and on, the user... equipment does cause interference with the manufacturer's instructions, it may cause interference to provide reasonable protection against such interference in a residential installation. If this product away from the receiver ...: This equipment generates and uses radio frequency energy and if not installed and used properly, that is no guarantee that interference will not occur ...


