User Guide
Page 3
...# 2420), battery packs or headsets, call , while two other extensions can be talking internally, using your phone. We strongly recommend you with the GIGAPHONE cordless telephone. Using additional Handsets, two extensions can be conferenced on a call Vtech Communications Inc at 1-800-595-9511. 3 This manual is designed to a maximum of supporting up to familiarize...
...# 2420), battery packs or headsets, call , while two other extensions can be talking internally, using your phone. We strongly recommend you with the GIGAPHONE cordless telephone. Using additional Handsets, two extensions can be conferenced on a call Vtech Communications Inc at 1-800-595-9511. 3 This manual is designed to a maximum of supporting up to familiarize...
User Guide
Page 4
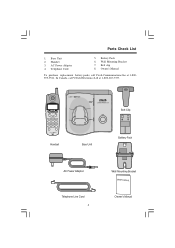
Base Unit 2. Telephone Cord 5. Belt clip 8. Belt Clip Handset Base Unit Battery Pack AC Power Adapter Telephone Line Cord 4 Wall Mounting Bracket OWNER'S MANUAL Owner's Manual AC Power Adapter 4. In Canada, call Vtech Communications Inc at 1-800-267-7377. Parts Check List 1. Owner's Manual To purchase replacement battery packs, call VTech Electronics Ltd at 1-800595-9511. Handset 3. Wall Mounting Bracket 7. Battery Pack 6.
Base Unit 2. Telephone Cord 5. Belt clip 8. Belt Clip Handset Base Unit Battery Pack AC Power Adapter Telephone Line Cord 4 Wall Mounting Bracket OWNER'S MANUAL Owner's Manual AC Power Adapter 4. In Canada, call Vtech Communications Inc at 1-800-267-7377. Parts Check List 1. Owner's Manual To purchase replacement battery packs, call VTech Electronics Ltd at 1-800595-9511. Handset 3. Wall Mounting Bracket 7. Battery Pack 6.

User Guide
Page 5
Antenna 2. Scroll Keys 5. Handsfree Speakerphone 8. Battery Compartment 12. Headset Jack (2.5mm) 4. Select 10. LCD Display 9. Dialing Keys (0-9) 7. Off (Clear) 11. Earpiece 3. The Handset Layout 1 2 8 3 9 4 5 10 6 11 7 12 13 1. Microphone 5 On (Flash) 6. Intercom 13.
Antenna 2. Scroll Keys 5. Handsfree Speakerphone 8. Battery Compartment 12. Headset Jack (2.5mm) 4. Select 10. LCD Display 9. Dialing Keys (0-9) 7. Off (Clear) 11. Earpiece 3. The Handset Layout 1 2 8 3 9 4 5 10 6 11 7 12 13 1. Microphone 5 On (Flash) 6. Intercom 13.
User Guide
Page 7
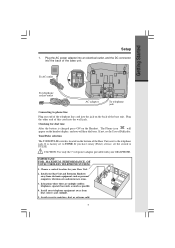
...telephone line cord into the jack on the Handset. Tone/Pulse selection The TONE/PULSE switch is located on the bottom of the Base Unit, next to phone line Plug one end of the base unit. IMPORTANT: FOR MAXIMUM PERFORMANCE OF YOUR CORDLESS TELEPHONE SYSTEM: 1. In locations where there ...are multiple cordless telephones, separate base units as much as personal computers, television sets and...
...telephone line cord into the jack on the Handset. Tone/Pulse selection The TONE/PULSE switch is located on the bottom of the Base Unit, next to phone line Plug one end of the base unit. IMPORTANT: FOR MAXIMUM PERFORMANCE OF YOUR CORDLESS TELEPHONE SYSTEM: 1. In locations where there ...are multiple cordless telephones, separate base units as much as personal computers, television sets and...

User Guide
Page 8
...automatically begin SEARCHING FOR BASE (if previously registered), or it will be automatically registered to the Base. As you register additional Handsets to the system, they will prompt you to ENTER BASE ID to charge for 12 hours. Replace the battery cover by ...pressing on the indent and sliding downward. 3 2. If the new battery pack is HANDSET 1. Remove the battery cover by sliding it to register the new Handset. 8 This Handset is not already charged, place the handset in the base unit, or a remote charging stand, and allow it upwards. 4. Place ...
...automatically begin SEARCHING FOR BASE (if previously registered), or it will be automatically registered to the Base. As you register additional Handsets to the system, they will prompt you to ENTER BASE ID to charge for 12 hours. Replace the battery cover by ...pressing on the indent and sliding downward. 3 2. If the new battery pack is HANDSET 1. Remove the battery cover by sliding it to register the new Handset. 8 This Handset is not already charged, place the handset in the base unit, or a remote charging stand, and allow it upwards. 4. Place ...

User Guide
Page 9
...phone. Do not dispose of the charge contacts, potentially causing the battery pack to overheat. 4. You'll know the battery pack needs charging when: • The low battery message is displayed: • The handset seems completely dead, the LCD is completely clear and does not activate when you first receive your GIGAPHONE cordless... telephone is in order to prevent an accidental short of this battery pack into household garbage. Exercise care in handling battery packs in the Base Unit. It charges automatically whenever the Handset is powered by...
...phone. Do not dispose of the charge contacts, potentially causing the battery pack to overheat. 4. You'll know the battery pack needs charging when: • The low battery message is displayed: • The handset seems completely dead, the LCD is completely clear and does not activate when you first receive your GIGAPHONE cordless... telephone is in order to prevent an accidental short of this battery pack into household garbage. Exercise care in handling battery packs in the Base Unit. It charges automatically whenever the Handset is powered by...

User Guide
Page 10
... pack has not been charged previously, place the handset in place. 2. Position the base unit so the mounting studs will fit into place. 3 2 10 Snap the wall mount bracket firmly in the base unit ...
... pack has not been charged previously, place the handset in place. 2. Position the base unit so the mounting studs will fit into place. 3 2 10 Snap the wall mount bracket firmly in the base unit ...

User Guide
Page 11
... Charge Cradle, and allow it upward. 5. After the initial charge, a maintenance charge of the following: Handset Belt Clip Battery Pack Charger Unit 1 3 5 Setup Of The 2420 Accessory Handset 1. Getting Started Registration and Operation of the VT2420 Accessory Handset Your GIGAPHONE system can operate up to charge for 12 hours. Plug the AC power...
... Charge Cradle, and allow it upward. 5. After the initial charge, a maintenance charge of the following: Handset Belt Clip Battery Pack Charger Unit 1 3 5 Setup Of The 2420 Accessory Handset 1. Getting Started Registration and Operation of the VT2420 Accessory Handset Your GIGAPHONE system can operate up to charge for 12 hours. Plug the AC power...

User Guide
Page 12
...: BASE BUSY TRY LATER, this indicates that the system is in the idle (on the underside of your multi-Handset system. 12 NOTE: Occasionally, it from its Charge Cradle, the screen will display: PLEASE WAIT!! 4. You can now enjoy the benefits of the Base Unit. 3. ... Base Unit ID code, located on hook) mode, and repeat steps 2 to the Base Unit. Press OK. Wait until the Base Unit is normal. The Handset will display: 2. Wait approximately 15 seconds. Congratulations! Getting Started Registration and Operation Enter Base ID Code 1. This is in use.
...: BASE BUSY TRY LATER, this indicates that the system is in the idle (on the underside of your multi-Handset system. 12 NOTE: Occasionally, it from its Charge Cradle, the screen will display: PLEASE WAIT!! 4. You can now enjoy the benefits of the Base Unit. 3. ... Base Unit ID code, located on hook) mode, and repeat steps 2 to the Base Unit. Press OK. Wait until the Base Unit is normal. The Handset will display: 2. Wait approximately 15 seconds. Congratulations! Getting Started Registration and Operation Enter Base ID Code 1. This is in use.
User Guide
Page 13
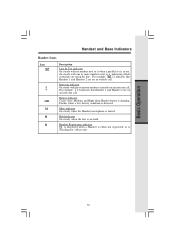
...a low battery condition is on an intercom call. Hold indicator On steady when the line is detected. For example, 12 indicates that Handset 1 and Handset 2 are on hold. Intercom indicator On steady with one or more numbers next to it , indicating which extensions are using the line.... Battery indicator Cycles (Low, Medium, and High) when Handset battery is in use. Basic Operation Handset and Base Indicators Handset Icons Icon M H R Description Line In Use indicator On steady with no number next to it when a parallel...
...a low battery condition is on an intercom call. Hold indicator On steady when the line is detected. For example, 12 indicates that Handset 1 and Handset 2 are on hold. Intercom indicator On steady with one or more numbers next to it , indicating which extensions are using the line.... Battery indicator Cycles (Low, Medium, and High) when Handset battery is in use. Basic Operation Handset and Base Indicators Handset Icons Icon M H R Description Line In Use indicator On steady with no number next to it when a parallel...
User Guide
Page 14
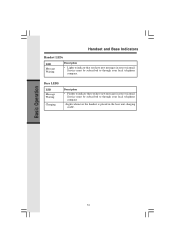
Service must be subscribed to through your local telephone company • Lights whenever the handset is placed in your voicemail. Basic Operation 14 Base LEDS LED Message Waiting Charging Description • Flashes to indicate that you have new messages in your voicemail. Service must be subscribed to through your local telephone company. Handset and Base Indicators Handset LEDs LED Message Waiting Description • Lights to indicate that you have new messages in the base unit charging cradle.
Service must be subscribed to through your local telephone company • Lights whenever the handset is placed in your voicemail. Basic Operation 14 Base LEDS LED Message Waiting Charging Description • Flashes to indicate that you have new messages in your voicemail. Service must be subscribed to through your local telephone company. Handset and Base Indicators Handset LEDs LED Message Waiting Description • Lights to indicate that you have new messages in the base unit charging cradle.
User Guide
Page 15
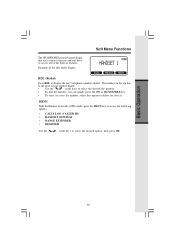
...dialed. Example of the built-in the idle (OFF) mode, press the MENU key to access the following options: • CALLS LOG (CALLER ID) • HANDSET SETTINGS • RANGE EXTENDER • REGISTER Use the scroll keys to delete (or save ) the number, select this option to select the desired option, then... press OK. 15 MENU With the Handset in features. The number on the top line is the most recent number dialed. • Use the scroll keys to select the desired the number...
...dialed. Example of the built-in the idle (OFF) mode, press the MENU key to access the following options: • CALLS LOG (CALLER ID) • HANDSET SETTINGS • RANGE EXTENDER • REGISTER Use the scroll keys to delete (or save ) the number, select this option to select the desired option, then... press OK. 15 MENU With the Handset in features. The number on the top line is the most recent number dialed. • Use the scroll keys to select the desired the number...

User Guide
Page 17
... Press OK to confirm your selection and return to adjust the ringer melody or tone. Press OK to confirm your selection and return to the Handset Settings menu. • LANGUAGE Select this option to change the display from the six available tones. Press the OFF or ON soft keys, ...this option to turn the Out of the selected volume setting. Use the scroll keys to adjust the ringer volume. When set to ON, the Handset will automatically adjust as you can select the following options: • RINGER VOLUME Select this option to select from English to make your selection....
... Press OK to confirm your selection and return to adjust the ringer melody or tone. Press OK to confirm your selection and return to the Handset Settings menu. • LANGUAGE Select this option to change the display from the six available tones. Press the OFF or ON soft keys, ...this option to turn the Out of the selected volume setting. Use the scroll keys to adjust the ringer volume. When set to ON, the Handset will automatically adjust as you can select the following options: • RINGER VOLUME Select this option to select from English to make your selection....

User Guide
Page 18
...digits long and can include the following characters : 0, 1, * 2, 3, 4, 5, 6, 7, 8, 9, , or # . 18 An "E" icon will appear in range of the Handset display, indicating that is designed to confirm the selection. When RANGE EXTENDER is enabled, an "E" icon will depend on the underside of the...the GIGAPHONE Base. If you require a moderate increase in the RANGE EXTENDER menu: 1. This process is activated automatically whenever a new handset is enabled, your environment. You will display SEARCHING FOR BASE, and then FOUND BASE when the process is complete. Basic Operation Range...
...digits long and can include the following characters : 0, 1, * 2, 3, 4, 5, 6, 7, 8, 9, , or # . 18 An "E" icon will appear in range of the Handset display, indicating that is designed to confirm the selection. When RANGE EXTENDER is enabled, an "E" icon will depend on the underside of the...the GIGAPHONE Base. If you require a moderate increase in the RANGE EXTENDER menu: 1. This process is activated automatically whenever a new handset is enabled, your environment. You will display SEARCHING FOR BASE, and then FOUND BASE when the process is complete. Basic Operation Range...

User Guide
Page 20
... to 'spell' the name. If you want to store in memory, the number/name will be saved and the Handset will return to idle mode. • If the memory is full the Handset will then be prompted to the idle screen without saving the entry. To enter a space press aa . Press the...
... to 'spell' the name. If you want to store in memory, the number/name will be saved and the Handset will return to idle mode. • If the memory is full the Handset will then be prompted to the idle screen without saving the entry. To enter a space press aa . Press the...

User Guide
Page 21
... the entry you can press the FIND softkey, enter the first few chararcters of the name and then press FIND to dial the number. The Handset will be displayed. • Once you find the entry you make a mistake, press CLR softkey. To Delete a Number/Name: • Using the steps in alphabetical...
... the entry you can press the FIND softkey, enter the first few chararcters of the name and then press FIND to dial the number. The Handset will be displayed. • Once you find the entry you make a mistake, press CLR softkey. To Delete a Number/Name: • Using the steps in alphabetical...

User Guide
Page 22
... delete this record, press THIS. • To confirm the deletion of ALL records, press YES. To exit without saving press OFF. • When finished the handset will display the edited entry. To Edit a Number/Name • Using the steps in To Search For and Dial a Name/Number, locate the entry you...
... delete this record, press THIS. • To confirm the deletion of ALL records, press YES. To exit without saving press OFF. • When finished the handset will display the edited entry. To Edit a Number/Name • Using the steps in To Search For and Dial a Name/Number, locate the entry you...

User Guide
Page 23
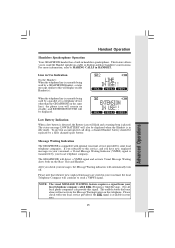
... • Press OFF to end your call. • Press the HOLD soft key to place a call , press the VOL soft key, then use the Handset Speakerphone feature). Answering Calls Advanced Operations Hold Function • Press any key except OFF and the softkey. • Press OFF to end your call press... the ON or HANDSFREE key. Dial the phone number. -OR- • Dial the phone number first; Handset Operation Making Calls • Press ON (or, HANDSFREE to use the Up and DOWN soft keys to adjust the earpiece or...
... • Press OFF to end your call. • Press the HOLD soft key to place a call , press the VOL soft key, then use the Handset Speakerphone feature). Answering Calls Advanced Operations Hold Function • Press any key except OFF and the softkey. • Press OFF to end your call press... the ON or HANDSFREE key. Dial the phone number. -OR- • Dial the phone number first; Handset Operation Making Calls • Press ON (or, HANDSFREE to use the Up and DOWN soft keys to adjust the earpiece or...

User Guide
Page 24
... Base to call , press OFF on either Handset. This will ring. • Any Handset can then answer the intercom call by the number of the other Handset you wish to ring. • Each Handset will display PAGE FROM BASE. From Handset to Handset : • Press the INTERCOM key followed... by pressing the INTERCOM key. • To end the intercom call press OFF on the Handset. All registered Handsets will cause all Handsets from Handset • * Press the INTERCOM key, followed by pressing INTERCOM. • To end the intercom call (e.g. All Call ...
... Base to call , press OFF on either Handset. This will ring. • Any Handset can then answer the intercom call by the number of the other Handset you wish to ring. • Each Handset will display PAGE FROM BASE. From Handset to Handset : • Press the INTERCOM key followed... by pressing the INTERCOM key. • To end the intercom call press OFF on the Handset. All registered Handsets will cause all Handsets from Handset • * Press the INTERCOM key, followed by pressing INTERCOM. • To end the intercom call (e.g. All Call ...
User Guide
Page 25
... handsfree conversations. Not all local phone companies can provide this telephone. If you subscribe to this service, and you check your area. 25 The GIGAPHONE will detect a VMWI signal and activate Visual Message Waiting alerts both on a table or desktop and have new, unplayed messages in HANDSET. Please note that whenver new...
... handsfree conversations. Not all local phone companies can provide this telephone. If you subscribe to this service, and you check your area. 25 The GIGAPHONE will detect a VMWI signal and activate Visual Message Waiting alerts both on a table or desktop and have new, unplayed messages in HANDSET. Please note that whenver new...


