
QuickStart Guide
Page 2
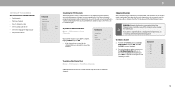
... Support 34 Front Panel 1 Rear Panel 2 Using the USB Power Feature 23 Turning the Power Indicator On or Off 23 Help Topics 35 Wall-mounting the TV 4 Using the Remote 5 Completing the First-Time Setup 6 Using the On-Screen Menu 7 Navigating the On-Screen Menu 7 Changing the Input Source 7 Adjusting the Picture Settings 8 Adjusting the Color Temperature 8 Changing the Picture Aspect Ratio 9 Adjusting Advanced Picture Settings 9 Adjusting Picture Input Settings 12 Adjusting the Picture Mode Edit Settings 12 Adjusting the Audio Settings 14 Setting Timers 23 Setting...
... Support 34 Front Panel 1 Rear Panel 2 Using the USB Power Feature 23 Turning the Power Indicator On or Off 23 Help Topics 35 Wall-mounting the TV 4 Using the Remote 5 Completing the First-Time Setup 6 Using the On-Screen Menu 7 Navigating the On-Screen Menu 7 Changing the Input Source 7 Adjusting the Picture Settings 8 Adjusting the Color Temperature 8 Changing the Picture Aspect Ratio 9 Adjusting Advanced Picture Settings 9 Adjusting Picture Input Settings 12 Adjusting the Picture Mode Edit Settings 12 Adjusting the Audio Settings 14 Setting Timers 23 Setting...

QuickStart Guide
Page 3
...'s instructions. • Do not install near water. • Clean only with the apparatus. Do not install your TV close to protect it from tip-over. • Unplug the power cord before connecting other components to qualified service personnel. The manufacturer's warranty does not cover user abuse or improper installations. • The power cord must be selecting. To totally disconnect power, unplug the power cord. • The lightning flash...
...'s instructions. • Do not install near water. • Clean only with the apparatus. Do not install your TV close to protect it from tip-over. • Unplug the power cord before connecting other components to qualified service personnel. The manufacturer's warranty does not cover user abuse or improper installations. • The power cord must be selecting. To totally disconnect power, unplug the power cord. • The lightning flash...

QuickStart Guide
Page 4
... that can be installed near your TV away from moisture. Continuous use cabinets or stands or mounting methods recommended by qualified service personnel only. Stability Hazard: A television set to the sound level, which may result • Disposal of the television or furniture on furniture to reach the television set or its controls. • ALWAYS route cords and cables connected to the floor/wall in fire or...
... that can be installed near your TV away from moisture. Continuous use cabinets or stands or mounting methods recommended by qualified service personnel only. Stability Hazard: A television set to the sound level, which may result • Disposal of the television or furniture on furniture to reach the television set or its controls. • ALWAYS route cords and cables connected to the floor/wall in fire or...

QuickStart Guide
Page 5
..., the screen of time, unplug the TV from the wall outlet and disconnect the antenna or cable system. Installation of Antenna The installation instructions states the cable distribution system used for long periods of the coaxial cable is intended to be connected to antennas and dishes should be grounded (earthed) in particular Section 820.93, Grounding of Outer Conductive Shield of a Coaxial Cable. Receiving Stations. Lightning...
..., the screen of time, unplug the TV from the wall outlet and disconnect the antenna or cable system. Installation of Antenna The installation instructions states the cable distribution system used for long periods of the coaxial cable is intended to be connected to antennas and dishes should be grounded (earthed) in particular Section 820.93, Grounding of Outer Conductive Shield of a Coaxial Cable. Receiving Stations. Lightning...

QuickStart Guide
Page 11
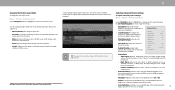
Power Turn television on or off Dash Use with number pad to manually enter a digital subchannel (for example, 18-4 or 18-5) 1 Replacing the Batteries 1. Push the bottom of the battery compartment and lift battery cover to open Accessibility menu featuring captions, talk back, speech rate, and zoom mode Channel Up/Down Change the channel Last Return to SmartCast Home Screen Closed Caption Enable or disable close . For more information please visit...
Power Turn television on or off Dash Use with number pad to manually enter a digital subchannel (for example, 18-4 or 18-5) 1 Replacing the Batteries 1. Push the bottom of the battery compartment and lift battery cover to open Accessibility menu featuring captions, talk back, speech rate, and zoom mode Channel Up/Down Change the channel Last Return to SmartCast Home Screen Closed Caption Enable or disable close . For more information please visit...

QuickStart Guide
Page 12
... Automated Content Recognition ("ARC") Technology also known as Viewing Data. LLECT? Let's set up local channels. To search for use of this device and software functionality are you using the Cast functionality of the steps necessary to get your TV ready for local broadcast channels, make sure the cable from the antenna, wall or cable box is properly connected to your VIZIO TV. Congratulations! You...
... Automated Content Recognition ("ARC") Technology also known as Viewing Data. LLECT? Let's set up local channels. To search for use of this device and software functionality are you using the Cast functionality of the steps necessary to get your TV ready for local broadcast channels, make sure the cable from the antenna, wall or cable box is properly connected to your VIZIO TV. Congratulations! You...
QuickStart Guide
Page 14
... details. If the setting is useful in adjusting the flesh tones in dark or bright areas of the picture settings, use the Left/Right Navigation buttons to the default settings. • Calibrated Dark - To adjust the color temperature: Menu > Picture > Color Temperature Use the Navigation buttons on the remote to highlight that produce a brighter, more vivid picture. • Bright - Optimized for displaying game console output. Also the preferred picture mode for a picture mode, an asterick will...
... details. If the setting is useful in adjusting the flesh tones in dark or bright areas of the picture settings, use the Left/Right Navigation buttons to the default settings. • Calibrated Dark - To adjust the color temperature: Menu > Picture > Color Temperature Use the Navigation buttons on the remote to highlight that produce a brighter, more vivid picture. • Bright - Optimized for displaying game console output. Also the preferred picture mode for a picture mode, an asterick will...
QuickStart Guide
Page 15
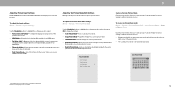
Stretches a 4:3 image to fill 16:9 screen with black bars left and right, stretches to view. Expands image both horizontally and vertically by adjusting the backlight. Advanced Picture Black Detail Super Resolution Edge Enhancement Local Contrast Backlight Control Reduce Noise Game Low Latency Film Mode Gamma Color Calibration Off Medium Low Low On Auto On 2.1 - The High setting will apply for high definition TV (720p/1080i...
Stretches a 4:3 image to fill 16:9 screen with black bars left and right, stretches to view. Expands image both horizontally and vertically by adjusting the backlight. Advanced Picture Black Detail Super Resolution Edge Enhancement Local Contrast Backlight Control Reduce Noise Game Low Latency Film Mode Gamma Color Calibration Off Medium Low Low On Auto On 2.1 - The High setting will apply for high definition TV (720p/1080i...

QuickStart Guide
Page 16
...the remote to manually calibrate the TV. 3 Adjusting the Color Tuner Settings The Color Tuner settings allow technicians to highlight Red, Green, or Blue. 2. To access the color tuner table: Menu > Picture > Advanced Picture > Color Calibration > Color Tuner WARNING: The Color Tuner, 20 Point White Balance, and test patterns allow you wish to adjust. Calibration requires specialized training, an input with precisely set colors, and a specialized light meter. Use the Navigation buttons on : 1. Press the OK button to turn color channels off for testing, and display SMPTE, flat, ramp...
...the remote to manually calibrate the TV. 3 Adjusting the Color Tuner Settings The Color Tuner settings allow technicians to highlight Red, Green, or Blue. 2. To access the color tuner table: Menu > Picture > Advanced Picture > Color Calibration > Color Tuner WARNING: The Color Tuner, 20 Point White Balance, and test patterns allow you wish to adjust. Calibration requires specialized training, an input with precisely set colors, and a specialized light meter. Use the Navigation buttons on : 1. Press the OK button to turn color channels off for testing, and display SMPTE, flat, ramp...
QuickStart Guide
Page 18
... • Lock Picture Mode - 3 Adjusting Picture Input Settings Enable HDMI Mode, Full Color 4:4:4, Filmmaker Mode and adjust picture size and position. Adjusts picture settings to the screen. • HDMI Mode* - Inputs assigned to save a group of a movie as the director intended. • Color Space Range - Bright* Saving a Custom Picture Mode Custom picture modes allow you to change the setting: • Save Picture Mode - configure the display size and position of the picture to provide a viewing experience of custom settings for various viewing conditions and video sources...
... • Lock Picture Mode - 3 Adjusting Picture Input Settings Enable HDMI Mode, Full Color 4:4:4, Filmmaker Mode and adjust picture size and position. Adjusts picture settings to the screen. • HDMI Mode* - Inputs assigned to save a group of a movie as the director intended. • Color Space Range - Bright* Saving a Custom Picture Mode Custom picture modes allow you to change the setting: • Save Picture Mode - configure the display size and position of the picture to provide a viewing experience of custom settings for various viewing conditions and video sources...

QuickStart Guide
Page 19
... > Picture Mode > select saved custom picture mode 4. To lock all custom picture modes: Menu > Picture > Picture Mode Edit > Lock Picture Mode > On > Enter Your PIN > Save To unlock all custom picture modes: Menu > Picture > Picture Mode Edit > Lock Picture Mode > Off > Enter Your PIN Lock Picture Mode Create a picture control PIN to prevent changes to all inputs. 2. To delete a custom picture mode: Menu > Picture > Picture Mode Edit > Delete Picture Mode > Delete To delete the user created Custom 1 picture mode, select the Delete button. 3 Copy a Picture Mode Custom picture mode settings...
... > Picture Mode > select saved custom picture mode 4. To lock all custom picture modes: Menu > Picture > Picture Mode Edit > Lock Picture Mode > On > Enter Your PIN > Save To unlock all custom picture modes: Menu > Picture > Picture Mode Edit > Lock Picture Mode > Off > Enter Your PIN Lock Picture Mode Create a picture control PIN to prevent changes to all inputs. 2. To delete a custom picture mode: Menu > Picture > Picture Mode Edit > Delete Picture Mode > Delete To delete the user created Custom 1 picture mode, select the Delete button. 3 Copy a Picture Mode Custom picture mode settings...

QuickStart Guide
Page 20
... Sound - If On, audio is sent using HDMI 1. Turn the built-in order to PCM. • Analog Audio Out - If enabled and the signal source includes Dolby 5.1 AC-4 audio then clarity of dialogue is uncompressed. When set to OFF. ADJUSTING THE AUDIO SETTINGS To adjust the audio settings: Menu > Audio Use the Navigation buttons to highlight the setting you are controlling the volume with the remote. Digital Audio Out Analog Audio Out Dialogue Enhancer Auto Fixed Off • Balance - Select the digital audio output format...
... Sound - If On, audio is sent using HDMI 1. Turn the built-in order to PCM. • Analog Audio Out - If enabled and the signal source includes Dolby 5.1 AC-4 audio then clarity of dialogue is uncompressed. When set to OFF. ADJUSTING THE AUDIO SETTINGS To adjust the audio settings: Menu > Audio Use the Navigation buttons to highlight the setting you are controlling the volume with the remote. Digital Audio Out Analog Audio Out Dialogue Enhancer Auto Fixed Off • Balance - Select the digital audio output format...
QuickStart Guide
Page 22
...-wall connection (without a cable box). 3 SETTING UP TV CHANNELS You can use the TV's Channels menu to: • Find channels • Find new channels • Select channels to skip • Select analog audio mode • Select the language for digital audio • Set parental controls TV Channels Find Channels Find New Channels Skip Channel Analog Audio Digital Audio Parental Controls Stereo English Scanning for TV Channels The TV may find that some channels you wish to remove, use see Locking and Unlocking Channels on the remote to highlight the channel...
...-wall connection (without a cable box). 3 SETTING UP TV CHANNELS You can use the TV's Channels menu to: • Find channels • Find new channels • Select channels to skip • Select analog audio mode • Select the language for digital audio • Set parental controls TV Channels Find Channels Find New Channels Skip Channel Analog Audio Digital Audio Parental Controls Stereo English Scanning for TV Channels The TV may find that some channels you wish to remove, use see Locking and Unlocking Channels on the remote to highlight the channel...
QuickStart Guide
Page 24
... channel completely using a composite video cable or a coaxial cable, such as when you must first set up a system PIN: Menu > TV Channels > Parental Controls > Enter in PIN TIP: to block content based on page 24. The Parental Controls menu only appears when: • You are using an antenna for adults). To enable or disable the Program Rating feature: Menu > TV Channels > Parental Controls > Locks > Off/On Locking and Unlocking Channels When a channel is unlocked, the Lock icon appears unlocked. locked. USA television program...
... channel completely using a composite video cable or a coaxial cable, such as when you must first set up a system PIN: Menu > TV Channels > Parental Controls > Enter in PIN TIP: to block content based on page 24. The Parental Controls menu only appears when: • You are using an antenna for adults). To enable or disable the Program Rating feature: Menu > TV Channels > Parental Controls > Locks > Off/On Locking and Unlocking Channels When a channel is unlocked, the Lock icon appears unlocked. locked. USA television program...

QuickStart Guide
Page 29
... Screen Feature To help save LED life, your TV is on . Using the USB Power Feature The USB port can be deactivated. To turn the Power Indicator Light On or Off: Menu > System > Power Indicator > Off/On Setting the Auto Power Off Feature To help save energy, your TV screen can turn the TV off while audio is streaming. The two options for this setting if you want the sleep timer to activate, change...
... Screen Feature To help save LED life, your TV is on . Using the USB Power Feature The USB port can be deactivated. To turn the Power Indicator Light On or Off: Menu > System > Power Indicator > Off/On Setting the Auto Power Off Feature To help save energy, your TV screen can turn the TV off while audio is streaming. The two options for this setting if you want the sleep timer to activate, change...

QuickStart Guide
Page 30
... Work iPad CEC Audio Setup Connect your audio device to delete it and press OK. On your device's user manual for the System PIN. See your audio device, select the HDMI ARC input. WARNING: You will need to enter your current PIN code the next time you access this menu or if you'd like to lock content and picture modes, as well as prevent accidental system resets. 3 Setting a System PIN Code You...
... Work iPad CEC Audio Setup Connect your audio device to delete it and press OK. On your device's user manual for the System PIN. See your audio device, select the HDMI ARC input. WARNING: You will need to enter your current PIN code the next time you access this menu or if you'd like to lock content and picture modes, as well as prevent accidental system resets. 3 Setting a System PIN Code You...

QuickStart Guide
Page 31
... factory defaults." 3. This includes any wireless or picture settings. The TV displays, "Select Reset to confirm the update. Using the ADMIN & PRIVACY menu, you can: • View system information • Check for system updates Admin & Privacy • Force the system to power off and on • Reset the TV to factory settings • Enable or disable store demo • Enable or disable viewing data • Personalize advertising choices • View the VIZIO...
... factory defaults." 3. This includes any wireless or picture settings. The TV displays, "Select Reset to confirm the update. Using the ADMIN & PRIVACY menu, you can: • View system information • Check for system updates Admin & Privacy • Force the system to power off and on • Reset the TV to factory settings • Enable or disable store demo • Enable or disable viewing data • Personalize advertising choices • View the VIZIO...
QuickStart Guide
Page 41
... no power. • Ensure the TV is plugged into a working . • Ensure you are securely attached. 35 The sound is flat or dialog is off Volume Leveling. See Adjusting the Audio Settings on page 8. • Select a pre-set picture mode. VIZIO recommends selecting Calibrated. • Check all devices are using an antenna, the signal strength of the TV to select a different input source. See Replacing the Batteries on the remote to turn...
... no power. • Ensure the TV is plugged into a working . • Ensure you are securely attached. 35 The sound is flat or dialog is off Volume Leveling. See Adjusting the Audio Settings on page 8. • Select a pre-set picture mode. VIZIO recommends selecting Calibrated. • Check all devices are using an antenna, the signal strength of the TV to select a different input source. See Replacing the Batteries on the remote to turn...
QuickStart Guide
Page 42
.... How do I change input source, the TV image changes size. • The TV remembers the viewing mode on the Settings icon > Network > Wireless Access Points. Some of my Channels are watching content on the television, press the INFO button on the Input key and select the Input of your TV remote and select the channels option. Open the VIZIO SmartCast Mobile app. Help Topics A I see the current resolution being displayed along with...
.... How do I change input source, the TV image changes size. • The TV remembers the viewing mode on the Settings icon > Network > Wireless Access Points. Some of my Channels are watching content on the television, press the INFO button on the Input key and select the Input of your TV remote and select the channels option. Open the VIZIO SmartCast Mobile app. Help Topics A I see the current resolution being displayed along with...

QuickStart Guide
Page 46
... or adjustments; (i) installation, set forth below . VIZIO will provide instructions for arbitration by visiting www.adr.org or by going to the original option) repair or replace it was purchased at the time of Service transaction in interstate or international commerce, the Federal Arbitration Act Your product may visit www.vizio.com for United States residents. To obtain warranty service, contact VIZIO Customer Support...
... or adjustments; (i) installation, set forth below . VIZIO will provide instructions for arbitration by visiting www.adr.org or by going to the original option) repair or replace it was purchased at the time of Service transaction in interstate or international commerce, the Federal Arbitration Act Your product may visit www.vizio.com for United States residents. To obtain warranty service, contact VIZIO Customer Support...


