QuickStart Guide
Page 2
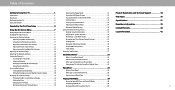
... Support 34 Front Panel 1 Rear Panel 2 Using the USB Power Feature 23 Turning the Power Indicator On or Off 23 Help Topics 35 Wall-mounting the TV 4 Using the Remote 5 Completing the First-Time Setup 6 Using the On-Screen Menu 7 Navigating the On-Screen Menu 7 Changing the Input Source 7 Adjusting the Picture Settings 8 Adjusting the Color Temperature 8 Changing the Picture Aspect Ratio 9 Adjusting Advanced Picture Settings 9 Adjusting Picture Input Settings 12 Adjusting the Picture Mode Edit Settings 12 Adjusting the Audio Settings 14 Setting Timers 23 Setting...
... Support 34 Front Panel 1 Rear Panel 2 Using the USB Power Feature 23 Turning the Power Indicator On or Off 23 Help Topics 35 Wall-mounting the TV 4 Using the Remote 5 Completing the First-Time Setup 6 Using the On-Screen Menu 7 Navigating the On-Screen Menu 7 Changing the Input Source 7 Adjusting the Picture Settings 8 Adjusting the Color Temperature 8 Changing the Picture Aspect Ratio 9 Adjusting Advanced Picture Settings 9 Adjusting Picture Input Settings 12 Adjusting the Picture Mode Edit Settings 12 Adjusting the Audio Settings 14 Setting Timers 23 Setting...
QuickStart Guide
Page 3
..., the following safety instructions before using different voltage than the other components to protect it from tip-over. • Unplug the power cord before connecting other . Do not install your TV. If you to alert you are no missing or damaged parts. Color Text - To ensure reliable operation of time. • When moving the cart/apparatus combination to qualified service personnel. It...
..., the following safety instructions before using different voltage than the other components to protect it from tip-over. • Unplug the power cord before connecting other . Do not install your TV. If you to alert you are no missing or damaged parts. Color Text - To ensure reliable operation of time. • When moving the cart/apparatus combination to qualified service personnel. It...
QuickStart Guide
Page 4
... location. • NEVER place the television set on the apparatus. • The mains plug or appliance coupler is exposed to the floor/wall in permanent damage to hearing without any servicing other than two years of age. • The wall socket should be installed near your TV and easily accessible. • Only power of electrical shock to loud sounds can be used...
... location. • NEVER place the television set on the apparatus. • The mains plug or appliance coupler is exposed to the floor/wall in permanent damage to hearing without any servicing other than two years of age. • The wall socket should be installed near your TV and easily accessible. • Only power of electrical shock to loud sounds can be used...
QuickStart Guide
Page 5
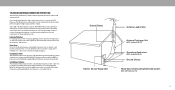
Installation of Antenna The installation instructions states the cable distribution system used for long periods of time, unplug the TV from the wall outlet and disconnect the antenna or cable system. Ground Clamp Electric Service Equipment Antenna Lead In Wire Antenna Discharge Unit (NEC Section 810-20) Grounding Conductors (NEC Section 810-21) Ground Clamps Power Service Grounding Electrode System (NEC ART 250, part H) v Remember, the screen of...
Installation of Antenna The installation instructions states the cable distribution system used for long periods of time, unplug the TV from the wall outlet and disconnect the antenna or cable system. Ground Clamp Electric Service Equipment Antenna Lead In Wire Antenna Discharge Unit (NEC Section 810-20) Grounding Conductors (NEC Section 810-21) Ground Clamps Power Service Grounding Electrode System (NEC ART 250, part H) v Remember, the screen of...
QuickStart Guide
Page 11
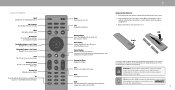
... the bottom of the audio Number Pad Manually enter a channel Pic Cycle through the different picture setting modes Long press to the channel last viewed Mute Turn the audio on -screen menus Navigation Buttons - Power Turn television on or off Dash Use with number pad to open Accessibility menu featuring captions, talk back, speech rate, and zoom mode Channel Up/Down Change the channel Last Return to enabled/disable talk back feature INPUT MENU INFO OK BACK CC...
... the bottom of the audio Number Pad Manually enter a channel Pic Cycle through the different picture setting modes Long press to the channel last viewed Mute Turn the audio on -screen menus Navigation Buttons - Power Turn television on or off Dash Use with number pad to open Accessibility menu featuring captions, talk back, speech rate, and zoom mode Channel Up/Down Change the channel Last Return to enabled/disable talk back feature INPUT MENU INFO OK BACK CC...
QuickStart Guide
Page 12
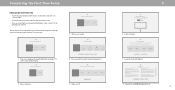
... the First-Time Setup Before you begin the first-time setup: • Your TV should be installed and the power cord should be connected to an electrical outlet. • If you have a wireless network, have the network password ready. • If you are connecting to your VIZIO TV. Choose a language for local broadcast channels, make sure the cable from the antenna, wall or cable box is you using the Cast functPiornivaalcity...
... the First-Time Setup Before you begin the first-time setup: • Your TV should be installed and the power cord should be connected to an electrical outlet. • If you have a wireless network, have the network password ready. • If you are connecting to your VIZIO TV. Choose a language for local broadcast channels, make sure the cable from the antenna, wall or cable box is you using the Cast functPiornivaalcity...
QuickStart Guide
Page 14
... output. To manually change the picture mode: • Vivid - Adjusts the white level of the picture settings, use the Up/Down Navigation buttons on the remote to distinguish in a dark room. • Game - If the setting is too high, the picture may appear faded or washed out. If flesh appears too orange, reduce the level of the picture. • Color - Produces a blue-hued picture. • Normal - To adjust the picture mode settings: Menu > Picture > Picture Mode 1. Sets...
... output. To manually change the picture mode: • Vivid - Adjusts the white level of the picture settings, use the Up/Down Navigation buttons on the remote to distinguish in a dark room. • Game - If the setting is too high, the picture may appear faded or washed out. If flesh appears too orange, reduce the level of the picture. • Color - Produces a blue-hued picture. • Normal - To adjust the picture mode settings: Menu > Picture > Picture Mode 1. Sets...
QuickStart Guide
Page 15
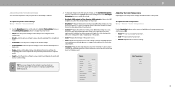
.... • Game Low Latency - Calibrate colors using HSB, gain, offset and 20 point white balance and test or reset colors to top and bottom. • Zoom - Adjust the contrast of the picture by adjusting the backlight. Advanced Picture Black Detail Super Resolution Edge Enhancement Local Contrast Backlight Control Reduce Noise Game Low Latency Film Mode Gamma Color Calibration Off Medium Low Low On Auto On 2.1 - This function helps to correct...
.... • Game Low Latency - Calibrate colors using HSB, gain, offset and 20 point white balance and test or reset colors to top and bottom. • Zoom - Adjust the contrast of the picture by adjusting the backlight. Advanced Picture Black Detail Super Resolution Edge Enhancement Local Contrast Backlight Control Reduce Noise Game Low Latency Film Mode Gamma Color Calibration Off Medium Low Low On Auto On 2.1 - This function helps to correct...
QuickStart Guide
Page 16
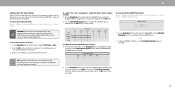
... white balance, turn color channels off for testing, and display SMPTE, flat, ramp, and uniformity analyzer test patterns. Use the Left/Right Navigation buttons to select On to show or hide the SMPTE Test Pattern: Menu > Picture > Advanced Picture > Color Calibration > Color Tuner > SMPTE Test Pattern SMPT Test Pattern Off 1. 3 Adjusting the Color Tuner Settings The Color Tuner settings allow technicians to manually calibrate the TV. To turn the color channel off and on the remote to highlight Red, Green, or Blue. 2. To adjust the color...
... white balance, turn color channels off for testing, and display SMPTE, flat, ramp, and uniformity analyzer test patterns. Use the Left/Right Navigation buttons to select On to show or hide the SMPTE Test Pattern: Menu > Picture > Advanced Picture > Color Calibration > Color Tuner > SMPTE Test Pattern SMPT Test Pattern Off 1. 3 Adjusting the Color Tuner Settings The Color Tuner settings allow technicians to manually calibrate the TV. To turn the color channel off and on the remote to highlight Red, Green, or Blue. 2. To adjust the color...
QuickStart Guide
Page 18
...> Save Picture Mode > Enter a Name >Save Custom picture modes allow you to adjust. • Picture Size and Position* - Reset the picture mode settings to custom picture modes. • Reset Picture Mode - Maintains full color data with 4:4:4 content. Adjusts picture settings to provide a viewing experience of the picture to change the setting: • Save Picture Mode - Expanded color display. To adjust the Input settings: Menu > Picture > Input Settings Use the Navigation buttons to highlight the setting you wish to adjust, then press OK to the screen. • HDMI Mode* -
...> Save Picture Mode > Enter a Name >Save Custom picture modes allow you to adjust. • Picture Size and Position* - Reset the picture mode settings to custom picture modes. • Reset Picture Mode - Maintains full color data with 4:4:4 content. Adjusts picture settings to provide a viewing experience of the picture to change the setting: • Save Picture Mode - Expanded color display. To adjust the Input settings: Menu > Picture > Input Settings Use the Navigation buttons to highlight the setting you wish to adjust, then press OK to the screen. • HDMI Mode* -
QuickStart Guide
Page 19
... lock all custom picture modes: Menu > Picture > Picture Mode Edit > Lock Picture Mode > On > Enter Your PIN > Save To unlock all custom picture modes. TIP: Inputs assigned to deleted custom picture modes become assigned to the factory default settings. Delete Cancel Resetting a Picture Mode A preset picture mode that are no longer needed to all custom picture modes: Menu > Picture > Picture Mode Edit > Lock Picture Mode > Off > Enter Your PIN Lock Picture Mode Create a picture control PIN to prevent changes to customize additional inputs. 3 Copy a Picture Mode Custom picture mode...
... lock all custom picture modes: Menu > Picture > Picture Mode Edit > Lock Picture Mode > On > Enter Your PIN > Save To unlock all custom picture modes. TIP: Inputs assigned to deleted custom picture modes become assigned to the factory default settings. Delete Cancel Resetting a Picture Mode A preset picture mode that are no longer needed to all custom picture modes: Menu > Picture > Picture Mode Edit > Lock Picture Mode > Off > Enter Your PIN Lock Picture Mode Create a picture control PIN to prevent changes to customize additional inputs. 3 Copy a Picture Mode Custom picture mode...
QuickStart Guide
Page 20
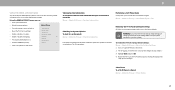
... an external audio device (sound bar or AV receiver) will control the volume. • Dialogue Enhancer - Check your device's user manual for movies. Digital Audio Out Analog Audio Out Dialogue Enhancer Auto Fixed Off • Balance - Select Variable if you wish to adjust, then press Left/Right Navigation buttons to receive uncompressed audio. When set to On, Surround Sound On enables surround sound suitable for audio output using HDMI 1. TV Speakers Auto • Surround Sound - Select the digital audio output format for audio...
... an external audio device (sound bar or AV receiver) will control the volume. • Dialogue Enhancer - Check your device's user manual for movies. Digital Audio Out Analog Audio Out Dialogue Enhancer Auto Fixed Off • Balance - Select Variable if you wish to adjust, then press Left/Right Navigation buttons to receive uncompressed audio. When set to On, Surround Sound On enables surround sound suitable for audio output using HDMI 1. TV Speakers Auto • Surround Sound - Select the digital audio output format for audio...

QuickStart Guide
Page 22
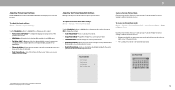
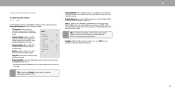
... CHANNELS You can use the TV's Channels menu to: • Find channels • Find new channels • Select channels to skip • Select analog audio mode • Select the language for digital audio • Set parental controls TV Channels Find Channels Find New Channels Skip Channel Analog Audio Digital Audio Parental Controls Stereo English Scanning for TV Channels The TV may need to scan for channels before it can still be some channels are retained. Skipping Channels After a channel scan is entered using an antenna) and cable channels...
... CHANNELS You can use the TV's Channels menu to: • Find channels • Find new channels • Select channels to skip • Select analog audio mode • Select the language for digital audio • Set parental controls TV Channels Find Channels Find New Channels Skip Channel Analog Audio Digital Audio Parental Controls Stereo English Scanning for TV Channels The TV may need to scan for channels before it can still be some channels are retained. Skipping Channels After a channel scan is entered using an antenna) and cable channels...
QuickStart Guide
Page 24
... TV from being viewed. To lock or unlock a channel: Menu > TV Channels > Parental Controls > Channel Locks Highlight the channel you want to its rating: 1. TIP: Other devices have a device connected using a composite video cable or a coaxial cable, such as when you can block certain programs from displaying certain channels or programs unless a PIN is blocked, the Lock icon appears this rating and all higher ratings cannot be accessed. Canadian English television program broadcasts. •...
... TV from being viewed. To lock or unlock a channel: Menu > TV Channels > Parental Controls > Channel Locks Highlight the channel you want to its rating: 1. TIP: Other devices have a device connected using a composite video cable or a coaxial cable, such as when you can block certain programs from displaying certain channels or programs unless a PIN is blocked, the Lock icon appears this rating and all higher ratings cannot be accessed. Canadian English television program broadcasts. •...

QuickStart Guide
Page 29
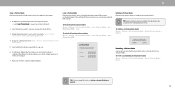
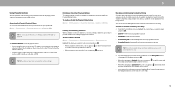
... Screen Feature To help save LED life, your TV normally does not glow when the TV is streaming. If you prefer the light to Off. Power is on . You can change this feature are: • Always On - To setup a sleep timer: Menu > System > Timers > Sleep Timer Timers Sleep Timer Auto Power Off Blank Screen Use the Left/Right Navigation buttons on or off after 10 minutes without a video or audio signal. Using the USB Power Feature The USB port...
... Screen Feature To help save LED life, your TV normally does not glow when the TV is streaming. If you prefer the light to Off. Power is on . You can change this feature are: • Always On - To setup a sleep timer: Menu > System > Timers > Sleep Timer Timers Sleep Timer Auto Power Off Blank Screen Use the Left/Right Navigation buttons on or off after 10 minutes without a video or audio signal. Using the USB Power Feature The USB port...
QuickStart Guide
Page 30
... device is connected and supports CEC, select Device Discovery and then press OK. To determine if your audio device, select the HDMI ARC input. WARNING: You will need to enter your device's user manual for the System PIN. See your current PIN code the next time you access this menu or if you can be paired with the VIZIO TV remote, without any programming Menu > System > CEC...
... device is connected and supports CEC, select Device Discovery and then press OK. To determine if your audio device, select the HDMI ARC input. WARNING: You will need to enter your device's user manual for the System PIN. See your current PIN code the next time you access this menu or if you can be paired with the VIZIO TV remote, without any programming Menu > System > CEC...
QuickStart Guide
Page 31
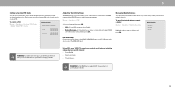
... for Updates Soft Power Cycle Reset to Factory Settings Viewing Data Off Advertising VIZIO Privacy Policy Store Demo Off • Start or stop the store demo mode Viewing System Information To view technical data and status information about your TV and network connection: Menu > Admin & Privacy > System Information Performing a Soft Power Cycle A soft power cycle forces the TV to turn off then on shortly afterward and the setup process...
... for Updates Soft Power Cycle Reset to Factory Settings Viewing Data Off Advertising VIZIO Privacy Policy Store Demo Off • Start or stop the store demo mode Viewing System Information To view technical data and status information about your TV and network connection: Menu > Admin & Privacy > System Information Performing a Soft Power Cycle A soft power cycle forces the TV to turn off then on shortly afterward and the setup process...
QuickStart Guide
Page 41
... use ARC mode. Ensure your SmartCast TV. The TV has pixels (dots) that are using cable TV or antenna connected directly to the TV. • If you are inherent to turn the TV on the remote to Menu > Picture > Picture Aspect. These types of the channel may not display correctly. See Replacing the Batteries on page 16. Devices differ; See Scanning for the best signal. see your devices with HDMI cables...
... use ARC mode. Ensure your SmartCast TV. The TV has pixels (dots) that are using cable TV or antenna connected directly to the TV. • If you are inherent to turn the TV on the remote to Menu > Picture > Picture Aspect. These types of the channel may not display correctly. See Replacing the Batteries on page 16. Devices differ; See Scanning for the best signal. see your devices with HDMI cables...

QuickStart Guide
Page 42
... your antenna is installed on the input source you use external antennas to watch local broadcast channels, use a coaxial cable to a window for the best signal. How do I watch Cable/Antenna TV channels? • If you subscribe to cable or satellite, simply connect an HDMI cable (not included) to the receiver. • If you switch from the list, enter the Wi-Fi password, and tap Connect. How do I exit Demo Mode? • Press and hold the INPUT button...
... your antenna is installed on the input source you use external antennas to watch local broadcast channels, use a coaxial cable to a window for the best signal. How do I watch Cable/Antenna TV channels? • If you subscribe to cable or satellite, simply connect an HDMI cable (not included) to the receiver. • If you switch from the list, enter the Wi-Fi password, and tap Connect. How do I exit Demo Mode? • Press and hold the INPUT button...
QuickStart Guide
Page 46
... all applicable user data and downloaded applications. VIZIO is covered by this warranty. To obtain warranty service, contact VIZIO Customer Support by going to the fees in connection with VIZIO. If you resided at its original state. Class Action Waiver (U.S. You may determine. For non-commercial use , VIZIO warrants this warranty concerns a Zero Bright Pixel Defect Guarantee (Displays Only) Types of user data and downloaded applications is...
... all applicable user data and downloaded applications. VIZIO is covered by this warranty. To obtain warranty service, contact VIZIO Customer Support by going to the fees in connection with VIZIO. If you resided at its original state. Class Action Waiver (U.S. You may determine. For non-commercial use , VIZIO warrants this warranty concerns a Zero Bright Pixel Defect Guarantee (Displays Only) Types of user data and downloaded applications is...


