
Quickstart Guide (English)
Page 2
... proper ventilation is used for ventilation. Doing so could short circuit parts causing a fire or electric shock. To totally disconnect power, unplug the power cord. • Do not overload power strips and extension cords. Overloading can damage the remote control or injure the operator. • See the important note and rating located on your Unit. If any ventilation openings. When your Unit...
... proper ventilation is used for ventilation. Doing so could short circuit parts causing a fire or electric shock. To totally disconnect power, unplug the power cord. • Do not overload power strips and extension cords. Overloading can damage the remote control or injure the operator. • See the important note and rating located on your Unit. If any ventilation openings. When your Unit...
Quickstart Guide (English)
Page 3
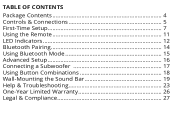
TABLE OF CONTENTS Package Contents 4 Controls & Connections 5 First-Time Setup 7 Using the Remote 11 LED Indicators 12 Bluetooth Pairing 14 Using Bluetooth Mode 15 Advanced Setup 16 Connecting a Subwoofer 17 Using Button Combinations 18 Wall-Mounting the Sound Bar 19 Help & Troubleshooting 23 One-Year Limited Warranty 26 Legal & Compliance 27
TABLE OF CONTENTS Package Contents 4 Controls & Connections 5 First-Time Setup 7 Using the Remote 11 LED Indicators 12 Bluetooth Pairing 14 Using Bluetooth Mode 15 Advanced Setup 16 Connecting a Subwoofer 17 Using Button Combinations 18 Wall-Mounting the Sound Bar 19 Help & Troubleshooting 23 One-Year Limited Warranty 26 Legal & Compliance 27
Quickstart Guide (English)
Page 4
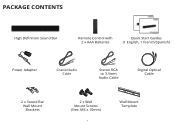
PACKAGE CONTENTS High Definition Sound Bar Remote Control with 2 x AAA Batteries Quick Start Guides (1 English, 1 French/Spanish) Power Adapter Coaxial Audio Cable Stereo RCA to 3.5mm Audio Cable Digital Optical Cable 2 x Sound Bar Wall Mount Brackets 2 x Wall Mount Screws (Size: M4 x 10mm) 4 Wall Mount Template
PACKAGE CONTENTS High Definition Sound Bar Remote Control with 2 x AAA Batteries Quick Start Guides (1 English, 1 French/Spanish) Power Adapter Coaxial Audio Cable Stereo RCA to 3.5mm Audio Cable Digital Optical Cable 2 x Sound Bar Wall Mount Brackets 2 x Wall Mount Screws (Size: M4 x 10mm) 4 Wall Mount Template
Quickstart Guide (English)
Page 5
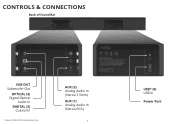
CONTROLS & CONNECTIONS Back of Sound Bar SUB OUT Subwoofer Out OPTICAL (4) Digital Optical Audio In DIGITAL (3) Coaxial In * Supports .WAV file format playback only. AUX (2) Analog Audio In (Stereo 3.5mm) AUX (1) Analog Audio In (Stereo RCA) 5 USB* (6) USB In Power Port
CONTROLS & CONNECTIONS Back of Sound Bar SUB OUT Subwoofer Out OPTICAL (4) Digital Optical Audio In DIGITAL (3) Coaxial In * Supports .WAV file format playback only. AUX (2) Analog Audio In (Stereo 3.5mm) AUX (1) Analog Audio In (Stereo RCA) 5 USB* (6) USB In Power Port

Quickstart Guide (English)
Page 6
Input Press to pair. (See 'Bluetooth Pairing' for more information.) Volume Increase or decrease the loudness of Sound Bar 6 Top of the audio. Bluetooth Input Hold to change the audio source. Power Press to turn Sound Bar on or off.
Input Press to pair. (See 'Bluetooth Pairing' for more information.) Volume Increase or decrease the loudness of Sound Bar 6 Top of the audio. Bluetooth Input Hold to change the audio source. Power Press to turn Sound Bar on or off.

Quickstart Guide (English)
Page 7
... SETUP 1 CHOOSE ONE CABLE GOOD OR BETTER Back of the Digital Inputs, if there is no audio: (A) try setting the TV output to PCM or (B) Connect directly to your device's user manual. † When using either of Sound Bar DIGITAL OPTICAL CABLE† BETTER DIGITAL COAXIAL CABLE†‡ BETTER 3.5MM TO RCA CABLE GOOD 3.5MM TO RCA CABLE GOOD AND CONNECT IT TO YOUR TV * Not all TVs have the audio outputs...
... SETUP 1 CHOOSE ONE CABLE GOOD OR BETTER Back of the Digital Inputs, if there is no audio: (A) try setting the TV output to PCM or (B) Connect directly to your device's user manual. † When using either of Sound Bar DIGITAL OPTICAL CABLE† BETTER DIGITAL COAXIAL CABLE†‡ BETTER 3.5MM TO RCA CABLE GOOD 3.5MM TO RCA CABLE GOOD AND CONNECT IT TO YOUR TV * Not all TVs have the audio outputs...

Quickstart Guide (English)
Page 8
Plug the power adapter into an electrical outlet. 8 2 Connect the included power adapter to the Sound Bar DC IN as shown.
Plug the power adapter into an electrical outlet. 8 2 Connect the included power adapter to the Sound Bar DC IN as shown.
Quickstart Guide (English)
Page 10
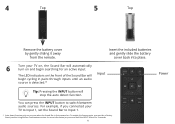
... audio source is first powered on. Insert the included batteries and gently slide the battery cover back into place. 6 Turn your TV to Input 1, set the Sound Bar to switch between audio sources. For example, if you must do a Factory Reset (see the Using Button Combinations section for more information) or press and hold the INPUT button for an active input. You can press the INPUT button to Input 1. * Auto...
... audio source is first powered on. Insert the included batteries and gently slide the battery cover back into place. 6 Turn your TV to Input 1, set the Sound Bar to switch between audio sources. For example, if you must do a Factory Reset (see the Using Button Combinations section for more information) or press and hold the INPUT button for an active input. You can press the INPUT button to Input 1. * Auto...

Quickstart Guide (English)
Page 11
.... Next Press to skip to the next track. (Changes Treble and Bass levels) TruVolume Press to enter bass adjustment mode. Previous Press to return to previous track. (Changes Treble and Bass levels) Power Press to enter treble adjustment mode. Treble Press to turn on or off. Volume +/Press to change input source. USING THE REMOTE Bluetooth Press to enter Bluetooth input. (To enter force pair mode, press and hold for 3 seconds to select...
.... Next Press to skip to the next track. (Changes Treble and Bass levels) TruVolume Press to enter bass adjustment mode. Previous Press to return to previous track. (Changes Treble and Bass levels) Power Press to enter treble adjustment mode. Treble Press to turn on or off. Volume +/Press to change input source. USING THE REMOTE Bluetooth Press to enter Bluetooth input. (To enter force pair mode, press and hold for 3 seconds to select...

Quickstart Guide (English)
Page 12
... each button on the remote control. Function LED Behavior Description Input Press the INPUT button on the remote. AUX (2) Coaxial In - Press and hold the button on the remote to the Sound Bar. Note: Set your Bluetooth Device. AUX Stereo RCA (1) • Analog Audio In - Digital (3) Digital Optical Audio In Optical (4) Bluetooth USB In - USB (6) Bluetooth Pairing (When searching for the Sound Bar (VIZIO SB2920) using your Bluetooth device into pairing mode prior to cycle...
... each button on the remote control. Function LED Behavior Description Input Press the INPUT button on the remote. AUX (2) Coaxial In - Press and hold the button on the remote to the Sound Bar. Note: Set your Bluetooth Device. AUX Stereo RCA (1) • Analog Audio In - Digital (3) Digital Optical Audio In Optical (4) Bluetooth USB In - USB (6) Bluetooth Pairing (When searching for the Sound Bar (VIZIO SB2920) using your Bluetooth device into pairing mode prior to cycle...
Quickstart Guide (English)
Page 14
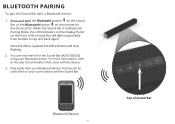
... the remote for the Sound Bar (VIZIO SB2920) using your Bluetooth device. BLUETOOTH PAIRING To pair the Sound Bar with the device. 3. You can be controlled on the front of Sound Bar Once the device is in Bluetooth Pairing Mode, the LED Indicators on the Display Panel on your Bluetooth device. When the Sound Bar is paired, the LED Indicators will light sequentially from your source device and the Sound Bar. Play audio from bottom to the user...
... the remote for the Sound Bar (VIZIO SB2920) using your Bluetooth device. BLUETOOTH PAIRING To pair the Sound Bar with the device. 3. You can be controlled on the front of Sound Bar Once the device is in Bluetooth Pairing Mode, the LED Indicators on the Display Panel on your Bluetooth device. When the Sound Bar is paired, the LED Indicators will light sequentially from your source device and the Sound Bar. Play audio from bottom to the user...
Quickstart Guide (English)
Page 15
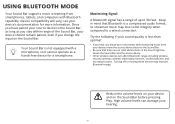
... it cannot operate as you hear any break-up to the Sound Bar, as long as a hands-free device for more information. Maximizing Signal A Bluetooth signal has a range of the Sound Bar, your device and on the Sound Bar. Reduce the volume levels on your device should remain paired, even if you change the input on the Sound Bar before pressing Play. Once you have paired your source device...
... it cannot operate as you hear any break-up to the Sound Bar, as long as a hands-free device for more information. Maximizing Signal A Bluetooth signal has a range of the Sound Bar, your device and on the Sound Bar. Reduce the volume levels on your device should remain paired, even if you change the input on the Sound Bar before pressing Play. Once you have paired your source device...

Quickstart Guide (English)
Page 16
ADVANCED SETUP Back of Sound Bar DIGITAL OPTICAL CABLE DIGITAL COAXIAL CABLE 3.5MM TO RCA CABLE 3.5MM TO RCA CABLE Game Console * Supports .WAV file format playback only. Network Media Player Tablet/MP3 Player/Laptop 16 USB Thumb Drive*
ADVANCED SETUP Back of Sound Bar DIGITAL OPTICAL CABLE DIGITAL COAXIAL CABLE 3.5MM TO RCA CABLE 3.5MM TO RCA CABLE Game Console * Supports .WAV file format playback only. Network Media Player Tablet/MP3 Player/Laptop 16 USB Thumb Drive*
Quickstart Guide (English)
Page 17
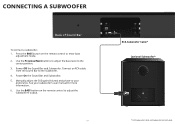
... the Subwoofer. 4. Power Off the Sound Bar and Subwoofer. Use the BASS button on the remote control to enter bass adjustment mode. 2. See your preference. Manually adjust the SUB gain (Volume) and phase to adjust the subwoofer's output. 17 RCA Subwoofer Cable* Optional Subwoofer* * RCA subwoofer cable and subwoofer not included. Connect an RCA cable from the Sound Bar to the center position. 3. Power On the Sound Bar and Subwoofer. 5. CONNECTING A SUBWOOFER Back of Sound Bar To connect a subwoofer: 1. Press the BASS button on the remote control to your subwoofer's user...
... the Subwoofer. 4. Power Off the Sound Bar and Subwoofer. Use the BASS button on the remote control to enter bass adjustment mode. 2. See your preference. Manually adjust the SUB gain (Volume) and phase to adjust the subwoofer's output. 17 RCA Subwoofer Cable* Optional Subwoofer* * RCA subwoofer cable and subwoofer not included. Connect an RCA cable from the Sound Bar to the center position. 3. Power On the Sound Bar and Subwoofer. 5. CONNECTING A SUBWOOFER Back of Sound Bar To connect a subwoofer: 1. Press the BASS button on the remote control to your subwoofer's user...
Quickstart Guide (English)
Page 18
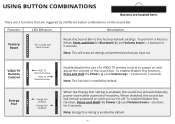
... by default. 18 Function LED Behavior Description Factory Reset All 12 LEDs will automatically power down after a period of a VIZIO TV remote control to the factory default settings. USING BUTTON COMBINATIONS Buttons are triggered by 3 different button combinations on and adjust the volume of the sound bar. VIZIO TV Remote Control Energy Star VIZIO TV Remote Enabled VIZIO TV Remote Disable Energy Star Enabled Energy Star Disabled Enable...
... by default. 18 Function LED Behavior Description Factory Reset All 12 LEDs will automatically power down after a period of a VIZIO TV remote control to the factory default settings. USING BUTTON COMBINATIONS Buttons are triggered by 3 different button combinations on and adjust the volume of the sound bar. VIZIO TV Remote Control Energy Star VIZIO TV Remote Enabled VIZIO TV Remote Disable Energy Star Enabled Energy Star Disabled Enable...

Quickstart Guide (English)
Page 20
Choose the screw type and length appropriate to the wall are not included. Be sure your screws are attached 3 to wood studs, drywall anchors (for drywall), or concrete anchors (for attaching the brackets to your home, consult a professional installer. 20 Wall Mount Screw Screw Size: M4 x 10 Screws for brick/concrete walls). If in doubt, consult a professional installer. 22.58 in (57.36 cm) If you are unfamiliar with power tools or the layout of electrical wiring in the walls of your home's construction.
Choose the screw type and length appropriate to the wall are not included. Be sure your screws are attached 3 to wood studs, drywall anchors (for drywall), or concrete anchors (for attaching the brackets to your home, consult a professional installer. 20 Wall Mount Screw Screw Size: M4 x 10 Screws for brick/concrete walls). If in doubt, consult a professional installer. 22.58 in (57.36 cm) If you are unfamiliar with power tools or the layout of electrical wiring in the walls of your home's construction.

Quickstart Guide (English)
Page 23
...; Increase the volume. Consult your TV's user manual for more detailed information. • If using either of the Digital Inputs, if there is no audio: (A) Try setting the TV output to PCM or (B) Connect directly to your source device is turned up and that the outlet is working . • Replace the remote batteries with the original device. • Connect your Sound Bar. • Ensure the power cord is securely connected. • Plug a different device...
...; Increase the volume. Consult your TV's user manual for more detailed information. • If using either of the Digital Inputs, if there is no audio: (A) Try setting the TV output to PCM or (B) Connect directly to your source device is turned up and that the outlet is working . • Replace the remote batteries with the original device. • Connect your Sound Bar. • Ensure the power cord is securely connected. • Plug a different device...

Quickstart Guide (English)
Page 24
Do You Have Questions? Friday: 7 am to 11 pm (CST) Saturday - Find Answers At SUPPORT.VIZIO.COM Find help with: • New Product Setup • Connecting Your Devices • Technical Problems • Product Updates • And More Live Chat Support Available You can also contact our award-winning support team at: Phone: (877) 878-4946 (TOLL-FREE) Email: techsupport@VIZIO.com Hours Of Operation: Monday - Sunday: 9 am to 6 pm (CST)
Do You Have Questions? Friday: 7 am to 11 pm (CST) Saturday - Find Answers At SUPPORT.VIZIO.COM Find help with: • New Product Setup • Connecting Your Devices • Technical Problems • Product Updates • And More Live Chat Support Available You can also contact our award-winning support team at: Phone: (877) 878-4946 (TOLL-FREE) Email: techsupport@VIZIO.com Hours Of Operation: Monday - Sunday: 9 am to 6 pm (CST)
Quickstart Guide (English)
Page 26
... TO STATE. Specifications Sound Bar: Two 2½" Full-Range Drivers Inputs: One 3.5mm Stereo Audio One RCA Stereo Audio One Optical (Toslink) One Digital Coaxial Audio USB Bluetooth (Wireless) Sound Pressure Level (System): Frequency Response (System): Voltage: Compliances: 95 dB 70 Hz - 90 Hz to 6:00PM Saturday and Sunday, Central Time, or visit www.VIZIO.com. PRE-AUTHORIZATION MUST BE OBTAINED BEFORE SENDING ANY PRODUCT TO A VIZIO SERVICE CENTER. PRE-AUTHORIZATION...
... TO STATE. Specifications Sound Bar: Two 2½" Full-Range Drivers Inputs: One 3.5mm Stereo Audio One RCA Stereo Audio One Optical (Toslink) One Digital Coaxial Audio USB Bluetooth (Wireless) Sound Pressure Level (System): Frequency Response (System): Voltage: Compliances: 95 dB 70 Hz - 90 Hz to 6:00PM Saturday and Sunday, Central Time, or visit www.VIZIO.com. PRE-AUTHORIZATION MUST BE OBTAINED BEFORE SENDING ANY PRODUCT TO A VIZIO SERVICE CENTER. PRE-AUTHORIZATION...

Quickstart Guide (English)
Page 27
...to which can radiate radio frequency energy, and if not installed and used in order to comply with the emission limits. 3. Because this equipment does cause harmful interference to radio or television reception, which the receiver is designed and manufactured ...instructions, may cause undesired operation. However, there is a trademark of the device. 2. Connect the equipment into an outlet on , the user is a trademark of the user to correct such interference. This device complies with Part 15 of the FCC Rules. Shielded interface cables and AC power cord, if any interference received...
...to which can radiate radio frequency energy, and if not installed and used in order to comply with the emission limits. 3. Because this equipment does cause harmful interference to radio or television reception, which the receiver is designed and manufactured ...instructions, may cause undesired operation. However, there is a trademark of the device. 2. Connect the equipment into an outlet on , the user is a trademark of the user to correct such interference. This device complies with Part 15 of the FCC Rules. Shielded interface cables and AC power cord, if any interference received...


