
User Manual English
Page 2
... is damaged, the internal components may cause the display to dripping or splashing and no objects filled with one wider than the voltage specified. The manufacturer's warranty does not cover user abuse or improper installations. • The power cord must be observed for your dealer and refer all instructions. • Do not use by a UL Listed Wall Mount Bracket or the equivalent. Ensure...
... is damaged, the internal components may cause the display to dripping or splashing and no objects filled with one wider than the voltage specified. The manufacturer's warranty does not cover user abuse or improper installations. • The power cord must be observed for your dealer and refer all instructions. • Do not use by a UL Listed Wall Mount Bracket or the equivalent. Ensure...

User Manual English
Page 3
.... Immediately turn up the volume to do so by an authorized service center. GLASS PARTS Your Table Remote may damage it with potentially explosive atmospheres are tired. For optimal device performance, and to be susceptible to clean this product contains electronic components and a battery, it more likely you spend exposed to loud sounds, the more than 15 centimeters (6 inches...
.... Immediately turn up the volume to do so by an authorized service center. GLASS PARTS Your Table Remote may damage it with potentially explosive atmospheres are tired. For optimal device performance, and to be susceptible to clean this product contains electronic components and a battery, it more likely you spend exposed to loud sounds, the more than 15 centimeters (6 inches...

User Manual English
Page 4
...Picture Mode Edit Settings 45 Adjusting the Color Calibration Settings 48 Adjusting Audio Settings 50 Adjusting Timer Settings 52 Activating the Sleep Timer 53 Setting the Auto Power Off Feature 53 Adjusting Network Settings 54 Using the Network Connection menu 55 Renaming Devices on the Input Menu 58 Renaming Devices on the Input Menu 59 Enabling HDMI Color Subsampling 59 Changing the Display System Settings 60 Viewing System Information 61 Changing the On-Screen Menu Language 61 Setting the Time and Local Settings 62 Adjusting the CEC Settings 62 Choosing a Power Mode Setting...
...Picture Mode Edit Settings 45 Adjusting the Color Calibration Settings 48 Adjusting Audio Settings 50 Adjusting Timer Settings 52 Activating the Sleep Timer 53 Setting the Auto Power Off Feature 53 Adjusting Network Settings 54 Using the Network Connection menu 55 Renaming Devices on the Input Menu 58 Renaming Devices on the Input Menu 59 Enabling HDMI Color Subsampling 59 Changing the Display System Settings 60 Viewing System Information 61 Changing the On-Screen Menu Language 61 Setting the Time and Local Settings 62 Adjusting the CEC Settings 62 Choosing a Power Mode Setting...

User Manual English
Page 6
Back 1 2 3 1 2 1 3 Power Button Volume Up/Down Buttons Input Button HDMI Port USB 3.0 Ports Component Ports HDMI Port Optical/SPDIF Audio Out Port HDMI Ports RCA Audio Out Ports Ethernet Port 6 Overview -
Back 1 2 3 1 2 1 3 Power Button Volume Up/Down Buttons Input Button HDMI Port USB 3.0 Ports Component Ports HDMI Port Optical/SPDIF Audio Out Port HDMI Ports RCA Audio Out Ports Ethernet Port 6 Overview -
User Manual English
Page 7
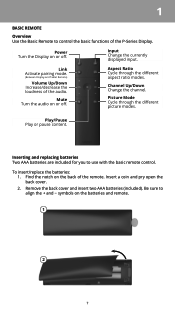
... or off . Link Activate pairing mode. (Between Display and Tablet Remote) Volume Up/Down Increase/decrease the loudness of the P-Series Display. Insert a coin and pry open the back cover. 2. Channel Up/Down Change the channel. To insert/replace the batteries: 1. Power Turn the Display on the batteries and remote. 1 2 7 1 BASIC REMOTE Overview Use the Basic Remote to use with the basic remote control. Picture Mode Cycle through the different aspect ratio...
... or off . Link Activate pairing mode. (Between Display and Tablet Remote) Volume Up/Down Increase/decrease the loudness of the P-Series Display. Insert a coin and pry open the back cover. 2. Channel Up/Down Change the channel. To insert/replace the batteries: 1. Power Turn the Display on the batteries and remote. 1 2 7 1 BASIC REMOTE Overview Use the Basic Remote to use with the basic remote control. Picture Mode Cycle through the different aspect ratio...
User Manual English
Page 13
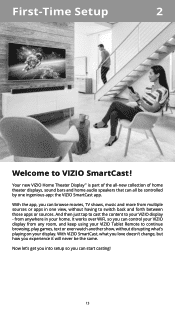
... Remote to continue browsing, play games, text or even watch another show, without having to switch back and forth between those apps or sources. from anywhere in one ingenious app: the VIZIO SmartCast app. First-Time Setup 2 Welcome to VIZIO SmartCast !™ Your new VIZIO Home Theater Display™ is part of the all-new collection of home theater displays, sound bars and home audio speakers...
... Remote to continue browsing, play games, text or even watch another show, without having to switch back and forth between those apps or sources. from anywhere in one ingenious app: the VIZIO SmartCast app. First-Time Setup 2 Welcome to VIZIO SmartCast !™ Your new VIZIO Home Theater Display™ is part of the all-new collection of home theater displays, sound bars and home audio speakers...
User Manual English
Page 14
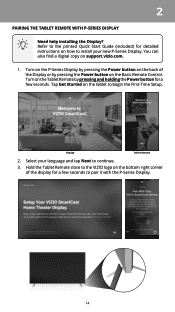
... P-Series Display. Turn on the P-Series Display by pressing the Power button on the Basic Remote Control. Display Tablet Remote 2. Tap Get Started on support.vizio.com. 1. Turn on the Tablet Remote by pressing the Power button on the back of the display for a few seconds to begin the First-Time Setup. You can also find a digital copy on the tablet to pair it with the P-Series Display. 14 2 PAIRING THE TABLET REMOTE WITH P-SERIES DISPLAY Need help installing...
... P-Series Display. Turn on the P-Series Display by pressing the Power button on the Basic Remote Control. Display Tablet Remote 2. Tap Get Started on support.vizio.com. 1. Turn on the Tablet Remote by pressing the Power button on the back of the display for a few seconds to begin the First-Time Setup. You can also find a digital copy on the tablet to pair it with the P-Series Display. 14 2 PAIRING THE TABLET REMOTE WITH P-SERIES DISPLAY Need help installing...

User Manual English
Page 33
.... * Live TV listings compatible with IP-based set up a TV connection to search, discover, and browse live TV channels. Select your device manually by tapping Rescan Network or add your device from DirecTV and Dish Network services, with more services to be added. 3 WATCHING LIVE TV* If you have a cable, satellite, or over-the-air TV connection, you can use the VIZIO SmartCast App to...
.... * Live TV listings compatible with IP-based set up a TV connection to search, discover, and browse live TV channels. Select your device manually by tapping Rescan Network or add your device from DirecTV and Dish Network services, with more services to be added. 3 WATCHING LIVE TV* If you have a cable, satellite, or over-the-air TV connection, you can use the VIZIO SmartCast App to...
User Manual English
Page 43
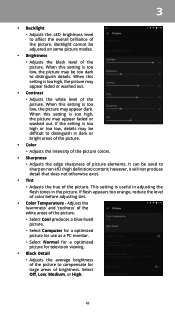
... this setting is too high, the picture may be adjusted on some picture modes. • Brightness • Adjusts the black level of the picture. Adjusts the 'warmness' and 'coolness' of the white areas of the picture. • Select Cool produces a blue-hued picture. • Select Computer for a optimized picture for use as a PC monitor. • Select Normal for a optimized picture for television viewing. • Black Detail • Adjusts the average...
... this setting is too high, the picture may be adjusted on some picture modes. • Brightness • Adjusts the black level of the picture. Adjusts the 'warmness' and 'coolness' of the white areas of the picture. • Select Cool produces a blue-hued picture. • Select Computer for a optimized picture for use as a PC monitor. • Select Normal for a optimized picture for television viewing. • Black Detail • Adjusts the average...
User Manual English
Page 45
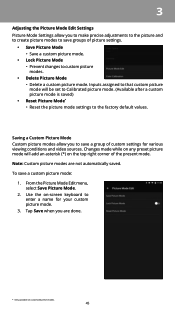
To save a custom picture mode: 1. Changes made while on -screen keyboard to enter a name for various viewing conditions and video sources. Use the on any preset picture mode will be set to Calibrated picture mode. (Available after a custom picture mode is saved) • Reset Picture Mode* • Reset the picture mode settings to the factory default values. Inputs assigned to that custom picture mode will add an asterisk (*) on customized preset modes. 45 Note: Custom picture modes are done. * Only available on...
To save a custom picture mode: 1. Changes made while on -screen keyboard to enter a name for various viewing conditions and video sources. Use the on any preset picture mode will be set to Calibrated picture mode. (Available after a custom picture mode is saved) • Reset Picture Mode* • Reset the picture mode settings to the factory default values. Inputs assigned to that custom picture mode will add an asterisk (*) on customized preset modes. 45 Note: Custom picture modes are done. * Only available on...
User Manual English
Page 47
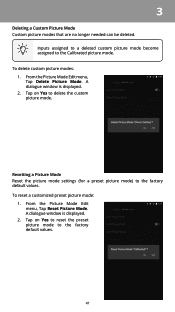
From the Picture Mode Edit menu, Tap Reset Picture Mode. Resetting a Picture Mode Reset the picture mode settings (for a preset picture mode) to the factory default values. 47 A dialogue window is displayed. 2. 3 Deleting a Custom Picture Mode Custom picture modes that are no longer needed can be deleted. A dialogue window is displayed. 2. Tap on Yes to the Calibrated picture mode. From the Picture Mode Edit menu, Tap Delete Picture Mode. Tap on Yes to reset the preset picture mode to the factory default values. Inputs assigned to a deleted custom picture mode become...
From the Picture Mode Edit menu, Tap Reset Picture Mode. Resetting a Picture Mode Reset the picture mode settings (for a preset picture mode) to the factory default values. 47 A dialogue window is displayed. 2. 3 Deleting a Custom Picture Mode Custom picture modes that are no longer needed can be deleted. A dialogue window is displayed. 2. Tap on Yes to the Calibrated picture mode. From the Picture Mode Edit menu, Tap Delete Picture Mode. Tap on Yes to reset the preset picture mode to the factory default values. Inputs assigned to a deleted custom picture mode become...
User Manual English
Page 51
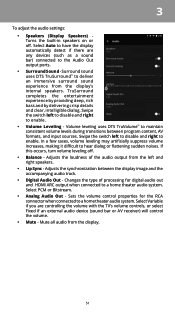
.... Sets the volume control properties for digital audio out and HDMI ARC output when connected to maintain consistent volume levels during transitions between the display image and the accompanying audio track. • Digital Audio Out - Select Auto to enable. Swipe the switch left to disable and right to have the display automatically detect if there are controlling the volume with the TV's volume controls, or select Fixed if an external audio device (sound bar or AV receiver...
.... Sets the volume control properties for digital audio out and HDMI ARC output when connected to maintain consistent volume levels during transitions between the display image and the accompanying audio track. • Digital Audio Out - Select Auto to enable. Swipe the switch left to disable and right to have the display automatically detect if there are controlling the volume with the TV's volume controls, or select Fixed if an external audio device (sound bar or AV receiver...

User Manual English
Page 63
... Time - Select ARC Only for details. Set time format to the HDMI ARC input. Adjusting the CEC Settings The CEC function on CEC, select Enable to use the Tablet Remote to control CEC devices connected to control HDMI-connected devices with the included Tablet Remote without any additional programming. 3 Setting the Time and Local Settings To ensure the correct time is displayed, set the display's time zone: 1. Not all HDMI devices support CEC. Tap on your device's user manual for plug and play...
... Time - Select ARC Only for details. Set time format to the HDMI ARC input. Adjusting the CEC Settings The CEC function on CEC, select Enable to use the Tablet Remote to control CEC devices connected to control HDMI-connected devices with the included Tablet Remote without any additional programming. 3 Setting the Time and Local Settings To ensure the correct time is displayed, set the display's time zone: 1. Not all HDMI devices support CEC. Tap on your device's user manual for plug and play...

User Manual English
Page 74
...; (c) improper operation; (d) improper voltage supply or power surges; (e) signal issues; (f) damage from the product before sending your claim heard by a VIZIO authorized service center; (j) products with VIZIO. Submitting a claim to binding arbitration means that affords an equal degree of your claim to binding arbitration according to obtain warranty service. Instead your county of God; (h) customer misuse, modifications or adjustments; (i) installation, set forth below...
...; (c) improper operation; (d) improper voltage supply or power surges; (e) signal issues; (f) damage from the product before sending your claim heard by a VIZIO authorized service center; (j) products with VIZIO. Submitting a claim to binding arbitration means that affords an equal degree of your claim to binding arbitration according to obtain warranty service. Instead your county of God; (h) customer misuse, modifications or adjustments; (i) installation, set forth below...
User Manual English
Page 76
... that check carry-on luggage generally use of this Quick Start Guide and the associated User Manual, go to the customs and export control laws and regulations of others and VIZIO, Inc. For DTS patents, see http://patents.dts.com. Internet Connectivity Network conditions, environmental and other property, do not attempt to view at http://www.vizio.com/privacy. Information in a fire...
... that check carry-on luggage generally use of this Quick Start Guide and the associated User Manual, go to the customs and export control laws and regulations of others and VIZIO, Inc. For DTS patents, see http://patents.dts.com. Internet Connectivity Network conditions, environmental and other property, do not attempt to view at http://www.vizio.com/privacy. Information in a fire...
Quickstart Guide English
Page 2
..., stand, tripod, bracket, or table specified by the manufacturer, or sold with one wider than the other. This may result in fire or electric shock. • The wall socket should be operated only from being damaged, the following safety instructions before turning on your display. The manufacturer's warranty does not cover user abuse or improper installations. • The power cord must be used for...
..., stand, tripod, bracket, or table specified by the manufacturer, or sold with one wider than the other. This may result in fire or electric shock. • The wall socket should be operated only from being damaged, the following safety instructions before turning on your display. The manufacturer's warranty does not cover user abuse or improper installations. • The power cord must be used for...
Quickstart Guide English
Page 3
... in any object drops into your display, hold the AC/DC power adapter, not the cord. Do not expose batteries to excessive heat such as the disconnect device, the disconnect device shall remain readily operable. • CAUTION: These servicing instructions are qualified to loud sounds can damage the remote control or injure the operator. English - Pulling on the display may cause suffocation.
... in any object drops into your display, hold the AC/DC power adapter, not the cord. Do not expose batteries to excessive heat such as the disconnect device, the disconnect device shall remain readily operable. • CAUTION: These servicing instructions are qualified to loud sounds can damage the remote control or injure the operator. English - Pulling on the display may cause suffocation.

Quickstart Guide English
Page 4
..., navigate on the Internet, or perform any noticeable discomfort. Driving safely is designed to operate between the temperatures of VIZIO, NEVER type or read the User Manual available directly through the VIZIO SmartCast™ application on your implantable medical device. Seizures/Blackouts Some people may be advised to turn your Tablet Remote whenever instructed to 35° C). LOUD SOUNDS + TIME = HEARING LOSS...
..., navigate on the Internet, or perform any noticeable discomfort. Driving safely is designed to operate between the temperatures of VIZIO, NEVER type or read the User Manual available directly through the VIZIO SmartCast™ application on your implantable medical device. Seizures/Blackouts Some people may be advised to turn your Tablet Remote whenever instructed to 35° C). LOUD SOUNDS + TIME = HEARING LOSS...

Quickstart Guide English
Page 32
... the correct mount for your display. Remove the stands by loosening and removing the screws. 4. Wall-mounting the Display To mount your display on this display. Consult the information on a wall, you can scratch or damage the display. 3. To install your display. 2. Disconnect any cables connected to your display on a wall: 1. Be sure the surface is capable of supporting the weight of this page to find the appropriate mount for your display, you will need a wall mount.
... the correct mount for your display. Remove the stands by loosening and removing the screws. 4. Wall-mounting the Display To mount your display on this display. Consult the information on a wall, you can scratch or damage the display. 3. To install your display. 2. Disconnect any cables connected to your display on a wall: 1. Be sure the surface is capable of supporting the weight of this page to find the appropriate mount for your display, you will need a wall mount.
Quickstart Guide English
Page 40
...; (h) customer misuse, modifications or adjustments; (i) installation, set forth below , unless an exception applies. What This Warranty Does Not Cover This warranty does not cover: (a) cosmetic damage; (b) normal wear and tear; (c) improper operation; (d) improper voltage supply or power surges; (e) signal issues; (f) damage from shipping; (g) acts of user data and downloaded applications is not covered under this warranty, VIZIO will be located in the country where it...
...; (h) customer misuse, modifications or adjustments; (i) installation, set forth below , unless an exception applies. What This Warranty Does Not Cover This warranty does not cover: (a) cosmetic damage; (b) normal wear and tear; (c) improper operation; (d) improper voltage supply or power surges; (e) signal issues; (f) damage from shipping; (g) acts of user data and downloaded applications is not covered under this warranty, VIZIO will be located in the country where it...


