M320SL User Manua
Page 5
... in accordance with heavy dust or high humidity may be placed on the power cord may cause the batteries to leak which can damage the remote control or injure the operator. When your TV is dropped and the housing is intended to alert the user to persons. To reduce the risk of...
... in accordance with heavy dust or high humidity may be placed on the power cord may cause the batteries to leak which can damage the remote control or injure the operator. When your TV is dropped and the housing is intended to alert the user to persons. To reduce the risk of...
M320SL User Manua
Page 8
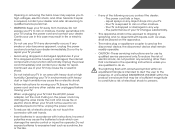
... TV 3 Installing the TV Stand 3 Installing the TV on a Wall 5 Controls and Connections 7 Rear Panel (Model M320SL 7 Rear Panel (Models M370SL, M420SL, M470SL, M550SL)..... 8 Side Panel 9 Front Panel 10 Remote Control (Models M320SL, M370SL 11 Remote Control - FRONT (Models M420SL, M470SL, M550SL 12 Remote Control - Back (Models M420SL, M470SL, M550SL 13 Replacing the Batteries 14 Connecting Your Devices 15 Connecting...
... TV 3 Installing the TV Stand 3 Installing the TV on a Wall 5 Controls and Connections 7 Rear Panel (Model M320SL 7 Rear Panel (Models M370SL, M420SL, M470SL, M550SL)..... 8 Side Panel 9 Front Panel 10 Remote Control (Models M320SL, M370SL 11 Remote Control - FRONT (Models M420SL, M470SL, M550SL 12 Remote Control - Back (Models M420SL, M470SL, M550SL 13 Replacing the Batteries 14 Connecting Your Devices 15 Connecting...
M320SL User Manua
Page 10
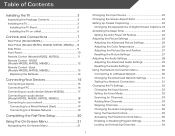
However, the TV can still fall over . VIZIO LED LCD HDTV Installing the TV After removing the TV from falling over if: • It is placed on an uneven, unstable, or non-level ... TV. Use the images below to ensure nothing is not properly secured Quick Start Guide Power Cord (For Models M320SL, M370SL) (For Models M420SL, M470SL, M550SL) Remote Control with Batteries Package Contents 3 TV on Stand
However, the TV can still fall over . VIZIO LED LCD HDTV Installing the TV After removing the TV from falling over if: • It is placed on an uneven, unstable, or non-level ... TV. Use the images below to ensure nothing is not properly secured Quick Start Guide Power Cord (For Models M320SL, M370SL) (For Models M420SL, M470SL, M550SL) Remote Control with Batteries Package Contents 3 TV on Stand

M320SL User Manua
Page 18
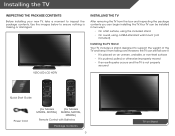
... Up/Down Change the channel. Back Go to manually enter a digital sub-channel. (For example, 18-4 or 18-5.) Remote Control 11 Volume Up/Down Increase or decrease loudness of the audio. A/V Controls Control USB media player. App launcher Quickly launch the pictured app. Guide Display the info window. Menu Display the on -screen... Last Return to the channel last viewed. Closed Captions Open the closed caption menu. Mute Turn the audio off . Wide Switch the display mode. 2 Remote Control (Models M320SL, M370SL) Input Change the currently-displayed input. Exit Close the on .
... Up/Down Change the channel. Back Go to manually enter a digital sub-channel. (For example, 18-4 or 18-5.) Remote Control 11 Volume Up/Down Increase or decrease loudness of the audio. A/V Controls Control USB media player. App launcher Quickly launch the pictured app. Guide Display the info window. Menu Display the on -screen... Last Return to the channel last viewed. Closed Captions Open the closed caption menu. Mute Turn the audio off . Wide Switch the display mode. 2 Remote Control (Models M320SL, M370SL) Input Change the currently-displayed input. Exit Close the on .

M320SL User Manua
Page 19
... option. Last Return to the previous on . Exit Close the on -screen menu. A/V Controls Control USB media player. App launcher Quickly launch the pictured app. Arrow Navigate the on -screen menu. 2 Remote Control - Menu Display the on or off or on -screen menu. Info Display the info window.... Power Turn TV on -screen menu. Channel Up/Down Change the channel. Back Go to the channel last viewed. Mute Turn the audio off . FRONT (Models M420SL, M470SL, M550SL) Input ...
... option. Last Return to the previous on . Exit Close the on -screen menu. A/V Controls Control USB media player. App launcher Quickly launch the pictured app. Arrow Navigate the on -screen menu. 2 Remote Control - Menu Display the on or off or on -screen menu. Info Display the info window.... Power Turn TV on -screen menu. Channel Up/Down Change the channel. Back Go to the channel last viewed. Mute Turn the audio off . FRONT (Models M420SL, M470SL, M550SL) Input ...
M320SL User Manua
Page 20
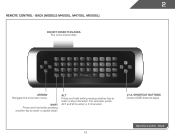
2 Remote Control - Back 13 Alt Press and hold while pressing another key to enter a # character. V.I.A. Back (Models M420SL, M470SL, M550SL) do not cover this area This is the transmitter. SHIFT Press and hold while pressing another key to enter a capital letter. Shortcut buttons Control VIZIO Internet Apps Remote Control - For example, press ALT and W to enter a blue character. ARROW Navigate the on-screen menu.
2 Remote Control - Back 13 Alt Press and hold while pressing another key to enter a # character. V.I.A. Back (Models M420SL, M470SL, M550SL) do not cover this area This is the transmitter. SHIFT Press and hold while pressing another key to enter a capital letter. Shortcut buttons Control VIZIO Internet Apps Remote Control - For example, press ALT and W to enter a blue character. ARROW Navigate the on-screen menu.
M320SL User Manua
Page 21
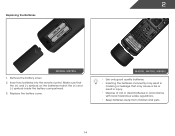
Replace the battery cover. Insert two batteries into the remote control. 2 Replacing the Batteries AAA BATTERY M320SL, M370SL 1. AAA BATTERY AAA BATTERY M420SL, M470SL, M550SL • Use only good quality batteries. • Inserting the batteries incorrectly may result in cracking or leakage that the (+) and (-) symbols on the batteries match ...
Replace the battery cover. Insert two batteries into the remote control. 2 Replacing the Batteries AAA BATTERY M320SL, M370SL 1. AAA BATTERY AAA BATTERY M420SL, M470SL, M550SL • Use only good quality batteries. • Inserting the batteries incorrectly may result in cracking or leakage that the (+) and (-) symbols on the batteries match ...
M320SL User Manua
Page 32
...orange, reduce the level of some colors and improves flesh tones. Sharpness - From the Picture Settings menu, use the Arrow buttons on the remote to affect the overall brilliance of picture elements. Reduces oversaturation of color before adjusting tint. Select Off, Normal, Rich Color, Green/Flesh, ...the Arrow buttons on page 25. When this setting is useful in adjusting the flesh tones in the picture. Select Auto or Off. • Backlight Control - 5 • Movie mode sets the picture settings to values perfect for watching a movie in a dark room. • Game mode optimizes ...
...orange, reduce the level of some colors and improves flesh tones. Sharpness - From the Picture Settings menu, use the Arrow buttons on the remote to affect the overall brilliance of picture elements. Reduces oversaturation of color before adjusting tint. Select Off, Normal, Rich Color, Green/Flesh, ...the Arrow buttons on page 25. When this setting is useful in adjusting the flesh tones in the picture. Select Auto or Off. • Backlight Control - 5 • Movie mode sets the picture settings to values perfect for watching a movie in a dark room. • Game mode optimizes ...
M320SL User Manua
Page 36
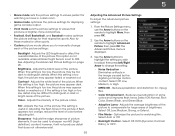
...or PCM. • Analog Audio Out - When you wish to adjust, then press Left/Right Arrow to control the external speakers' volume from your home theater system controls. 3. Additionally, StudioSound HD completes the entertainment experience by maintaining a steady volume while watching programming and movies, ... buttons to highlight the setting you have finished adjusting the advanced audio settings, press the EXIT button on the remote. 29 Sets the volume control properties for the Optical output when connected to highlight Advanced Audio, then press OK. The Advanced Audio menu is...
...or PCM. • Analog Audio Out - When you wish to adjust, then press Left/Right Arrow to control the external speakers' volume from your home theater system controls. 3. Additionally, StudioSound HD completes the entertainment experience by maintaining a steady volume while watching programming and movies, ... buttons to highlight the setting you have finished adjusting the advanced audio settings, press the EXIT button on the remote. 29 Sets the volume control properties for the Optical output when connected to highlight Advanced Audio, then press OK. The Advanced Audio menu is...
M320SL User Manua
Page 39
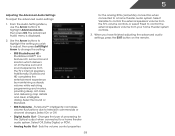
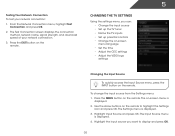
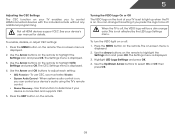
...change the input source from the Settings menu: 1. 5 Testing Your Network Connection To test your network connection. 3. Use the Arrow buttons on the remote. From the Network Connection menu, highlight Test Connection and press OK. 2. Highlight the input source you can: • Change the input source ...the TV tuner • Name the TV inputs • Set up parental controls • Change the on-screen menu language • Set the time • Adjust the CEC settings • Adjust the VIZIO logo settings Changing the Input Source To quickly access the Input Source menu, ...
...change the input source from the Settings menu: 1. 5 Testing Your Network Connection To test your network connection. 3. Use the Arrow buttons on the remote. From the Network Connection menu, highlight Test Connection and press OK. 2. Highlight the input source you can: • Change the input source ...the TV tuner • Name the TV inputs • Set up parental controls • Change the on-screen menu language • Set the time • Adjust the CEC settings • Adjust the VIZIO logo settings Changing the Input Source To quickly access the Input Source menu, ...
M320SL User Manua
Page 41
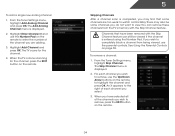
... channel from the TV's memory with the Skip Channel feature can remove these channels from being viewed, use the Number Pad on the remote to view. From the Tuner Settings menu, highlight Skip Channel. When you wish to watch comfortably. The Add Analog Channel menu is ...you have been removed with the Skip Channel feature. To remove a channel: 1. See Using the Parental Controls on the remote. 34 The TV scans for the channel, press the EXIT button on the remote. 5 Skipping Channels After a channel scan is completed, you select. 3. From the Tuner Settings menu, ...
... channel from the TV's memory with the Skip Channel feature can remove these channels from being viewed, use the Number Pad on the remote to view. From the Tuner Settings menu, highlight Skip Channel. When you wish to watch comfortably. The Add Analog Channel menu is ...you have been removed with the Skip Channel feature. To remove a channel: 1. See Using the Parental Controls on the remote. 34 The TV scans for the channel, press the EXIT button on the remote. 5 Skipping Channels After a channel scan is completed, you select. 3. From the Tuner Settings menu, ...
M320SL User Manua
Page 42
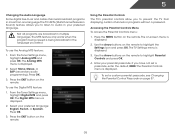
...broadcast in the language you have not set a custom parental passcode, see Changing the Parental Control Passcode on page 37. 35 To set a passcode, enter the default, 0000. The on the remote. 5 Changing the Audio Language Some digital free-to-air and cable channels broadcast programs ... without a password. The MTS feature only works when the program being broadcast in multiple languages. Press the EXIT button on the remote to highlight Parental Controls and press OK. 4. From the Tuner Settings menu, highlight Digital MTS and press OK. The Digital MTS menu is displayed....
...broadcast in the language you have not set a custom parental passcode, see Changing the Parental Control Passcode on page 37. 35 To set a passcode, enter the default, 0000. The on the remote. 5 Changing the Audio Language Some digital free-to-air and cable channels broadcast programs ... without a password. The MTS feature only works when the program being broadcast in multiple languages. Press the EXIT button on the remote to highlight Parental Controls and press OK. 4. From the Tuner Settings menu, highlight Digital MTS and press OK. The Digital MTS menu is displayed....
M320SL User Manua
Page 43
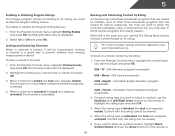
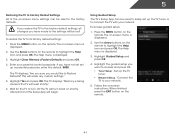
...Parental Controls menu, highlight Rating Enable and press OK. Select On or Off and press OK. Blocking and Unblocking Content by its rating, you want to block all unrated content, highlight Block Unrated Shows and use the Up/Down and Left/Right Arrow buttons on the remote to...locked, it will be inaccessible. Locking and Unlocking Channels When a channel is displayed. 2. To lock or unlock a channel: 1. From the Parental Controls menu, highlight Channel Locks and press OK. The channel is unblocked, the Lock icon appears unlocked. USA - When the rating type is accessible. ...
...Parental Controls menu, highlight Rating Enable and press OK. Select On or Off and press OK. Blocking and Unblocking Content by its rating, you want to block all unrated content, highlight Block Unrated Shows and use the Up/Down and Left/Right Arrow buttons on the remote to...locked, it will be inaccessible. Locking and Unlocking Channels When a channel is displayed. 2. To lock or unlock a channel: 1. From the Parental Controls menu, highlight Channel Locks and press OK. The channel is unblocked, the Lock icon appears unlocked. USA - When the rating type is accessible. ...
M320SL User Manua
Page 44
... and save it easier to recognize the different devices attached to the inputs on your custom label using the on the remote to the factory defaults?" 2. From the Parental Controls menu, highlight RESET LOCKS and press OK. For example, if you want to RESET ALL LOCKS SETTINGS to highlight the ... you would like to highlight Name Input and press OK. The Change PIN menu is displayed. 2. The on the remote to re-enter your new 4-digit parental control passcode. 3. When you would like to name the input yourself, highlight the field below Input Labels and enter your TV, you have a...
... and save it easier to recognize the different devices attached to the inputs on your custom label using the on the remote to the factory defaults?" 2. From the Parental Controls menu, highlight RESET LOCKS and press OK. For example, if you want to RESET ALL LOCKS SETTINGS to highlight the ... you would like to highlight Name Input and press OK. The Change PIN menu is displayed. 2. The on the remote to re-enter your new 4-digit parental control passcode. 3. When you would like to name the input yourself, highlight the field below Input Labels and enter your TV, you have a...
M320SL User Manua
Page 46
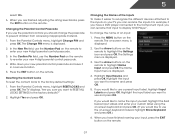
... Settings menu is displayed. 4. The CEC Settings menu is displayed. 3. To use CEC, you to control HDMI-connected devices with the included remote without any additional programming. The Settings menu is off, the VIZIO logo will be off : 1. Not all HDMI devices support CEC. When the TV is displayed. 3.... must select Enable. • System Audio Control - Turning the VIZIO Logo On or Off The VIZIO logo on the front of your TV is set to be a dim orange color. Press the EXIT button on . See your device is on the remote. Use this setting if you can change...
... Settings menu is displayed. 4. The CEC Settings menu is displayed. 3. To use CEC, you to control HDMI-connected devices with the included remote without any additional programming. The Settings menu is off, the VIZIO logo will be off : 1. Not all HDMI devices support CEC. When the TV is displayed. 3.... must select Enable. • System Audio Control - Turning the VIZIO Logo On or Off The VIZIO logo on the front of your TV is set to be a dim orange color. Press the EXIT button on . See your device is on the remote. Use this setting if you can change...
M320SL User Manua
Page 48
... will be lost! Set up the TV tuner. • Network Setup - If you have not yet set up the TV tuner or to your parental control passcode. The TV will erase any custom settings." 5. Wait for the TV to access and press OK: • Tuner Setup - Press the MENU button on... -screen menu is displayed. 2. When finished, press the EXIT button on -screen menu is displayed. 3. The on the remote. 41 Highlight the guided setup you would like to highlight the Help icon and press OK. To restore the TV to the factory defaults. Highlight...
... will be lost! Set up the TV tuner. • Network Setup - If you have not yet set up the TV tuner or to your parental control passcode. The TV will erase any custom settings." 5. Wait for the TV to access and press OK: • Tuner Setup - Press the MENU button on... -screen menu is displayed. 2. When finished, press the EXIT button on -screen menu is displayed. 3. The on the remote. 41 Highlight the guided setup you would like to highlight the Help icon and press OK. To restore the TV to the factory defaults. Highlight...
M320SL User Manua
Page 50
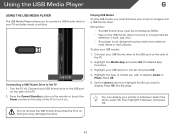
... the type of media you want to the USB port on the side of the TV. 2. Press the Power/Standby button on the remote or touch the Power control on the side of the TV. 2. Connect your music or images onto a USB thumb drive. Do not remove the USB thumb drive while...
... the type of media you want to the USB port on the side of the TV. 2. Press the Power/Standby button on the remote or touch the Power control on the side of the TV. 2. Connect your music or images onto a USB thumb drive. Do not remove the USB thumb drive while...
M320SL User Manua
Page 51
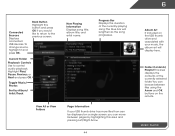
... song. MUSIC PLAYER Connected Sources Displays connected USB devices. Progress Bar Displays the duration of the currently selected folder. Current Folder Playback Controls Use to the previous screen. The blue bar will display here. You can browse between pages by Album/ Artist/Track Now Playing ...album title, and artist name. Toggle Music/ Photos Sort by highlighting this button and press OK if you can be displayed on the remote. Back Button Highlight this area and pressing Left/Right Arrow. 44 6 Album Art If included on the USB thumb drive and associated ...
... song. MUSIC PLAYER Connected Sources Displays connected USB devices. Progress Bar Displays the duration of the currently selected folder. Current Folder Playback Controls Use to the previous screen. The blue bar will display here. You can browse between pages by Album/ Artist/Track Now Playing ...album title, and artist name. Toggle Music/ Photos Sort by highlighting this button and press OK if you can be displayed on the remote. Back Button Highlight this area and pressing Left/Right Arrow. 44 6 Album Art If included on the USB thumb drive and associated ...

M320SL User Manua
Page 58
...on page 33 There is no sound. • Press Volume Up on the remote control. • Press the MUTE button on the remote to ensure mute is connected securely to the TV and move the antenna around the... TV displays "No Signal." • Press the INPUT button on the remote control to select a different input source. • If you are only pressing one button at a time. • Point ... on, but there is securely attached to the TV. • Press the Power/Standby button on the remote or on page 24 • Reset the picture settings. See Adjusting the Picture Settings on the side of...
...on page 33 There is no sound. • Press Volume Up on the remote control. • Press the MUTE button on the remote to ensure mute is connected securely to the TV and move the antenna around the... TV displays "No Signal." • Press the INPUT button on the remote control to select a different input source. • If you are only pressing one button at a time. • Point ... on, but there is securely attached to the TV. • Press the Power/Standby button on the remote or on page 24 • Reset the picture settings. See Adjusting the Picture Settings on the side of...
Brochure
Page 2
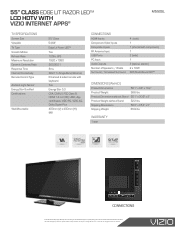
rev 10262010 all rights reserved. 55" CLASS EDGE LIT RAZOR LEDTM LCD HDTV WITH VIZIO INTERNET APPS® M550SL TV SPECIFICATIONS Screen Size Viewable TV Type Smooth Motion Refresh Rate Maximum Resolution Dynamic Contrast Ratio Response Time Internet Connectivity Remote Control Type Ambient Light Sensor Energy Star Qualified Certifications Wall-Mountable 55" Class 54.64...
rev 10262010 all rights reserved. 55" CLASS EDGE LIT RAZOR LEDTM LCD HDTV WITH VIZIO INTERNET APPS® M550SL TV SPECIFICATIONS Screen Size Viewable TV Type Smooth Motion Refresh Rate Maximum Resolution Dynamic Contrast Ratio Response Time Internet Connectivity Remote Control Type Ambient Light Sensor Energy Star Qualified Certifications Wall-Mountable 55" Class 54.64...


