User Manual (English)
Page 3
... into your TV, hold the AC/DC power adapter, Overloading can damage the remote control or injure the operator. If repair is dropped or damaged in environments with instructions. This may result in the operating instructions unless you to repair your TV away from damage due to power surges. • Do not attempt to qualified service personnel. • WARNING: Keep your TV...
... into your TV, hold the AC/DC power adapter, Overloading can damage the remote control or injure the operator. If repair is dropped or damaged in environments with instructions. This may result in the operating instructions unless you to repair your TV away from damage due to power surges. • Do not attempt to qualified service personnel. • WARNING: Keep your TV...
User Manual (English)
Page 6
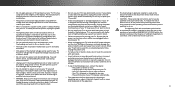
... Menu 43 Troubleshooting & Technical Support 59 Saving a Custom Picture Mode 27 Locking/Unlocking a Custom Picture Mode 27 Enabling or Disabling Program Ratings 43 Locking and Unlocking Channels 43 Specifications 63 Deleting a Custom Picture Mode 28 Blocking and Unblocking Content by Rating 44 Warranty 68 Resetting Picture Mode 28 Adjusting the Color Tuner Settings 29 Changing the Parental Control PIN 44 Resetting the Content Locks 44 Legal & Compliance 69 Adjusting the Audio Settings 31 vi Plus 53 Using the fullscreen V.I .A. Arc 18 Connecting to Your Network...
... Menu 43 Troubleshooting & Technical Support 59 Saving a Custom Picture Mode 27 Locking/Unlocking a Custom Picture Mode 27 Enabling or Disabling Program Ratings 43 Locking and Unlocking Channels 43 Specifications 63 Deleting a Custom Picture Mode 28 Blocking and Unblocking Content by Rating 44 Warranty 68 Resetting Picture Mode 28 Adjusting the Color Tuner Settings 29 Changing the Parental Control PIN 44 Resetting the Content Locks 44 Legal & Compliance 69 Adjusting the Audio Settings 31 vi Plus 53 Using the fullscreen V.I .A. Arc 18 Connecting to Your Network...
User Manual (English)
Page 11
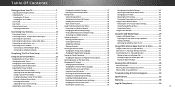
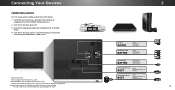
The actual number of ports and their locations may be subject to increase volume and the - Connect USB thumb drive to access the input menu. Stereo Audio Out - Connect optical/SPDIF audio device, such as sound bar. HDMI - Coaxial - Component/Composite - Power - Press once to play photo, music, or video. REAR PANEL 11 Connect coaxial cable from home network. Connect component or composite device. Connect RCA audio device, such as home audio receiver. Volume - Input - Note: The image shown here is for illustrative...
The actual number of ports and their locations may be subject to increase volume and the - Connect USB thumb drive to access the input menu. Stereo Audio Out - Connect optical/SPDIF audio device, such as sound bar. HDMI - Coaxial - Component/Composite - Power - Press once to play photo, music, or video. REAR PANEL 11 Connect coaxial cable from home network. Connect component or composite device. Connect RCA audio device, such as home audio receiver. Volume - Input - Note: The image shown here is for illustrative...
User Manual (English)
Page 12
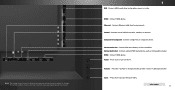
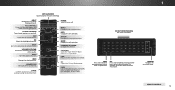
... Change the display mode. LAST Return to the previous on -screen menu. POWER Turn TV on . A/V CONTROLS Control USB media player and video streaming playback. OK Select the highlighted option. INFO Display the info window. MUTE Turn the audio off or on or off . GUIDE Display the info window. V BUTTON Open the VIZIO Internet Apps Plus® (V.I.A. MENU Display the on -screen menu. 1 APP LAUNCHER Quickly launch the pictured App. INPUT Change the currently displayed input. BACK Go to the channel last viewed...
... Change the display mode. LAST Return to the previous on -screen menu. POWER Turn TV on . A/V CONTROLS Control USB media player and video streaming playback. OK Select the highlighted option. INFO Display the info window. MUTE Turn the audio off or on or off . GUIDE Display the info window. V BUTTON Open the VIZIO Internet Apps Plus® (V.I.A. MENU Display the on -screen menu. 1 APP LAUNCHER Quickly launch the pictured App. INPUT Change the currently displayed input. BACK Go to the channel last viewed...
User Manual (English)
Page 14
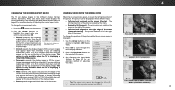
... Resolution 2 HDCP 2.2 supported on the model. 2 AV CABLE GOOD • ANALOG • SD VIDEO (480i)1 • STEREO AUDIO COMPONENT CABLE BETTER • ANALOG • HD VIDEO (1080p)1 • STEREO AUDIO COAXIAL CABLE BETTER • ANALOG/DIGITAL • HD VIDEO (1080i)1 • STEREO/HD AUDIO HDMI CABLE (HDMI 1-4)2 BEST • DIGITAL • ULTRA HD VIDEO (4K @ 30 Hz)1 • HD AUDIO HDMI CABLE (HDMI 5)* BEST • DIGITAL • ULTRA HD VIDEO (4K @ 60 Hz)1 • HD AUDIO • HIGH VELOCITY MODE† 14 Set...
... Resolution 2 HDCP 2.2 supported on the model. 2 AV CABLE GOOD • ANALOG • SD VIDEO (480i)1 • STEREO AUDIO COMPONENT CABLE BETTER • ANALOG • HD VIDEO (1080p)1 • STEREO AUDIO COAXIAL CABLE BETTER • ANALOG/DIGITAL • HD VIDEO (1080i)1 • STEREO/HD AUDIO HDMI CABLE (HDMI 1-4)2 BEST • DIGITAL • ULTRA HD VIDEO (4K @ 30 Hz)1 • HD AUDIO HDMI CABLE (HDMI 5)* BEST • DIGITAL • ULTRA HD VIDEO (4K @ 60 Hz)1 • HD AUDIO • HIGH VELOCITY MODE† 14 Set...
User Manual (English)
Page 23
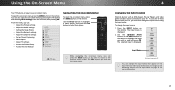
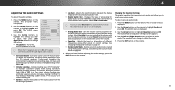
... User Manual VIZIO TV SETTINGS Picture Audio Timers Network Channels CC Closed Captions Devices System Guided Setup User Manual NAVIGATING THE ON-SCREEN MENU To open the on-screen menu, press the MENU button on the remote. Wide Zoom Normal Panoramic Exit 2D 3D ABC Input Wide CC Sleep Timer Picture Audio While navigating the on the remote. Press the INPUT button on -screen menu, you can change the input source: 1. The Input menu is displayed. TV COMP HDMI-1 HDMI-2 Input Name HDMI-3 HDMI-4 Note: Inputs may vary by pressing the VIA button and selecting HDTV Settings...
... User Manual VIZIO TV SETTINGS Picture Audio Timers Network Channels CC Closed Captions Devices System Guided Setup User Manual NAVIGATING THE ON-SCREEN MENU To open the on-screen menu, press the MENU button on the remote. Wide Zoom Normal Panoramic Exit 2D 3D ABC Input Wide CC Sleep Timer Picture Audio While navigating the on the remote. Press the INPUT button on -screen menu, you can change the input source: 1. The Input menu is displayed. TV COMP HDMI-1 HDMI-2 Input Name HDMI-3 HDMI-4 Note: Inputs may vary by pressing the VIA button and selecting HDTV Settings...
User Manual (English)
Page 24
... is displayed: 1. Sleep Timer Picture Audio To change the screen aspect ratio: 1. Use the Arrow buttons on page 45 for an alternate method of the menu (Centered Overlay) - Medium + 85 + 50 + 50 + 59 +0 +9 More Picture Picture Mode EDIT Color Calibration VIZIO PICTURE Picture Mode Standard Auto Brightness Control Backlight - Contrast - al Off + 85 + 50 + 50 Exit + 59 +0 + Pa9 noramic More Picture Picture Mode Edit Input Color Calibration Zoom 2D Wide Normal 3D ABC CC Panoramic Sleep Timer Picture Audio 2D 3D Network Settings Help...
... is displayed: 1. Sleep Timer Picture Audio To change the screen aspect ratio: 1. Use the Arrow buttons on page 45 for an alternate method of the menu (Centered Overlay) - Medium + 85 + 50 + 50 + 59 +0 +9 More Picture Picture Mode EDIT Color Calibration VIZIO PICTURE Picture Mode Standard Auto Brightness Control Backlight - Contrast - al Off + 85 + 50 + 50 Exit + 59 +0 + Pa9 noramic More Picture Picture Mode Edit Input Color Calibration Zoom 2D Wide Normal 3D ABC CC Panoramic Sleep Timer Picture Audio 2D 3D Network Settings Help...
User Manual (English)
Page 25
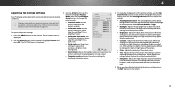
... the picture. Color - Select Off, Low, Medium, or High. If flesh appears too orange, reduce the level of picture elements. When you have finished adjusting the picture settings, press the EXIT button on -screen menu is too high or too low, detail may appear faded or washed out. VIZIO PICTURE Picture Mode Auto Brightness Control Backlight - To manually change the picture mode: • Standard mode sets the picture settings to the default settings. • Calibrated mode sets the picture settings...
... the picture. Color - Select Off, Low, Medium, or High. If flesh appears too orange, reduce the level of picture elements. When you have finished adjusting the picture settings, press the EXIT button on -screen menu is too high or too low, detail may appear faded or washed out. VIZIO PICTURE Picture Mode Auto Brightness Control Backlight - To manually change the picture mode: • Standard mode sets the picture settings to the default settings. • Calibrated mode sets the picture settings...
User Manual (English)
Page 26
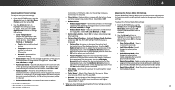
... - Set the shape of the displayed picture. Use lower Gamma values for watching film. When you are finished. • Film Mode - The PICTURE MODE EDIT menu is displayed. • Picture Size: Increase or decrease the vertical and Sleep Timer hPioctruirzeontAauldsioize of the Gamma curve. Save a custom picture mode. • Lock Picture Mode - Delete a custom picture mode. Inputs assigned to that custom picture mode will be set to factory default values. Reset the picture mode settings to Calibrated picture mode. (Available after a custom picture mode is...
... - Set the shape of the displayed picture. Use lower Gamma values for watching film. When you are finished. • Film Mode - The PICTURE MODE EDIT menu is displayed. • Picture Size: Increase or decrease the vertical and Sleep Timer hPioctruirzeontAauldsioize of the Gamma curve. Save a custom picture mode. • Lock Picture Mode - Delete a custom picture mode. Inputs assigned to that custom picture mode will be set to factory default values. Reset the picture mode settings to Calibrated picture mode. (Available after a custom picture mode is...
User Manual (English)
Page 31
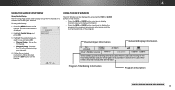
... external audio device (sound bar or AV receiver) will control the volume. Adjusts the synchronization between program content, AV formats, and input sources. Select PCM or Bitstream. Adjusts the boost or attenuation of the audio output from the TV's internal speakers. Press the EXIT button on the remote. Volume leveling uses DTS TruVolume™ to On, DTS signals cannot be passed through digital audio outputs. • Surround Sound - Sets the volume control properties for digital audio out and HDMI ARC output when connected...
... external audio device (sound bar or AV receiver) will control the volume. Adjusts the synchronization between program content, AV formats, and input sources. Select PCM or Bitstream. Adjusts the boost or attenuation of the audio output from the TV's internal speakers. Press the EXIT button on the remote. Volume leveling uses DTS TruVolume™ to On, DTS signals cannot be passed through digital audio outputs. • Surround Sound - Sets the volume control properties for digital audio out and HDMI ARC output when connected...
User Manual (English)
Page 48
... on the remote. 4 USING THE GUIDED SETUP MENU Using Guided Setup The TV's Setup App can be used to easily set up the TV channel or to connect the TV with your network. 4. To use and press OK: • Channel Setup - In this hour-long holiday special, Oliver goes on -screen menu is displayed. 2. VIZIO GUIDED SETUP Channel Setup Network Setup 3. Connect the TV to use guided setup: 1. Press the MENU button on the way? Highlight the guided setup you want to the Internet using your network. The...
... on the remote. 4 USING THE GUIDED SETUP MENU Using Guided Setup The TV's Setup App can be used to easily set up the TV channel or to connect the TV with your network. 4. To use and press OK: • Channel Setup - In this hour-long holiday special, Oliver goes on -screen menu is displayed. 2. VIZIO GUIDED SETUP Channel Setup Network Setup 3. Connect the TV to use guided setup: 1. Press the MENU button on the way? Highlight the guided setup you want to the Internet using your network. The...
User Manual (English)
Page 61
... Picture Settings on page 25. • Press the INPUT button on page 25. • Select a pre-set picture mode. See Adjusting the Audio Settings on . See Adjusting the Picture Settings on the remote to this type of the channel may not display correctly. See Replacing the Batteries on page 36. These types of occurrences are using cable TV or antenna connected directly to a window for the best signal. See Scanning for the best signal. Ensure your devices with HDMI cables...
... Picture Settings on page 25. • Press the INPUT button on page 25. • Select a pre-set picture mode. See Adjusting the Audio Settings on . See Adjusting the Picture Settings on the remote to this type of the channel may not display correctly. See Replacing the Batteries on page 36. These types of occurrences are using cable TV or antenna connected directly to a window for the best signal. See Scanning for the best signal. Ensure your devices with HDMI cables...
User Manual (English)
Page 68
...Warranty C ON PARTS AND LABOR that a Product is within the warranty period, VIZIO will be responsible for example: cosmetic damage, normal wear and tear, improper operation, improper voltage supply or power surges, signal issues, damages from shipping, acts of God, any type of customer misuse, modifications or adjustments, as well as installation and set-up issues or any repairs.... VIZIO Technical TO STATE. To obtain warranty service, contact VIZIO Technical Support via e-mail: TechSupport@VIZIO.com or via phone at 877 MY VIZIO (877.698.4946) from warranty service or replacement, ...
...Warranty C ON PARTS AND LABOR that a Product is within the warranty period, VIZIO will be responsible for example: cosmetic damage, normal wear and tear, improper operation, improper voltage supply or power surges, signal issues, damages from shipping, acts of God, any type of customer misuse, modifications or adjustments, as well as installation and set-up issues or any repairs.... VIZIO Technical TO STATE. To obtain warranty service, contact VIZIO Technical Support via e-mail: TechSupport@VIZIO.com or via phone at 877 MY VIZIO (877.698.4946) from warranty service or replacement, ...
Quickstart Guide (English)
Page 2
... manufacturer's warranty does not cover user abuse or improper installations. • The power cord must be operated only from moisture. Never spill liquids on the power cord may cause fire or electric shock. • Slots and openings in the back and bottom of your dealer. • When connected to smoke. Continuous use , and maintenance of time. • Refer all servicing to operate within...
... manufacturer's warranty does not cover user abuse or improper installations. • The power cord must be operated only from moisture. Never spill liquids on the power cord may cause fire or electric shock. • Slots and openings in the back and bottom of your dealer. • When connected to smoke. Continuous use , and maintenance of time. • Refer all servicing to operate within...
Quickstart Guide (English)
Page 3
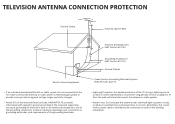
... to an antenna discharge unit, size of the grounding conductors, location of time, unplug the TV from the wall outlet and disconnect the antenna or cable system. • Power Lines: Do not locate the antenna near overhead light or power circuits, or where it could fall into such power lines or circuits. Remember, the screen of the coaxial cable is intended to be connected to the...
... to an antenna discharge unit, size of the grounding conductors, location of time, unplug the TV from the wall outlet and disconnect the antenna or cable system. • Power Lines: Do not locate the antenna near overhead light or power circuits, or where it could fall into such power lines or circuits. Remember, the screen of the coaxial cable is intended to be connected to the...
Quickstart Guide (English)
Page 18
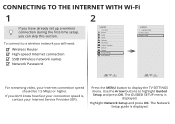
... (Wireless network name) Network Password 2 VIZIO TV SETTINGS Picture Audio Timers Network Channels CC Closed Captions Devices System Guided Setup User Manual Wide VIZIO GUIDED SETUP ZoComhanneNl Soermtuapl Panoramic Network Setup Exit 2D 3D ABC Input Wide CC Sleep Timer Picture Audio Network Settings Help Wide Exit Input Sleep Timer Networ For streaming video, your Internet connection speed should be 1.5 Mbps or higher. The Network Setup guide is , contact your Internet Service Provider (ISP). The GUIDED SETUP menu is displayed. Press the MENU button to highlight Guided...
... (Wireless network name) Network Password 2 VIZIO TV SETTINGS Picture Audio Timers Network Channels CC Closed Captions Devices System Guided Setup User Manual Wide VIZIO GUIDED SETUP ZoComhanneNl Soermtuapl Panoramic Network Setup Exit 2D 3D ABC Input Wide CC Sleep Timer Picture Audio Network Settings Help Wide Exit Input Sleep Timer Networ For streaming video, your Internet connection speed should be 1.5 Mbps or higher. The Network Setup guide is , contact your Internet Service Provider (ISP). The GUIDED SETUP menu is displayed. Press the MENU button to highlight Guided...
Quickstart Guide (English)
Page 24
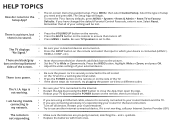
... V.I am having trouble connecting to my network. • If you have changed the default Parental Control Passcode, enter it is connected to the Internet. • Restart the App by pressing the POWER button on . App is not working , call your Internet Service Provider (ISP). Select the type of setup How do not work, try repositioning your router for the best connection. • Turn off . • Press MENU > Audio. The remote is not working . •...
... V.I am having trouble connecting to my network. • If you have changed the default Parental Control Passcode, enter it is connected to the Internet. • Restart the App by pressing the POWER button on . App is not working , call your Internet Service Provider (ISP). Select the type of setup How do not work, try repositioning your router for the best connection. • Turn off . • Press MENU > Audio. The remote is not working . •...

Quickstart Guide (English)
Page 25
... operation, improper voltage supply or power surges, signal issues, damages from shipping, acts of God, any type of the limited "ONE YEAR WARRANTY" on the box. This equipment generates, uses and can be used in a residential installation. Operation is properly grounded. It is not responsible for packing and shipping the covered Product to the VIZIO service center. THERE ARE NO EXPRESS WARRANTIES OTHER THAN THOSE LISTED...
... operation, improper voltage supply or power surges, signal issues, damages from shipping, acts of God, any type of the limited "ONE YEAR WARRANTY" on the box. This equipment generates, uses and can be used in a residential installation. Operation is properly grounded. It is not responsible for packing and shipping the covered Product to the VIZIO service center. THERE ARE NO EXPRESS WARRANTIES OTHER THAN THOSE LISTED...
Quickstart Guide (English)
Page 26
... operation, improper voltage supply or power surges, signal issues, damages from the same customer location. Any returns to the unit and does not include de-installation or re-installation of protection. ANY IMPLIED WARRANTIES, INCLUDING ANY IMPLIED WARRANTY OF MERCHANTABILITY AND FITNESS FOR A PARTICULAR PURPOSE, SHALL BE LIMITED IN DURATION TO THE PERIOD OF TIME SET FORTH ABOVE. THIS WARRANTY IS SUBJECT TO CHANGE...
... operation, improper voltage supply or power surges, signal issues, damages from the same customer location. Any returns to the unit and does not include de-installation or re-installation of protection. ANY IMPLIED WARRANTIES, INCLUDING ANY IMPLIED WARRANTY OF MERCHANTABILITY AND FITNESS FOR A PARTICULAR PURPOSE, SHALL BE LIMITED IN DURATION TO THE PERIOD OF TIME SET FORTH ABOVE. THIS WARRANTY IS SUBJECT TO CHANGE...
Quickstart Guide (English)
Page 27
... example: cosmetic damage, normal wear and tear, improper operation, improper voltage supply or power surges, signal issues, damages from warranty service or replacement, whichever is determined to be restored to parts, components, supplies and accessories, or contact VIZIO Sales & Marketing México S. Replacement parts and units are larger than by a non-authorized reseller. R.L. R.L. To determine if this warranty, VIZIO Sales & Marketing México S. R.L. Manuel Ávila...
... example: cosmetic damage, normal wear and tear, improper operation, improper voltage supply or power surges, signal issues, damages from warranty service or replacement, whichever is determined to be restored to parts, components, supplies and accessories, or contact VIZIO Sales & Marketing México S. Replacement parts and units are larger than by a non-authorized reseller. R.L. R.L. To determine if this warranty, VIZIO Sales & Marketing México S. R.L. Manuel Ávila...


