
Download
Page 4
..., unplug the power cord. • The lightning flash with the apparatus. To ensure reliable operation of the display. • Use only with the cart, stand, tripod, bracket, or table specified by the manufacturer, or sold with arrowhead symbol within an equilateral triangle is always flowing into your TV and to...
..., unplug the power cord. • The lightning flash with the apparatus. To ensure reliable operation of the display. • Use only with the cart, stand, tripod, bracket, or table specified by the manufacturer, or sold with arrowhead symbol within an equilateral triangle is always flowing into your TV and to...
Download
Page 7
... Digital Audio Language 40 Setting Up Closed Captioning 41 1 Table of Contents Installing the TV 3 Inspecting the Package Contents 3 Installing the TV 3 Installing the TV Stand 3 Installing the TV on a Wall 6 Controls and Connections 7 Rear Panel 7 Front Panel 8 Remote Control Front 9 Remote Control Back 10 Replacing the Batteries 11 Connecting Your...
... Digital Audio Language 40 Setting Up Closed Captioning 41 1 Table of Contents Installing the TV 3 Inspecting the Package Contents 3 Installing the TV 3 Installing the TV Stand 3 Installing the TV on a Wall 6 Controls and Connections 7 Rear Panel 7 Front Panel 8 Remote Control Front 9 Remote Control Back 10 Replacing the Batteries 11 Connecting Your...
Download
Page 9
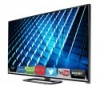
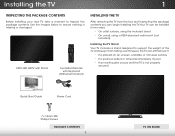
... to ensure nothing is not properly secured Quick Start Guide Power Cord 7 x 14mm M4 Phillips Screws Package Contents 3 TV on Stand However, the TV can begin installing the TV. Use the images below to support the weight of the TV and keep it from the box ...and inspecting the package contents you can still fall over . VIZIO LED HDTV with Stand INPUT LIST EXIT MENU INFO BACK VOL GUIDE CH 3D 1 2 3 4 5 6 7 8 9 ENTER 0 Two-Sided Remote with Keyboard (Batteries Included) Installing the TV After removing...
... to ensure nothing is not properly secured Quick Start Guide Power Cord 7 x 14mm M4 Phillips Screws Package Contents 3 TV on Stand However, the TV can begin installing the TV. Use the images below to support the weight of the TV and keep it from the box ...and inspecting the package contents you can still fall over . VIZIO LED HDTV with Stand INPUT LIST EXIT MENU INFO BACK VOL GUIDE CH 3D 1 2 3 4 5 6 7 8 9 ENTER 0 Two-Sided Remote with Keyboard (Batteries Included) Installing the TV After removing...

Download
Page 10
1 To install the base: 1. Remove any plastic wrapping from the TV and stand. To prevent scratches or damage to the screen, place the TV on a clean, flat surface. Place the TV screen-down on a soft surface, such as shown. 4 Insert and tighten the four (4) included M4 14mm Phillips screws into the back of the TV. Align the neck piece with the back of the TV as carpet, rug, or blanket. 2. It is recommended that two people take part in the base installation.
1 To install the base: 1. Remove any plastic wrapping from the TV and stand. To prevent scratches or damage to the screen, place the TV on a clean, flat surface. Place the TV screen-down on a soft surface, such as shown. 4 Insert and tighten the four (4) included M4 14mm Phillips screws into the back of the TV. Align the neck piece with the back of the TV as carpet, rug, or blanket. 2. It is recommended that two people take part in the base installation.

Download
Page 12
... clear of the TV. Consult the information below to the wall, carefully following the instructions that can begin the installation. Screw Size: Hole Pattern: Weight w/o Stand: M422i-B1 M6 200mm (V) x 200mm (H) 24.25 lbs Be sure the mount you can scratch or damage the TV. 3. Attach your TV and wall mount to find...
... clear of the TV. Consult the information below to the wall, carefully following the instructions that can begin the installation. Screw Size: Hole Pattern: Weight w/o Stand: M422i-B1 M6 200mm (V) x 200mm (H) 24.25 lbs Be sure the mount you can scratch or damage the TV. 3. Attach your TV and wall mount to find...

Download
Page 69
Specifications B Screen Size: Viewable Area: Dimensions w/ Stand: w/o Stand: Weight w/ Stand: w/o Stand: TV Type: Refresh Rate: Maximum Resolution: Pixel Pitch: Dynamic Contrast Ratio Response Time: Brightness: Viewing Angle: HDMI Inputs: Component Video Inputs: Composite Inputs: RF Antenna Input: USB 2.0 Ports: Ethernet: Audio Outputs: M422i-B1 42" 42.00" 37.63" x 23.83" x 7.86" 37.63" x 22.10" x 2.01...
Specifications B Screen Size: Viewable Area: Dimensions w/ Stand: w/o Stand: Weight w/ Stand: w/o Stand: TV Type: Refresh Rate: Maximum Resolution: Pixel Pitch: Dynamic Contrast Ratio Response Time: Brightness: Viewing Angle: HDMI Inputs: Component Video Inputs: Composite Inputs: RF Antenna Input: USB 2.0 Ports: Ethernet: Audio Outputs: M422i-B1 42" 42.00" 37.63" x 23.83" x 7.86" 37.63" x 22.10" x 2.01...

Download
Page 2
... servicing to repair or service your dealer. If repair is intended to alert the user to qualify for your TV in environments with the cart, stand, tripod, bracket, or table specified by qualified service personnel only. Continuous use in this apparatus near water. • Clean only with the apparatus. Operating your...
... servicing to repair or service your dealer. If repair is intended to alert the user to qualify for your TV in environments with the cart, stand, tripod, bracket, or table specified by qualified service personnel only. Continuous use in this apparatus near water. • Clean only with the apparatus. Operating your...

Download
Page 5
PACKAGE CONTENTS VIZIO LED HDTV with Stand Two-Sided Remote with Keyboard (Batteries Included) This Quick Start Guide Power Cord 7 x M4 14mm Phillips Screws
PACKAGE CONTENTS VIZIO LED HDTV with Stand Two-Sided Remote with Keyboard (Batteries Included) This Quick Start Guide Power Cord 7 x M4 14mm Phillips Screws

Download
Page 6
Place the TV screen-down on a soft surface such as a blanket. Remove any plastic wrapping from the TV and stand. To prevent scratches or damage to the screen, place the TV on a clean, flat surface. INSTALLING THE BASE 1 It is recommended that two people take part in the base installation.
Place the TV screen-down on a soft surface such as a blanket. Remove any plastic wrapping from the TV and stand. To prevent scratches or damage to the screen, place the TV on a clean, flat surface. INSTALLING THE BASE 1 It is recommended that two people take part in the base installation.


