

E601i-A3 Quick Start Guide
Page 17
... I return to the Setup App? • The on-screen menu has guided setup. Be sure the surface is off. • Press MENU, then select TV Settings > Audio. See the online user manual for more information. • Attach your TV and wall mount to the wall, carefully following the instructions that can... "No Signal." • Be sure your connected devices are black/gray bars on the top/ bottom/sides of debris that came with your device is set to ON. HELP TOPICS How do I mount my TV to the wall? • Place the TV face-down on a clean, flat, stable surface. The Setup...
... I return to the Setup App? • The on-screen menu has guided setup. Be sure the surface is off. • Press MENU, then select TV Settings > Audio. See the online user manual for more information. • Attach your TV and wall mount to the wall, carefully following the instructions that can... "No Signal." • Be sure your connected devices are black/gray bars on the top/ bottom/sides of debris that came with your device is set to ON. HELP TOPICS How do I mount my TV to the wall? • Place the TV face-down on a clean, flat, stable surface. The Setup...
E601i-A3 Quick Start Guide
Page 19
...warranty period. THIS WARRANTY IS SUBJECT TO CHANGE WITHOUT NOTICE. CHECK WWW.VIZIO.COM FOR THE MOST CURRENT VERSION. Personal Data If your personal information, VIZIO recommends that you configured as installation and set-up issues or any type of a new Product against defects in ... FOR A PARTICULAR PURPOSE, SHALL BE LIMITED IN DURATION TO THE PERIOD OF TIME SET FORTH ABOVE. VIZIO'S TOTAL LIABILITY FOR ANY AND ALL LOSSES AND DAMAGES RESULTING FROM ANY CAUSE WHATSOEVER INCLUDING VIZIO'S NEGLIGENCE, ALLEGED DAMAGE, OR DEFECTIVE GOODS, WHETHER SUCH DEFECTS ARE DISCOVERABLE OR LATENT...
...warranty period. THIS WARRANTY IS SUBJECT TO CHANGE WITHOUT NOTICE. CHECK WWW.VIZIO.COM FOR THE MOST CURRENT VERSION. Personal Data If your personal information, VIZIO recommends that you configured as installation and set-up issues or any type of a new Product against defects in ... FOR A PARTICULAR PURPOSE, SHALL BE LIMITED IN DURATION TO THE PERIOD OF TIME SET FORTH ABOVE. VIZIO'S TOTAL LIABILITY FOR ANY AND ALL LOSSES AND DAMAGES RESULTING FROM ANY CAUSE WHATSOEVER INCLUDING VIZIO'S NEGLIGENCE, ALLEGED DAMAGE, OR DEFECTIVE GOODS, WHETHER SUCH DEFECTS ARE DISCOVERABLE OR LATENT...

E701i-A3 User Manual
Page 2
...trademarks of Dolby Laboratories. Dolby and the double-D symbol are trademarks of SRS Labs, Inc. Changing the factory default picture settings or enabling other features will increase power consumption that could exceed the limits necessary to qualify for ENERGY STAR in the "factory default..." setting and this is the setting in which power savings will be achieved. SRS StudioSound HD and SRS TruVolume are trademarks of HDMI Licensing LLC. Manufactured ...
...trademarks of Dolby Laboratories. Dolby and the double-D symbol are trademarks of SRS Labs, Inc. Changing the factory default picture settings or enabling other features will increase power consumption that could exceed the limits necessary to qualify for ENERGY STAR in the "factory default..." setting and this is the setting in which power savings will be achieved. SRS StudioSound HD and SRS TruVolume are trademarks of HDMI Licensing LLC. Manufactured ...
E701i-A3 User Manual
Page 7
... Using the Network Connection Menu 26 Connecting to a Wireless Network 26 Changing the Advanced Network Settings 27 Testing Your Network Connection 27 Changing the TV Settings 28 Changing the Input Source 28 Setting the Tuner Mode 29 Scanning for Channels 29 Adding New Channels 30 Skipping Channels 31 Changing the Audio Language 31...
... Using the Network Connection Menu 26 Connecting to a Wireless Network 26 Changing the Advanced Network Settings 27 Testing Your Network Connection 27 Changing the TV Settings 28 Changing the Input Source 28 Setting the Tuner Mode 29 Scanning for Channels 29 Adding New Channels 30 Skipping Channels 31 Changing the Audio Language 31...
E701i-A3 User Manual
Page 8
... Turning the indicator LED On or Off 36 Using the Help Menu 36 Displaying System Information 37 Resetting the TV Settings 37 Restoring the TV to Factory Default Settings 37 Using Guided Setup 38 Using the Info Window 39 Using the USB Media Player 40 Using the USB Media Player 40 Connecting... a USB Thumb Drive to the TV 40 Playing USB Media 40 Using VIZIO Internet Apps 43 Using the VIA Shortcut Buttons 43...
... Turning the indicator LED On or Off 36 Using the Help Menu 36 Displaying System Information 37 Resetting the TV Settings 37 Restoring the TV to Factory Default Settings 37 Using Guided Setup 38 Using the Info Window 39 Using the USB Media Player 40 Using the USB Media Player 40 Connecting... a USB Thumb Drive to the TV 40 Playing USB Media 40 Using VIZIO Internet Apps 43 Using the VIA Shortcut Buttons 43...

E701i-A3 User Manual
Page 18
... AUDIO * Maximum Resolution 12 CONNECTING A DEVICE Connecting Your Devices Connecting A Device Your TV can be used to match the connection you used (HDMI-1, HDMI-2, etc). Set the TV's input to display output from most devices. 1. Verify that your device off. 3.
... AUDIO * Maximum Resolution 12 CONNECTING A DEVICE Connecting Your Devices Connecting A Device Your TV can be used to match the connection you used (HDMI-1, HDMI-2, etc). Set the TV's input to display output from most devices. 1. Verify that your device off. 3.

E701i-A3 User Manual
Page 19
This cable transmits audio. 3. Specifications. BACK OF TV 3 Personal Computer AUDIO OUT 3.5mm Cable (For Audio) RGB Cable (For Video) CONNECTING A PC 13 Connect an RGB cable (not included) to display output from a personal computer. Connecting A PC Your TV can be used to your PC and the RGB port on the back of your TV. To use your PC and the PC Audio In port on the back of the TV. Connect a 3.5mm cable (not included) to match the resolution of the TV. This cable transmits video. 2. Set your PC's resolution to your TV as a PC display: 1. See Appendix B -
This cable transmits audio. 3. Specifications. BACK OF TV 3 Personal Computer AUDIO OUT 3.5mm Cable (For Audio) RGB Cable (For Video) CONNECTING A PC 13 Connect an RGB cable (not included) to display output from a personal computer. Connecting A PC Your TV can be used to your PC and the RGB port on the back of your TV. To use your PC and the PC Audio In port on the back of the TV. Connect a 3.5mm cable (not included) to match the resolution of the TV. This cable transmits video. 2. Set your PC's resolution to your TV as a PC display: 1. See Appendix B -

E701i-A3 User Manual
Page 23
... menu, you can also open the on-screen menu, press the MENU button on -screen menu by pressing the VIA button and selecting HDTV Settings from the VIA Dock, then pressing OK. To open the on the remote. You can : • Change the input source • ...Change the screen aspect ratio • Set up closed captioning • Activate the sleep timer • Adjust the picture settings • Adjust the audio settings • Change network settings • Change TV settings • Access the help menu Navigating the On-Screen Menu To open the on...
... menu, you can also open the on-screen menu, press the MENU button on -screen menu by pressing the VIA button and selecting HDTV Settings from the VIA Dock, then pressing OK. To open the on the remote. You can : • Change the input source • ...Change the screen aspect ratio • Set up closed captioning • Activate the sleep timer • Adjust the picture settings • Adjust the audio settings • Change network settings • Change TV settings • Access the help menu Navigating the On-Screen Menu To open the on...

E701i-A3 User Manual
Page 25
... For example, CC1 may display English captions and CC2 may display Spanish captions. Change the transparency of a program's dialogue. 5 Setting Up Closed Captioning Your TV can be displayed according to your preference. To activate or deactivate closed captions can display closed captions for ... Changing the Appearance of closed captions you wish to see, use the Left/Right Arrow buttons on the remote to highlight the setting you are viewing is not being broadcast with closed captions: 1. Caption channels usually display different languages. Use the Arrow buttons on...
... For example, CC1 may display English captions and CC2 may display Spanish captions. Change the transparency of a program's dialogue. 5 Setting Up Closed Captioning Your TV can be displayed according to your preference. To activate or deactivate closed captions can display closed captions for ... Changing the Appearance of closed captions you wish to see, use the Left/Right Arrow buttons on the remote to highlight the setting you are viewing is not being broadcast with closed captions: 1. Caption channels usually display different languages. Use the Arrow buttons on...

E701i-A3 User Manual
Page 26
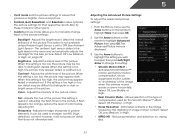
... Timer icon and press OK. This feature can be deactivated. To adjust the picture settings: 1. The Picture menu is the recommended setting. • Movie mode sets the picture settings to suit your TV is set by default to highlight Auto Power Off and press OK. This is displayed. 3. ... Power-Off menu is displayed. 2. The on -screen menu is displayed. 4. Use the Arrow buttons on the remote. Adjusting the Picture Settings Your TV display can be adjusted to values perfect for watching a movie in the most cases. Activating the Sleep Timer When activated, the ...
... Timer icon and press OK. This feature can be deactivated. To adjust the picture settings: 1. The Picture menu is the recommended setting. • Movie mode sets the picture settings to suit your TV is set by default to highlight Auto Power Off and press OK. This is displayed. 3. ... Power-Off menu is displayed. 2. The on -screen menu is displayed. 4. Use the Arrow buttons on the remote. Adjusting the Picture Settings Your TV display can be adjusted to values perfect for watching a movie in the most cases. Activating the Sleep Timer When activated, the ...
E701i-A3 User Manual
Page 27
... the brightness to distinguish details. Select Off, Low, Medium, or High. Adjusts the hue of color before adjusting tint. When this setting is displayed. 3. This setting is set to values that does not otherwise exist. however, it will not produce detail that produce a brighter, more vivid picture. • ..., or High. • Real Cinema Mode - Color - Select Off, Low, Medium, or High. • MPEG NR - 5 • Vivid mode sets the picture settings to OFF. This option is not available unless Ambient Light Sensor is useful in adjusting the flesh tones in dark or bright areas of...
... the brightness to distinguish details. Select Off, Low, Medium, or High. Adjusts the hue of color before adjusting tint. When this setting is displayed. 3. This setting is set to values that does not otherwise exist. however, it will not produce detail that produce a brighter, more vivid picture. • ..., or High. • Real Cinema Mode - Color - Select Off, Low, Medium, or High. • MPEG NR - 5 • Vivid mode sets the picture settings to OFF. This option is not available unless Ambient Light Sensor is useful in adjusting the flesh tones in dark or bright areas of...

E701i-A3 User Manual
Page 28
...Flesh, and Grn/Blue. • Adaptive Luma - When you have finished adjusting the Advanced Picture Settings, press the EXIT button on the remote to the factory default settings, highlight Reset Color Temperature and press OK. Adjusting the Color Temperature Adjusting the color temperature will change... temperature: 1. The Color Temperature menu is optimized for large areas of the picture. Adjusts the average brightness of the color temperature settings: Red/Green/Blue Gain - From the Picture Menu, use the Left/Right Arrow buttons to manually change each of the picture ...
...Flesh, and Grn/Blue. • Adaptive Luma - When you have finished adjusting the Advanced Picture Settings, press the EXIT button on the remote to the factory default settings, highlight Reset Color Temperature and press OK. Adjusting the Color Temperature Adjusting the color temperature will change... temperature: 1. The Color Temperature menu is optimized for large areas of the picture. Adjusts the average brightness of the color temperature settings: Red/Green/Blue Gain - From the Picture Menu, use the Left/Right Arrow buttons to manually change each of the picture ...

E701i-A3 User Manual
Page 29
From the Picture menu, use the Arrow buttons to highlight More, then press OK. 2. Automatically adjusts display image to the factory default settings: 1. Position - Adjusts the horizontal (left/right) position of the display image. • Fine Tune - Adjusts the height of the display image... is displayed. 3. Adjusts the height of the display image. • Vertical Size - Use the Arrow buttons to highlight the setting you want to RESET Picture Settings to highlight Size & Position, then press OK. Use the Arrow buttons on the remote. 5 Adjusting the Picture Size and Position...
From the Picture menu, use the Arrow buttons to highlight More, then press OK. 2. Automatically adjusts display image to the factory default settings: 1. Position - Adjusts the horizontal (left/right) position of the display image. • Fine Tune - Adjusts the height of the display image... is displayed. 3. Adjusts the height of the display image. • Vertical Size - Use the Arrow buttons to highlight the setting you want to RESET Picture Settings to highlight Size & Position, then press OK. Use the Arrow buttons on the remote. 5 Adjusting the Picture Size and Position...
E701i-A3 User Manual
Page 30
... adjust, then press Left/Right Arrow to Standard. • Balance - 5 Adjusting the Audio Settings To adjust the audio settings: 1. This setting is only available when SRS StudioSound HD is set to highlight Audio and press OK. Turns the built-in speakers on the remote. 24 StudioSound ... • Lip Sync - Use the Arrow buttons on the remote to Standard) • Reset Audio Mode - See Adjusting the Advanced Audio Settings on -screen menu is displayed. 3. Change the audio mode. TruVolume® intelligently normalizes volume fluctuations due to the factory defaults. The on ...
... adjust, then press Left/Right Arrow to Standard. • Balance - 5 Adjusting the Audio Settings To adjust the audio settings: 1. This setting is only available when SRS StudioSound HD is set to highlight Audio and press OK. Turns the built-in speakers on the remote. 24 StudioSound ... • Lip Sync - Use the Arrow buttons on the remote to Standard) • Reset Audio Mode - See Adjusting the Advanced Audio Settings on -screen menu is displayed. 3. Change the audio mode. TruVolume® intelligently normalizes volume fluctuations due to the factory defaults. The on ...

E701i-A3 User Manual
Page 31
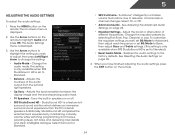
... the MENU button on the remote. 25 The on-screen menu is displayed. 3. Use the Arrow buttons on the remote. 5 Resetting the Audio Settings To reset the audio settings to a home theatre audio system. The Audio Settings menu is displayed. 2. Highlight Yes and press OK. 5. Use the Arrow buttons to highlight the... highlight Advanced Audio, then press OK. The TV displays, "Are you sure you have finished adjusting the advanced audio settings, press the EXIT button on the remote to control the external speakers' volume from the TV's volume controls, or select Fixed to highlight...
... the MENU button on the remote. 25 The on-screen menu is displayed. 3. Use the Arrow buttons on the remote. 5 Resetting the Audio Settings To reset the audio settings to a home theatre audio system. The Audio Settings menu is displayed. 2. Highlight Yes and press OK. 5. Use the Arrow buttons to highlight the... highlight Advanced Audio, then press OK. The TV displays, "Are you sure you have finished adjusting the advanced audio settings, press the EXIT button on the remote to control the external speakers' volume from the TV's volume controls, or select Fixed to highlight...

E701i-A3 User Manual
Page 32
... OK. Use the Arrow buttons on the remote. Using the on -screen keyboard, enter your TV is displayed. 3. The Network Connection menu is connected to set up a wireless network connection. 1. Using the on -screen keyboard, enter your network's password, then highlight Connect and press OK. 6. The More Access Points menu, which...
... OK. Use the Arrow buttons on the remote. Using the on -screen keyboard, enter your TV is displayed. 3. The Network Connection menu is connected to set up a wireless network connection. 1. Using the on -screen keyboard, enter your network's password, then highlight Connect and press OK. 6. The More Access Points menu, which...
E701i-A3 User Manual
Page 33
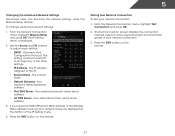
...you need the RJ45 (Ethernet) MAC address or the Wireless MAC address to the TV. • Subnet Mask - The IP Setting menu is displayed. 2. From the Network Connection menu, highlight Manual Setup and press OK. The IP address assigned to... 1. 5 Changing the Advanced Network Settings Advanced users can fine-tune the network settings using the Manual Setup feature. Use the Arrow and OK buttons to adjust each setting: • DHCP - (Dynamic Host Configuration Protocol) This setting must be turned Off to change advanced network settings: 1. Your network's default gateway ...
...you need the RJ45 (Ethernet) MAC address or the Wireless MAC address to the TV. • Subnet Mask - The IP Setting menu is displayed. 2. From the Network Connection menu, highlight Manual Setup and press OK. The IP address assigned to... 1. 5 Changing the Advanced Network Settings Advanced users can fine-tune the network settings using the Manual Setup feature. Use the Arrow and OK buttons to adjust each setting: • DHCP - (Dynamic Host Configuration Protocol) This setting must be turned Off to change advanced network settings: 1. Your network's default gateway ...

E701i-A3 User Manual
Page 34
... source you can: • Change the input source • Set up the TV tuner • Name the TV inputs • Set up parental controls • Change the on-screen menu language • Set the time • Adjust the CEC settings • Adjust the indicator LED settings 5 Changing the Input Source To quickly access the Input...
... source you can: • Change the input source • Set up the TV tuner • Name the TV inputs • Set up parental controls • Change the on-screen menu language • Set the time • Adjust the CEC settings • Adjust the indicator LED settings 5 Changing the Input Source To quickly access the Input...

E701i-A3 User Manual
Page 35
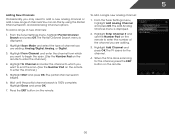
...Tuner and press OK. Press the EXIT button on the remote. 29 From the Tuner Settings menu, highlight Auto Channel Scan and press OK. The auto channel scan begins. 2. Highlight Done and press OK. 3. 5 Setting the Tuner Mode If you are available. 1. Highlight Tuner Mode, then use the Left/...external antenna or cable TV connection, you must scan for Channels Before the TV can detect and display channels and their associated information, you must set the tuner mode. 1. Wait until the channel scan is displayed. 3. Use the Arrow buttons on the remote. Press the MENU button on...
...Tuner and press OK. Press the EXIT button on the remote. 29 From the Tuner Settings menu, highlight Auto Channel Scan and press OK. The auto channel scan begins. 2. Highlight Done and press OK. 3. 5 Setting the Tuner Mode If you are available. 1. Highlight Tuner Mode, then use the Left/...external antenna or cable TV connection, you must scan for Channels Before the TV can detect and display channels and their associated information, you must set the tuner mode. 1. Wait until the channel scan is displayed. 3. Use the Arrow buttons on the remote. Press the MENU button on...
E701i-A3 User Manual
Page 36
The partial channel search begins. 6. From the Tuner Settings menu, highlight Add Analog Channel and press OK. Highlight Enter Channel # and use the Number Pad on the remote to enter the number of channels....You can do this by using the Partial Channel Search and Add Analog Channel options. Highlight Add Channel and press OK. From the Tuner Settings menu, highlight Partial Channel Search and press OK. Highlight Done and press OK. 7. To add a single new analog channel: 1. The Add Analog Channel menu is...
The partial channel search begins. 6. From the Tuner Settings menu, highlight Add Analog Channel and press OK. Highlight Enter Channel # and use the Number Pad on the remote to enter the number of channels....You can do this by using the Partial Channel Search and Add Analog Channel options. Highlight Add Channel and press OK. From the Tuner Settings menu, highlight Partial Channel Search and press OK. Highlight Done and press OK. 7. To add a single new analog channel: 1. The Add Analog Channel menu is...


