
User Manual English
Page 2
...of uninsulated DANGERO S VOLTAGE within the product's enclosure that may be sure these instructions. • Heed all warnings. • Follow all Mount Bracket or the equivalent. This will not be of su cient magnitude to constitute a risk of electric shock to do not touch the ...be observed for ventilation. This may cause fire or electric shock. • Slots and openings in fire or electric shock. • The wall socket should be operated only from being walked on the label. The manufacturer's warranty does not cover user abuse or improper installations. •...
...of uninsulated DANGERO S VOLTAGE within the product's enclosure that may be sure these instructions. • Heed all warnings. • Follow all Mount Bracket or the equivalent. This will not be of su cient magnitude to constitute a risk of electric shock to do not touch the ...be observed for ventilation. This may cause fire or electric shock. • Slots and openings in fire or electric shock. • The wall socket should be operated only from being walked on the label. The manufacturer's warranty does not cover user abuse or improper installations. •...
Quickstart Guide English
Page 4
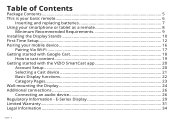
... Pairing Via Wi-Fi...17 Getting started with Google Cast 18 How to cast content 19 Getting started with the VIZIO SmartCast app 20 Account Setup...20 Selecting a Cast device 21 Basic Display functions 22 Category Pages...23 Wall-mounting the Display 24 Additional connections 26 Connecting an audio device 26 Regulatory Information -
... Pairing Via Wi-Fi...17 Getting started with Google Cast 18 How to cast content 19 Getting started with the VIZIO SmartCast app 20 Account Setup...20 Selecting a Cast device 21 Basic Display functions 22 Category Pages...23 Wall-mounting the Display 24 Additional connections 26 Connecting an audio device 26 Regulatory Information -
Quickstart Guide English
Page 24
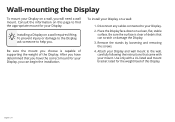
... Display. 3. To install your Display. 2. Remove the stands by loosening and removing the screws. 4. English - 24 After you have determined that came with a UL-listed wall mount bracket rated for your Display. Be sure the surface is capable of supporting the weight of this page to your Display on...
... Display. 3. To install your Display. 2. Remove the stands by loosening and removing the screws. 4. English - 24 After you have determined that came with a UL-listed wall mount bracket rated for your Display. Be sure the surface is capable of supporting the weight of this page to your Display on...
Quickstart Guide English
Page 25
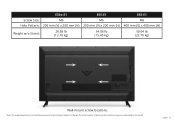
The actual number of ports and their locations may be subject to change. English - 25 Note: The image shown here is for illustrative purposes only and may vary, depending on the model. Screw Size: Hole Pattern: E50x-E1 M6 200 mm (V) x 200 mm (H) E55-E1 M6 200 mm (V) x 200 mm (H) E65-E1 M6 400 mm (V) x 400 mm (H) Weight w/o Stand: 26.68 lb (12.10 kg) 34.06 lb (15.45 kg) 50.04 lb (22.70 kg) Wall-mount screw locations.
The actual number of ports and their locations may be subject to change. English - 25 Note: The image shown here is for illustrative purposes only and may vary, depending on the model. Screw Size: Hole Pattern: E50x-E1 M6 200 mm (V) x 200 mm (H) E55-E1 M6 200 mm (V) x 200 mm (H) E65-E1 M6 400 mm (V) x 400 mm (H) Weight w/o Stand: 26.68 lb (12.10 kg) 34.06 lb (15.45 kg) 50.04 lb (22.70 kg) Wall-mount screw locations.


