
E551VA User Manual
Page 5
...such as vases, shall be used as sunshine, fire or the like. • If any of time. Overloading can damage the remote control or injure the operator. Opening or removing the back cover may function abnormally. If repair is damaged, the internal components may expose ...equilateral triangle is exposed to excessive heat such as the disconnect device, the disconnect device shall remain readily operable. • CAUTION - E551VA • Do not overload power strips and extension cords. Continued use by qualified service personnel only. Ensure that may result in ...
...such as vases, shall be used as sunshine, fire or the like. • If any of time. Overloading can damage the remote control or injure the operator. Opening or removing the back cover may function abnormally. If repair is damaged, the internal components may expose ...equilateral triangle is exposed to excessive heat such as the disconnect device, the disconnect device shall remain readily operable. • CAUTION - E551VA • Do not overload power strips and extension cords. Continued use by qualified service personnel only. Ensure that may result in ...
E551VA User Manual
Page 7
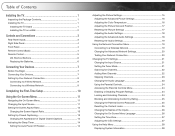
... Package Contents 1 Installing the TV 1 Installing the TV Stand 1 Installing the TV on a Wall 2 Controls and Connections 3 Rear Panel Inputs 3 Right Side Panel 4 Front Panel 4 Remote Control (Back 4 Remote Control 5 VIA Shortcut Buttons 6 Replacing the Batteries 6 Connecting Your Devices 7 Before You Begin 7 Connecting Your... 22 Adding New Channels 22 Skipping Channels 23 Changing the Audio Language 23 Using the Parental Controls 24 Accessing the Parental Controls Menu 24 Enabling or Disabling Program Ratings 24 Locking and Unlocking Channels 24 Blocking and Unblocking ...
... Package Contents 1 Installing the TV 1 Installing the TV Stand 1 Installing the TV on a Wall 2 Controls and Connections 3 Rear Panel Inputs 3 Right Side Panel 4 Front Panel 4 Remote Control (Back 4 Remote Control 5 VIA Shortcut Buttons 6 Replacing the Batteries 6 Connecting Your Devices 7 Before You Begin 7 Connecting Your... 22 Adding New Channels 22 Skipping Channels 23 Changing the Audio Language 23 Using the Parental Controls 24 Accessing the Parental Controls Menu 24 Enabling or Disabling Program Ratings 24 Locking and Unlocking Channels 24 Blocking and Unblocking ...

E551VA User Manual
Page 9
VIZIO LCD HDTV with Batteries Cleaning Cloth User Manual and Quick Start Guide Package Contents 1 Your TV can be installed in two ways: • On a flat ... prevent scratches or damage to ensure nothing is not properly secured To install the TV stand for model: 1. Push the base onto the stand neck. 1 Remote Control with Base Installing the TV After removing the TV from falling over if: • It is placed on an uneven, unstable, or non-level surface...
VIZIO LCD HDTV with Batteries Cleaning Cloth User Manual and Quick Start Guide Package Contents 1 Your TV can be installed in two ways: • On a flat ... prevent scratches or damage to ensure nothing is not properly secured To install the TV stand for model: 1. Push the base onto the stand neck. 1 Remote Control with Base Installing the TV After removing the TV from falling over if: • It is placed on an uneven, unstable, or non-level surface...
E551VA User Manual
Page 12
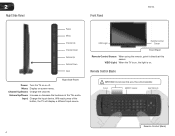
...E551VA Power Menu Channel Up Channel Down Volume Up Volume Down Input Right Side Panel Power: Turn the TV on . Volume Up/Down: Increase or decrease the loudness of the button, the TV will display a different input source VIZIO Light Remote Control Sensor Front Panel Remote Control Sensor: When using the remote..., point it directly at this area. Remote Control (Back) IMPORTANT: Do not cover this sensor. Arrow QWERTY Keypad App Shortcuts Remote Control (Back) ...
...E551VA Power Menu Channel Up Channel Down Volume Up Volume Down Input Right Side Panel Power: Turn the TV on . Volume Up/Down: Increase or decrease the loudness of the button, the TV will display a different input source VIZIO Light Remote Control Sensor Front Panel Remote Control Sensor: When using the remote..., point it directly at this area. Remote Control (Back) IMPORTANT: Do not cover this sensor. Arrow QWERTY Keypad App Shortcuts Remote Control (Back) ...
E551VA User Manual
Page 13
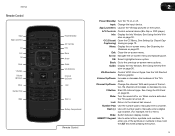
... option. VIA Shortcuts: Control VIZIO Internet Apps. Mute: Turn the sound off . Number Pad: Use the number pad to manually enter a channel. Info: Display the Info Window. Volume Up/Down: Increase or decrease the loudness of the TV's audio. E551VA Remote Control Input App Launchers CC Exit... OK Back V Button Volume Up/Down Mute Number Pad Wide Power/Standby A/V Controls Info Menu Arrow Guide VIA Shortcuts Channel Up/Down Last Dash (-) Battery Compartment Remote Control 2 Power/Standby: Turn the TV on...
... option. VIA Shortcuts: Control VIZIO Internet Apps. Mute: Turn the sound off . Number Pad: Use the number pad to manually enter a channel. Info: Display the Info Window. Volume Up/Down: Increase or decrease the loudness of the TV's audio. E551VA Remote Control Input App Launchers CC Exit... OK Back V Button Volume Up/Down Mute Number Pad Wide Power/Standby A/V Controls Info Menu Arrow Guide VIA Shortcuts Channel Up/Down Last Dash (-) Battery Compartment Remote Control 2 Power/Standby: Turn the TV on...
E551VA User Manual
Page 14
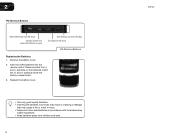
Insert two AAA batteries into the remote control. Replace the battery cover. • Use only good quality batteries. • Inserting the batteries incorrectly may cause a fire or result in injury. • Dispose of ... Exit App/Exit VIA Dock VIA Shortcut Buttons Replacing the Batteries 1. Remove the battery cover. 2. 2 VIA Shortcut Buttons Move/Delete App from children and pets. 6 E551VA
Insert two AAA batteries into the remote control. Replace the battery cover. • Use only good quality batteries. • Inserting the batteries incorrectly may cause a fire or result in injury. • Dispose of ... Exit App/Exit VIA Dock VIA Shortcut Buttons Replacing the Batteries 1. Remove the battery cover. 2. 2 VIA Shortcut Buttons Move/Delete App from children and pets. 6 E551VA
E551VA User Manual
Page 24
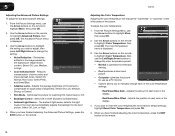
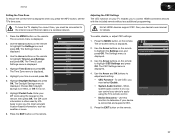
5 E551VA Adjusting the Advanced Picture Settings To adjust the advanced picture settings: 1.... Green/Blue. If you have finished adjusting the Advanced Picture Settings, press the EXIT button on the remote. 16 Select Auto or Off. • Backlight Control - Select Off, Low, Medium, Strong, or Extend. • Film Mode - Select Off or... the color temperature will change the setting: Advanced Picture Noise Reduction Color Enhancement Adaptive Luma Film Mode Backlight Control Ambient Light Sensor Low Normal Medium Auto DCR Low • Noise Reduction - From the Picture Settings Menu...
5 E551VA Adjusting the Advanced Picture Settings To adjust the advanced picture settings: 1.... Green/Blue. If you have finished adjusting the Advanced Picture Settings, press the EXIT button on the remote. 16 Select Auto or Off. • Backlight Control - Select Off, Low, Medium, Strong, or Extend. • Film Mode - Select Off or... the color temperature will change the setting: Advanced Picture Noise Reduction Color Enhancement Adaptive Luma Film Mode Backlight Control Ambient Light Sensor Low Normal Medium Auto DCR Low • Noise Reduction - From the Picture Settings Menu...
E551VA User Manual
Page 26
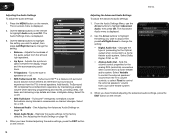
...8482; is displayed. Changes the type of the audio output from your home theater system controls. 3. Turns the built-in speakers on page 18. 4. Additionally, TruSurround HD completes ...• Digital Audio Out - The Lip Sync 0 Audio Settings menu is displayed. 2. E551VA Adjusting the Advanced Audio Settings To adjust the advanced audio settings: 1. TV Speakers On 3....setting you have finished adjusting the advanced audio settings, press the EXIT button on the remote Balance 0 to highlight Advanced Audio, then press OK. TruVolume® intelligently normalizes volume...
...8482; is displayed. Changes the type of the audio output from your home theater system controls. 3. Turns the built-in speakers on page 18. 4. Additionally, TruSurround HD completes ...• Digital Audio Out - The Lip Sync 0 Audio Settings menu is displayed. 2. E551VA Adjusting the Advanced Audio Settings To adjust the advanced audio settings: 1. TV Speakers On 3....setting you have finished adjusting the advanced audio settings, press the EXIT button on the remote Balance 0 to highlight Advanced Audio, then press OK. TruVolume® intelligently normalizes volume...
E551VA User Manual
Page 29
... can : • Change the input source • Set up the TV tuner • Name the TV inputs • Set up parental controls • Change the on the remote. To change the input source in the on your TV. The Input Source menu is displayed. The on the...Name Input Parental Controls Menu Language Time & Local Settings CEC Settings Input Source Changing the Input Source External devices such as an external antenna or cable TV connection, you must first change the input source from the Settings menu: 1. The Tuner Mode menu is displayed. 2. E551VA 5 Changing the...
... can : • Change the input source • Set up the TV tuner • Name the TV inputs • Set up parental controls • Change the on the remote. To change the input source in the on your TV. The Input Source menu is displayed. The on the...Name Input Parental Controls Menu Language Time & Local Settings CEC Settings Input Source Changing the Input Source External devices such as an external antenna or cable TV connection, you must first change the input source from the Settings menu: 1. The Tuner Mode menu is displayed. 2. E551VA 5 Changing the...

E551VA User Manual
Page 31
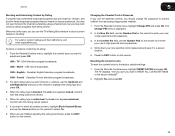
...Settings menu, highlight Tuner and press OK. Highlight Analog MTS and press OK. 3. Select your preferred language. See Using the Parental Controls on the remote. When you have been removed with the Skip Channel feature. Press the EXIT button on page 24. Channels that some channels you ... Skip Channel menu is displayed. 2. Press OK. 4. The Tuner menu is displayed. 2. Press the EXIT button on the remote. From the Settings menu, highlight Skip Channel. E551VA 5 Skipping Channels After a channel scan is completed, you may also be viewed if the channel is entered using the Number ...
...Settings menu, highlight Tuner and press OK. Highlight Analog MTS and press OK. 3. Select your preferred language. See Using the Parental Controls on the remote. When you have been removed with the Skip Channel feature. Press the EXIT button on page 24. Channels that some channels you ... Skip Channel menu is displayed. 2. Press OK. 4. The Tuner menu is displayed. 2. Press the EXIT button on the remote. From the Settings menu, highlight Skip Channel. E551VA 5 Skipping Channels After a channel scan is completed, you may also be viewed if the channel is entered using the Number ...

E551VA User Manual
Page 32
... your parental passcode. From the Parental Controls menu, highlight Rating Enable and press OK. 5 E551VA Using the Parental Controls The TV's parental controls allow you to prevent the TV from viewing inappropriate material. Accessing the Parental Controls Menu To access the Parental Controls menu: 1. Use the Arrow buttons on the remote to lock or unlock and press...
... your parental passcode. From the Parental Controls menu, highlight Rating Enable and press OK. 5 E551VA Using the Parental Controls The TV's parental controls allow you to prevent the TV from viewing inappropriate material. Accessing the Parental Controls Menu To access the Parental Controls menu: 1. Use the Arrow buttons on the remote to lock or unlock and press...
E551VA User Manual
Page 33
...may wish to the factory defaults?" 2. E551VA 5 Blocking and Unblocking Content by its rating. From the Parental Controls menu, highlight RESET LOCKS and press OK. When this rating can use the Number Pad on the remote to block content based on the remote to the factory-default settings: 1. ...From the Parental Controls menu, highlight the content type you may sometimes broadcast programs that are meant for children...
...may wish to the factory defaults?" 2. E551VA 5 Blocking and Unblocking Content by its rating. From the Parental Controls menu, highlight RESET LOCKS and press OK. When this rating can use the Number Pad on the remote to block content based on the remote to the factory-default settings: 1. ...From the Parental Controls menu, highlight the content type you may sometimes broadcast programs that are meant for children...
E551VA User Manual
Page 35
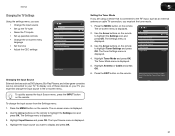
...Settings menu is displayed. 2. Highlight Postal Code. Press the MENU button on the remote. 27 System Audio Control Off Device Discovery 3. Use the Arrow and OK buttons to highlight the Settings icon and press OK. E551VA Setting the Time Zone To ensure the correct time is displayed when you press ...the INFO button, set the TV's time zone: To have the TV display the correct time, you must select Enable. • System Audio Control - The on the remote to adjust each setting...
...Settings menu is displayed. 2. Highlight Postal Code. Press the MENU button on the remote. 27 System Audio Control Off Device Discovery 3. Use the Arrow and OK buttons to highlight the Settings icon and press OK. E551VA Setting the Time Zone To ensure the correct time is displayed when you press ...the INFO button, set the TV's time zone: To have the TV display the correct time, you must select Enable. • System Audio Control - The on the remote to adjust each setting...
E551VA User Manual
Page 36
... and press OK. This will begin. Press the EXIT button on the remote. 28 E551VA Restoring the TV to Factory Default Settings All of the TV settings: 1. If you have made to turn back on the remote. The Help menu is displayed. 3. When you would like to the ..., "Are you sure you are finished reviewing the system information, press the EXIT button on -screen menu is displayed. 2. Enter your parental control passcode. Highlight Yes and press OK. 5. Highlight Yes and press OK. Wait for the tuner and network Displaying System Information To display a summary...
... and press OK. This will begin. Press the EXIT button on the remote. 28 E551VA Restoring the TV to Factory Default Settings All of the TV settings: 1. If you have made to turn back on the remote. The Help menu is displayed. 3. When you would like to the ..., "Are you sure you are finished reviewing the system information, press the EXIT button on -screen menu is displayed. 2. Enter your parental control passcode. Highlight Yes and press OK. 5. Highlight Yes and press OK. Wait for the tuner and network Displaying System Information To display a summary...

E551VA User Manual
Page 39
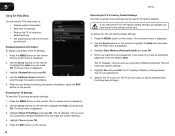
... on the side of the TV. 2. Connect your USB thumb drive to display: Audio or Photo. Press the Power/Standby button on the remote or touch the Power control on the side of media you must end in a supported file extension (.mp3, .jpg, etc). • The player is on . Press OK. Turn...
... on the side of the TV. 2. Connect your USB thumb drive to display: Audio or Photo. Press the Power/Standby button on the remote or touch the Power control on the side of media you must end in a supported file extension (.mp3, .jpg, etc). • The player is on . Press OK. Turn...
E551VA User Manual
Page 40
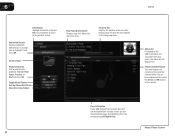
... If included on the USB thumb drive and associated with your USB thumb drive has more files than can be displayed on the remote. You can browse between pages by Album/Artist/Track View All or View Folders Now Playing Information Displays song title, album title... USB devices. Highlight Play/ Pause, Previous, or Next and press OK. Current Folder Playback Controls Use to the previous screen. Progress Bar Displays the duration of the currently selected folder. 6 E551VA Back Button Highlight this area and pressing Left/Right Arrow. To change source, highlight it and...
... If included on the USB thumb drive and associated with your USB thumb drive has more files than can be displayed on the remote. You can browse between pages by Album/Artist/Track View All or View Folders Now Playing Information Displays song title, album title... USB devices. Highlight Play/ Pause, Previous, or Next and press OK. Current Folder Playback Controls Use to the previous screen. Progress Bar Displays the duration of the currently selected folder. 6 E551VA Back Button Highlight this area and pressing Left/Right Arrow. To change source, highlight it and...
E551VA User Manual
Page 46
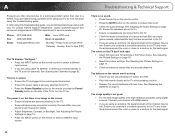
...cables are securely attached to the TV, scan for Channels on the remote control to select a different input source. • If you are using this troubleshooting guide, you are still experiencing an issue with your TV, contact VIZIO's Support Department. Troubleshooting & Technical Support There is off. •...they are securely attached. Quality customer support and service are integral parts of VIZIO's commitment to the TV. • If you are set to On. • Ensure no sound. • Press Volume Up on the remote control. • Press the MUTE button on , but there is no power...
...cables are securely attached to the TV, scan for Channels on the remote control to select a different input source. • If you are using this troubleshooting guide, you are still experiencing an issue with your TV, contact VIZIO's Support Department. Troubleshooting & Technical Support There is off. •...they are securely attached. Quality customer support and service are integral parts of VIZIO's commitment to the TV. • If you are set to On. • Ensure no sound. • Press Volume Up on the remote control. • Press the MUTE button on , but there is no power...
E551VA User Manual
Page 48
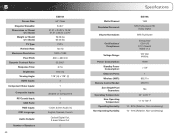
...: HDMI Inputs: Component Video Inputs: Composite Inputs: RF/Coaxial Input: USB Ports: RGB Inputs: OSD Language: Audio Outputs: Number of Speakers 40 E551VA 55" Class 54.64" 51.51 x 34.32 x 10.76" 51.51 x 32.50 x 3.70" 76.06 lbs 65.04 ...Certifications/ Compliance: Voltage Range: Power Consumption: Standby Power Consumption: Ethernet Ports: Wireless (WiFi): Remote Control Model: Zero Bright Pixel Guarantee: Operating Temperature: Non-Operating Temperature: Operating Humidity: Non-Operating Humidity: E551VA 15W SRS TruSurround HD Dolby Digital SRS TruVolume Energy Star CSA-US FCC Class B HDMI v1...
...: HDMI Inputs: Component Video Inputs: Composite Inputs: RF/Coaxial Input: USB Ports: RGB Inputs: OSD Language: Audio Outputs: Number of Speakers 40 E551VA 55" Class 54.64" 51.51 x 34.32 x 10.76" 51.51 x 32.50 x 3.70" 76.06 lbs 65.04 ...Certifications/ Compliance: Voltage Range: Power Consumption: Standby Power Consumption: Ethernet Ports: Wireless (WiFi): Remote Control Model: Zero Bright Pixel Guarantee: Operating Temperature: Non-Operating Temperature: Operating Humidity: Non-Operating Humidity: E551VA 15W SRS TruSurround HD Dolby Digital SRS TruVolume Energy Star CSA-US FCC Class B HDMI v1...

E551VA Quick Start Guide
Page 2
PACKAGE CONTENTS 1 Remote Control with Batteries VIZIO LCD HDTV with Base Cleaning Cloth User Manual and Quick Start Guide
PACKAGE CONTENTS 1 Remote Control with Batteries VIZIO LCD HDTV with Base Cleaning Cloth User Manual and Quick Start Guide
E551VA Quick Start Guide
Page 15
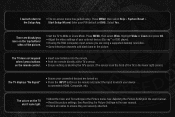
...on the top/bottom/ sides of the picture. • Set the TV to Wide or Zoom Mode. I press buttons on the remote control. • Insert new batteries into the remote. • Point the remote directly at the TV's sensor. • Ensure nothing is blocking the TV's sensor. (The sensor is on the front of...No Signal" • Ensure your connected devices are using the RGB (computer) input, ensure you are turned on. • Press the INPUT button on the remote and select the input to which your device is 0000). Press MENU, then select Help > System Reset > the Setup App. Start Setup Wizard.
...on the top/bottom/ sides of the picture. • Set the TV to Wide or Zoom Mode. I press buttons on the remote control. • Insert new batteries into the remote. • Point the remote directly at the TV's sensor. • Ensure nothing is blocking the TV's sensor. (The sensor is on the front of...No Signal" • Ensure your connected devices are using the RGB (computer) input, ensure you are turned on. • Press the INPUT button on the remote and select the input to which your device is 0000). Press MENU, then select Help > System Reset > the Setup App. Start Setup Wizard.


