Download
Page 6
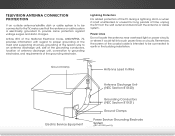
... antenna discharge unit, size of the grounding conductors, location of antenna discharge unit, connection to grounding electrodes, and requirements of the grounding electrode. Remember, the screen of the coaxial cable is intended to be connected to proper grounding of the mast and supporting structure, grounding of time, unplug the TV from...
... antenna discharge unit, size of the grounding conductors, location of antenna discharge unit, connection to grounding electrodes, and requirements of the grounding electrode. Remember, the screen of the coaxial cable is intended to be connected to proper grounding of the mast and supporting structure, grounding of time, unplug the TV from...
Download
Page 7
... a Wired Network (Best 17 Connecting to a Wireless Network 17 Completing the First-Time Setup 18 Using the On-Screen Menu 20 Navigating the On-Screen Menu 20 Changing the Input Source 21 Changing the Screen Aspect Ratio 21 Viewing Video with the Menu Open 22 Adjusting the Picture Settings 23 Adjusting the Advanced...
... a Wired Network (Best 17 Connecting to a Wireless Network 17 Completing the First-Time Setup 18 Using the On-Screen Menu 20 Navigating the On-Screen Menu 20 Changing the Input Source 21 Changing the Screen Aspect Ratio 21 Viewing Video with the Menu Open 22 Adjusting the Picture Settings 23 Adjusting the Advanced...

Download
Page 8
... Appearance of Digital Closed Captions.. 40 Renaming Devices on the Input Menu 42 Changing the TV Settings 43 Viewing System Information 43 Changing the On-Screen Menu Language 44 Setting the Time & Local Settings 44 Using the Parental Controls 45 Accessing the Parental Controls Menu 45 Enabling or Disabling Program Ratings... 50 Using the USB Media Player 50 Preparing Your USB Drive to the My Apps Tab 57 Deleting an App from the TV 50 Using VIZIO Internet Apps Plus® (V.I.A. Plus Apps Window 55 Fullscreen V.I .A. Plus)....... 54 Using the V.I .A.
... Appearance of Digital Closed Captions.. 40 Renaming Devices on the Input Menu 42 Changing the TV Settings 43 Viewing System Information 43 Changing the On-Screen Menu Language 44 Setting the Time & Local Settings 44 Using the Parental Controls 45 Accessing the Parental Controls Menu 45 Enabling or Disabling Program Ratings... 50 Using the USB Media Player 50 Preparing Your USB Drive to the My Apps Tab 57 Deleting an App from the TV 50 Using VIZIO Internet Apps Plus® (V.I.A. Plus Apps Window 55 Fullscreen V.I .A. Plus)....... 54 Using the V.I .A.
Download
Page 10
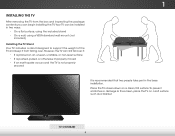
... and inspecting the package contents you can begin installing the TV. Your TV can still fall over . TV on a clean, flat surface. Place the TV screen-down on Stand 4 1 Installing the TV After removing the TV from falling over if: • It is placed on an uneven, unstable, or non-level..., using the included stand • On a wall, using a VESA-standard wall mount (not included) Installing the TV Stand Your TV includes a stand designed to the screen, place the TV on a soft surface such as a blanket. However, the TV can be installed in the base installation.
... and inspecting the package contents you can begin installing the TV. Your TV can still fall over . TV on a clean, flat surface. Place the TV screen-down on Stand 4 1 Installing the TV After removing the TV from falling over if: • It is placed on an uneven, unstable, or non-level..., using the included stand • On a wall, using a VESA-standard wall mount (not included) Installing the TV Stand Your TV includes a stand designed to the screen, place the TV on a soft surface such as a blanket. However, the TV can be installed in the base installation.

Download
Page 15
...the VIZIO Internet Apps Plus® dock. Channel Up/Down Change the channel. Hot Keys Perform functions within an on or off. Number Pad Manually enter a channel. Wide Switch the display mode. Ok Select the highlighted menu option. Dash Use with number pad to the previous on-screen menu.... Turn closed captions on or off or on -screen menu. App launcher Quickly launch the pictured app. Power Turn TV on -screen menu or app. Arrow Navigate the on -screen menu. Guide Display the info window. Exit Close the on -screen menu. 2 Remote Control Input Change the currently-displayed...
...the VIZIO Internet Apps Plus® dock. Channel Up/Down Change the channel. Hot Keys Perform functions within an on or off. Number Pad Manually enter a channel. Wide Switch the display mode. Ok Select the highlighted menu option. Dash Use with number pad to the previous on-screen menu.... Turn closed captions on or off or on -screen menu. App launcher Quickly launch the pictured app. Power Turn TV on -screen menu or app. Arrow Navigate the on -screen menu. Guide Display the info window. Exit Close the on -screen menu. 2 Remote Control Input Change the currently-displayed...
Download
Page 24
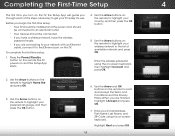
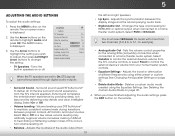
... to your wireless network in . Highlight Next and press OK. 18 4 Enter the wireless password using the on-screen keyboard. SeSleecletcHt oHmomeeUUsseefoforriinn--hhoommee uussee.. To complete the first-time setup: 1. ChoisCishsoeiszis"sHeozm"HeoUmseeU" speo"uproMuroMdeodDeoDmoimciilceileouou"S"StotorereDDeemmoo"" ... press OK. Before you are finished, highlight I Accept and press OK. 7. Press the Power/Standby button on -screen keyboard, then highlight Connect and press OK. 2. StoSretoDreeDmeomo HHoomme UUssee 3. Use the Arrow buttons on the TV. SelecSceiolenceci...
... to your wireless network in . Highlight Next and press OK. 18 4 Enter the wireless password using the on-screen keyboard. SeSleecletcHt oHmomeeUUsseefoforriinn--hhoommee uussee.. To complete the first-time setup: 1. ChoisCishsoeiszis"sHeozm"HeoUmseeU" speo"uproMuroMdeodDeoDmoimciilceileouou"S"StotorereDDeemmoo"" ... press OK. Before you are finished, highlight I Accept and press OK. 7. Press the Power/Standby button on -screen keyboard, then highlight Connect and press OK. 2. StoSretoDreeDmeomo HHoomme UUssee 3. Use the Arrow buttons on the TV. SelecSceiolenceci...
Download
Page 25
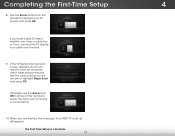
... Scan and press OK. Otherwise, use the Arrow and OK buttons on the remote to a cable from the wall. 9. If the TV Signal channel scan screen appears, the TV will appear. The First-Time Setup is set up" will need to highlight your TV source is connected to. 10. Completing the... First-Time Setup 4 8. If you have cable TV, select whether you have a cable box or if you are finished, the message "Your VIZIO TV is complete. 19 Use the Arrow buttons on the remote to scan for channels, which takes several minutes.
... Scan and press OK. Otherwise, use the Arrow and OK buttons on the remote to a cable from the wall. 9. If the TV Signal channel scan screen appears, the TV will appear. The First-Time Setup is set up" will need to highlight your TV source is connected to. 10. Completing the... First-Time Setup 4 8. If you have cable TV, select whether you have a cable box or if you are finished, the message "Your VIZIO TV is complete. 19 Use the Arrow buttons on the remote to scan for channels, which takes several minutes.
Download
Page 26
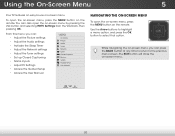
...scrAeBCen menu. Input Wide CC Sleep Timer Picture Audio Network Settings Help 20 Using the On-Screen Menu 5 Your TV features an easy-to select that option. From this menu, you ...can press Exit 2Dthe BA3DCK button at any time to return to the previous menu screen. The EXIT button will close the on the remote. Use the Arrow buttons to highlight a menu option... Settings • Access the Guided Setup • Access the User Manual VIZIO TV Settings Picture Audio Timers Network Tuner CC Closed Captions Devices System Guided Setup User Manual Navigating the On...
...scrAeBCen menu. Input Wide CC Sleep Timer Picture Audio Network Settings Help 20 Using the On-Screen Menu 5 Your TV features an easy-to select that option. From this menu, you ...can press Exit 2Dthe BA3DCK button at any time to return to the previous menu screen. The EXIT button will close the on the remote. Use the Arrow buttons to highlight a menu option... Settings • Access the Guided Setup • Access the User Manual VIZIO TV Settings Picture Audio Timers Network Tuner CC Closed Captions Devices System Guided Setup User Manual Navigating the On...

Download
Page 27
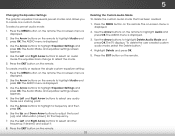
... widescreen (1.85:1 or 2.35:1) content, black bars will still appear on the Input menu to make your devices easy to the edges of the screen. You change the input source in five different modes: Normal, Stretch, Panoramic, Wide, and Zoom. If you wish to highlight the aspect ratio... image may appear wider than intended. Since the picture is displaying a 720p/1080i source. • Panoramic expands the display image to fill the screen. Use the Arrow buttons to view and press OK. Wide Wide Zoom Zoom Note: Aspect ratio settings may vary by TV. Images may appear ...
... widescreen (1.85:1 or 2.35:1) content, black bars will still appear on the Input menu to make your devices easy to the edges of the screen. You change the input source in five different modes: Normal, Stretch, Panoramic, Wide, and Zoom. If you wish to highlight the aspect ratio... image may appear wider than intended. Since the picture is displaying a 720p/1080i source. • Panoramic expands the display image to fill the screen. Use the Arrow buttons to view and press OK. Wide Wide Zoom Zoom Note: Aspect ratio settings may vary by TV. Images may appear ...
Download
Page 28
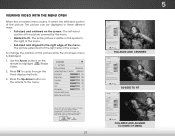
... + 50 PictureColor Tint Audi--o + 59 +0 Sharpness - +9 Advanced Picture Professional Picture Network Select from preset picture modes. Use the Arrow buttons on -screen menu is visible inIntphuet spaWcidee to CC the right of the menu. • Full-sized and aligned to the right edge of the menu The...; requirements. Color - VIZIO Wide Zoom Normal Panoramic Viewing Video with the Menu Open When the on the remote to the menu. The picture can be displayed in Etxhit ree d2Differen3tD ways: • Full-sized and centered on the screen - VIZIO Network Settings Help Picture...
... + 50 PictureColor Tint Audi--o + 59 +0 Sharpness - +9 Advanced Picture Professional Picture Network Select from preset picture modes. Use the Arrow buttons on -screen menu is visible inIntphuet spaWcidee to CC the right of the menu. • Full-sized and aligned to the right edge of the menu The...; requirements. Color - VIZIO Wide Zoom Normal Panoramic Viewing Video with the Menu Open When the on the remote to the menu. The picture can be displayed in Etxhit ree d2Differen3tD ways: • Full-sized and centered on the screen - VIZIO Network Settings Help Picture...
Download
Page 29
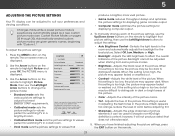
Press the MENU button on -screen menu is too high, the Exit pic2tDure ma3Dy appear faded or washed out. • Contrast - Use the Arrow buttons on the remote to suit your ... mode sets the picture settings to values perfect for watching TV in dark or bright areas of the picture. To manually change the picture mode: VIZIO Picture Picture Mode Auto Brightness Control Backlight - Adjusts the hue of the of the picture settings, use the Up/Down Arrow buttons on the remote...
Press the MENU button on -screen menu is too high, the Exit pic2tDure ma3Dy appear faded or washed out. • Contrast - Use the Arrow buttons on the remote to suit your ... mode sets the picture settings to values perfect for watching TV in dark or bright areas of the picture. To manually change the picture mode: VIZIO Picture Picture Mode Auto Brightness Control Backlight - Adjusts the hue of the of the picture settings, use the Up/Down Arrow buttons on the remote...
Download
Page 30
... brightness. Wide Zoom Normal Panoramic • Picture Position - Optimizes the picture for mpeg files. VIZIO AAddvvaanncceedd PPiiccttuurree CCoolloorr TTeemmppeerraattuurree BBllaacckk DDeettaaiill ABactcivkeligLhEDt CZonterosl RReedduuccee SSiiggnnaall NNooiissee RReedduuccee BBlloocckk NNooiissee PPiiccttuurree SPiozesition PPiiccttuurree ... OK button wheAABBnCC you have finished adjusting the Advanced Picture Settings, press the EXIT button on the screen. When you are finished. Increase or decrease the vertical and horizontal size of the displayed picture. ...
... brightness. Wide Zoom Normal Panoramic • Picture Position - Optimizes the picture for mpeg files. VIZIO AAddvvaanncceedd PPiiccttuurree CCoolloorr TTeemmppeerraattuurree BBllaacckk DDeettaaiill ABactcivkeligLhEDt CZonterosl RReedduuccee SSiiggnnaall NNooiissee RReedduuccee BBlloocckk NNooiissee PPiiccttuurree SPiozesition PPiiccttuurree ... OK button wheAABBnCC you have finished adjusting the Advanced Picture Settings, press the EXIT button on the screen. When you are finished. Increase or decrease the vertical and horizontal size of the displayed picture. ...
Download
Page 34
.... Ramp Test Pattern Off 2. Creating a Custom Picture Mode Custom picture modes allow you are changed while in use the Arrow buttons to the picture settings. 5. VIZIO Create PICTURE MODE Custom1_ abc def ghi j k l mn o p q r s t u v wx y z 0 123456789 .@# .com Space Done 4. A custom picture mode ...Custom picture modes can have up to highlight Off. 3. To hide the Ramp Test Pattern, use the Arrow buttons to exit the menu screens. 28 Each input can be created manually. • A new custom picture mode is displayed. 2. From the PROFESSIONAL PICTURE menu, use...
.... Ramp Test Pattern Off 2. Creating a Custom Picture Mode Custom picture modes allow you are changed while in use the Arrow buttons to the picture settings. 5. VIZIO Create PICTURE MODE Custom1_ abc def ghi j k l mn o p q r s t u v wx y z 0 123456789 .@# .com Space Done 4. A custom picture mode ...Custom picture modes can have up to highlight Off. 3. To hide the Ramp Test Pattern, use the Arrow buttons to exit the menu screens. 28 Each input can be created manually. • A new custom picture mode is displayed. 2. From the PROFESSIONAL PICTURE menu, use...
Download
Page 35
... to exit the STlimm eeeper nuPisccturree enAsu.dio To unlock all custom picture modes: Create a 4 digit passcode using the on-screen keyboard. 4. From the PROFESSIONAL PICTURE menu, use the Arrow Network Settings Help buttons to highlight Rename Picture Mode, and then ... to their settings. From the PROFESSIONAL PICTURE menu, use the Arrow WibdeuttoZnoosmto hNigormhalilghPtanLooracmkic Picture Mode, and then press OK. ABC 3. To rename a custom picture mode: 1. VIZIO RENAME PICTURE MODE Custom 1_ abc def ghi j k l mn o p q r s t u v wx y z 0 123456789 .@# .com Space Done 3. Set...
... to exit the STlimm eeeper nuPisccturree enAsu.dio To unlock all custom picture modes: Create a 4 digit passcode using the on-screen keyboard. 4. From the PROFESSIONAL PICTURE menu, use the Arrow Network Settings Help buttons to highlight Rename Picture Mode, and then ... to their settings. From the PROFESSIONAL PICTURE menu, use the Arrow WibdeuttoZnoosmto hNigormhalilghPtanLooracmkic Picture Mode, and then press OK. ABC 3. To rename a custom picture mode: 1. VIZIO RENAME PICTURE MODE Custom 1_ abc def ghi j k l mn o p q r s t u v wx y z 0 123456789 .@# .com Space Done 3. Set...

Download
Page 36
Use the Left/Right Arrow buttons to exit the menu screens. 30 Press the EXIT button to highlight Delete and press OK. 3. From the PROFESSIONAL PICTURE menu, use the Arrow buttons to the Calibrated picture mode. ...
Use the Left/Right Arrow buttons to exit the menu screens. 30 Press the EXIT button to highlight Delete and press OK. 3. From the PROFESSIONAL PICTURE menu, use the Arrow buttons to the Calibrated picture mode. ...
Download
Page 37
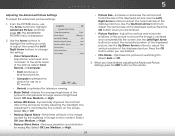
... deep, rich bass and by delivering crisp details and clear, intelligible dialog. Ne•tworkDeSelettitnegsAudHeilop Mode - Use the Arrow buttons on -screen menu is displayed. 3. Lip Sync - In a few cases, volume leveling may artificially suppress volume increases, making it difficult to ...the volume control properties for the anaAlBoCg RCA (red/white) connectors when connected to hear dialog or flattening sudden noises. VIZIO Audio TV Speakers Surround Sound Volume Leveling Balance - Surround sound uses DTS TruSurround™ to control the external device's ...
... deep, rich bass and by delivering crisp details and clear, intelligible dialog. Ne•tworkDeSelettitnegsAudHeilop Mode - Use the Arrow buttons on -screen menu is displayed. 3. Lip Sync - In a few cases, volume leveling may artificially suppress volume increases, making it difficult to ...the volume control properties for the anaAlBoCg RCA (red/white) connectors when connected to hear dialog or flattening sudden noises. VIZIO Audio TV Speakers Surround Sound Volume Leveling Balance - Surround sound uses DTS TruSurround™ to control the external device's ...
Download
Page 38
...to adjust the boost (up) and attenuation (down) for the frequency. 7. The Audio menu is displayed. 2. The Audio Mode and equalizer settings screen appears. 4. The on -screen menu is displayed. 3. The on the remote to highlight Delete Audio Mode and press OK. Use the Arrow buttons to select an audio mode... mode. 5. Press the MENU button on the remote. Use the Arrow buttons to highlight Audio and press OK. Use the Arrow buttons on -screen menu is displayed. 2. To create, modify, or replace the single custom equalizer setting: 1. The Audio Mode and equalizer settings...
...to adjust the boost (up) and attenuation (down) for the frequency. 7. The Audio menu is displayed. 2. The Audio Mode and equalizer settings screen appears. 4. The on -screen menu is displayed. 3. The on the remote to highlight Delete Audio Mode and press OK. Use the Arrow buttons to select an audio mode... mode. 5. Press the MENU button on the remote. Use the Arrow buttons to highlight Audio and press OK. Use the Arrow buttons on -screen menu is displayed. 2. To create, modify, or replace the single custom equalizer setting: 1. The Audio Mode and equalizer settings...
Download
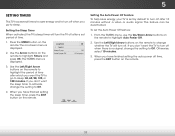
Page 39
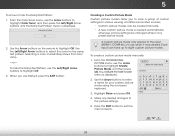
... activate, change the setting to Off. 4. Exit 2D 3D ABC Input Wide CC Sleep Timer Picture Audio Network Settings Help 33 The on the remote. VIZIO Timers Sleep Timer Auto Power Off Off 10 minutes 3. To set period of time after 10 minutes without a video or audio signal. When you have.... If you don't want the TV to go to sleep. When you have finished setting the auto power off time, press the EXIT button on -screen menu is displayed. 2. Use the Left/Right Arrow buttons on the remote to change the setting to Off. 5 Setting Timers This TV has several timers...
... activate, change the setting to Off. 4. Exit 2D 3D ABC Input Wide CC Sleep Timer Picture Audio Network Settings Help 33 The on the remote. VIZIO Timers Sleep Timer Auto Power Off Off 10 minutes 3. To set period of time after 10 minutes without a video or audio signal. When you have.... If you don't want the TV to go to sleep. When you have finished setting the auto power off time, press the EXIT button on -screen menu is displayed. 2. Use the Left/Right Arrow buttons on the remote to change the setting to Off. 5 Setting Timers This TV has several timers...

Download
Page 40
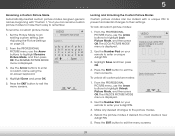
...an Ethernet cable, you do not see the wireless network connection menu. Press the MENU button on the remote. 34 Using the on -screen menu is displayed. 3. DHCP Off 2. Use the Arrow and OK buttons to highlight Save and press OK. Use the Arrow buttons on... network's password, then highlight Connect and press OK. From the Network menu, highlight Manual Setup and VIZIO press OK. The subnet Exit ma2sDk. 3D • Default Gateway - VIZIO Network Wired Connection Disconnected Wireless Access Points More Access Points WPS Manual Setup Hidden Network Test Connection 6. ...
...an Ethernet cable, you do not see the wireless network connection menu. Press the MENU button on the remote. 34 Using the on -screen menu is displayed. 3. DHCP Off 2. Use the Arrow and OK buttons to highlight Save and press OK. Use the Arrow buttons on... network's password, then highlight Connect and press OK. From the Network menu, highlight Manual Setup and VIZIO press OK. The subnet Exit ma2sDk. 3D • Default Gateway - VIZIO Network Wired Connection Disconnected Wireless Access Points More Access Points WPS Manual Setup Hidden Network Test Connection 6. ...

Download
Page 41
... Manual Setup and press OK. The Manual Setup menu is displayed. 2. Press the EXIT button on -screen keyboard, enter your network's name (SSID), then highlight Connect and press OK. 3. VIZIO Enter Access Point Name Enter your network connection. 3. Using the on the remote. 35 5 Finding MAC...to enter the TV's MAC address in use are displayed: • RJ45 MAC - This is not being broadcast: 1. The Test Connection screen displays the connection method, network name, signal strength, and download speed of the list. The MAC addresses for the TV at the bottom of...
... Manual Setup and press OK. The Manual Setup menu is displayed. 2. Press the EXIT button on -screen keyboard, enter your network's name (SSID), then highlight Connect and press OK. 3. VIZIO Enter Access Point Name Enter your network connection. 3. Using the on the remote. 35 5 Finding MAC...to enter the TV's MAC address in use are displayed: • RJ45 MAC - This is not being broadcast: 1. The Test Connection screen displays the connection method, network name, signal strength, and download speed of the list. The MAC addresses for the TV at the bottom of...

