
E420VSE User Manual
Page 3
... limits. Install in accordance with the manufacturer's instructions. • Do not install near water. • Clean only with the cart, stand, tripod, bracket, or table specified by the manufacturer, or sold We recommend that produce heat. • Do not defeat the safety... power cord from being damaged, the following safety instructions before using your TV. When you either: • Register your VIZIO product at www.VIZIO.com • Complete and mail the enclosed registration card Extended Warranties For peace of important operating instructions. Keep these instructions before...
... limits. Install in accordance with the manufacturer's instructions. • Do not install near water. • Clean only with the cart, stand, tripod, bracket, or table specified by the manufacturer, or sold We recommend that produce heat. • Do not defeat the safety... power cord from being damaged, the following safety instructions before using your TV. When you either: • Register your VIZIO product at www.VIZIO.com • Complete and mail the enclosed registration card Extended Warranties For peace of important operating instructions. Keep these instructions before...

E420VSE User Manual
Page 8
Table of Contents Installing the TV 3 Inspecting the Package Contents 3 Installing the TV 3 Installing the TV Stand 3 Installing the TV on a Wall 6 Controls and Connections 7 Rear Panel 7 Side Panel 8 Front Panel 9 Remote Control 10 Replacing the Batteries 11 Connecting Your Devices 12 ...
Table of Contents Installing the TV 3 Inspecting the Package Contents 3 Installing the TV 3 Installing the TV Stand 3 Installing the TV on a Wall 6 Controls and Connections 7 Rear Panel 7 Side Panel 8 Front Panel 9 Remote Control 10 Replacing the Batteries 11 Connecting Your Devices 12 ...

E420VSE User Manual
Page 10
...two ways: • On a flat surface, using the included stand • On a wall, using a VESA-standard wall mount (not included) Installing the TV Stand Your TV includes a stand designed to ensure nothing is not properly secured VIZIO LCD HDTV 4 x M4 8mm Screws Quick Start Guide Remote Control... 4 x M4 14mm with Batteries Screws Package Contents 3 TV on Stand Installing the TV Inspecting the Package ...
...two ways: • On a flat surface, using the included stand • On a wall, using a VESA-standard wall mount (not included) Installing the TV Stand Your TV includes a stand designed to ensure nothing is not properly secured VIZIO LCD HDTV 4 x M4 8mm Screws Quick Start Guide Remote Control... 4 x M4 14mm with Batteries Screws Package Contents 3 TV on Stand Installing the TV Inspecting the Package ...

E420VSE User Manual
Page 11
Then slide the collar piece over the neck. 2. To prevent scratches or damage to the screen, place the TV on a clean, flat surface. 1 To install the TV stand: 1 2 Assembled Base 1. Align the neck piece with the TV and tighten the four (4) included 14mm phillips screws. 4 Align the base with the base stand and tighten the four (4) included 8mm phillips screws from the bottom. Place the TV screen-down on a soft surface, such as a carpet, rug, or blanket.
Then slide the collar piece over the neck. 2. To prevent scratches or damage to the screen, place the TV on a clean, flat surface. 1 To install the TV stand: 1 2 Assembled Base 1. Align the neck piece with the TV and tighten the four (4) included 14mm phillips screws. 4 Align the base with the base stand and tighten the four (4) included 8mm phillips screws from the bottom. Place the TV screen-down on a soft surface, such as a carpet, rug, or blanket.

E420VSE User Manual
Page 12
Move the TV with attached stand into place. 4. To ensure proper ventilation, leave at least 1" of space between the back of the TV and any other objects (walls, etc). 5 Slide the base cover downward into an upright position and place on a flat, level, and stable surface. 5. 1 3.
Move the TV with attached stand into place. 4. To ensure proper ventilation, leave at least 1" of space between the back of the TV and any other objects (walls, etc). 5 Slide the base cover downward into an upright position and place on a flat, level, and stable surface. 5. 1 3.

E420VSE User Manual
Page 13
... to the TV, ask someone to find the appropriate mount for your TV on a wall: 1. E420VSE Screw Size: Screw Length: Hole Pattern: M6 12mm 300mm (V) x 400mm (H) Be sure the mount you . See Appendix B - Remove the stand by loosening and removing the screws. 4. This allows the TV to rest closer to use cables...
... to the TV, ask someone to find the appropriate mount for your TV on a wall: 1. E420VSE Screw Size: Screw Length: Hole Pattern: M6 12mm 300mm (V) x 400mm (H) Be sure the mount you . See Appendix B - Remove the stand by loosening and removing the screws. 4. This allows the TV to rest closer to use cables...
E420VSE User Manual
Page 48
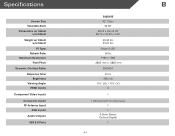
Specifications Screen Size: Viewable Area: Dimensions w/ Stand: w/o Stand: Weight w/ Stand: w/o Stand: TV Type: Refresh Rate: Maximum Resolution: Pixel Pitch: Dynamic Contrast Ratio: Response Time: Brightness: Viewing Angle: HDMI Inputs: Component Video Inputs: Composite Inputs: RF Antenna Input: RGB Inputs: Audio Outputs: USB 2.0 Ports: B E420VSE 42" Class 42.00" 38.74 x 25 x 8.78" 38.74 x 23.49 x 2.40" 40.34 lbs 33.07 lbs Edge-Lit LED 60 Hz 1920 x 1080 .4845 mm x .4845 mm 200000:1 8 ms 350 nits 176° (H) / 176° (V) 3 1 1 (Shared with Component) 1 1 3.5mm Stereo Optical Digital 1 41
Specifications Screen Size: Viewable Area: Dimensions w/ Stand: w/o Stand: Weight w/ Stand: w/o Stand: TV Type: Refresh Rate: Maximum Resolution: Pixel Pitch: Dynamic Contrast Ratio: Response Time: Brightness: Viewing Angle: HDMI Inputs: Component Video Inputs: Composite Inputs: RF Antenna Input: RGB Inputs: Audio Outputs: USB 2.0 Ports: B E420VSE 42" Class 42.00" 38.74 x 25 x 8.78" 38.74 x 23.49 x 2.40" 40.34 lbs 33.07 lbs Edge-Lit LED 60 Hz 1920 x 1080 .4845 mm x .4845 mm 200000:1 8 ms 350 nits 176° (H) / 176° (V) 3 1 1 (Shared with Component) 1 1 3.5mm Stereo Optical Digital 1 41

E420VSE Quick Start Guide
Page 2
... the cart/apparatus combination to qualified service personnel. When a cart is used, use attachments/accessories specified by the manufacturer. • Use only with the cart, stand, tripod, bracket, or table specified by qualified service personnel only. Do not install your TV changes substantially. • This apparatus shall not be sure these...
... the cart/apparatus combination to qualified service personnel. When a cart is used, use attachments/accessories specified by the manufacturer. • Use only with the cart, stand, tripod, bracket, or table specified by qualified service personnel only. Do not install your TV changes substantially. • This apparatus shall not be sure these...

E420VSE Quick Start Guide
Page 4
package contents VIZIO LCD HDTV with Stand 4 x M4 8mm Screws Remote Control with Batteries This Quick Start Guide 4 x M4 14mm Screws Help vizio reduce paper waste. download the full user manual at vizio.com/support
package contents VIZIO LCD HDTV with Stand 4 x M4 8mm Screws Remote Control with Batteries This Quick Start Guide 4 x M4 14mm Screws Help vizio reduce paper waste. download the full user manual at vizio.com/support

E420VSE Quick Start Guide
Page 6
Slide the collar piece over the neck. Align the base with the base stand and tighten the four (4) included 8mm phillips screws from the bottom. Place the TV screen-down on a soft surface, such as carpet, rug, or blanket. To prevent scratches or damage to the screen, place the TV on a clean, flat surface. Installing the base 1 2 1 2 Assembled Base Align the neck piece with the TV and tighten the four (4) included 14mm phillips screws.
Slide the collar piece over the neck. Align the base with the base stand and tighten the four (4) included 8mm phillips screws from the bottom. Place the TV screen-down on a soft surface, such as carpet, rug, or blanket. To prevent scratches or damage to the screen, place the TV on a clean, flat surface. Installing the base 1 2 1 2 Assembled Base Align the neck piece with the TV and tighten the four (4) included 14mm phillips screws.


